Are your blow-molded bottles coming out misshapen? This common issue plagues many, leading to waste and frustration. Don't let deformed bottles derail your production.
Bottle deformation in blow molding often stems from issues with preforms, heating, mold cooling, or blowing parameters. Identifying the specific type of deformation is the first step to finding a targeted solution and improving your bottle quality.

Dealing with deformed bottles can be a real headache, I know. After 16 years in the PET plastic packaging machinery industry, I've seen it all. The good news is that most deformation problems are solvable with a systematic approach. This article will guide you through the common causes and how to address them. We will explore key areas like preform quality, heating precision, mold cooling efficiency, blowing parameters, material storage, and machine maintenance. Understanding these factors will empower you to troubleshoot and prevent future issues. Let's get those bottles looking perfect!
What are the common types of bottle deformation in blow molding?
Seeing your bottles come out dented, lopsided, or with a collapsed bottom is disheartening. Wondering what exactly went wrong? Identifying the defect is crucial.
Common bottle deformations include collapsed bodies (瘪瓶), tilted bottles (歪瓶), sunken bottoms (底部塌陷), and skewed threads (螺牙歪斜). Recognizing these helps pinpoint the root cause in your blow molding process.
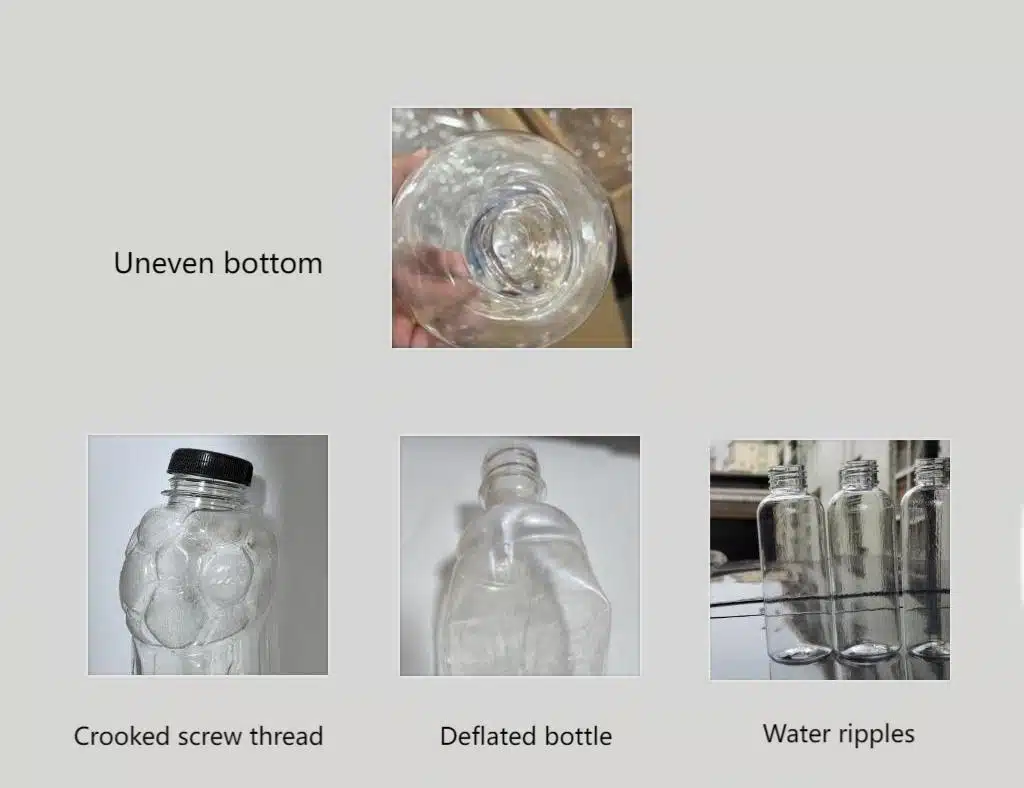
When I get a call from a client, the first thing I ask is, "What does the deformed bottle look like?" This initial description is my first clue. For example, a client might say the bottle looks like it's sucked in on itself, or that the neck area is completely off. These visual cues are vital. Over the years, I've learned that a picture is worth a thousand words, especially when I'm trying to diagnose a problem remotely. Let's break down these common types of deformation a bit more.
Identifying Common Bottle Defects
Understanding the specific type of deformation is the first step towards a solution. Each defect points to different potential problems in the blow molding cycle.
- Collapsed or Dented Bottles (瘪瓶): These bottles appear as if vacuum was applied after molding, causing the walls to suck inward. This can be due to insufficient material, excessive cooling shock, or problems with post-molding pressure stabilization.
- Tilted or Bent Bottles (歪瓶): The bottle's body or neck is not straight. This often points to uneven heating of the preform, misalignment in the mold, or issues with the stretch rod.
- Sunken or Rocker Bottoms (底部塌陷): The base of the bottle is pushed upwards or is unstable, making the bottle rock. This is frequently linked to problems with preform base heating, gate cooling, or high pre-blow pressure.
- Skewed or Deformed Threads (螺牙歪斜): The threads on the bottle neck are misshapen or not correctly formed. This can be caused by issues with the neck finish area of the preform, incorrect mold closure, or excessive heat in the neck region.
Here's a table to summarize:
| Defect Type | Common Visual Cue | Potential Area of Concern |
|---|---|---|
| Collapsed Body | Walls sucked inward | Material distribution, cooling, pressure |
| Tilted Bottle | Body/neck not aligned | Preform heating, mold alignment, stretch rod |
| Sunken/Rocker Bottom | Unstable or pushed-up base | Preform base heating, mold cooling, pressure |
| Skewed Threads | Misshapen neck threads | Preform neck, mold closure, neck heating |
Recognizing these distinctions helps narrow down the troubleshooting process significantly. Instead of randomly adjusting parameters, you can focus on the most likely culprits.
Why are preform defects a key cause of bottle deformation?
You've checked your machine settings, but bottles are still deforming. Could the issue start before blowing? Preform quality is absolutely fundamental.
Preform defects are a primary source of bottle deformation. Issues like uneven wall thickness, material inconsistencies, or degraded preforms will inevitably lead to problems during the blowing stage, as the preform is the foundation of your final bottle.

I always tell my clients: your bottle can only be as good as the preform it's made from. It sounds simple, but it's often overlooked. Many customers, especially those new to blow molding, focus heavily on the blow molding machine itself. While the machine is critical, a flawed preform will cause headaches no matter how perfectly the machine is tuned.
One particularly tricky case I remember involved a client in Ghana. They were experiencing severe deformation in the neck area of their 500ml bottles. We went through all the usual checks – adjusting heating for the preform neck, ensuring proper cooling airflow – but nothing worked. The problem persisted. Finally, I asked, "Have you by any chance changed your preform supplier or batch recently?" After some checking, they realized they had mistakenly started using 1810 neck finish preforms instead of the 1881 preforms their molds were designed for. The height difference was subtle, but it meant the preform neck was being crushed and deformed during the blowing process. They had multiple bottle types and preforms, and a simple mix-up led to days of frustration. This highlights how critical preform selection and consistency are.
Unpacking Preform-Related Issues
Several types of preform defects can lead to bottle deformation. Understanding these can save you a lot of diagnostic time.
- Uneven Wall Thickness (Eccentricity): If the preform wall isn't uniform, the thinner sections will overheat and stretch excessively during blowing, while thicker sections won't stretch enough. This leads to uneven material distribution and weak spots or distortion in the final bottle.
- Cause: Often originates from the preform injection molding process – issues with the injection mold, gate, or process parameters.
- Material Problems:
- Contamination: Foreign particles in the PET material can cause weak spots or blowouts.
- Incorrect IV (Intrinsic Viscosity): If the PET material's IV is too low, the parison won't have enough melt strength, leading to sagging or tearing. If it's too high, it might not flow or stretch properly.
- Moisture Content: PET is hygroscopic. If preforms absorb too much moisture (due to improper drying before injection or poor storage), this moisture will vaporize during heating, causing splay or bubbles, and degrading the material, leading to brittleness or deformation.
- Preform Aging and Storage:
- Aging: Over time, PET preforms can become more crystalline, especially if stored improperly. This increased crystallinity makes them harder to blow consistently, requiring higher processing temperatures and potentially leading to haze or deformation.
- Storage Conditions: Storing preforms in hot, humid environments or for excessively long periods can degrade their quality.
- Preform Design: Sometimes, the preform design itself isn't optimized for the target bottle shape, leading to inherent difficulties in achieving uniform material distribution.
Here's a quick checklist for preform quality:
| Aspect | Check For | Impact if Defective |
|---|---|---|
| Wall Thickness | Uniformity, concentricity | Uneven stretching, weak spots, distortion |
| Material Clarity | Bubbles, black specks, haze, streaks | Brittleness, blowouts, aesthetic defects, weakness |
| Physical Integrity | Cracks, chips, damage to neck finish | Seal issues, blowouts, handling problems |
| Dimensions | Correct length, diameter, neck finish | Fit in mold, thread issues, overall deformation |
| Crystallinity | Excessive whiteness/opacity (especially at gate) | Poor processing, brittleness, haze |
Always ensure you're using high-quality preforms from a reputable supplier and that they are appropriate for your specific bottle design and blow molding machine.
How does uneven heating during blow molding cause bottle deformation?
Are parts of your bottles too thin while others are too thick? This inconsistency often points directly to your heating process. Proper heating is crucial.
Uneven heating of the preform is a major culprit for bottle deformation. If some areas are too hot and others too cool, the material won't stretch uniformly, resulting in thin spots, thick spots, or overall distortion.

Think of heating a preform like toasting a slice of bread. If your toaster elements are faulty, you get burnt edges and an untoasted middle. It's similar with PET preforms. The goal is to achieve a precise and uniform temperature profile throughout the preform body just before it enters the mold. This ensures the material has the right elasticity to stretch evenly. I often find clients struggling with this, especially when they change bottle designs or preform types. Adjusting the heating lamps isn't always intuitive.
Mastering Preform Temperature Profiles
The heating stage, typically using infrared (IR) lamps, is where the preform is brought to the optimal temperature for stretching and blowing.
- Incorrect Heating Temperature:
- Too Low: The preform will be too stiff, resisting stretching. This can lead to bottles not fully forming, thick walls, or pearlescence (stress whitening).
- Too High: The preform becomes too soft and sags, leading to thin walls, blowouts, or distortion in the neck and shoulder areas.
- Uneven Heating Zones: Most blow molding machines have multiple heating zones with adjustable IR lamps.
- Lamp Adjustment: The position and power output of each lamp need to be carefully calibrated. If lamps are too close, they can scorch the preform surface. If too far, heating is inefficient. Burnt-out or incorrectly performing lamps are also a common issue.
- Vertical Profile: Different sections of the preform (e.g., body vs. base) require different amounts of heat. The lamp configuration must create the correct vertical temperature gradient.
- Horizontal Profile: For some bottle shapes, achieving a slightly different temperature on one side of the preform versus the other might be necessary, requiring individual lamp adjustments across the preform's circumference.
- Preform Rotation: Inconsistent or failed preform rotation through the oven results in one side being overheated and the other underheated.
- Ventilation in the Oven: Proper ventilation is needed to remove excess heat and fumes, but incorrect airflow can also disrupt the heating pattern on the preforms.
Here's a table highlighting common heating issues and their signs:
| Heating Issue | Observable Sign on Preform/Bottle | Likely Cause |
|---|---|---|
| Overall Underheating | Pearlescence, thick base, incompletely formed bottle, rough texture | Low lamp power, fast transit, preform too cold initially |
| Overall Overheating | Thin spots, sagging preform before mold, hazy/crystallized appearance | High lamp power, slow transit, preform too hot initially |
| Localized Overheating (Hot Spot) | Thin wall section, blowout at specific point, shiny/melted surface | Lamp too close/too powerful, poor preform rotation |
| Localized Underheating (Cold Spot) | Thick wall section, webbing, incomplete stretching in an area | Lamp burnt out/obstructed, lamp too far/low power, poor rotation |
I always advise clients to use a non-contact infrared pyrometer to check the preform surface temperature at various points as it exits the oven. This data is invaluable for fine-tuning the lamp settings.
What is the impact of poor mold cooling on bottle deformation?
Your bottles look fine initially but warp after cooling? The issue might lie in your mold's cooling system. Effective cooling is key for stability.
Poor mold cooling significantly impacts bottle stability and can cause deformation like shrinkage or warping. Uneven mold temperatures or clogged cooling channels lead to inconsistent cooling rates, causing localized contraction and defects, especially in the bottle base and neck.

I've seen many situations where a bottle looks perfect coming out of the mold, but then it starts to distort as it cools down to room temperature. This is often a sign that the cooling within the mold wasn't sufficient or uniform. The PET material needs to be cooled below its glass transition temperature quickly and evenly to lock in the bottle's shape. If parts of the mold are hotter than others, those parts of the bottle will cool slower, leading to differential shrinkage.
Optimizing Mold Cooling for Bottle Stability
The mold doesn't just shape the bottle; it also cools it rapidly.
- Uneven Mold Temperature:
- Hot Spots in Mold: If certain areas of the mold (e.g., base, neck inserts) are running hotter than others, the corresponding sections of the bottle will cool slower. This can cause post-mold shrinkage, warping, or sunken areas. For example, a hot mold base can lead to a rocker bottom.
- Cold Spots in Mold: Conversely, overly cold areas can cause issues too, though less common for deformation and more related to condensation or material stress.
- Cooling Channel Design and Maintenance:
- Blocked or Restricted Channels: Over time, cooling channels in the mold can become clogged with scale or debris from the cooling water. This restricts flow and reduces cooling efficiency in those areas.
- Insufficient Flow Rate: The volume of coolant (usually chilled water) flowing through the mold might be too low to extract heat effectively.
- Incorrect Coolant Temperature: If the chilled water is not at the recommended temperature, it will affect the cooling rate.
- Blow Pressure and Cooling Time: While not directly a mold issue, holding the blow pressure for an adequate duration helps keep the bottle in contact with the cool mold surface, aiding heat transfer. Insufficient cooling time in the mold before ejection can also lead to deformation.
Here's a breakdown of common mold cooling problems:
| Cooling Problem | Resulting Bottle Defect | Potential Solution |
|---|---|---|
| Clogged Cooling Channels (Base) | Sunken bottom, rocker bottom | Clean/descale mold cooling channels, check water filter |
| Clogged Cooling Channels (Body) | Warping, ovalization, uneven shrinkage | Clean/descale mold cooling channels, ensure even flow to all circuits |
| Insufficient Coolant Flow/Temp | General instability, longer cycle times, post-mold shrinkage | Check chiller performance, pump pressure, coolant lines for kinks or restrictions |
| Uneven Temperature Across Mold Halves | Asymmetrical deformation, bent necks | Verify separate cooling circuits are balanced, check for blockages on one side |
Regular mold maintenance, including descaling of cooling channels, is critical. I also recommend periodically checking the surface temperature of different parts of the mold using a contact thermometer to ensure uniformity.
How do improper blowing pressure and timing parameters lead to deformation?
Are your bottles not fully formed or showing uneven expansion? Your blowing parameters might be off. Precision in pressure and timing is essential.
Improper blowing pressure (pre-blow and main blow) and timing settings are common causes of bottle deformation. Too little pressure or incorrect timing can result in under-stretched bottles, while too much or poorly timed pressure can cause uneven expansion or blowouts.

Setting the blow parameters correctly is a bit of an art and a science. It often requires fine-tuning based on the specific preform, bottle design, and machine. I've often worked with operators who are hesitant to adjust these settings, but sometimes small changes can make a big difference. For instance, if a bottle isn't fully stretching into the corners of the mold, a slight increase in main blow pressure or a change in pre-blow timing might be all that's needed.
Fine-Tuning Blowing Parameters
The blowing process typically involves two main stages: pre-blow and main blow.
- Pre-Blow Pressure and Timing:
- Purpose: The pre-blow stage starts to stretch the preform axially (with the stretch rod) and radially just before the main blow. It helps center the preform in the mold and sets the initial material distribution.
- Too Low/Late Pre-Blow: Can result in the preform not centering correctly, leading to uneven wall thickness, or the base not forming properly ("rocker bottom"). The stretch rod might even puncture the preform if it's not supported by initial air pressure.
- Too High/Early Pre-Blow: Can cause the preform to expand too quickly before the stretch rod has fully extended, leading to thin shoulders, a thick base, or even chilling the material too much if it touches the cold mold too soon.
- Main Blow Pressure and Timing:
- Purpose: This is the high-pressure air that fully inflates the preform against the mold cavity walls.
- Too Low Main Blow Pressure: The bottle may not fully conform to the mold shape, resulting in poorly defined details, rounded corners, or a generally "soft" appearance. The phrase "bottle not fully stretched" is common here.
- Too High Main Blow Pressure: While less common for causing deformation (more likely to stress the machine or mold), excessively high pressure if combined with weak spots in the preform could lead to blowouts or very thin sections. More critically, if the material is too hot, high pressure can cause overstretching.
- Incorrect Main Blow Timing/Duration: If the main blow starts too late, the preform may have cooled too much or sagged. If the duration is too short, the bottle might not fully form or stabilize against the mold.
- Exhaust/Ventilation: Proper venting of the mold cavity is also crucial. If air is trapped between the preform and the mold, it can prevent the bottle from conforming properly, leading to surface imperfections or incomplete formation.
Consider these adjustments:
| Parameter | Issue if Too Low / Too Late | Issue if Too High / Too Early |
|---|---|---|
| Pre-Blow Pressure | Poor centering, thin base, stretch rod puncture, rocker bottom | Thin shoulders, thick base, material chilling, pearlescence |
| Pre-Blow Timing | (Similar to low pressure) | (Similar to high pressure) |
| Main Blow Pressure | Incomplete formation, rounded corners, poor detail definition | Potential for blowouts (if hot spots), excessive stress on material |
| Main Blow Duration | Incomplete formation, poor cooling contact | Usually not an issue, but could waste air/energy if excessively long |
When I'm helping a customer troubleshoot, we often adjust these parameters incrementally, observing the effect on the bottle after each change. It's a process of careful observation and adjustment.
How do preform storage conditions affect blow molding results?
Are you seeing inconsistent bottle quality even with good preforms? The way you store your preforms could be the unseen saboteur.
Preform storage conditions significantly impact blow molding. Exposure to moisture or high temperatures for extended periods can degrade PET material, leading to processing issues and bottle deformation. Proper storage is key for consistent results.

It's easy to forget about preforms once they arrive at the factory. They get put into storage, and we assume they'll be fine until they're needed. However, PET is sensitive. I've visited plants where preforms are stored outdoors under a tarp, or in very humid, hot warehouses. These conditions can slowly but surely compromise the quality of the preforms, leading to frustrating and hard-to-diagnose problems on the production line.
The Importance of a Stable Preform Environment
PET (Polyethylene Terephthalate) is a hygroscopic material, meaning it readily absorbs moisture from the surrounding air. This is one of the primary concerns during storage.
- Moisture Absorption:
- Impact: If preforms absorb excessive moisture, this moisture turns into steam during the heating process in the blow molder. This can cause hydrolytic degradation of the PET, reducing its Intrinsic Viscosity (IV). Lower IV means weaker material, which can lead to issues like splay marks, bubbles, brittleness, reduced clarity, and inconsistent stretching, ultimately causing deformation.
- Prevention: Store preforms in a cool, dry environment. Ideally, the storage area should be climate-controlled. Keep preforms in their original protective packaging (usually sealed plastic bags or liners within boxes/octabins) for as long as possible before use.
- Temperature Exposure:
- Impact: Prolonged exposure to high temperatures (e.g., direct sunlight, near heat sources) can accelerate the aging process of PET preforms. It can also lead to increased crystallinity in the preforms. Highly crystalline PET is more difficult to heat evenly and stretch properly, often requiring higher processing temperatures, which can narrow the processing window and increase the risk of defects like haze or uneven wall distribution.
- Prevention: Avoid storing preforms in areas where temperatures can fluctuate wildly or become excessively high. A shaded, well-ventilated area is better if climate control isn't available.
- Storage Duration (First-In, First-Out - FIFO):
- Impact: Even under good conditions, preforms have a shelf life. Over extended periods (many months or years), natural aging can occur, leading to changes in material properties. Older preforms might behave differently in the blow molding process compared to fresh ones.
- Prevention: Implement a strict FIFO system to ensure older stock is used before newer stock. Clearly label preform batches with their arrival date.
- Contamination:
- Impact: Dust, dirt, or other contaminants settling on preforms can cause black specks, burn marks, or weak spots in the final bottles.
- Prevention: Keep the storage area clean. Keep preforms covered.
Key Storage Recommendations:
| Factor | Ideal Condition | Risk if Not Met |
|---|---|---|
| Humidity | Low (e.g., < 50% RH if possible) | Moisture absorption, IV degradation, splay, bubbles |
| Temperature | Cool, stable (e.g., 15-25°C or 60-77°F) | Increased crystallinity, aging, processing issues |
| Sunlight | Avoid direct exposure | UV degradation, localized heating |
| Cleanliness | Dust-free environment | Contamination, burn spots |
| Duration | Use FIFO, minimize long-term storage | Material degradation, inconsistent processing |
Paying attention to these storage details can significantly improve the consistency and quality of your blow-molded bottles and reduce the likelihood of unexpected deformations.
How can you prevent bottle deformation through equipment and mold maintenance?
Are you facing recurring bottle defects despite checking materials and process settings? Your equipment's condition might be the underlying issue. Maintenance is prevention.
Regular equipment and mold maintenance is crucial for preventing bottle deformation. Issues like worn blow nozzles, misaligned molds, or degraded guide rails can directly cause defects. Proactive upkeep ensures consistent and high-quality bottle production.
In my experience, many persistent blow molding problems can be traced back to a lack of consistent, thorough maintenance. It's often the small, overlooked components that wear out or go out of adjustment and start causing big headaches. As I always stress to my clients, after-sales service and proactive maintenance are just as important, if not more so, than the initial machine purchase. Most customers, especially newcomers, can learn to operate the machine, but troubleshooting subtle issues or identifying wear and tear requires a deeper understanding.
Proactive Maintenance for Consistent Quality
A well-maintained blow molding machine and mold are fundamental to producing defect-free bottles.
- Blow Nozzle (Blow Pin) Condition and Alignment:
- Impact: The blow nozzle seals against the preform neck and delivers the high-pressure air. If the nozzle tip is worn, chipped, or misaligned, it can cause air leaks, leading to insufficient blowing pressure. Misalignment can also damage the preform neck or cause uneven stretching.
- Maintenance: Regularly inspect blow nozzle tips for wear and tear. Ensure they are correctly centered and seal properly with the preform. Check the height setting.
- Mold Alignment and Clamping:
- Impact: If mold halves don't align perfectly or don't clamp with sufficient, even force, it can lead to flash (material squeezing out at the parting line), offset necks, or mismatched bottle halves. Worn mold guiding components (like guide pins and bushings) are common culprits.
- Maintenance: Check mold alignment regularly. Inspect guide pins and bushings for wear. Ensure the clamping mechanism is functioning correctly and providing adequate tonnage. Verify parting line surfaces are clean and undamaged.
- Stretch Rod Condition and Operation:
- Impact: A bent stretch rod, a worn tip, or incorrect stroke length/speed can lead to uneven axial stretching, off-center gates, or even puncturing the preform base.
- Maintenance: Inspect stretch rods for straightness and tip condition. Verify their mechanical movement is smooth and settings (speed, stroke) are correct.
- Oven and Preform Handling Components:
- Impact: Worn preform grippers or mandrels can cause preforms to be improperly positioned in the heating oven or when transferred to the mold, leading to uneven heating or damage. Issues with preform rotation mechanisms in the oven lead to uneven heating.
- Maintenance: Inspect and replace worn grippers, mandrels, and rotation components. Ensure smooth transfer of preforms.
- Pneumatic System Leaks:
- Impact: Leaks in the high-pressure air lines or valves can result in inconsistent or insufficient blowing pressure, leading to under-formed bottles.
- Maintenance: Regularly check for air leaks throughout the pneumatic system using soapy water or an ultrasonic leak detector.
- Cooling System for Machine Components: Some machine components, like the mold clamping unit or hydraulics, might have their own cooling. Overheating of these parts can lead to inconsistent operation.
Preventative Maintenance Checklist Snippet:
| Component Group | Key Checks | Frequency (Example) |
|---|---|---|
| Blow Nozzles | Wear, alignment, sealing, height | Daily / Weekly |
| Molds | Alignment, parting line, cooling channels, guide pins/bushings, venting | Weekly / Monthly |
| Stretch Rods | Straightness, tip condition, stroke, speed | Weekly |
| Heating Oven | Lamp function, reflectors, rotation, ventilation, preform grippers/mandrels | Daily / Weekly |
| Pneumatic System | Air leaks, filter condition, regulator function | Weekly |
| Hydraulic System | Oil level/condition, leaks, filter | Monthly |
| General Machine | Lubrication, loose bolts, sensor function, guide rail wear | Daily / Weekly |
This kind of systematic approach is what I try to instill in my clients. When they face a problem, we go through a checklist, ruling out factors one by one. It's this process of elimination that often leads to the solution, preventing small issues from escalating into major production stoppages.
Conclusion
Fixing bottle deformation involves checking preforms, heating, cooling, blowing parameters, and machine maintenance. A systematic approach solves most issues effectively.
Frequently Asked Questions (FAQs)
Q1: What is the very first thing I should check if my bottles start deforming?
A1: Start by examining the preforms. Ensure you are using the correct type, that they are not damaged, and that they are from a good batch. Many deformation issues begin with the preform itself. Then, check your heating settings, as incorrect temperatures are a very common culprit.
Q2: How can I tell if uneven heating is my problem?
A2: Look for inconsistent wall thickness in your bottles. If one side is thinner than the other, or if there are distinct thin or thick bands, uneven heating is likely. You can use an infrared pyrometer to measure the preform surface temperature as it exits the oven to confirm temperature variations.
Q3: Can the type of PET material affect deformation?
A3: Yes, absolutely. The Intrinsic Viscosity (IV) of the PET resin is critical. If the IV is too low, the material may not have enough melt strength and can overstretch or tear easily. If it's too high, it might be difficult to stretch. Also, using recycled PET (rPET) can sometimes introduce variability if not processed correctly or if the quality of rPET is inconsistent.
Q4: How often should I clean my mold's cooling channels?
A4: The frequency depends on your water quality and production volume, but as a general guideline, inspect and clean mold cooling channels every few months, or sooner if you notice issues like increased cycle times or base deformation. Hard water can cause scale buildup more quickly.
Q5: My bottle bottoms are consistently collapsing. What are the top three things to check?
A5: For collapsing or sunken bottoms (rocker bottoms), check these:
- Preform Base Temperature: The preform base might be too hot. Try reducing heat to the lamps focused on the base area or increasing cooling air to the preform base.
- Mold Base Cooling: Ensure the cooling channels in the mold base are clear and the coolant is flowing effectively. The mold base itself might be too hot.
- Pre-blow Pressure/Timing: Too low or too late pre-blow can cause the base not to form correctly. Try slightly increasing pre-blow pressure or making it occur a fraction earlier.
