Choosing the right mold feels complex. A mismatch is a costly mistake that can halt your production. Let's make sure your investment pays off by matching your equipment perfectly.
To correctly match a PET preform mold with an injection molding machine, you must verify four critical factors. Ensure the machine's clamping force fits the mold, the tie bar distance can physically accommodate it, the injection volume is sufficient for the total preform weight, and the cooling capacity supports your desired cycle time.
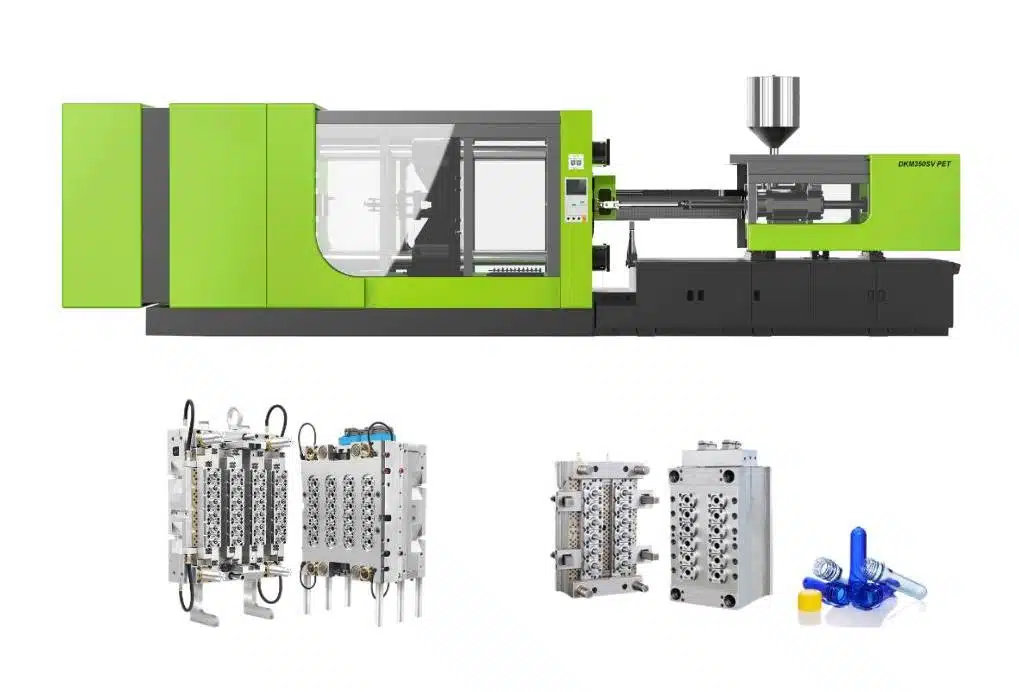
I’ve spent 16 years in the PET preform mold industry, helping over 300 clients navigate these decisions. The process is more complex than for a blow bottle mold, as every detail, from preform weight to your machine's model, matters. Many customers are unsure about how many cavities they truly need or can handle. My goal is to walk you through the same process I use with my clients to find the most efficient and reliable solution for your factory. Let's break down the technical details so you can choose with confidence.
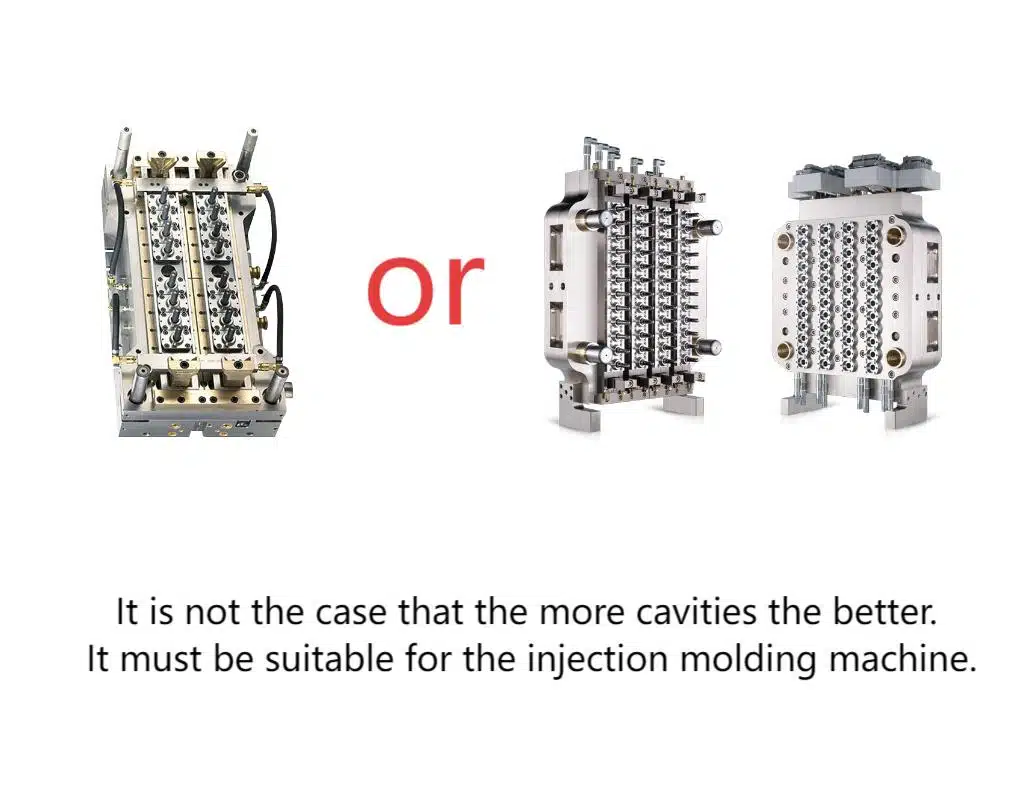
Not All Mold Cavities Are Equal: Why Is “More” Not Always Better?
You want to maximize output, so you think more cavities are the obvious answer. But this can backfire, leading to lower efficiency or a mold that simply won't run.
More cavities are not always better. The ideal cavity count is limited by your injection machine's performance, the preform's specific design, and a balanced production rhythm. Choosing based on your actual capacity is much smarter and more profitable in the long run.
Dive Deeper into Cavity Selection
When a client wants a new PET preform mold, the first question is always about the number of cavities. The instinct is to go for the highest number possible, assuming more cavities directly equal more output. However, the reality is a careful balance between three key areas.
1. Injection Molding Machine Performance
Your machine is the ultimate gatekeeper. A smaller machine, for example one with 200 tons of clamping force, cannot physically or functionally handle a mold designed for a 500-ton machine. The power isn't there to keep the mold clamped shut against the pressure of injecting plastic into 96 cavities, and the physical size of the mold will be too large for the machine's platens.
2. Preform Parameters
The design of the preform itself plays a huge role.
- Weight: Heavier preforms require more plastic and, critically, more cooling time.
- Wall Thickness: Thicker walls also extend the cooling time needed for the plastic to solidify properly.
A high-cavity mold for a heavy, thick-walled preform might have such a long cycle time that it produces fewer quality preforms per hour than a smaller mold with a faster cycle.
3. The Production Rhythm
Efficiency comes from a fast, stable, and repeatable cycle. The total cycle time is made up of injection, holding, cooling, and mold open/eject time. Cooling is often the longest phase. If you choose a 96-cavity mold but the cycle time has to be 35 seconds to ensure proper cooling, you might be better off with a 72-cavity mold that can run a stable 20-second cycle. You must calculate the output per hour, not just the output per cycle.
| Factor | Why It Limits Cavity Count |
|---|---|
| Machine Tonnage | Insufficient force leads to mold flashing and defects. |
| Machine Size | Mold may be too large to fit between the tie bars. |
| Preform Weight | Heavier preforms require longer cooling, slowing the cycle. |
| Cycle Time | A balanced cycle on a smaller mold can outperform a slow cycle on a larger one. |
Clamping Force and Tie Bar Distance: Can Your Machine Physically Fit the Mold?
You found a great deal on a high-cavity mold. But will it even mount onto your machine? Let's check the two most basic physical constraints to avoid a simple but costly error.
Your machine’s clamping force, measured in tons, must be high enough to keep the mold shut during injection. The mold must also physically fit between the machine's tie bars. Checking these two specifications is the very first step.

Dive Deeper into Physical Compatibility
Before we even discuss cycle times or material flow, we have to confirm if the mold and machine can be physically introduced. I treat this as the first checkpoint. If the answer here is no, nothing else matters. The two non-negotiable parameters are clamping force and the distance between tie bars.
1. What is Clamping Force?
Clamping force is the pressure exerted by the injection molding machine to hold the two halves of the PET preform mold securely closed during the injection process. It’s measured in tons. When molten PET is injected into the cavities under high pressure, it generates a massive force that tries to push the mold open. If the machine's clamping force is too low, the mold will be pushed apart slightly, causing molten plastic to leak out around the edges. This defect is known as "flash" and it makes the preforms unusable. A general rule of thumb is to have 2.5 to 3 tons of clamping force for every square inch of the preform's projected area.
2. What is Tie Bar Distance?
The tie bars are the four large steel rods that connect the two main platens of the injection molding machine. They provide the structural support for the clamping action. The space between these bars—horizontally and vertically—determines the maximum size of the mold that can be physically mounted in the machine. Your mold's width and height, including its mounting plates, must be smaller than this distance. If the mold is even a centimeter too wide, it simply won't fit. It’s a pass/fail test with no room for error.
Here is a general guide I use to give clients a starting point:
| Machine Clamping Force (Tons) | Typical Max Mold Size (mm x mm) | Suitable For |
|---|---|---|
| 150 - 250 T | ~ 500 x 500 | 8-24 cavity molds for small preforms |
| 280 - 400 T | ~ 650 x 650 | 32-72 cavity molds for standard water bottles |
| 450 - 600 T | ~ 850 x 850 | 72-96 cavity molds for standard or large preforms |
| 700+ T | > 1000 x 1000 | 96-144 cavity molds for high-volume production |
Injection Volume vs Total Preform Weight: Is It a Crucial Compatibility Factor?
Don't want to produce preforms that are half-full or flashing at the seams? This simple calculation is one of the most important checks you will make to ensure quality.
Calculate the total shot weight by multiplying your preform's weight by the number of cavities. Your machine's maximum injection volume, or shot size, must be comfortably larger than this total weight to avoid production defects.
.gif "How To Match Your Pet Preform Mold With The Right Injection Molding Machine? 4")
Dive Deeper into Shot Size Calculation
This is where we connect the mold's demand with the machine's ability to supply the raw material. A mismatch here leads directly to rejected products. The key is to ensure your machine’s plasticizing unit and screw can deliver the right amount of molten PET resin for every single cycle.
1. The Core Formula
The calculation itself is straightforward. You must determine the total amount of plastic the mold requires for one complete cycle.
$$ \text{Total Shot Weight (g)} = (\text{Single Preform Weight (g)}) \times (\text{Number of Cavities}) $$
For example, if you have an 18-gram preform and a 48-cavity mold, the calculation is:
$$ 18 \, \text{g/preform} \times 48 \, \text{cavities} = 864 \, \text{g} $$
This means the machine must be able to inject at least 864 grams of PET resin in one shot.
2. The Critical Buffer Zone
Here's a pro tip: never max out your machine. The machine's listed maximum shot size is a theoretical limit. For stable and high-quality production, you should only use between 30% and 80% of the machine's maximum shot capacity. I always advise my clients to ensure their calculated "Total Shot Weight" is no more than 80% of the machine's stated capacity. This buffer is essential for a few reasons:
- Plasticizing Rate: The screw needs time to melt resin consistently. Running at 100% capacity can lead to incompletely melted plastic and defects.
- Process Cushion: It provides a "cushion" for the screw to maintain consistent pressure at the end of the injection stroke, which is vital for dimensional stability and preventing sink marks.
- Machine Longevity: Constantly running a machine at its absolute limit leads to premature wear and tear on the screw, barrel, and motor.
3. The Consequences of a Mismatch
- Shot Size Too Small: If the machine's shot capacity is less than the mold's requirement, you will get "short shots." This means the cavities don't fill completely, and the resulting preforms are incomplete and useless.
- Shot Size at the Limit: If you operate right at the machine's limit, you risk inconsistent preform weights, dimensional instability, and a high defect rate. You will struggle to maintain a stable process window.
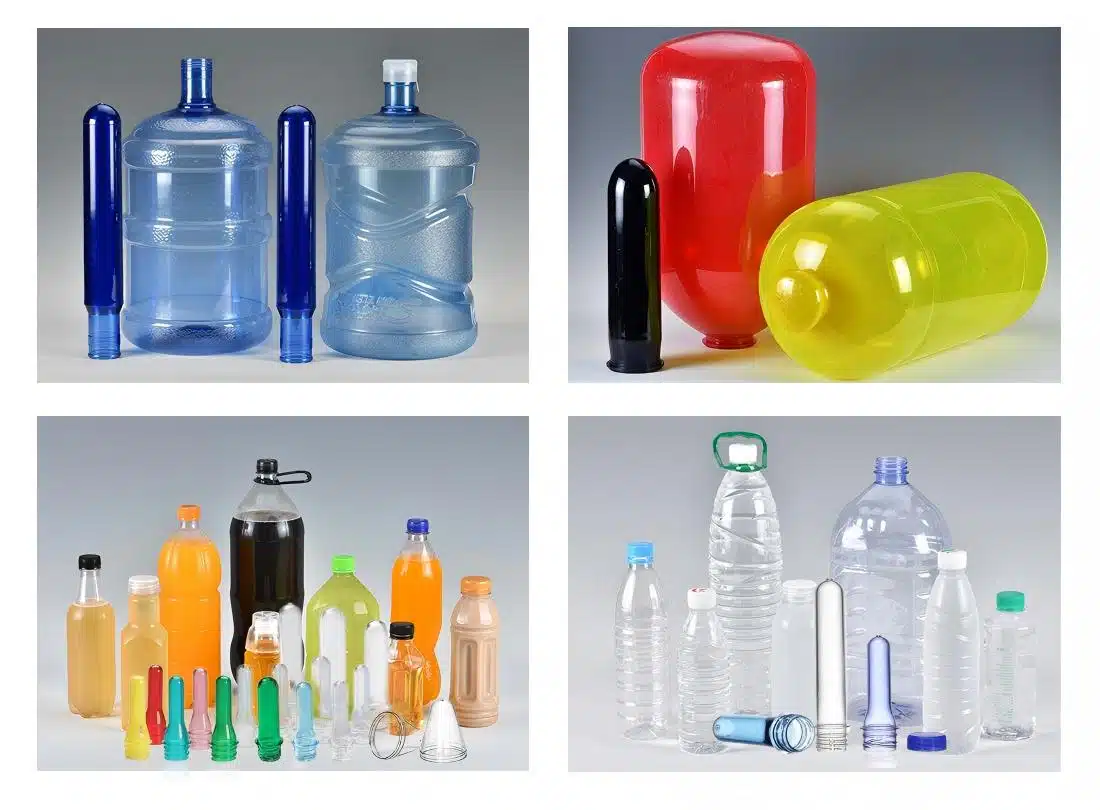
Why Does Neck Size Matter So Much for Mold Design?
You plan to make wide-mouth jars and want a 48-cavity mold. Why am I suggesting only 24 cavities for your machine? The reason is all in the neck finish.
A larger preform neck diameter forces a greater distance between each cavity on the mold plate. This increases the overall mold base size, meaning fewer cavities can fit within your injection molding machine's physical limits.
Dive Deeper into the Impact of Neck Finish
When designing a PET preform, the neck finish is a critical dimension that has a direct ripple effect on the entire mold design and its compatibility with your equipment. It's not just about the cap that will be used; it dictates the fundamental layout of the mold.
1. Understanding "Pitch" in Mold Design
In a multi-cavity mold, the "pitch" is the center-to-center distance between adjacent cavities. This distance is determined by several factors, but the most important one is the outer diameter of the preform's neck finish. You need enough steel in the mold between each cavity to ensure structural integrity and to accommodate cooling channels. A wider neck finish naturally requires a larger pitch to maintain this necessary separation.
2. How Pitch Influences Overall Mold Size
Imagine you have a fixed machine platen size. Let's see how neck size changes things:
- Scenario A: 28mm PCO1881 Neck: A common neck for water bottles. The pitch might be around 50mm. You can fit many of these in a grid, for example, an 8x9 layout for a 72-cavity mold.
- Scenario B: 38mm Bericap Neck: A common neck for juices or sports drinks. The pitch might need to increase to 70mm to accommodate the larger diameter and associated mold mechanics. In the same physical area, you might only be able to fit a 6x6 layout, reducing you to a 36-cavity mold.
The wider neck forces a larger mold base for the same number of cavities. This means for a given machine, a larger neck size will always result in a lower maximum number of cavities.
3. Table: Neck Size vs. Potential Cavitation (Example for a 350T Machine)
This table illustrates how, for the same injection molding machine, the choice of neck finish directly impacts the maximum number of cavities you can realistically run.
| Neck Finish | Typical Application | Approx. Pitch (mm) | Max. Feasible Cavities (on a 350T Machine) |
|---|---|---|---|
| PCO 1881 (28mm) | Carbonated Soft Drinks, Water | 50-60 | 72 |
| PCO 1810 (28mm) | Lightweight Water Bottles | 45-55 | 72 |
| 30/25 (30mm) | Lightweight Water Bottles | 50-60 | 72 |
| Bericap 38mm | Hot-fill Juices, Dairy | 65-75 | 36-48 |
| 48mm | Wide-mouth Jars, Sauces | 80-90 | 24-32 |
This is why, during my initial consultation with a client, the neck finish is one of the first specifications I ask for, right after the preform weight. It immediately sets a realistic boundary on our options for their specific bottle blowing machine and molding setup.
How Does Preform Weight Impact Cycle Time and Mold Cooling?
You've matched the tonnage and shot size, so you're ready to go, right? Not so fast. A heavy preform can turn your high-speed production line into a slow crawl.
Heavier preforms contain more plastic and retain more heat, requiring a longer cooling time inside the mold. For high-cavity molds, this extended cooling can dramatically slow down the overall cycle time, potentially lowering your total hourly output.

Dive Deeper into the Cooling Challenge
In PET preform manufacturing, the race is almost always won or lost during the cooling phase. For any given preform design, the cooling time is the biggest single component of the overall cycle time. The heavier and thicker the preform, the more dominant the cooling phase becomes.
1. The Physics of Cooling
Plastic is a poor conductor of heat. When you inject molten PET (at around 280°C) into a steel mold (at around 10°C), the heat has to travel from the core of the preform out to the surface and into the mold's cooling channels. The time this takes increases exponentially with the thickness of the preform's wall. A preform that is twice as thick does not take twice as long to cool; it can take four times as long. This is why heavy preforms are a production challenge.
2. Deconstructing the Injection Cycle
Let’s look at the typical parts of a cycle:
- Mold Close & Clamp: 1-2 seconds
- Injection: 2-4 seconds (injecting the molten plastic)
- Holding Pressure: 2-5 seconds (packing the cavity to prevent sinks)
- Cooling: 5-30+ seconds (this is the variable part)
- Mold Open, Eject, Mold Close: 2-4 seconds
For a lightweight 12g preform, the cooling time might be just 5-7 seconds. For a heavy 50g preform for a large jar, the cooling time could easily be 25-30 seconds.
3. The Output Equation: Cavities vs. Cycle Time
This is where customers often get a surprise. They focus on the number of preforms per shot, but the real metric for success is preforms per hour.
- Scenario A: 72-cavity mold for a 14g preform. Cycle time is 15 seconds.
- (3600 seconds/hour) / (15 seconds/cycle) = 240 cycles/hour
- 240 cycles/hour * 72 preforms/cycle = 17,280 preforms/hour
- Scenario B: 72-cavity mold for a 45g preform. The required cooling extends the cycle time to 30 seconds.
- (3600 seconds/hour) / (30 seconds/cycle) = 120 cycles/hour
- 120 cycles/hour * 72 preforms/cycle = 8,640 preforms/hour
In this case, the heavy preform cuts production in half, even with the same mold and machine. It might have been more economical to use a mold with fewer cavities that could be better optimized. This is a critical conversation to have before purchasing any tooling, as it impacts everything from the blow bottle mold design to the final production cost.
What Are Some Standard Machine-to-Mold Pairings by Neck Size and Weight?
Feeling overwhelmed by all the numbers and calculations? Let's simplify it. Here are some common, real-world examples I recommend to my clients every day to get them started.
For a quick reference, a standard 18g PCO1881 preform (28mm neck) often runs well in a 72-cavity PET preform mold on a 350-400T machine. A heavier 35g preform with a 38mm neck is better suited for a 24 or 36-cavity mold on a similar machine.
Dive Deeper with a Practical Matching Guide
After 16 years in this business, I can often predict the right mold configuration just by hearing a client's basic needs. While every project is unique, most fall into common categories. This reference table provides a strong starting point for some of the most popular preform types in the market. It combines the principles of clamping force, shot size, and mold dimensions into practical, proven pairings.
Remember, this is a guide. The final decision should always be confirmed by a detailed analysis of your specific preform drawing and your exact injection molding machine specifications.
Table: Practical Guide to Matching Preforms, Molds, and Machines
| Preform Neck Finish | Preform Weight (g) | Common Application | Recommended Cavity Count | Recommended Machine Tonnage (Tons) |
|---|---|---|---|---|
| PCO 1881 (28mm) | 12 - 15 g | Lightweight still water | 72 - 96 | 350 - 500 T |
| PCO 1881 (28mm) | 18 - 22 g | Carbonated soft drinks (CSD) | 48 - 72 | 300 - 450 T |
| PCO 1881 (28mm) | 23 - 28 g | Heavier CSD, large volume | 32 - 48 | 300 - 400 T |
| 30/25 (30mm) | 11 - 14 g | Ultra-light still water | 72 - 96 | 350 - 500 T |
| Bericap 38mm | 25 - 32 g | Aseptic, Hot-fill juice | 32 - 48 | 350 - 500 T |
| Bericap 38mm | 35 - 45 g | Large volume juice, Dairy | 24 - 36 | 400 - 550 T |
| 48mm Screw Cap | 40 - 55 g | Wide-mouth food jars | 16 - 32 | 400 - 600 T |
| 89mm Screw Cap | 60 - 80 g | Large food jars | 8 - 16 | 500 - 700 T |
A Note on Customization and Your System
This table is your starting point. The final configuration depends on the fine details of your preform design—especially the wall thickness distribution—and the capabilities of your auxiliary equipment. For instance, the performance of your resin dryer and mold chiller can also become a limiting factor. It's a complete system, from the plastic pellet to the final bottle coming off your bottle blowing machine. I always review the full picture with my clients to ensure the mold we build for them performs optimally within their specific production environment.
What Is the Role of Hot Runner Systems in High-Cavity Mold Compatibility?
Your mold fits and the cycle time seems good, but half your preforms have defects. The problem might be hidden inside the mold itself, in the hot runner system.
The hot runner system delivers molten plastic to each cavity. In high-cavity molds, its stability and heating balance are absolutely critical. An unreliable system causes inconsistent preform quality, so choosing a professional, reputable brand is essential.

Dive Deeper into Hot Runner Technology
The hot runner is the heart of a modern PET preform mold. You can have the best machine and the most perfectly machined steel, but if the hot runner fails to deliver perfectly uniform molten plastic to every single cavity, your production will be a disaster. This is especially true for molds with 48, 72, 96, or more cavities.
1. What is a Hot Runner?
A hot runner is a heated manifold assembly that is built into the mold. Its job is to transport the molten plastic from the machine's nozzle to a series of "gates" that open into each mold cavity. It keeps the plastic at a precise, uniform temperature throughout its journey. This eliminates the need for a "cold runner" (a solid plastic sprue and runner system that gets ejected with the parts), which saves an enormous amount of material and energy.
2. Why It's So Critical for High-Cavity Molds
Imagine trying to ensure 96 different streams of molten plastic all arrive at their destination at the exact same time, at the exact same temperature, and at the exact same pressure. This is the challenge.
- Thermal Balance: Even a few degrees of temperature difference between one nozzle and another can cause major variations in preform weight and quality. Some cavities might produce perfect parts while others produce preforms with stringing, crystallization, or black spots.
- Pressure Drop: The system must be designed to have a balanced flow, so the cavities closest to the machine nozzle fill with the same pressure as the ones furthest away. An imbalanced flow leads to inconsistent filling and dimensions.
3. Valve Gate vs. Pin Point Gate
For high-quality PET preforms, a valve gate hot runner system is the industry standard and what I always recommend.
- Valve Gate: Uses a small, pneumatically-actuated pin that physically opens and closes the gate for each cavity. This provides precise control over the plastic flow, resulting in a perfectly clean gate mark on the preform and preventing issues like "stringing" or "drooling." It is more complex and expensive but offers superior quality control.
- Pin Point Gate (or Thermal Gate): Relies on the plastic "freezing off" in the small gate opening at the end of the cycle. It is simpler and cheaper but offers far less control and is not suitable for the demanding, fast-cycle world of high-cavity PET preform production.
Investing in a top-tier hot runner brand is not an expense; it's insurance for stable production and is a key component of a high-performance blow bottle mold system.
How Can We Help You Select the Right Mold Based on Your Machine and Bottle Design?
Worried about making a multi-thousand-dollar mistake on a new mold? You don't have to figure this all out alone. My 16 years of experience can save you time, money, and a lot of future headaches.
I help you select the perfect mold. Based on your bottle design, preform weight, and existing machinery, I provide a complete configuration that guarantees performance and prevents you from buying the wrong tool for the job.

Dive Deeper into My Consultation Process
My role goes beyond just taking an order. I see myself as a technical partner for my clients. The goal is to provide a PET preform mold that not only works, but works efficiently and profitably for years to come. This involves a detailed pre-sale consultation where I gather all the necessary information to propose an optimal solution. I need to understand the preform's weight, neck finish, wall thickness, and its intended application. Just as importantly, I need to know the exact model and specifications of the client's injection molding machine and even their bottle blowing machine.
A Real-World Example: Preventing a Costly Mismatch
I remember a client from Egypt who was ready to order a 48-cavity mold for his 18g preforms with a 30/25 neck. It's a very common request. The first question I asked was, "What injection molding machine will you be running this on?" He told me he had a 200-ton machine.
I had to stop him right there. I knew from experience that a 200T machine does not have the clamping force or the physical space between the tie bars to handle a 48-cavity mold of that type. The mold would be too big to fit, and even if it did, the machine couldn't keep it closed during injection.
I explained the technical limitations clearly. I gave him two honest and practical options:
- We could design and build an excellent 24-cavity mold that would run perfectly on his existing 200T machine.
- He could invest in a larger 300T or 350T machine, and I could then confidently build the 48-cavity mold he originally wanted.
He was grateful for the direct advice. He realized that receiving a mold he couldn't even use would have been a disaster for his business. He decided to purchase a new 300-ton machine, and we supplied him with the 48-cavity mold. Today, he is running it successfully and profitably. This is the value I bring: preventing mistakes before they happen. My job is to ensure that the entire system, from the preform to the final bottle created with the blow bottle mold, is coherent and efficient.
Conclusion
Matching your mold and machine is crucial for success. Always verify the clamping force, tie bar space, required shot weight, and cooling needs to make a smart, profitable investment.
Frequently Asked Questions (FAQs)
1. What is the most common mistake people make when buying a PET preform mold?
The most common mistake is focusing only on getting the highest number of cavities without first confirming if their existing injection molding machine can handle the mold's physical size, clamping force requirement, and shot weight. This leads to buying a mold that is inefficient or, in the worst case, completely unusable on their equipment.
2. What happens if my machine's clamping force is too low for my mold?
If the clamping force is too low, the immense pressure of the molten plastic injection will force the two halves of the mold slightly apart. This causes a thin layer of plastic, known as "flash," to form around the preforms. This flash is a defect that usually requires manual trimming and often results in the entire shot being rejected, wasting material, time, and energy.
3. Can I use a 72-cavity mold for very heavy preforms (e.g., 50g)?
While physically possible on a very large machine, it is generally not recommended. A 50g preform has a thick wall and requires a very long cooling time. Running a 72-cavity mold would result in an extremely long cycle time, which could make your production per hour very low. For such heavy preforms, a mold with fewer cavities (e.g., 24 or 32) often provides better overall efficiency and process stability.
4. How do I calculate the required shot size for my machine?
You can calculate the required shot weight with a simple formula: (Weight of one preform in grams) × (Number of mold cavities). For example, for a 20g preform in a 48-cavity mold, the shot weight is 20g × 48 = 960g. Crucially, your machine's maximum shot size should be about 20-25% larger than this number to ensure a stable process.
5. Why is an expensive valve-gate hot runner so important for PET preforms?
A valve-gate hot runner uses mechanical pins to open and close the entry point to each cavity precisely. This gives you superior control over the plastic flow, prevents drooling and stringing, and leaves a clean, small gate mark on the preform. This level of control is essential for producing the consistent, high-quality preforms needed for trouble-free operation on a modern bottle blowing machine. It's a critical investment for high-cavity, high-speed production.
🔗 Learn More about Preform Molds and Injection Molding Technology
Injection Molding – Wikipedia
Describes the basic process of injecting molten plastic into a mold — the core method used to produce PET preforms.Injection Molding Machine – Wikipedia
Details the machinery that drives the injection process, including clamping and injection units relevant to preform production.Mold (Manufacturing) – Wikipedia
Explains how molds are engineered, maintained, and applied across different manufacturing processes, including injection molding of PET preforms.Plastic Bottle – Wikipedia
Provides a general overview of plastic bottle production, beginning with the injection-molded preform stage.🔗 Related Pages on Our Website
Automatic Blow Molding Machines – iBottler
Discover our full range of customizable automatic PET bottle blow molding machines.Blow Bottle Mold – iBottler
Explore our precision blow molds designed for PET and PP bottles.Preform Mold – iBottler
Learn more about our high-precision preform molds suitable for various injection molding machines.
