Struggling to know if your unique bottle design can actually be made? You have a brilliant idea for a complex bottle, but the fear that it's technically impossible to produce is holding you back.
Yes, blow molding can create incredibly complex bottle shapes. The key is understanding the process limitations and designing the bottle, preform, and blow bottle mold together. Success depends on balancing design aesthetics with the physics of polymer stretching and cooling.

It can be a frustrating journey from a beautiful 3D render to a physical, mass-produced bottle. Many amazing designs get rejected because they are deemed "impossible" to manufacture. But is that always the case? I've seen countless projects, and the line between possible and impossible is often just a matter of expertise. This article will walk you through the practical realities of designing complex bottles for blow molding, helping you understand the rules so you can confidently push the boundaries.
What Makes a Bottle Shape “Complicated” in Blow Molding?
Ever wondered why some bottle designs are simple, while others are a nightmare to produce? The challenges of a complex shape often go unseen, causing production headaches and unexpected costs down the line.
In blow molding, a "complicated" shape isn't just about looks. It includes asymmetrical designs, sharp angles, high shoulder or base features, and deep concave structures. The real complexity lies in the physics: managing the stretch ratio, ensuring even wall thickness, and designing effective mold cooling.
Diving Deeper into Complexity
When we talk about complex bottle design in blow molding, we're moving beyond simple cylinders and rectangles. I've had clients bring me stunning, sculptural designs that, while beautiful, present significant manufacturing hurdles. The term "complicated" covers several categories of features that challenge the standard blow molding process.
Types of Complicated Geometries
- Asymmetrical Designs: Bottles that are not symmetrical around their vertical axis are inherently difficult. During inflation, the plastic wants to stretch evenly. In an asymmetrical shape, one side might need to stretch much more than the other, leading to thin spots or incomplete formation. For example, a bottle shaped like a crescent moon would be extremely challenging.
- High Shoulders and Deep Bases: Designs with very steep shoulders or deep, pushed-in bases (known as a "high kick-up") create high stretch ratios. The PET material has to travel a longer distance in these areas, which can thin it out excessively, making the bottle weak and prone to failure under pressure or impact.
- Concave or "Pinched" Structures: Any design that features an inward-curving surface, like a grip handle or a decorative indent, is tricky. The mold has to close perfectly around these features, and air needs to be vented properly to ensure the plastic conforms to the concave shape without trapping air, which causes defects.
- Integrated Handles: Handleware is a classic example of a complex bottle. These require precise material distribution to form both the main body and the handle without creating weak points where they connect. The parison (the initial tube of molten plastic) or preform must be programmed to provide extra material specifically for the handle area.
Beyond Geometry: The Process Challenges
The true complexity is a combination of the bottle's shape and the process physics. It’s a delicate dance between temperature, pressure, and time.
| Challenge | Description | Why It's a Problem for Complex Shapes |
|---|---|---|
| Stretch Ratio | The ratio of the final bottle surface area to the preform surface area. | High ratios in specific areas (like corners or shoulders) lead to excessive thinning and potential holes. A bottle with varied widths requires a very carefully designed preform to manage these different ratios. |
| Wall Thickness Transition | The change in material thickness from one part of the bottle to another, for example, from the wall to the base. | Sharp transitions in shape require gradual transitions in wall thickness, which is hard to control. Abrupt changes can create weak points or stress concentrations. |
| Mold Cooling Design | The network of channels within the mold that circulates water to cool the plastic. | Complex shapes have varied surface areas and thicknesses, meaning they cool at different rates. The cooling channels in the blow bottle mold must be meticulously designed to cool the bottle uniformly, otherwise, you get warping and shrinkage issues. |
Understanding these factors is the first step. It's not about abandoning creative designs, but about engineering them smartly from the very beginning.
The Limits of Stretch Blow Molding: Where It Struggles?
Are you pushing your bottle design too far for stretch blow molding? Trying to achieve an extreme shape can lead to frustrating failures, wasted material, and blown budgets if you don't know the limits of the process.
Stretch blow molding struggles with designs that demand uneven material distribution. This includes bottles with very deep or pointed bases, which can deform; requirements for drastically different wall thicknesses; and combinations of extremely narrow necks with very wide bodies.

Diving Deeper into Process Boundaries
Stretch blow molding is a fantastic technology, but it's not magic. It has physical limitations rooted in how a PET preform is heated and stretched. Acknowledging these limits isn't about crushing creativity; it's about channeling it into designs that are both innovative and manufacturable. Let's break down the specific areas where the process hits a wall.
The Challenge of the Bottle Base
The base is one of the most critical areas for structural integrity, especially for carbonated or hot-fill products.
- Overly Deep or Pointed Centers: I once worked on a project where the designer wanted a very deep, conical base for aesthetic reasons. The problem is that the very center of the preform base, known as the gate area, doesn't stretch much. As we tried to form the deep cone, the material in the center became either too thin, creating a weak spot prone to bursting, or it would bulge outwards after cooling (a defect called "rocker bottom"). A stable bottle needs a stable base, and extreme designs compromise this.
| Base Design Feature | The Problem It Creates | The Solution |
|---|---|---|
| Deep, Pointed Center | Thinning, weakness, potential for "rocker bottom" deformation. The stretch rod can even puncture the preform. | Redesign for a flatter, more structured base (e.g., a petaloid base for CSD bottles) to distribute stress. |
| Sharp Inner Corners | High-stress concentration points. Material struggles to pack into sharp corners, leading to weak spots. | Use generous radii on all inner corners to allow the material to flow smoothly and maintain thickness. |
The Unbalanced Wall Thickness Dilemma
Achieving perfect, uniform wall thickness is the holy grail of blow molding. Complex shapes make this incredibly difficult.
- Hot Spots and Cold Spots: A preform is heated by infrared lamps before stretching. If a bottle has a wide section and a narrow section, the part of the preform that will form the wide section needs to be heated more to allow it to stretch further. This creates a temperature differential. If not managed perfectly, you get "hot spots" (too much stretch, too thin) and "cold spots" (not enough stretch, too thick). This non-uniformity can compromise the bottle's top-load strength and barrier properties. An irregular PET bottle is a common victim of this issue.
The Preform-to-Bottle Proportionality Rule
The preform is the blueprint for the final bottle. Its shape and size dictate what's possible.
- Extreme Small Neck / Wide Body Combinations: Imagine trying to blow up a tiny balloon inside a huge box to make it touch all the walls. This is the challenge with a small neck finish and a very wide, flat bottle body. The preform, constrained by the small neck diameter, cannot be made very wide. To form the wide bottle, the material has to stretch an enormous amount horizontally. This "hoop stretch" often reaches its limit before the bottle is fully formed, resulting in an unacceptably thin or even torn bottle wall. This is a key blow molding bottle design rule that cannot be ignored.
My Malaysian client's dumbbell-shaped bottle was a prime example. We had to carefully balance the neck size, the grip area diameter, and the wide "weight" sections to make it work. It required a custom preform mold and extensive testing to find the right balance of stretch ratios.
How Preform Design Affects Complex Bottle Feasibility?
Think you can use any standard preform for your custom bottle design? This common mistake is a primary reason why innovative bottle projects fail before they even start, wasting time and money on impossible goals.
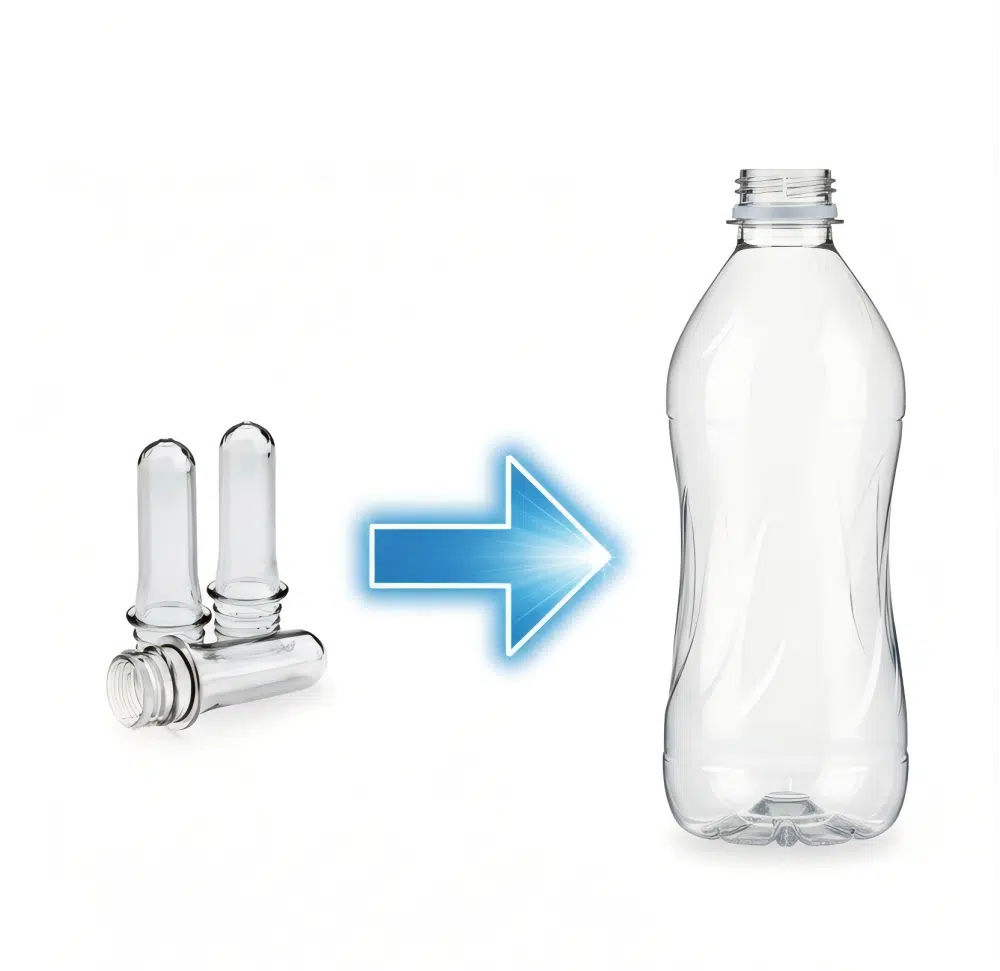
The feasibility of a complex bottle is decided when the preform is designed. Everything—the neck finish, length, weight (grams), and even shape—must be custom-tailored to the final bottle. A mismatched preform can make even the best design impossible to blow.
Diving Deeper into Preform Engineering
I cannot stress this enough: "One bottle shape, one dedicated preform." This is the golden rule, especially for complicated blow molded bottles. I've seen many clients come to me with a beautiful bottle design but hope to use a cheap, off-the-shelf preform. It's a recipe for disaster. The preform is not just a tube of plastic; it's the genetic code of your bottle.
The Anatomy of a Preform and Its Impact
Every feature of the preform is engineered with the final bottle shape in mind. Let's look at the critical elements:
- Neck Finish: The neck finish (the threaded part) is the only part of the preform that is not reheated and blown. It's already in its final shape. The design of the bottle must therefore start with a specific, existing neck finish standard. The neck finish also dictates the maximum inner diameter of the preform body, which directly impacts how much the plastic can be stretched.
- Preform Length: A longer preform allows for better vertical distribution of material, which is crucial for tall, slender bottles. For shorter, wider bottles, a shorter preform might be necessary to prevent the preform from touching the bottom of the mold before inflation is complete.
- Preform Weight (Grams): This is the most direct factor influencing wall thickness. The gram weight is simply the amount of plastic in the preform. An insufficient gram weight for a large or complex bottle will result in thin walls, while too much weight can cause thick, clunky sections and waste material. For my Korean client's sake bottle, which had a unique, thick base to mimic traditional glass, we had to design a custom, heavier preform with extra material concentrated in the base area. A standard preform mold could never have achieved this effect.
Customizing Preforms for Asymmetric Plastic Bottle Molding
Asymmetrical bottles are a special challenge. A standard, symmetrical preform will stretch unevenly into an asymmetrical mold cavity. The solution is often an asymmetrical preform.
| Feature of Custom Preform | Purpose | Example Application |
|---|---|---|
| Varied Wall Thickness | To strategically place more plastic in areas that will need to stretch more. | For a bottle with a flat side and a curved side, the preform wall on the side that will form the curve would be made thicker. |
| Oval or Shaped Body | To give the preform a starting shape that is closer to the final bottle's cross-section. | For an oval-shaped bottle, using an oval-shaped preform reduces the amount of sideways stretch needed, leading to better material distribution. |
| Specialized Gate | To control the flow of material at the base, which is critical for bottles with off-center base designs. | For a bottle with an offset standing base, the injection gate on the preform might also be slightly offset. |
The takeaway here is that you must think about the preform while you are designing the bottle. They are two halves of the same whole. Trying to finalize a bottle design without considering the preform is like designing a car without knowing what engine it will use. It's a fundamental error that will block your path to successful manufacturing.
Bottle Molds for Complicated Shapes: Key Design Factors?
Do you believe any mold can create a complex bottle? Simply carving your design into aluminum is not enough. A poorly designed mold will ruin even the most carefully planned bottle project, leading to defects, slow cycles, and constant frustration.
For complex shapes, the blow bottle mold design is critical. You must precisely calculate cooling channels for uniform temperature, strategically place parting lines to hide them, and engineer venting structures to ensure the plastic fills every detail perfectly.

Diving Deeper into Mold Engineering
The blow mold is the final partner in the dance of creating a bottle. The preform provides the material, the machine provides the force, and the mold gives the final shape. For an irregular PET bottle, the mold's job is exceptionally difficult. Its design must compensate for the challenges we've already discussed.
Cooling: The Secret to Stability and Speed
Plastic enters the mold hot and must be cooled rapidly and evenly to hold its shape. Uneven cooling is the enemy.
- Targeted Cooling Channels: In a complex mold, you can't just run a simple loop of water. You need to design cooling channels that follow the contours of the bottle. Thicker sections of the bottle retain more heat, so they need more aggressive cooling. This means placing more or larger cooling channels closer to these areas. I often use computational fluid dynamics (CFD) analysis to simulate heat transfer and optimize the cooling layout before we even cut the metal for the blow bottle mold. This saves a lot of trial and error later.
- Mold Material: The material of the mold itself matters. Aircraft-grade aluminum is common because it's light and conducts heat well. For high-wear areas or parts requiring a high-polish finish, we might use inserts made of harder materials like stainless steel or beryllium copper, which has excellent thermal conductivity.
Parting Lines: Hiding the Seams
Every mold has to open to release the bottle, which means it's made of at least two halves. The line where these halves meet is called the parting line or split line.
- Strategic Placement: On a simple round bottle, the parting line is on the side. But on a complex shape, you have choices. The goal is to make it as invisible as possible. I always advise my clients to place the parting line along a sharp edge or a feature line in the design. For example, on a square bottle, the parting lines are perfectly hidden at the corners. For my Malaysian client's dumbbell bottle, we ran the parting line right down the center of the handle and across the middle of the "weights," where it was least noticeable. Hiding the parting line in a label area is another common and effective strategy.
Venting: Letting the Air Out
As the hot plastic expands to fill the mold cavity, the air that's already inside must escape. If it can't, it gets trapped, preventing the plastic from filling small details and causing defects.
| Venting Technique | Description | Best For |
|---|---|---|
| Parting Line Vents | Micro-channels ground into the surface where the mold halves meet. This is the most common form of venting. | General venting for the main body of the bottle. |
| Vent Pins/Plugs | Small, porous metal plugs inserted into the mold in areas where air is likely to get trapped. | Deep ribs, sharp corners, and detailed embossed or debossed logos. |
| Vacuum Assistance | A system that actively sucks the air out of the mold cavity just before or during inflation. | Extremely complex shapes with very fine details where passive venting isn't enough. |
A well-designed mold is an investment that pays for itself. It produces better quality bottles, runs faster (thanks to efficient cooling), and lasts longer. When you're dealing with complex bottle design blow molding, skimping on the mold is the last thing you want to do.
Blow Molding Machine Considerations: Semi vs Fully Automatic?
Is a faster, fully automatic machine always the best choice for your complex bottle? Choosing the wrong type of bottle blowing machine can lead to low production quality for difficult shapes, or conversely, a massive investment that isn't necessary for small-scale validation.
The choice depends on your goal. Semi-automatic machines are ideal and cost-effective for validating a new, complex bottle design. Fully automatic machines are necessary for high-volume production but require customized handling parts and heating setups to avoid defects.
Diving Deeper into Machine Selection
The machine is the engine of the blow molding process. Both semi-automatic and fully automatic machines can produce excellent bottles, but they are suited for different stages of a product's life cycle, especially when dealing with complicated shapes. The decision involves a trade-off between flexibility, speed, cost, and consistency.
Semi-Automatic: The Prototyping Hero
A semi-automatic machine requires an operator to manually load the heated preforms into the blowing station. This might sound inefficient, but it offers incredible flexibility.
- Advantages for Complex Shapes: When we are first testing a new bottle, like the dumbbell shape for my Malaysian client, we almost always start on a semi-automatic machine. Why? Because an experienced operator can visually inspect each heated preform and make micro-adjustments on the fly. If they see a preform is slightly too hot on one side, they can manually orient it in the mold to compensate. This hands-on approach is invaluable for troubleshooting a new design and figuring out the perfect heating and blowing parameters. It's the perfect platform for research and development.
- Lower Initial Cost: The investment for a semi-automatic bottle blowing machine is significantly lower, making it accessible for startups or for testing market response with a small batch.
Fully Automatic: The Production Powerhouse
A fully automatic machine integrates preform heating, transferring, and blowing into one continuous, high-speed process. Preforms are loaded into a hopper and come out as finished bottles at the other end.
- The Need for Customization: The downside of this automation for complex bottles is that "one size fits all" does not apply. The grippers (or mandrels) that carry the preforms through the heating oven and into the mold are standardized. For a non-standard or asymmetrical preform, these grippers must be customized to hold it securely and in the correct orientation. The heating lamp configuration also needs to be precisely matched to the bottle shape to ensure even heat distribution at high speed. Failure to customize these elements will lead to a high rate of defects.
- High-Volume Consistency: Once dialed in, a fully automatic machine produces bottles with incredible consistency at rates of thousands per hour. This is essential for large-scale commercial production where quality must be identical from the first bottle to the millionth.
Structural Considerations for Demanding Bottles
Beyond the automation level, the physical structure of the machine matters.
| Machine Feature | Why It Matters for Complex Bottles | My Recommendation |
|---|---|---|
| Clamping System | The force that holds the two mold halves together against the blowing pressure. | For large bottles or those with wide parting line surfaces, a strong clamping system is crucial to prevent the mold from flashing (leaking air). A toggle-style clamping system is good, but for very large or thick bottles, I recommend a four-plate mold frame structure for maximum rigidity. |
| Heating Oven (Lamps) | The type and zoning of the infrared lamps that heat the preforms. | Complex shapes require precise heat zones. A machine with more, smaller heating zones offers finer control. For colored preforms like amber, you need special lamps (like ruby red tubes) that emit the right infrared wavelength to heat the material effectively. |
| Stretch Rod | The rod that mechanically stretches the preform vertically before blowing. | For very tall bottles, you need a machine with a long stretch stroke. For some wide bottles, a dual-stage stretch speed can help control the material's initial expansion. |
Choosing the right bottle blowing machine is a strategic decision. My advice is always to start with a semi-auto machine to prove your design. Once you have a stable process and market demand, you can then invest in a fully automatic system, using the data from your initial trials to specify the exact customizations needed for flawless mass production.
Tips for Avoiding Defects in Complicated Bottle Designs?
Are you tired of seeing defects like shrinking necks, wrinkles, and thin spots ruin your beautifully designed bottles? These common problems are frustrating and costly, but they are not random. They are direct results of a process that is not properly tuned.
Avoiding defects in complex bottles comes down to controlling the details. This means carefully selecting the right heating lamps, making precise adjustments to the heat zones, and meticulously setting the blowing pressure, speed, and mold temperature.

Diving Deeper into Process Optimization
Getting a complex bottle to mold perfectly is a science. It's about finding the precise recipe of heat, time, and pressure that works for your specific design. After designing the bottle, preform, and mold, the final step is fine-tuning the machine parameters. This is where experience really pays off. Here are the key areas I focus on to eliminate defects.
Mastering the Heat: The Heating Profile
The way a preform is heated is the single most important factor in determining final bottle quality. The goal is a "thermal profile" where every part of the preform is at the ideal temperature for the amount it needs to stretch.
- Heating Lamp Selection: It's not just about getting the preform hot. The type of lamp matters. Standard halogen lamps are great for clear PET. But when my client brought me an amber-colored bottle project for a UV-sensitive product, we had to switch to ruby red heating tubes. Amber PET absorbs infrared radiation differently, and the ruby lamps provided the right wavelength for deep, even heating without overheating the surface.
- Heat Zone Adjustments: A modern bottle blowing machine oven has multiple, independently controlled heating zones. For a complex bottle, you must use these zones to your advantage. If your bottle has a wide, flat panel, you increase the power to the lamps heating the corresponding section of the preform. If you have a narrow, detailed area, you might even turn off a lamp or use a cooling shield to prevent that part from getting too hot. It's a meticulous process of adjusting power percentages zone by zone until the wall thickness is perfect.
Controlling the Blow: Air Pressure and Timing
Once the preform is perfectly heated, you have to control its expansion inside the mold. This is done with high-pressure air, but how and when that air is introduced is critical.
| Common Defect | Cause | Solution |
|---|---|---|
| Pearlescence / Hazing | Over-stretching the material, or stretching it when it's too cold. The PET crystallizes incorrectly. | Increase the preform temperature in that area, or slow down the stretch rod speed to stretch the material more gently. |
| Wrinkles (especially in the neck/shoulder) | The preform skin cools too quickly before it's fully stretched, or blowing pressure is applied too late. | Reduce cooling air flow over the preforms. Apply the pre-blow pressure slightly earlier to set the material against the mold before the main blow. |
| Shrunken Neck | Too much heat is allowed to travel up into the neck finish area, causing it to soften and deform after molding. | Check the neck cooling shields on the machine. Ensure there is adequate airflow cooling the neck finish as the preform body is heated. |
| Thin/Weak Base | The stretch rod pushes the material too thin, or the pre-blow timing is off, allowing the base to expand too early. | Adjust the pre-blow pressure and timing. A lower pre-blow pressure can help keep more material in the base area for the final blow. |
- Mold Temperature: The temperature of the mold itself also plays a role. A warmer mold allows the material to flow better into sharp details, but it increases the cooling time, slowing down the production cycle. A colder mold "freezes" the plastic faster, which can be good for cycle time but can sometimes trap stress in the bottle. Finding the optimal mold temperature (usually with chilled water between 8-12°C) is a key part of the setup.
It's a process of elimination and careful adjustment. We make one change at a time, produce a few bottles, and measure the results. This methodical approach is the only way to solve the puzzle of how to blow mold complex shapes successfully.
Real-World Examples of Successful Complex Bottle Projects?
Are you wondering if your ambitious bottle concept is truly achievable? It’s easy to feel like you’re alone when pushing design boundaries. Seeing how others have successfully navigated these challenges can provide the confidence and inspiration you need.
Many brands are successfully using complex blow-molded bottles to stand out. From PET cleaning bottles with integrated handles to curved perfume bottles and cosmetic bottles with special anti-slip textures, these projects prove that complexity is possible with the right expertise.

Diving Deeper into Case Studies
Theory is one thing, but seeing it in practice is another. Over the years, I've had the pleasure of working on some truly innovative projects that pushed the limits of what people thought was possible with blow molding. These stories show that the answer to "can blow molding make complex bottle shapes?" is a resounding yes, provided you approach it with a combination of creativity and engineering discipline.
Case Study 1: The Functional Dumbbell Drink Bottle
One of my most memorable projects was with a Malaysian client launching a new functional beverage. His vision was brilliant: a bottle that was not only packaging for the drink but could be refilled with water and used as a lightweight dumbbell for exercise.
- The Challenge: The design was inherently asymmetrical and complex. It involved two bulbous "weight" ends connected by a narrow, ergonomic grip section. The key challenges were ensuring the grip was strong enough and that the wall thickness of the entire bottle was sufficient to withstand being dropped, all while being visually appealing and comfortable to hold.
- Our Solution:
- Preform Design: We couldn't use a standard preform. We designed a custom preform mold to create a preform with thicker walls in the sections that would form the grip and the base of the "weights."
- Mold Engineering: The blow bottle mold was a masterpiece of cooling design. We had separate, high-flow cooling circuits for the thick "weight" sections to prevent them from taking too long to cool, which would have killed the production speed. The parting line was cleverly hidden along the natural seams of the dumbbell shape.
- Process Tuning: We started on a semi-automatic bottle blowing machine to perfect the heating profile. We needed to heat the center of the preform less (for the grip) and the ends more (for the weights). It took dozens of trials, but we achieved a strong, functional, and beautiful final product. The client was thrilled, and the product was a huge hit for its novelty and utility.
Case Study 2: The Glass-like PET Sake Bottle
A Korean client wanted to move their premium sake product from heavy, breakable glass bottles to PET for export markets. The challenge was that they wanted to retain the premium look and feel of their traditional glass bottle, which included a very thick, heavy base and a unique curved profile.
- The Challenge: Mimicking the optical clarity and heavy feel of glass in PET is difficult. The main hurdle was the thick base. Simply adding more plastic (a heavier preform) can lead to cloudiness (haze) and long cooling times.
- Our Solution:
- Material and Preform: We chose a special grade of PET with high clarity. We then designed a "thick base" preform where the majority of the extra gram weight was concentrated at the very bottom.
- Controlled Heating: The heating process was delicate. We had to heat the body of the preform enough for it to stretch into the curved shape, but we had to shield the base area from getting too hot. This allowed it to retain its thickness instead of stretching out.
- Mold and Base Cooling: The mold had a separate, intensely cooled base insert made of beryllium copper to rapidly cool the thick base, preventing haze and crystallization.
- Result: The final PET bottle was virtually indistinguishable from the glass original at first glance. It had the premium look, the satisfying weight in the hand, and all the benefits of PET: it was lightweight, shatterproof, and more economical to ship.
These projects show that you shouldn't be afraid to dream big. If you have a unique idea, don't immediately dismiss it as "too complex." Instead, partner with experts who understand the deep connection between design, preforms, molds, and machines.
What We Offer: From Bottle Design Review to Mold and Machine Setup?
Have a great bottle design but no clear path to production? Trying to coordinate separate designers, mold makers, and machine suppliers can be a nightmare of miscommunication, delays, and costly mistakes.
We provide a complete, one-stop solution. Our service takes you from initial design review and feasibility analysis, through custom preform and mold design, all the way to machine setup and sample production. We manage the entire process to ensure your vision becomes a reality.
Diving Deeper into Our Integrated Service
I've seen too many promising projects fail because they were fragmented. A designer creates a shape in a vacuum, a mold maker builds it without understanding the process, and then the client is left with a mold that doesn't work on their machine. It's an inefficient and frustrating way to work. That's why we built our service around a holistic, integrated approach. We believe that to successfully produce a complex bottle, you need a single team overseeing every variable.
Our Step-by-Step Process
Here’s how we guide our clients from a simple idea to a factory-ready solution:
Phase 1: Design & Feasibility Analysis
- You Submit: You send us your bottle design, whether it's a sketch, a 3D file, or a physical sample. You also tell us about the product it will hold (e.g., carbonated, hot-fill, chemical) and your target production volume.
- We Analyze: I and my team of engineers perform a thorough design for manufacturability (DFM) review. We look for potential problem areas: high stretch ratios, sharp corners, un-moldable features. We use simulation software to predict material flow and thickness.
- Our Feedback: We provide you with a detailed feasibility report. We'll tell you honestly if your design is manufacturable as-is. If not, we'll provide specific, constructive suggestions for modification that preserve your design intent while making it production-friendly.
Phase 2: Preform & Mold Engineering
- Custom Preform Design: Based on the approved final bottle design, we engineer the perfect preform. This includes specifying the gram weight, dimensions, and material distribution, leading to the creation of a custom preform mold if necessary.
- Advanced Mold Design: We then design the production blow bottle mold. This is where we integrate solutions for the complexities of your design. We optimize cooling channels, strategically place parting lines, design venting systems, and select the best materials (aluminum, steel, etc.) for longevity and performance.
Phase 3: Machine Configuration & Sampling
- Machine Selection: We recommend the ideal bottle blowing machine for your project, considering your budget, required output, and the complexity of the bottle. We'll advise whether a semi-automatic or a fully customized automatic line is the right fit.
- Mold & Machine Integration: We ensure the mold we build is perfectly compatible with the selected machine, including the clamping system, neck finish holders, and automation components.
- First Article Inspection (FAI): The most exciting part! We install the mold, set up the machine, and run the first samples. We conduct a rigorous inspection, measuring wall thickness, checking dimensions, and performing stress tests. We fine-tune the process until the bottle is perfect.
Phase 4: Full-Line Configuration & Support
- Turnkey Solution: For clients needing a complete production line, we can configure and supply everything: the blow molder, air compressors, chillers, and conveyors.
- Training & Handover: We don't just hand you the keys. We train your staff on how to operate the equipment and maintain the process, ensuring you can continue to produce high-quality bottles long after we've left.
By managing this entire chain of events, we eliminate the gaps where errors and miscommunications occur. We take full responsibility for the outcome, which is a high-quality, complex bottle, produced efficiently and reliably. If you have a design, send it our way. Let's analyze its feasibility together.
Conclusion
Designing complex blow-molded bottles is a journey of balancing bold creativity with smart engineering. Success is not a matter of chance, but of integrated, expert-led design from start to finish.
Frequently Asked Questions (FAQ)
1. What is the most common reason a complex bottle design fails in production?
The most common reason for failure is a disconnect between the bottle design and the preform design. Many designers create a shape without considering how the plastic material will stretch to form it. They might try to use a generic, off-the-shelf preform for a highly customized bottle. This leads to uncontrollable wall thickness, weak spots, and an inability to form the intended shape. The rule is simple: a custom bottle almost always requires a custom-engineered preform.
2. How much more expensive is a mold for a complex bottle compared to a simple one?
A mold for a complex bottle can be anywhere from 20% to 100%+ more expensive than a mold for a simple round bottle. The cost increase comes from several factors:
- Longer Design Time: More engineering hours are needed to design and simulate cooling channels, parting lines, and venting for complex geometries.
- Complex Machining: The mold cavity may require advanced 5-axis CNC machining to create curved surfaces and intricate details, which is more time-consuming than simple 3-axis machining.
- Special Materials/Inserts: Areas of high wear or those needing rapid cooling might require expensive inserts made from materials like beryllium copper.
- More Components: Molds for bottles with handles or special features might have more moving parts (slides or core pulls), adding to the complexity and cost.
3. Can I get a realistic-looking prototype of my complex bottle before I invest in a production mold?
Yes, absolutely. Before committing to a multi-cavity production blow bottle mold, there are several good prototyping options:
- 3D Printing: We can 3D print a model of your bottle. This is excellent for checking the ergonomics, aesthetics, and size, but it won't have the properties of a real PET bottle.
- CNC Machined Model: We can machine a solid model from acrylic or another clear plastic. This gives a better sense of the final clarity and shape.
- Single-Cavity Pilot Mold: This is the best option. We create a single-cavity mold from aluminum. It's less expensive than a full production mold and allows us to use a real bottle blowing machine to produce actual PET bottle samples. This allows you to test everything: wall thickness, strength, and even how it performs on a filling line.
4. What is the minimum production quantity for a custom complex bottle?
This depends heavily on the project's economics. The main cost is the tooling (the preform mold and the blow mold). If a new set of molds has to be created, you will typically need to produce a large volume (often 500,000 to 1,000,000+ bottles) to amortize that tooling cost and make the per-bottle price competitive. However, if you are using a single-cavity pilot mold on a semi-automatic machine for a niche, high-value product, you could potentially do much smaller runs, perhaps in the range of 10,000 to 50,000 bottles. We always work with clients to analyze the business case and find a viable production path.
5. My bottle has a very flat, wide panel. How do you prevent it from being too thin?
This is a classic challenge in asymmetric plastic bottle molding. A large, flat panel requires the preform to stretch a great deal horizontally (high hoop stretch), which naturally thins the material. Here is our multi-step approach:
- Preform Optimization: We would design a preform that is thicker on the side that will form the flat panel. An oval-shaped preform can also help by reducing the stretch distance compared to a round one.
- Differential Heating: In the machine's oven, we would increase the heat on the area of the preform that forms the panel. This makes the material softer and allows it to stretch further more easily. We might simultaneously shield or cool the opposite side to prevent it from stretching too much.
- Process Control: We use a two-stage blowing process. A low-pressure "pre-blow" starts to inflate the bottle slowly, which helps control the initial expansion. This is followed by the full high-pressure blow to set the final shape against the mold. Fine-tuning the timing and pressure of these stages is critical to ensure the panel forms correctly without becoming too thin.
🔗 Learn More about Blow Molding and Complex Bottle Design
Blow Molding – Wikipedia
Describes the blow molding process, including extrusion, injection, and stretch blow molding — essential for creating hollow plastic shapes.Bottle Design – Wikipedia
Explains various structural elements of bottle design such as shape, neck finish, base stability — critical for both aesthetics and function.Thermoforming – Wikipedia
A forming method sometimes compared to blow molding for shaping complex plastic parts, useful in discussing design limitations.Injection Molding – Wikipedia
Relevant when explaining hybrid or two-stage processes where complex features are pre-molded before blowing.Computer-aided Design – Wikipedia
Covers how CAD tools are used to model complex bottle shapes and simulate mold flow before manufacturing.Mold (Manufacturing) – Wikipedia
Provides insights into how molds are made and what design features are feasible or difficult in manufacturing.🔗 Related Pages on Our Website
Automatic Blow Molding Machines – iBottler
Discover our full range of automatic blow molding solutions for PET bottles.Semi-Automatic Blow Molding Machines – iBottler
Ideal solutions for startups and small-scale PET bottle production.
