Struggling to visualize your new bottle design? Worried about costly mistakes after the mold is already made? This uncertainty can delay your entire project and lead to significant financial losses.
You can rapidly validate blow mold designs by using 3D printed bottle samples. This process allows you to hold a physical model of your bottle, checking its shape, size, and feel before committing to expensive and time-consuming mold manufacturing, ensuring the final product meets your exact specifications.

This method sounds simple, but it has completely changed how I help my clients launch new products. It bridges the gap between a great idea and a successful market launch. Let's explore how this initial validation step can save you from major headaches and financial setbacks down the road.
Why does early bottle design validation matter in blow molding projects?
Ever invested heavily in a new blow bottle mold, only to find the final bottle doesn't fit your filling line? It’s a costly and frustrating setback. Early validation helps you avoid these preventable disasters.
Early bottle design validation is crucial because it prevents expensive mistakes. Confirming the design early on avoids incorrect molds, unsatisfactory bottle shapes, and incompatibility with your existing filling and labeling equipment. This foresight saves both time and significant amounts of money.
In my years of experience, I've seen too many projects stumble right before the finish line. A client might love a design on screen, but the physical reality can be very different. The most common issues I see are related to unforeseen structural problems or integration failures. For instance, a beautifully designed bottle might be too weak to withstand carbonation pressure, or its unique shape might not work with the star wheels on the client's conveyor belt. These are not minor hiccups; they can force a complete redesign of the blow bottle mold, costing tens of thousands of dollars and delaying the product launch by months. That's why I always insist on a thorough early validation process. It's not just about aesthetics; it's about functionality and manufacturability. We need to ensure the design is perfect not just on its own, but within the entire production ecosystem.
Key Areas for Early Validation
| Validation Point | Potential Issue if Skipped | Financial Impact | Time Delay |
|---|---|---|---|
| Ergonomics & Feel | Poor consumer experience, awkward grip | High (rebranding/redesign) | Months |
| Aesthetics & Branding | Mismatched label placement, weak shelf appeal | High (re-molding, new labels) | Weeks to Months |
| Structural Integrity | Bottle collapses under pressure or vacuum | Very High (product recall, mold redesign) | Months |
| Production Line Fit | Incompatibility with conveyors, fillers, cappers | Very High (new change parts or mold) | Months |
| Material Distribution | Uneven wall thickness, weak spots | Medium to High (high scrap rate, redesign) | Weeks |
This structured approach to validation transforms the process from a gamble into a calculated, strategic step. It's about investing a small amount of time and money upfront to save a fortune later. By using a 3D printed sample, we can identify and fix these problems before a single piece of metal is cut for the preform mold. It's a fundamental shift from reactive problem-solving to proactive quality assurance.
What can be verified with a 3D printed sample bottle?
You have a perfect design on paper, but how will it actually look and feel? It’s hard to be certain from a 2D drawing. A physical sample is needed to truly assess the design.
With a 3D printed sample bottle, you can verify the physical appearance, including intricate patterns and textures. You can also check the bottle's dimensions, confirm the label application area, and test the ergonomics and grip. This provides tangible feedback, preventing costly mold waste.
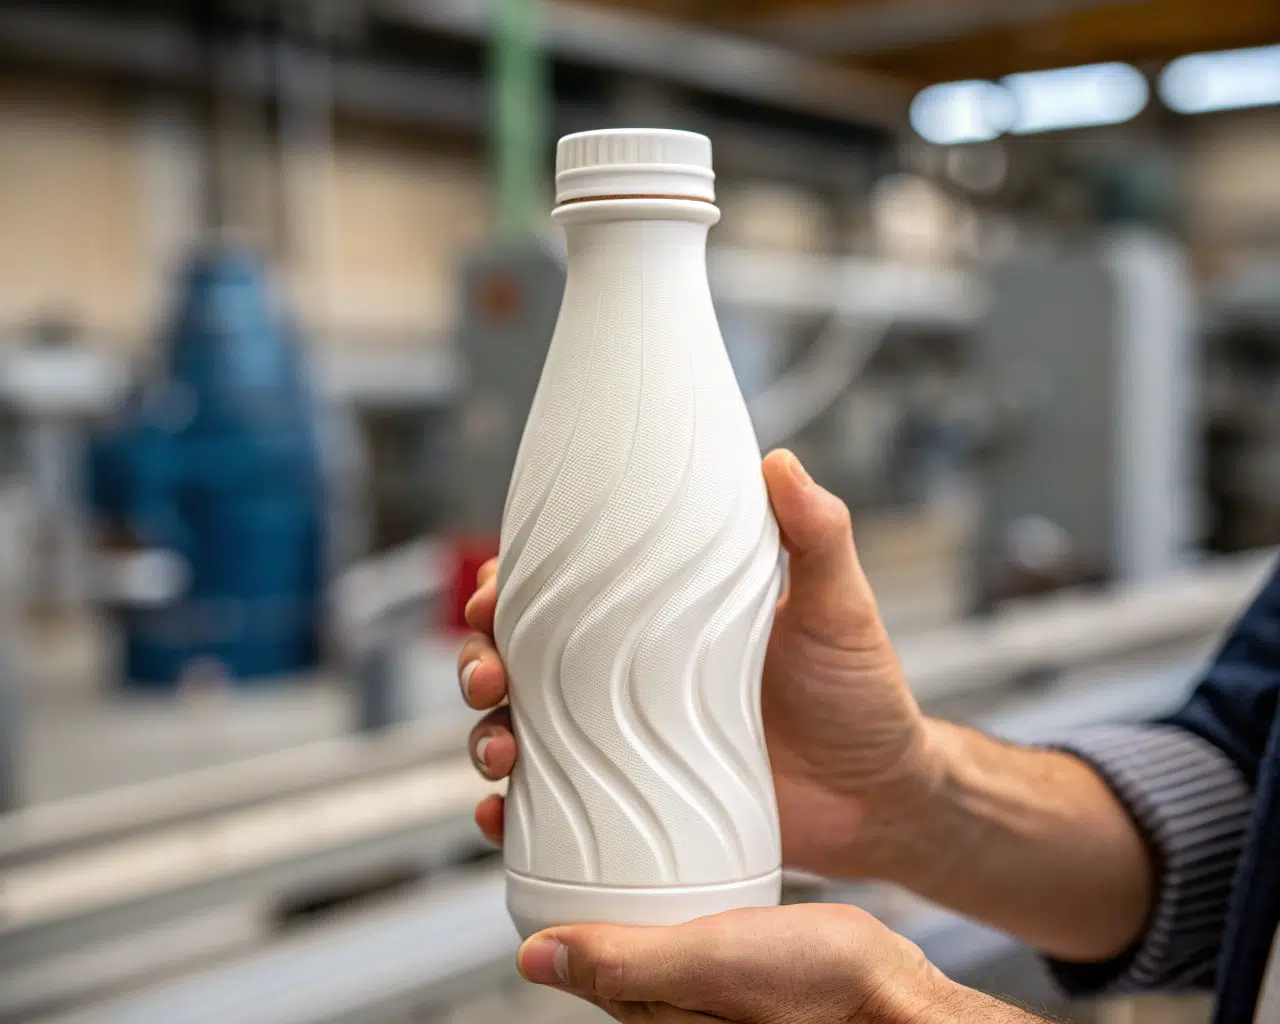
When a client receives a 3D printed sample, it's often a moment of truth. For the first time, they can interact with their concept in the real world. I always encourage them to go through a detailed checklist. First, we look at the overall shape and aesthetics. Does it stand out on the shelf? Do the curves and lines match the brand identity? We check the texture – for example, if the design includes ribs or a stippled pattern, the 3D print will replicate that, allowing the client to feel it. Next, we verify the critical dimensions. We use calipers to measure the height, diameter, and neck finish to ensure they match the technical specifications. This is also the perfect time to test the label. We can apply a sample label to the printed bottle to see how it fits. Does it lie flat? Is it positioned correctly for maximum visibility? The tactile experience, the hand-feel, is another crucial element we can test. How does it feel to hold and use the bottle? Is it comfortable for the target consumer?
Verification Checklist for 3D Samples
| Feature to Verify | Method of Verification | Importance |
|---|---|---|
| Overall Shape | Visual inspection, comparison with drawing | High |
| Surface Details (Ribs, Logos) | Visual and tactile inspection | Medium-High |
| Key Dimensions | Measurement with calipers | High |
| Label Panel | Application of a test label | High |
| Ergonomics (Grip) | Holding and handling the sample | Medium-High |
| Stackability | If applicable, testing how bottles stack | Medium |
A 3D printed sample provides comprehensive feedback on all these aspects. It's a low-cost, high-reward step that takes the guesswork out of the design process before committing to the final blow bottle mold. This early, tangible feedback is invaluable for making informed decisions and ensuring the final product is a success.
How does the 3D bottle sample process work: from drawing to physical sample?
Have a great idea for a bottle but not sure how to make it real? The process of turning a concept into a physical sample can seem complicated. It's actually a straightforward path from imagination to reality.
The process is simple. First, the client provides a design drawing or even a simple hand-drawn sketch. We then create a professional 3D model from that input. Once the client approves the 3D rendering, we print the physical sample and ship it for their review.

I've streamlined this process to be as fast and collaborative as possible. It all starts with the client's vision. Some clients come to me with detailed CAD files. Others, like a recent soda company I worked with, might just have a hand-drawn sketch on a napkin. My job is to take that initial concept and make it manufacturable. The first step is creating a 3D CAD model. My team and I translate the drawing or file into a precise, digital blueprint. We pay close attention to details like wall thickness, neck finish, and draft angles, ensuring the design is suitable for the bottle blowing machine. Once the 3D model is ready, we send renderings to the client for approval. This is an interactive step; we might go through a few revisions to get it just right. After the client signs off on the digital design, we move to the 3D printer. Using industrial-grade printers, we can create a high-fidelity physical sample in a matter of hours. The final step is shipping this sample directly to the client. Typically, a client can have a physical prototype in their hands within 3-5 days from our initial conversation.
Typical Timeline: Drawing to Sample
| Stage | Action | Duration |
|---|---|---|
| 1. Concept Submission | Client provides sketch, drawing, or idea | - |
| 2. 3D Modeling | We create a manufacturable 3D CAD model | 1-2 days |
| 3. Design Review | Client reviews renderings and provides feedback | 1 day |
| 4. 3D Printing | We print the physical sample bottle | 1 day |
| 5. Shipping | Express shipping to the client | 1-3 days |
| Total | 4-7 days |
This rapid turnaround is a game-changer. It allows for quick iterations and decision-making, accelerating the entire product development timeline without compromising on the quality of the final blow bottle mold.
What are the limitations of 3D printed bottles compared to real PET bottles?
A 3D printed sample is an amazing tool, but it's not a real bottle. Understanding its limitations is key to using it effectively. Confusing a prototype with a production part can lead to flawed testing.
The main limitation is that 3D printed bottles are for visual and ergonomic assessment only. They cannot withstand pressure or be used for liquid filling tests like a real PET bottle. However, their advantage lies in being a much faster and cheaper way to confirm the design's appearance.
I always make it very clear to my clients what a 3D printed sample can and cannot do. It's a fantastic replica for visual and tactile purposes, but it's not made of PET. The materials used in 3D printing, typically resins or plastics like PLA, don't have the same properties. They are more brittle and cannot handle the internal pressure required for carbonated beverages, nor can they withstand the heat of a hot-fill process. So, you can't perform tests like pressure resistance, drop tests, or shelf-life stability analysis on them. These crucial tests must be done later with actual bottles produced from the final blow bottle mold. The primary purpose of the 3D print is to be a design validation tool, not a functional prototype. Its strength is in speed and cost-effectiveness. For a few hundred dollars and a few days' wait, a client can avoid a potential fifty-thousand-dollar mistake on a mold.
3D Printed Sample vs. Production PET Bottle
| Feature | 3D Printed Sample | Production PET Bottle |
|---|---|---|
| Material | PLA, Resin, etc. | Polyethylene terephthalate (PET) |
| Purpose | Visual & Ergonomic Validation | Functional Use & Sale |
| Cost | Low ($30 - $80) | High (Requires full mold tooling) |
| Speed | Fast (2-4 days) | Slow (3-5 weeks for mold) |
| Pressure Test | No | Yes |
| Filling Test | No | Yes |
| Clarity | Opaque or Translucent | Typically Transparent |
Understanding this distinction is vital. We use the 3D sample to perfect the form and feel. Once the client is 100% satisfied with the physical design, we then move on with confidence to create the tooling needed to produce the fully functional PET bottles with the right bottle blowing machine.
How do you transition from a 3D sample to blow mold manufacturing?
You've approved the 3D printed sample and love it. What's the next step? Moving from a plastic prototype to a production-ready steel mold can seem like a big leap, but it's a direct and efficient process.
Once the 3D sample is approved, we use the exact same 3D CAD data to design and manufacture the production tooling. This includes the preform mold and the final blow mold. This direct conversion ensures a perfect match and significantly shortens the overall production timeline.
This is where the magic of a digital workflow really shines. The approved 3D model of the bottle serves as the master blueprint for everything that follows. There is no guesswork or re-interpretation. My engineering team takes that exact file and uses it to design the two critical components of production: the preform and the blow mold. First, we design the preform. This is the small, test-tube-shaped piece of plastic that will be inflated into the final bottle. Its design is critical for ensuring proper material distribution in the final product. The data from the bottle model tells us exactly how much plastic is needed and where it should be thickest. We then design the preform mold to produce these preforms in mass quantities. Simultaneously, we design the final blow bottle mold. This is the cavity that shapes the inflated preform into the bottle. Because we are using the same source data that the client approved, the fidelity is 100%. The curves, the logo embossing, the label panel—every detail from the 3D sample is precisely machined into the steel or aluminum of the mold.
The Digital Thread: From Sample to Production
| Process Step | Input Data | Output | Benefit |
|---|---|---|---|
| 1. 3D Sample | Approved 3D Bottle Model | Physical Prototype | Design Validation |
| 2. Preform Design | Approved 3D Bottle Model | 3D Preform Model | Optimized Material Use |
| 3. Preform Mold Mfg. | 3D Preform Model | Steel Preform Mold | Mass Production of Preforms |
| 4. Blow Mold Mfg. | Approved 3D Bottle Model | Steel/Aluminum Blow Mold | Mass Production of Bottles |
This seamless transition eliminates the risk of errors that can occur when data is transferred or redrawn between stages. It dramatically shortens the lead time from design approval to the first production run. By validating with a low-cost sample first, the significant investment in the production molds is made with complete confidence.
Can you share a case study, like the custom soda bottle project?
Theory is great, but real-world results are what matter. A client in Egypt needed to launch a new soda line, and they were in a hurry. This is a perfect example of how our process turns urgency into a competitive advantage.
Yes. A soda client from Egypt gave us only a hand-drawn sketch and needed a fast launch. We delivered a 3D printed sample in 3 days. After their quick approval, we produced the molds. The first bottle samples were ready in 20 days, enabling a full production launch in just 40 days.

I remember this project vividly. The client, a well-known beverage company in Egypt, was launching a new line of fruit-flavored sodas. They were under immense pressure to get to market before a competitor. Their marketing team had a clear vision, but all they had was a hand-drawn sketch of the bottle. They initially wanted to go straight to making a blow bottle mold, to see the final effect. I knew this was risky and could lead to delays if they weren't happy with the result. I convinced them to try the 3D sample process first. "Let's invest three days to save a potential thirty," I told them. They agreed. My team and I worked overnight to turn their sketch into a professional 3D model. We focused on the unique striped texture they wanted and made sure the label area was perfectly sized. Within 72 hours, the 3D model was approved, printed, and on a plane to Egypt. The client was thrilled. Holding the physical sample, they could test the label placement and feel the grip. It gave them the confidence to say "go." From that approval, we launched into manufacturing the preform mold and blow mold. Just 20 days later, the first real PET bottle samples from the new mold were ready. Within 40 days from that initial sketch, their entire production line, using a new bottle blowing machine, was up and running.
Project Timeline: Egyptian Soda Brand
| Milestone | Action | Duration |
|---|---|---|
| Day 1 | Client provided hand-drawn sketch | - |
| Day 3 | 3D printed sample delivered and approved | 3 Days |
| Day 20 | First bottle samples from new mold produced | 17 Days |
| Day 40 | Full production line operational | 20 Days |
| Total | 40 Days |
This case perfectly illustrates the power of rapid validation. We eliminated the uncertainty, saved them from a potentially costly and time-consuming mold rework, and helped them beat their competition to the market.
What are some common mistakes to avoid when using 3D bottle samples?
Using 3D samples is a powerful strategy, but it's not foolproof. I've seen a few common oversights trip people up. Being aware of these potential mistakes ensures you get the most value from your prototype.
Common mistakes include ignoring technical details like the preform's neck finish, which affects capping. Also, forgetting the exact label height requirements and the difference in appearance between a matte 3D print and a glossy final PET bottle can lead to surprises during production.
A 3D printed sample is an excellent representation of form, but you can't forget the underlying technical requirements of manufacturing. I guide my clients to look beyond just the shape. One of the most critical, yet often overlooked, details is the neck finish. The sample might look great, but if the neck finish specification in the CAD file is wrong, the final bottles won't seal properly with the chosen caps. This would be a disaster for production. Another common issue is label planning. We can test the label area on the sample, but we must also account for the specifications of the labeling machine. How much vertical tolerance does it have? Is the bottle surface smooth enough for adhesion? I also constantly remind clients about the material difference. A 3D print is often opaque with a matte finish. A final PET bottle is usually crystal clear and glossy. This can affect how light interacts with the bottle and how the final product color appears. We have to mentally bridge that gap, or even use renderings to simulate the final look.
Common Pitfalls and How to Avoid Them
| Mistake | Consequence | How to Avoid |
|---|---|---|
| Ignoring Neck Finish | Capping failure, leaks | Double-check the neck finish standard (e.g., PCO1881, 28mm) in the CAD file before printing. |
| Inaccurate Label Sizing | Wrinkled or misplaced labels | Get the exact label specs from your supplier and verify them on the sample and in the CAD model. |
| Forgetting Material Sheen | Unexpected final appearance | Review high-quality digital renderings that simulate PET clarity and glossiness alongside the physical sample. |
| Overlooking Draft Angles | Mold release issues | Trust your engineering partner to build proper draft angles into the manufacturable 3D model. |
By being meticulous about these technical details during the 3D sample review stage, we ensure that the transition to the bottle blowing machine and full-scale production is smooth and predictable. It’s about using the sample as one part of a comprehensive validation, not the only part.
What do we offer as a complete package?
Navigating the journey from an idea to a filled bottle on a shelf involves many steps. Trying to manage multiple vendors for design, samples, molds, and machinery can be a complex and frustrating puzzle.
We offer a complete, integrated service package. This includes a free drawing review, the 3D printed sample service, custom preform mold and blow mold design, and a perfectly matched bottle blowing machine. We manage the entire process for you from start to finish.
My goal is to make the entire process of launching a new bottle as simple and seamless as possible for my clients. That's why I've structured our services as a complete, end-to-end solution. It starts with your idea. We offer a free review of your initial drawings or concepts, providing expert feedback on manufacturability before you even spend a dollar. From there, we move to the 3D sampling process we've discussed. Once you approve the sample, my team designs and manufactures the high-quality, custom tooling you need: both the preform mold and the final blow mold. But we don't stop there. A mold is only as good as the machine it runs in. We also help you select the ideal bottle blowing machine for your specific bottle design, production volume, and budget. By providing the entire package, we ensure that every component is perfectly compatible. The mold is designed for the machine, and the machine is optimized for the mold. This eliminates the finger-pointing that can happen when you work with separate suppliers.
Our Integrated Service Solution
| Service Component | What You Get | Key Benefit |
|---|---|---|
| Free Drawing Review | Expert feedback on your initial design's feasibility. | Avoids fundamental design flaws from the start. |
| 3D Sample Service | A physical prototype of your bottle in just a few days. | Tangible validation before major investment. |
| Custom Mold Design | High-performance blow bottle mold and preform molds. | Guarantees quality and optimal production cycles. |
| Machine Pairing | Selection and provision of the ideal blow molding machine. | A fully compatible, optimized production system. |
| Project Management | A single point of contact and responsibility for the entire project. | Simplicity, accountability, and faster time-to-market. |
This all-in-one approach saves my clients time, reduces complexity, and ultimately provides them with the peace of mind that their project is in experienced hands from concept to completion.
Conclusion
Ultimately, using 3D printed samples transforms bottle design from guesswork into a precise, fast, and low-risk process, ensuring your vision becomes a successful product without costly surprises.
Frequently Asked Questions (FAQ)
1. How much does a 3D printed bottle sample typically cost?
The cost can vary depending on the size and complexity of the bottle, but generally, a single sample costs between $30 and $80. This is a very small investment compared to the cost of modifying or remaking a steel production mold, which can be tens of thousands of dollars.
2. Can the 3D printed sample be made in different colors?
Yes, while the standard is often a neutral white or gray to focus on form, we can print samples in various colors. However, it's important to remember the material is opaque, so it won't replicate the transparency or color effect of a final PET bottle. It's mainly for aesthetic and branding color checks.
3. What is the most critical information I need to provide to start the 3D sample process?
The most critical pieces of information are a drawing or sketch of the bottle shape, the desired bottle volume (e.g., 500ml), and the specific neck finish standard you will be using for your cap. This ensures we can create a model that is not only visually accurate but also technically manufacturable.
4. How long does a production blow mold last?
A high-quality blow mold, properly maintained, can last for millions of cycles. Molds made from aircraft-grade aluminum are excellent for speed and cost, typically lasting for 3-5 million cycles. For extremely high-volume, long-term production, molds made from steel can last for 10 million cycles or more. The choice depends on your project's lifespan and volume.
5. If I approve the 3D sample, are there any other checks before making the final mold?
Yes. After you approve the physical 3D sample, we finalize the 2D and 3D engineering drawings for the production molds. We will send these detailed blueprints to you for a final technical sign-off. This final check confirms all critical dimensions, tolerances, and specifications before we begin cutting steel, ensuring complete alignment.
🔗 Learn More about 3D Bottle Prototyping and Related Technologies
3D Printing – Wikipedia
Explains the additive manufacturing technology used for rapid bottle sample creation during early-stage product development.Rapid Prototyping – Wikipedia
Describes methods used to quickly fabricate a scale model or functional prototype of a part or product.Computer-aided Design – Wikipedia
Covers the use of CAD software to create and simulate bottle shapes before moving to mold production.🔗 Related Pages on Our Website
Automatic Blow Molding Machines – iBottler
Discover our full range of customizable automatic PET bottle blow molding machines.Blow Bottle Mold – iBottler
Explore our precision blow molds designed for PET and PP bottles.Preform Mold – iBottler
Learn more about our high-precision preform molds suitable for various injection molding machines.Industrial Design – Wikipedia
Discusses the process of designing products for function, form, and manufacturability — relevant to bottle aesthetics and usability.Bottle Design – Wikipedia
Provides context on bottle structure, material considerations, and features — all of which impact 3D sampling effectiveness.
