Have you ever considered that a tiny line on a bottle could save you hundreds of thousands of dollars? A poorly defined fill line can lead to legal issues and massive financial losses.
The fill line on a PET bottle indicates the target height for the liquid to reach the labeled net content. It is not the total volume of the container. Getting this line right is crucial for ensuring legal compliance with net content regulations and maintaining product quality and structural integrity during filling, capping, and transport.
I've seen firsthand how a simple oversight in bottle design can spiral into a costly disaster. A client of mine almost learned this the hard way. They were launching a new juice drink and didn't specify the fill line volume, assuming the labeled volume was the bottle's total capacity. This misunderstanding could have led to a massive recall and regulatory fines. Luckily, we caught it in the design phase. This experience highlighted just how critical understanding every detail of bottle design is, from the initial sketch to the final product on the shelf. Let's dive into how to get it right.
What Is a Fill Line in PET Bottle Design and Why Is It So Important?
Are you struggling to define the correct volume for your new bottle? It’s a common problem where confusion between total capacity and actual fill volume can cause significant issues down the line.
A fill line, or fill level, is a specific height marking in a PET bottle design. It shows the exact level the liquid should reach to ensure the volume inside matches the net content stated on the label. This is not the same as the bottle's total or overflow capacity.

When I start a new bottle design project with a client, one of the first questions I ask is, "Are you looking for the overflow (brimful) volume or the fill line volume?" Many clients initially say "either is fine," but this is a critical mistake. The volume noted on your technical drawing dictates everything. A fill line is a non-negotiable parameter for any beverage product. Its importance can be broken down into three key areas:
1. Ensuring Legal and Commercial Compliance
The net content printed on your product's label is a legal promise to the consumer. Regulators have strict rules about this. If you label a bottle as "600ml," the actual liquid volume inside must be at least 600ml. If a random inspection finds your bottles contain less than the stated amount, you face serious consequences, including product recalls, hefty fines, and damage to your brand's reputation. My Singaporean client faced this exact nightmare. His previous supplier designed a 600ml bottle based on the overflow volume. When he filled to a practical level below the cap, the actual content was only 550ml. This discrepancy made his product non-compliant. He had already printed three million labels stating "600ml." The potential loss was enormous. He had to scrap the labels and delay his product launch by a month while we re-engineered the blow bottle mold to increase the capacity.
2. Maintaining Production Efficiency and Consistency
On a high-speed production line, every second counts. The filling machines are calibrated to dispense a precise volume of liquid. This calibration relies on a consistent fill level. A clearly defined fill line in the bottle design ensures that every bottle filled by the bottle blowing machine and sent to the filler receives the correct amount of product. This prevents costly overfilling (wasting product) and under-filling (legal issues). The design must also account for a headspace—the empty space between the liquid and the cap. This headspace is vital for:
- Pressure Changes: It allows the product to expand or contract with temperature changes during shipping and storage without leaking or deforming the bottle.
- Shaking: For products that need to be shaken, headspace is essential.
- Capping: It prevents the product from spilling during the high-speed capping process.
3. Upholding Product Quality and Consumer Experience
The visual appearance of a product on the shelf influences a customer's purchasing decision. An inconsistent fill level across a row of bottles looks unprofessional and can make customers question the product's quality. A properly designed fill line ensures a uniform appearance, reinforcing brand trust. The position of the fill line also affects the bottle's structural integrity. Placing it correctly in relation to the bottle's support ring and shoulder design helps maintain stability and prevents the bottle from deforming under pressure.
| Aspect | Why the Fill Line is Critical | Potential Consequences of a Poorly Defined Fill Line |
|---|---|---|
| Legal | Ensures the actual liquid volume matches the labeled net content. | Fines, product recalls, legal action for "short-changing" customers. |
| Financial | Prevents product waste from overfilling and financial penalties from under-filling. | Loss of profit, costs of re-labeling or re-molding, delayed product launch. |
| Operational | Allows for accurate calibration of filling equipment for consistent production. | Production line stoppages, inconsistent product quality, equipment adjustments. |
| Structural | Provides necessary headspace for pressure changes and capping. | Bottle leakage, deformation during transport, capping failures. |
| Marketing | Creates a uniform, professional appearance on the retail shelf. | Negative brand perception, loss of consumer trust. |
Why Must the Net Content on the Label Be Less Than the Actual Fill Volume?
Worried about your product label being non-compliant? You should be. Stating an exact fill volume that matches the brimful capacity is a recipe for legal and financial disaster, a common trap for newcomers.
The net content on your label must be slightly less than the bottle's practical fill capacity to provide a safety margin. This buffer accounts for minor variations in the filling process and ensures that every single bottle sold contains at least the volume promised to the consumer.
The core principle here is consumer protection. Laws governing weights and measures are designed to ensure customers get what they pay for. If you sell a beverage labeled "750ml," you are legally bound to deliver 750ml of product, not 749ml. Production lines, even the most advanced ones, have slight tolerances. The volume dispensed can fluctuate minimally due to temperature, product viscosity, or machine calibration drifts.
To avoid falling foul of the law, designers and manufacturers intentionally create a bottle with a fill volume slightly larger than the labeled volume. This is standard practice in the industry. For example, for a 750ml labeled product, we might design the bottle so that the target fill line actually corresponds to 753ml. This small, 3ml buffer ensures that even with minor negative fluctuations in the filling process, the final volume in the bottle will never drop below the legally required 750ml.
Let's break down the reasons why this is not just a good idea, but an absolute necessity:
The Reality of High-Speed Filling
Imagine a bottle blowing machine producing thousands of bottles per hour, which are then immediately sent to a rotary filler.
- Dispensing Tolerance: No filling nozzle is perfect. There will always be a tiny variance, perhaps ±1% or less. For a 750ml fill, this could mean a variance of several milliliters.
- Product Foaming: Carbonated drinks or foamy products can make it difficult to measure the liquid volume accurately in real-time. The foam can trigger sensors prematurely.
- Temperature Effects: Liquids expand when warm and contract when cool. A product filled warm might have a lower volume once it cools on the shelf. The design must accommodate this.
By targeting a fill volume slightly above the label claim, you build a buffer that absorbs these variations. This practice protects you from a scenario where a batch of your product is found to be underweight, which could trigger a costly recall. The story of my Singaporean client is a perfect illustration. His initial 600ml bottles were brimful at 600ml. There was no margin for error. Any practical fill level would be under the labeled amount. He was forced to relabel to 550ml, which felt like a "cheat" to the consumer and cost him dearly in discarded labels and delayed market entry. The correct approach, which we implemented for his new 750ml bottle, was to design the bottle so that the fill line at a practical height (10mm below the support ring) corresponded to a volume of 755ml, providing a safe and compliant buffer. A reliable blow bottle mold is essential for producing bottles with consistent volume, which is the foundation of accurate filling.
| Reason for Buffer | Technical Challenge | How a Volume Buffer Helps |
|---|---|---|
| Filling Tolerance | Machines have a small +/- variance in dispensed volume. | Ensures that the lowest possible fill volume in a production run still meets the label claim. |
| Product Characteristics | Foaming, viscosity, and carbonation can affect filling accuracy. | Provides space to manage foam and ensures the final liquid volume is correct after settling. |
| Thermal Expansion | Liquid volume changes with temperature (e.g., hot-fill products). | Accommodates contraction as the product cools, preventing the final volume from dropping below the net content. |
| Legal Compliance | Strict regulations against selling underweight products. | Creates a safety margin to guarantee compliance and avoid fines or recalls. |
Fill Volume vs. Overflow (Brimful) Volume: What’s the Difference in Design?
Are you confused about which volume specification to use for your bottle design? Using the wrong one can derail your project, leading to a bottle that can't be properly filled or sealed.
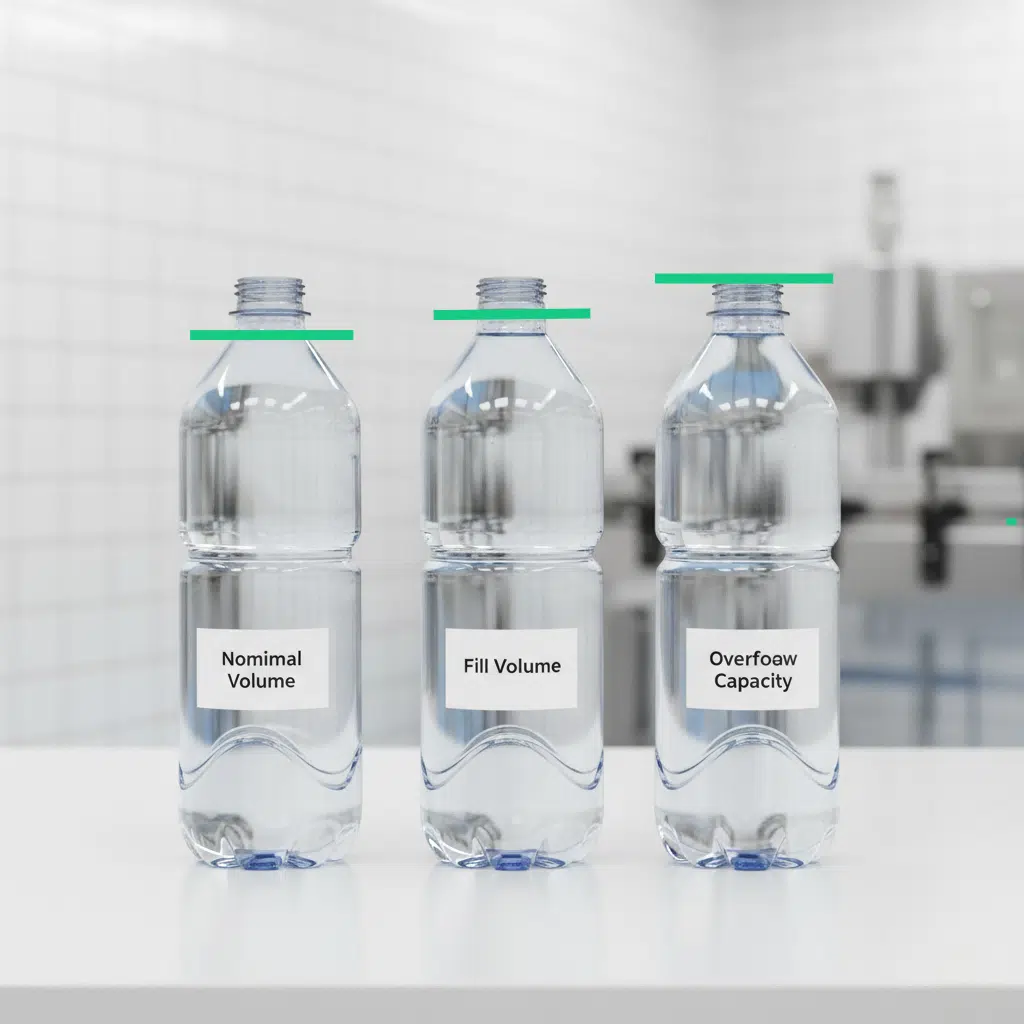
Fill volume is the target amount of liquid for production, corresponding to the fill line. Overflow volume (or brimful capacity) is the absolute maximum liquid the bottle can hold when filled to the very top. These two parameters are distinct and serve different purposes in the design process.
In my experience, this is the most common point of confusion for clients new to bottle development. They provide a single volume number, like "500ml," without specifying what it refers to. As a designer, I must clarify this immediately. Using the overflow volume for your label claim is a fundamental error. The overflow volume is a technical specification for the mold designer and engineer; it is not a number for the consumer or the filling line operator.
Let's dive deeper into why this distinction is so critical for a successful project.
The Role of Overflow (Brimful) Volume
The overflow volume represents the total internal capacity of the container. It's a crucial parameter for the person designing the preform mold and the final blow bottle mold. This value helps determine the precise amount of PET material needed in the preform and the final wall thickness distribution of the blown bottle. It's a quality control check for the bottle itself. For instance, we might specify that the overflow volume of a particular bottle design must be 530ml ± 5ml. This tells us if the bottle blowing machine is operating correctly and if the bottles are being formed to the correct specification. However, you can never actually fill a bottle to its overflow capacity on a production line. Doing so would leave no headspace, making capping impossible without spilling product and creating a high risk of leakage later on.
The Role of Fill Volume
The fill volume is the practical, commercial, and legal volume. This is the number that goes on your label and the volume your filling equipment is set to dispense. It's determined by the desired fill line height. The space between the fill line and the top of the bottle's neck is the headspace. This headspace is not wasted space; it's a functional feature that is essential for:
- Product Safety: In hot-fill applications, the headspace allows a vacuum to form as the product cools, which helps seal the cap and preserve the product. For carbonated beverages, it provides room for the gas.
- User Convenience: It prevents the drink from spilling when the consumer opens it.
- Process Integrity: It ensures a clean capping process without contaminating the sealing surface of the neck finish.
When my new client for the 750ml juice bottle came to me, we started by defining the fill volume first. He needed to label it "750ml." Based on that, we worked backward. We established that the fill line should be 10mm below the support ring for aesthetic and structural reasons. Then, using 3D CAD software, we designed the bottle's internal shape to ensure that the volume at that specific 10mm height was precisely 755ml, providing that crucial safety buffer. The final overflow capacity of the bottle ended up being around 790ml.
| Parameter | Definition | Primary Use | Who Uses It? | Example (for a 750ml product) |
|---|---|---|---|---|
| Fill Volume | The target volume of liquid in the bottle, corresponding to the fill line. | Production, labeling, legal compliance. | Brand Manager, Filling Line Operator, Quality Control | 755 ml |
| Net Content | The volume stated on the product label. | Marketing, sales, legal declaration. | Consumer, Regulator | 750 ml |
| Headspace Volume | The volume of empty space between the fill line and the cap. | Product integrity, safety, capping process. | Packaging Engineer, Production Manager | ~35 ml |
| Overflow Volume | The total internal volume of the bottle when filled to the brim. | Mold design, bottle manufacturing QC. | Mold Designer, Bottle Production QC | ~790 ml |
What Is the Recommended Fill Line Position?
Are you unsure where exactly to place the fill line on your bottle design? Placing it too high or too low can affect capping, visual appeal, and even the stability of the bottle itself.
While the exact position can vary with bottle design, a common industry guideline is to place the fill line approximately 10mm to 12mm below the bottle's support ring. This position typically offers a good balance between filling accuracy, structural integrity, and aesthetics.
The support ring (or neck ring) is the prominent flange on the neck of the PET bottle. It's the feature that the bottle blowing machine and other downstream equipment (like fillers and cappers) use to grip and transport the bottle. Its position is standardized, making it an excellent reference point for other critical dimensions, including the fill line. While 10-12mm is a strong starting point, the optimal position depends on a careful consideration of several factors.
Why 10-12mm Below the Support Ring?
This recommendation is based on a blend of practical engineering and visual design principles:
- Avoiding the "Contact Zone": The area immediately under the support ring is a high-stress area. It's where the bottle is handled mechanically during production. Placing the fill line lower avoids any potential interference with these handling mechanisms and minimizes stress on the bottle structure at the liquid's surface.
- Structural Integrity: The shoulder area of the bottle, which begins just below the neck, is a complex geometric shape. The transition from the narrow neck to the wider body is a point of potential weakness. Filling into the cylindrical part of the body, below the complex curves of the shoulder, generally provides better stability and resistance to pressure changes.
- Visual Aesthetics: A fill line that is too high can make the bottle look overfilled or "choked." A line that is too low can make it look under-filled or cheap. The 10-12mm position usually aligns well with the start of the bottle's main body, creating a visually pleasing and balanced look. It gives a sense of a full, generous product without looking strained.
- Capping and Sealing: This position ensures ample headspace. When the cap is applied, especially with force, it can displace a small amount of air and even product. Sufficient headspace prevents the liquid from being forced up into the threads of the cap, which could compromise the seal and lead to leaks.
For the 750ml juice bottle project I mentioned, I recommended we set the fill line at 10mm below the support ring. Before finalizing the production blow bottle mold, I created a pilot mold first. This allowed us to produce about 100 sample bottles. The client took these samples back to his facility and ran them through his actual filling line. This real-world test confirmed that the 10mm position worked perfectly with his equipment. The bottles looked great, filled consistently, and sealed without any issues. This small step of creating test samples saved us from potential problems and gave the client complete confidence before committing to the expensive production tooling. The design of the preform mold is also linked to this, as it determines the material distribution that forms this critical neck and shoulder area.
| Factor | Reason for the 10-12mm Recommendation | What Happens if the Fill Line is Too High? | What Happens if the Fill Line is Too Low? |
|---|---|---|---|
| Production Handling | Keeps the liquid surface away from mechanical grippers. | Potential interference with equipment, splashing. | No direct production issue, but affects other factors. |
| Structural Stability | The liquid is contained in the stronger, cylindrical part of the body. | Increased pressure on the weaker shoulder curves. | Can be less stable if the bottle has a high center of gravity. |
| Aesthetics | Looks balanced and full, not cheap or over-stuffed. | Can look "choked" or about to spill. | Can look "stingy" or partially empty. |
| Capping/Sealing | Provides sufficient headspace for a clean, secure seal. | Product can get into the cap threads, causing leaks. | Excessive headspace, which can be negative for some products (e.g., wine). |
How Does Bottle Shape Affect Liquid Level Perception and Actual Volume?
Have you ever noticed how two bottles with the same volume can look drastically different in size? The shape of a PET bottle plays a huge role in how customers perceive the amount of product and how the volume is actually distributed.
Different bottle shapes, including shoulder types, body diameters, and curvatures, create distinct visual impressions of the liquid level. A tall, slender bottle may appear to have more product than a short, wide bottle, even if their net content is identical. This is a key factor in marketing and design.
As a designer, my job is not just to make a bottle that holds a certain volume but also to create a shape that communicates the right message for the brand. The interplay between the actual, calculated volume and the perceived volume is a fascinating area of packaging psychology. A misjudgment here can lead to a bottle that looks empty on the shelf or one that is difficult to fill accurately.
Let's explore how specific design elements influence this perception and the real-world technical implications.
The Impact of Shoulder and Body Design
The geometry of the bottle has a direct and sometimes non-intuitive effect on volume.
- Shoulder Angle: A bottle with a steep, sharp shoulder will have a very different volume distribution compared to one with a long, sloping shoulder. With a sloping shoulder, a small change in fill height can result in a large change in volume. This can make the filling process less forgiving and require tighter control.
- Body Shape (Cylindrical vs. Square): A simple cylindrical bottle is the easiest to calculate and has a linear relationship between fill height and volume in its main body. A square or rectangular bottle is more complex. The corners contain "extra" volume. Visually, a square bottle can often look larger and more substantial than a round bottle of the same volume. However, they are often harder to produce with consistent wall thickness, which is a challenge for the blow bottle mold design.
- Waist/Grip Area: Many bottles have an indented "waist" or grip area. This feature dramatically changes the volume calculation. The volume per millimeter of height is much lower in this section than in the main body. This can be used creatively in design, but it must be accurately modeled in the 3D software to ensure the final fill volume is correct.
During the design phase for a new water bottle recently, the client wanted a very sleek, modern look with a sharp, high shoulder. In the 3D model, we discovered that the fill line needed to be placed very precisely. Because the shoulder was so steep, even a 1mm change in the fill height resulted in a significant 5ml volume difference. This meant the client's filling machine needed to be exceptionally precise. We advised them on this and adjusted the preform mold design to ensure better material distribution in that critical shoulder area, improving consistency from the bottle blowing machine.
| Bottle Shape Feature | Visual Perception Effect | Technical Implication for Volume |
|---|---|---|
| Tall, Slender Body | Appears to hold more liquid; looks elegant or premium. | Small changes in diameter have a large impact on volume. Can have a higher center of gravity. |
| Short, Wide Body | Looks stable and substantial; can convey value. | Larger volume change per mm of height, potentially more forgiving for fill level. |
| Sloping Shoulders | Creates a soft, organic look. | Non-linear volume change in the shoulder area; requires precise filling control. |
| Square/Rectangular Body | Looks larger and more modern; provides flat panels for labeling. | Complex volume calculation. Wall thickness in corners is a key challenge for molding. |
| Indented Grip Area | Provides ergonomic handling. | Creates a section with a much lower volume-to-height ratio. Must be accurately modeled. |
How Can You Accurately Calculate Volume at a Given Fill Height?
Are you relying on guesswork to determine your bottle's volume? An inaccurate calculation at the design stage can lead to costly mold modifications and production delays. This is not a place for estimation.
The most reliable way to calculate the灌装容量 (g_uànzhuāng róngliàng - fill volume) at a specific fill height is through a combination of 3D CAD modeling, simulation analysis, and physical verification with filled samples. This multi-step process ensures precision before committing to mass production.
In the old days, designers might have used mathematical approximations or even filled physical models with water to measure volume. Today, technology allows for incredible accuracy right from the computer screen. When a client gives me a concept, the first thing we do is build it in a professional 3D CAD program like SolidWorks or CATIA. This is where the science of volume control really begins.
This meticulous, multi-stage approach is the only way to guarantee that the bottle you produce is the bottle you designed.
Stage 1: 3D Design and Volume Analysis
This is the foundation of accurate volume control. Once we have a 3D model of the bottle, the software can perform a precise volume analysis.
- Define the Fill Plane: We create a flat plane within the 3D model that represents the liquid surface. This plane is positioned at the exact desired fill height (e.g., 10mm below the support ring).
- Calculate Internal Volume: The software then calculates the volume of the internal space of the model below this plane. This gives us an extremely accurate theoretical fill volume.
- Iterate and Adjust: If this calculated volume is not what we need (e.g., we are targeting 755ml but the model gives us 751ml), we can make tiny adjustments to the bottle's shape—perhaps increasing the diameter by a fraction of a millimeter—and re-run the analysis instantly. We repeat this process until the volume in the 3D model is perfect.
Stage 2: Simulation of the Blowing Process
This is a more advanced step that I often recommend for complex shapes or lightweight bottles. The 3D model assumes a perfect bottle. In reality, the bottle is formed in a bottle blowing machine from a heated preform. The material stretches and thins differently in different parts of the bottle. Simulation software can predict how the PET material will be distributed in the final bottle. This can reveal if certain areas will be too thin, and it can also predict how the bottle might shrink or deform slightly after molding and cooling. This predicted final shape, which is more realistic than the initial CAD model, can then be used for a more accurate volume analysis. This data is critical for refining the preform mold and the blow bottle mold design.
Stage 3: Pilot Mold and Physical Verification
This is the ultimate test. As I did with my Singaporean client, creating a single-cavity pilot mold is a crucial risk-reduction step.
- Produce Samples: We produce a small batch of actual bottles (50-100 units).
- Conduct Fill Tests: The client takes these samples and fills them with their actual product, on their actual filling line, to the specified fill height.
- Measure and Confirm: They then use laboratory-grade equipment (like a graduated cylinder or a precision scale) to measure the volume of the liquid in the bottles. This real-world data is used to confirm that the design and calculations are correct. If any minor discrepancies are found, a final adjustment can be made to the production mold design before the full, multi-cavity tool is manufactured. This step provides the final sign-off and complete peace of mind.
What Are Common Mistakes When Defining Fill Lines in Bottle Drawings?
Is your technical drawing for your PET bottle clear and unambiguous? A poorly specified drawing is a primary source of error, leading to confusion between the designer, the mold maker, and your production team.
Common mistakes in bottle drawings include only marking a target volume without a specific height, failing to provide tolerances, or not clearly distinguishing between fill volume and overflow capacity. These omissions create risks and can lead to costly errors.

I've reviewed hundreds of bottle drawings from various sources, and the same mistakes appear time and again. A technical drawing is a contract. It's the single source of truth for the preform mold maker and the factory running the bottle blowing machine. Ambiguity on this document is not just unprofessional; it's dangerous. Let’s look at the most frequent and damaging errors I see.
Mistake 1: Specifying Volume Without a Height
This is perhaps the most common error. The drawing might have a note that says "Fill Volume: 500ml," but it doesn't show where in the bottle that 500ml level is. This leaves the interpretation up to the mold maker. They might assume a visually pleasing level, but this may not work with your filling machine's nozzles or create the headspace you need.
- The Fix: Always include a clear dimension on the drawing. A line should point to the fill level, and there should be a precise vertical measurement from a fixed reference point, like the top of the bottle or the bottom of the support ring (e.g., "Fill line is 10mm below support ring").
Mistake 2: Only Stating the Overflow (Brimful) Volume
This is the mistake my Singaporean client's first supplier made. The drawing only noted "Volume: 600ml," which the mold maker correctly interpreted as the brimful capacity. The client, however, assumed this was the fill volume. The result was a bottle that was physically incapable of being filled to the labeled volume in a production setting.
- The Fix: The drawing must clearly label both volumes. It should state "Overflow Volume: 635ml ± 5ml" and separately "Target Fill Volume: 600ml at fill line reference."
Mistake 3: Forgetting to Include Tolerances
No manufacturing process is perfect. A drawing that specifies a volume of "500ml" is not realistic. There will always be slight variations. Professional drawings include tolerances for all critical dimensions and volumes.
- The Fix: Specify an acceptable range. For overflow volume, you might write "530ml ± 5ml." This tells the bottle manufacturer that any bottle with a brimful capacity between 525ml and 535ml is acceptable. This is a key quality control parameter for the blow bottle mold performance.
A Table of Drawing "Don'ts" and "Do's"
To make it crystal clear, here is a summary of best practices for your technical drawings:
| Common Mistake (The "Don't") | The Problem It Creates | Best Practice (The "Do") |
|---|---|---|
| Only writing "Volume: 500ml" in the notes. | Ambiguous. Is it fill or overflow volume? Where is the line? | Clearly label "Target Fill Volume: 500ml" and "Overflow Volume: 530ml". |
| Showing a fill line without a height dimension. | The mold maker has to guess the intended height. | Add a specific dimension: "Fill Line at 65mm from base" or "10mm below support ring". |
| Using vague terms like "Fill to here". | Unprofessional and impossible to measure or verify accurately. | Use precise engineering terminology and standardized dimensioning. |
| Not providing any tolerances on volume. | Sets an unrealistic expectation of perfection and provides no QC standard. | Provide a tolerance for overflow volume, e.g., "530ml ± 5ml". |
| Forgetting to specify the thread finish standard. | The cap might not fit correctly. | Clearly state the neck finish standard, e.g., "PCO 1881" or "38mm DBJ". |
A correct drawing leaves no room for interpretation. It is a precise set of instructions that ensures the bottle you get is exactly the bottle you need.
How Can We Support Your PET Bottle Project with Volume Control and Structural Optimization?
Are you feeling overwhelmed by the technical details of bottle design? Partnering with an experienced team can help you avoid costly mistakes and ensure your project is a success from start to finish.
We provide comprehensive support for your PET bottle projects, from initial concept to final production. Our services include precise volume calculation, fill line optimization, structural analysis, and the creation of pilot molds for verification, ensuring your bottle is both compliant and structurally sound.
My goal is to be more than just a supplier; I want to be your design and manufacturing partner. The story of my Singaporean client is a perfect example of how we work. He came to me after a painful and expensive experience with another supplier. He was worried, and he had every right to be. A delayed product launch and wasted packaging materials had already cost him significantly. He needed a partner he could trust to get it right this time.
Here’s how we approach every project to provide that level of trust and security:
Step 1: Deep Dive Consultation
It all starts with a conversation. I don't just ask for a drawing. I ask about the product: Is it carbonated? Is it hot-filled? What is the viscosity? I ask about the production line: What kind of filler and capper are you using? I ask about the market: What is the desired look and feel? This initial discussion helps us understand the full context. When the client for the 750ml bottle told me his previous 600ml bottle was designed to be brimful, I knew immediately what the core problem was.
Step 2: Precision Design and Analysis
Using this information, we move to the 3D CAD design. This is where we translate the vision into a technical reality.
- Volume Calculation: We don't just design the shape. We meticulously calculate the fill volume and overflow volume. We recommended a 10mm fill height for his 750ml bottle and adjusted the body diameter to achieve a target fill volume of 755ml, giving him that vital 5ml safety margin.
- Structural Optimization: We use Finite Element Analysis (FEA) simulation to predict how the bottle will perform under stress. We analyze top-load strength (for stacking), side-wall rigidity, and performance under internal pressure (for carbonated drinks). This ensures the bottle won't collapse or deform, even if we are aiming for a lower weight.
Step 3: Prototyping and Verification
This is the most critical step for building confidence. I strongly believe in "test before you invest."
- Pilot [Blow Bottle Mold](https://ibottler.com/blow-bottle-mold/): We created a single-cavity test mold for his new 750ml design. This is a relatively low-cost way to get real bottles in hand without committing to the full, multi-cavity production tool, which can be very expensive.
- Real-World Testing: He received 100 sample bottles. He tested them on his bottle blowing machine, filled them with his juice, capped them, and even sent them through a shipping test. The test was a complete success. This physical proof gave him the absolute confidence to proceed.
Step 4: High-Quality Mold Manufacturing
With the design verified, we manufacture the final production molds. Our expertise extends to the complete tooling system:
- Preform Mold: We design the preform for optimal material distribution, ensuring strength while minimizing weight.
- Blow Bottle Mold: Our production molds are built from high-quality materials with precision cooling channels to ensure fast cycle times and consistent bottle quality for millions of cycles.
By following this rigorous process, we were able to deliver a successful project for the client. His new 750ml juice bottle launched on time, with no compliance issues and a beautiful, structurally sound design. This is the partnership and peace of mind we offer.
Conclusion
In short, precisely defining your PET bottle's fill line is not a minor detail—it's foundational to your product's legal compliance, production efficiency, and brand image. Get it right from the start.
Frequently Asked Questions (FAQ)
1. What happens if I fill my bottles above the designed fill line?
Filling above the designed fill line reduces the headspace, which is critical for product safety. For carbonated drinks, this can cause excessive pressure buildup, leading to bottle deformation or even bursting. For hot-fill products, it can prevent a proper vacuum seal from forming, compromising shelf life. It can also cause spilling during capping, leading to sticky bottles and potential leaks.
2. How much does a pilot mold cost compared to a production mold?
A single-cavity pilot mold is significantly less expensive than a multi-cavity production mold. While prices vary, a pilot mold might cost only 10-20% of the price of a full 8-cavity production blow bottle mold. It's a small investment that can save you from a huge financial loss if a design flaw is discovered after the production mold is made.
3. Can I use the same bottle design for both a carbonated and a non-carbonated drink?
Not always. Bottles for carbonated soft drinks (CSD) require specific design features to handle internal pressure, such as a "petaloid" base with five feet for stability and thicker walls. Using a standard flat-bottomed bottle designed for water or juice for a carbonated beverage is extremely dangerous and will likely lead to failure. The structural requirements are fundamentally different.
4. Why is the support ring a better reference point than the bottle base?
The support ring is a more stable and consistent reference point because its dimensions and position are tightly controlled for handling by the bottle blowing machine and fillers. The base of the bottle, especially on hot-fill or CSD bottles, can have more dimensional variation and can even deform slightly after filling and cooling. Referencing from the support ring leads to a more consistent and accurate fill height across all bottles.
5. How does lightweighting a bottle affect the fill line and volume?
Lightweighting, or reducing the amount of PET in a bottle, can make the bottle walls thinner and more flexible. This can cause the bottle to expand or bulge slightly more when filled, a phenomenon known as "creep." This slight expansion can change the bottle's internal volume, which means the fill line may need to be adjusted slightly lower to compensate and hit the target net content. Accurate simulation and physical testing are crucial when lightweighting.
🔗 Learn More about Level Filling and Packaging Technologies
Filling Machine – Wikipedia
Explains various types of filling machines used in the packaging industry, including volumetric and level filling technologies.Packaging and Labeling – Wikipedia
Overview of packaging processes where consistent fill level is critical for both appearance and compliance.Quality Control – Wikipedia
Describes general principles of maintaining consistent product standards, including visual fill levels in bottles.Liquid Level – Wikipedia
Covers the concept of liquid level sensing and control, which is fundamental in designing level-based filling machines.
🔗 Related Pages on Our Website
Automatic Blow Molding Machines – iBottler
Discover our full range of customizable automatic PET bottle blow molding machines.Blow Bottle Mold – iBottler
Explore our precision blow molds designed for PET and PP bottles.Preform Mold – iBottler
Learn more about our high-precision preform molds suitable for various injection molding machines.
