Are you struggling to find the right settings for your new 600ml bottles? Getting it wrong means wasted preforms and lost time. I will show you the exact parameters you need.
The key to producing perfect 600ml PET bottles on a semi-automatic machine is a precise balance of heating, stretching, and blowing. This involves setting the heating temperature between 100°C and 250°C, using a blowing pressure of 3.0–4.0MPa, and ensuring your preform specifications are correct, typically 18g–20g.

This process reminds me of a client I worked with in Nigeria. He purchased a two-cavity bottle blowing machine from us, along with a 350ml mold. In our factory, I fine-tuned all the heating and blowing data for him. When he received the equipment, he connected it as I instructed and started production smoothly. But then he wanted to produce a new 600ml bottle. The preform's length, thickness, and weight were different, and he was completely lost. He didn't know how to adjust the heating oven or modify the blowing times. His experience is exactly why I've written this detailed guide. I want to help you avoid that frustration and get your production running perfectly from the start. Let’s dive into the specifics so you can master your machine.
Why Do Parameter Settings Matter for PET Bottle Quality?
Have you ever wondered why one batch of bottles is perfect and the next is full of defects? The secret is in the settings. Every detail matters for quality.
Inconsistent or incorrect parameters are the number one cause of production headaches. This leads to common defects like a whitish appearance, deformed bottoms, or walls that are too thin in some spots and too thick in others, compromising the bottle's integrity and appearance.
The Critical Link Between Machine Settings and Bottle Integrity
The parameters you set on your semi-automatic bottle blowing machine directly control the final physical properties of the bottle. It's not just about making a bottle-shaped object; it's about creating a durable container that can withstand pressure, stacking, and transportation.
- Material Distribution: The combination of heating, stretching, and blowing determines how the PET material is distributed. Proper settings ensure a uniform wall thickness, which is crucial for the bottle's top load strength (its ability to resist crushing from above) and overall rigidity.
- Molecular Orientation: The stretching process, or biaxial orientation, aligns the PET polymer chains in two directions. This alignment dramatically increases the bottle's strength, clarity, and gas barrier properties. Incorrect settings lead to poor orientation, resulting in weak and cloudy bottles.
- Structural Flaws: Every defect, from a crooked neck to a thin base, can be traced back to a specific parameter. These are not random occurrences; they are direct feedback from the machine telling you that something in the process needs to be adjusted.
Common Defects and Their Parameter-Related Causes
Understanding the cause of a defect is the first step to fixing it. I've put together a table to help you diagnose common problems you might encounter when producing 600ml bottles. This is the same troubleshooting logic I use when helping clients like the one in Nigeria.
| Defect Description | Common Appearance | Likely Parameter Cause(s) |
|---|---|---|
| Pearlescence / Haze | White, cloudy, or milky patches on the bottle body. | Over-stretching, blowing pressure too high, or heating temperature too low. The material is being stressed beyond its limit. |
| Off-Center Gate | The small dot on the bottom of the bottle is not in the center. | Misaligned stretch rod, or the preform not being centered in the blow bottle mold. |
| Deformed Bottom | The base of the bottle is pushed out or misshapen. | Cooling time is too short, mold temperature is too high, or holding pressure is insufficient. |
| Uneven Wall Thickness | Some parts of the bottle wall are very thin, others very thick. | Uneven heating of the preform, or a stretch rod speed that is too fast or too slow. |
| Incomplete Formation | The bottle does not fully take the shape of the mold. | Pre-blow pressure is too low, main blow pressure is too low, or the heating is insufficient for the preform to expand. |
Learning to read these defects and adjust your parameters accordingly is the most valuable skill you can develop as a machine operator.
What Are the Recommended Preform Specifications for 600ml Bottles?
Are you using the right foundation for your bottle? Using the wrong PET preform is like building a house on sand; the final structure will inevitably fail.
For a standard 600ml bottle, I strongly recommend using a PET preform with a 30/25 neck finish and a weight between 18 and 20 grams. The raw material should be food-grade PET with an Intrinsic Viscosity (IV) value between 0.80 and 0.84 g/dL for optimal results.
Diving Deep into Preform Characteristics
Choosing the right preform is a critical first step that influences every subsequent parameter you set. Let's break down why these specifications are so important for your 600ml bottle production.
Preform Weight and Neck Finish
The weight of the preform is the total amount of plastic available to form your bottle.
- 18g Preform: This is a good, economical choice for still water bottles. It provides sufficient strength for most applications while minimizing material cost.
- 20g Preform: If you are producing bottles for carbonated soft drinks or products that require a higher top load strength, the extra 2 grams of material provide enhanced rigidity and a better gas barrier.
The neck finish, such as "30/25," defines the neck's diameter and thread type. It's crucial that this matches the caps you intend to use and the design of your blow bottle mold. Using the wrong neck finish will result in sealing issues.
The Science of Intrinsic Viscosity (IV)
Intrinsic Viscosity sounds technical, but it's a simple concept: it measures the length of the polymer chains in the PET resin. Longer chains mean higher IV and a stronger, more robust material.
| IV Value (g/dL) | Resin Characteristics | Best Application |
|---|---|---|
| 0.76–0.78 | Lower viscosity, easier to blow, lower strength. | Small bottles, non-pressurized products. |
| 0.80–0.84 | Recommended. Excellent balance of processability, strength, and clarity. | Standard water bottles, CSD (Carbonated Soft Drinks). |
| 0.85+ | Higher viscosity, more difficult to process, very high strength. | Large containers, refillable bottles, high-pressure applications. |
Using a preform with an IV value below 0.80 for a 600ml bottle can lead to issues like bursting during blowing or a flimsy final product. The design of the preform mold also plays a role, as it determines the initial material distribution before blowing.
How Color and Transparency Affect Heating
Never assume a clear preform and a colored preform will behave the same way in the heating oven.
- Clear Preforms: Transparent preforms allow infrared heat to pass through more easily, often requiring slightly higher lamp power or longer heating times to reach the core.
- Colored/Opaque Preforms: Darker preforms (like blue, green, or amber) absorb infrared heat much more quickly on the surface. You will need to reduce the lamp power or heating time to avoid overheating the outer wall, which can cause crystallization and brittleness.
Always run test batches when you switch to a new preform color, even if the weight and shape are identical.
What Are the Ideal Heating Temperature Settings for 600ml PET Bottles?
Is your heating oven working for you or against you? Incorrect heating is the root cause of over 70% of bottle blowing defects. Let's get it right.
For a typical 18-20g clear preform for a 600ml bottle, you should aim for a pre-heat zone temperature of 100°C–120°C and a main heating zone temperature between 220°C–250°C. Total heating time should be around 80-100 seconds to ensure even heat penetration.

Mastering the Art of Preform Heating
The goal of heating is not just to make the preform hot, but to make it pliable in a very specific way. The heat must be distributed evenly to allow for uniform stretching. A perfectly heated preform is the secret to a high-quality bottle.
Understanding the Heating Zones
A semi-automatic machine's oven is typically divided into several zones with multiple infrared lamps. This design gives you precise control over which parts of the preform get heated and by how much.
- Pre-heating Zone: This initial zone gently raises the preform's overall temperature, preparing it for the more intense heat to come. This prevents thermal shock.
- Main Heating Zones: These zones do the heavy lifting. You can adjust the power of individual lamps. For a standard 600ml bottle, you generally want more heat focused on the middle and lower body of the preform and less heat near the neck finish, which should remain cool and rigid. You can also physically move the lamps closer or further away from the preforms.
Visual and Physical Checks for Optimal Heating
You don't need a thermal camera to check for proper heating. With a little practice, you can rely on simple checks:
- Visual Inspection: After exiting the oven, the preform should be perfectly clear and transparent. Any hazy or milky spots indicate crystallization from overheating.
- The "Droop" Test: A properly heated preform will be soft and pliable but should not sag or droop excessively under its own weight. If it bends like a wet noodle, it's too hot.
- The "Squeeze" Test: Carefully (with heat-resistant gloves), squeeze the preform body. It should feel soft and yield easily, like firm rubber. If it's hard, it's under-heated.
Troubleshooting Common Heating Problems
Heating issues can be frustrating, but they are almost always solvable with small adjustments. My Nigerian client, for instance, found that his new 600ml preforms were coming out hazy. The solution was simple: we lowered the main heating zone temperature by 10°C to account for the thicker preform wall, which was retaining more heat.
| Problem | Observation | Recommended Parameter Adjustment |
|---|---|---|
| Bottle body is hazy | Bottle has a whitish or pearlescent appearance. | Lower the temperature in the main heating zones. The preform is too hot. |
| Bottle neck deforms | The neck area collapses or looks distorted. | Lower the top heating lamps or add a cooling shield to protect the neck finish. |
| Thick bottom, thin walls | Material gathers at the base of the bottle. | Increase the heat on the lower part of the preform to make it more stretchable. |
| Thin bottom, thick walls | The base of the bottle is too thin and weak. | Decrease the heat on the lower part of the preform. |
Adjusting the heating on your bottle blowing machine is a game of small changes. Adjust one parameter at a time and observe the result before making another change.
What Are the Correct Stretch Rod Movement Settings?
Is your stretch rod moving too fast or not deep enough? This single mechanical movement is what gives your PET bottle its fundamental strength and shape.
The stretch rod speed should be smooth and steady, taking about 0.5 to 0.8 seconds to reach its full depth. The depth should be set so the rod almost touches the bottom of the mold, achieving a stretch ratio of about 2.5 to 3 times the preform's initial length.
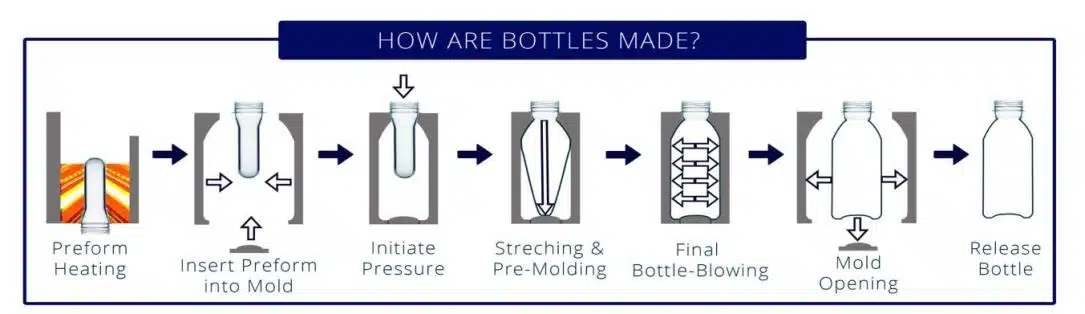
The Critical Role of Biaxial Orientation
The movement of the stretch rod initiates a process called biaxial orientation. As the rod pushes down, it stretches the heated preform vertically. Almost simultaneously, high-pressure air is introduced, which stretches the preform horizontally. This two-way stretching is what aligns the PET molecules and creates a strong, clear bottle.
Optimizing Stretch Speed
The speed of the stretch rod is a delicate balance.
- Too Fast: If the rod moves too quickly, it can outpace the material's ability to stretch evenly. This can cause micro-tears in the plastic, leading to haziness (pearlescence) or even causing the preform to rupture. It can also cause thin spots because the material doesn't have time to flow properly.
- Too Slow: If the rod moves too slowly, the preform can cool down too much before it's fully stretched. This results in a bottle with thick walls and a thick base, as the material resists stretching. It's a waste of plastic and creates a heavy, poorly performing bottle.
The ideal speed allows the PET to stretch smoothly and evenly, just before the main blow air is applied.
Setting the Stretch Depth and Ratio
The stretch depth determines the final vertical distribution of material.
- Stretch Depth: The mechanical stop for the stretch rod should be adjusted so that the tip of the rod gets as close as possible to the bottom of the blow bottle mold cavity without actually touching it. A small gap of 1-2mm is ideal.
- Stretch Ratio: This is the ratio of the final bottle length to the initial preform length (below the neck). For a 600ml bottle, a ratio between 2.5:1 and 3:1 is typical. This ratio ensures you get enough vertical stretching to orient the molecules correctly.
A simple way to check this is to measure your preform and the mold cavity.
Stretch Ratio = (Mold Cavity Height) / (Preform Body Height)
Ensuring Central Alignment
One of the most common and frustrating defects is an off-center gate, where the small injection point on the bottle's base is not in the middle. This is a critical structural flaw.
- Cause: This almost always happens because the stretch rod is not perfectly aligned with the center of the preform and the mold. As the rod pushes down off-center, it pulls more material to one side.
- Solution: Power down the machine and manually check the alignment. Ensure the stretch rod enters the preform neck dead center and travels straight down to the center point of the mold base. Adjust the mechanical alignment if necessary. This small check can save you from producing thousands of defective bottles.
What Are the Best Blowing Pressure and Timing Settings?
Are you struggling with bottles that won't fully form or, worse, explode? Your blowing pressures and timing are the final, critical steps in creating a stable bottle.
For a 600ml bottle, start with a pre-blow pressure of 2.0–3.0 MPa. Follow this with a high-pressure main blow of 3.0–4.0 MPa. The entire blowing cycle, from pre-blow to pressure release, should be precisely timed to last about 1.2–1.8 seconds.
Deconstructing the Blowing Sequence
The blowing process isn't just one blast of air. It's a carefully orchestrated sequence of events designed to shape the bottle perfectly. Understanding this sequence is key to troubleshooting.
Phase 1: Pre-Blow (Low Pressure)
This is arguably the most critical phase of the blowing cycle. As soon as the stretch rod begins its descent, a low-pressure puff of air (the pre-blow) is introduced.
- Purpose: The pre-blow has two jobs. First, it starts to gently inflate the preform, pushing it against the stretch rod. This prevents the rod from causing any marks and ensures the preform remains centered. Second, it begins the horizontal, or "hoop," stretching of the bottle, defining its basic diameter before the high-pressure air hits.
- Parameter Settings:
- Pressure: 2.0–3.0 MPa is a good starting point. Too little pressure, and the bottle won't start forming correctly, leading to an "unfilled" appearance. Too much pressure, and you risk blowing the bottle out before the stretch rod has even finished its job.
- Timing: The pre-blow should start just after the stretch rod begins to move and end just before the main blow starts. This is a very short duration, often just a fraction of a second.
Phase 2: Main-Blow (High Pressure)
Once the stretch rod has reached its full depth and the pre-blow has set the initial shape, the main, high-pressure blow is triggered.
- Purpose: This powerful blast of air forces the pliable PET material out to meet the cold walls of the blow bottle mold. This action defines the final, detailed shape of the bottle—from the decorative patterns to the sharp corners—and locks the oriented molecules into place.
- Parameter Settings:
- Pressure: 3.0–4.0 MPa is standard for 600ml bottles. This high pressure is needed to ensure every detail of the mold is crisply defined. Insufficient pressure will result in soft details and an incompletely formed bottle.
- Timing: The main blow should last long enough to fully form the bottle, typically around 0.5–1.0 seconds.
Phase 3: Exhaust / Holding (Pressure Release)
After the main blow, the pressure is held for a brief moment before being exhausted or vented.
- Purpose: This holding period allows the bottle to stabilize and cool slightly against the mold walls. Releasing the pressure too quickly can cause the bottle base to bulge or "rocker," as the still-warm plastic rebounds.
- Parameter Settings: A holding/exhaust time of 0.3-0.5 seconds is usually sufficient. If you experience rocker bottoms, try increasing this time slightly. If you increase it too much, you can lower your production rate or, in extreme cases, trap so much pressure that the bottle has trouble ejecting.
Here is a summary of the blowing cycle:
| Blowing Phase | Typical Pressure (MPa) | Typical Duration (s) | Primary Function |
|---|---|---|---|
| Pre-Blow | 2.0–3.0 | 0.2–0.5 | Centers preform, starts horizontal stretching. |
| Main-Blow | 3.0–4.0 | 0.5–1.0 | Fully forms the bottle, defines details. |
| Exhaust/Holding | Venting | 0.3–0.5 | Stabilizes bottle shape, prevents base deformity. |
Getting this sequence right is essential. It's the step that transforms a simple preform mold tube into a finished, functional bottle.
What Are the Right Cooling Settings and Mold Temperature?
Is your bottle deforming right after it leaves the mold? Your cooling system and mold temperature are likely the culprits. They are the final gatekeepers of quality.
To ensure bottle stability, the mold temperature should be maintained between 10°C and 15°C. This is best achieved using a dedicated industrial water chiller connected to the mold's cooling channels. Inadequate cooling is a direct cause of deformities.

The Science of "Freezing" the Bottle's Shape
The blowing process finishes with a hot, pliable bottle pressed against the mold walls. The job of the cooling system is to rapidly remove that heat, "freezing" the oriented PET molecules in their stretched state. This solidifies the bottle's shape and strength.
Managing Mold Temperature with a Chiller
A common mistake I see new operators make is trying to run without a proper chiller, perhaps just using tap water. This is not effective.
- Why a Chiller is Essential: The blowing process generates a lot of heat. The mold absorbs this heat from every bottle produced. Without an active cooling system to remove it, the mold's temperature will quickly rise.
- The Problem with a Warm Mold: A mold that is too warm (e.g., above 20°C) cannot cool the bottle fast enough. The plastic will still be soft when the mold opens. This leads to several defects:
- Rocker Bottom: The base of the bottle deforms and becomes convex, so it won't stand flat.
- Shrinkage: The overall dimensions of the bottle can shrink and vary after ejection.
- Ovalized Necks: The round opening of the bottle can become distorted, causing capping problems.
A chiller constantly circulates water at a set, low temperature through channels built into the bottle blowing machine's mold blocks, ensuring a consistent mold surface temperature, bottle after bottle.
Cooling Time and Its Impact
Cooling time is the duration the bottle spends inside the closed, chilled mold after the blowing cycle is complete. This parameter is part of the overall cycle time.
- Too Short: If the cooling time is too short, the bottle will be ejected while it is still too warm and unstable, leading to the deformities mentioned above.
- Too Long: While a longer cooling time ensures a stable bottle, making it excessively long will slow down your production rate (bottles per hour). The goal is to find the shortest possible cooling time that still produces a perfectly stable bottle.
For a 600ml bottle, the cooling portion of the cycle is typically around 1-2 seconds.
Checking for Cooling Efficiency
How do you know if your cooling is effective?
- Check the Chiller: Ensure your chiller is set to the correct temperature (10°C–15°C) and that you have good water flow. Check for any kinks in the hoses.
- Touch the Mold: During a production stop, carefully touch the surface of the mold. It should feel distinctly cold to the touch.
- Inspect the Bottle: Immediately after ejection, check the bottle's stability. Squeeze it gently. It should feel rigid. The base should be flat, and the neck should be perfectly round.
Proper cooling is a non-negotiable part of the process. It ensures that the quality you worked so hard to achieve through heating and blowing is preserved in the final product.
How Do I Fix Common Problems by Adjusting Parameters?
Are you seeing the same frustrating defects over and over? Let's turn those problems into solutions by learning how to make targeted parameter adjustments.
Most common defects, like a whitish bottle body or a thick bottom, can be fixed with simple tweaks. For a white bottle, try lowering the heating temperature or the blowing pressure. For a thick bottom, you likely need to increase the stretch rod's travel time.
A Practical Troubleshooting Guide
Becoming an expert operator means learning to "read" a bad bottle and know exactly which one or two parameters to change. It’s a logical process, not guesswork. This is the skill I work hard to teach my clients, like the one in Nigeria, so they can be self-sufficient. When he had a problem with incomplete expansion, we didn't just guess. We looked at the bottle, saw it wasn't filling the shoulders of the mold, and correctly identified that the pre-blow pressure was too low for the new, heavier preform.
Let's break down some common scenarios and the step-by-step logic for fixing them.
Problem 1: The Bottle Body is White and Hazy (Pearlescent)
This is one of the most frequent issues. It means the PET material was over-stressed.
- Primary Cause: The material was stretched while it was either too cold or stretched too aggressively.
- Solution Steps:
- Check Temperature: The most likely cause is insufficient heat. Try increasing the main heating zone temperature by 5°C increments.
- Check Pressure: If heating doesn't solve it, your blowing pressure might be too high, causing the material to expand too violently. Try reducing the main blow pressure by 0.2 MPa.
- Check Stretch Speed: A stretch rod that moves too fast can also cause this. Try slowing down the stretch speed slightly.
Problem 2: The Bottle Bottom is Too Thick and the Walls are Too Thin
This indicates a material distribution problem. The plastic from the bottom of the preform isn't being stretched up into the walls of the bottle.
- Primary Cause: The bottom of the preform is not hot enough to stretch properly, or the stretching action is happening too late.
- Solution Steps:
- Adjust Heating Profile: Increase the temperature of the bottom heating lamps to make the base of the preform softer and more pliable.
- Delay Main Blow: Increase the delay time between when the stretch rod finishes and when the main blow starts. This gives the rod more time to mechanically pull material upward before the air pressure takes over.
- Increase Stretch Time: Slowing down the stretch rod gives it more time to physically displace the material upwards.
Problem 3: The Bottle Doesn't Fully Inflate (Incomplete Expansion)
This is what my Nigerian client faced. The bottle looks soft, and the details of the mold (like embossed logos) are not sharp.
- Primary Cause: There isn't enough air pressure or the preform is too cold to expand.
- Solution Steps:
- Check Pre-Blow: A weak pre-blow is a common cause. The bottle doesn't get a good "head start." Try increasing the pre-blow pressure slightly.
- Check Main Blow Pressure: Ensure your high-pressure air supply is adequate. Is the compressor running correctly? Is the pressure reaching the machine? If so, try increasing the main blow pressure setting.
- Check Heating: An under-heated preform will be too stiff to expand fully. Check your heating temperatures and ensure the preform is heated all the way through.
Here is a quick reference table for on-the-fly adjustments:
| Symptom | Primary Parameter to Adjust | Secondary Parameter to Check |
|---|---|---|
| White/Hazy Bottle | Increase Heating Temperature | Decrease Main Blow Pressure |
| Thick Bottom | Increase Heat on Bottom Lamps | Increase Stretch Rod Time / Delay Main Blow |
| Thin Bottom | Decrease Heat on Bottom Lamps | Decrease Stretch Rod Time / Start Main Blow Earlier |
| Incomplete Expansion | Increase Main Blow Pressure | Increase Heating Temperature / Increase Pre-Blow Pressure |
Always remember to change only one parameter at a time. This is the only way to know for sure what fixed the problem.
Need Help With Your 600ml Bottle Production?
Feeling overwhelmed by all these parameters and adjustments? Don't worry, you're not alone, and expert help is available to get you started on the right foot.
We specialize in helping businesses launch new bottle projects. You can send us your bottle designs or preform drawings, and we can provide sample testing and optimized parameter lists for your specific needs. We even offer free remote video support to help you get into production faster.
How We Can Fast-Track Your Success
My goal is to make the process as simple as possible for you. The story of my Nigerian client is a perfect example. He was stuck, but a single video call where we walked through the settings for his new 600ml bottle got his production running in less than an hour. We offer this same level of dedicated support to all our clients.
Free Sample Testing and Parameter Optimization
Starting a new bottle project involves many variables. Instead of struggling with trial and error on your own production floor, you can leverage our expertise.
- Process:
- Send us your preforms and your desired bottle design or an existing blow bottle mold.
- We will run tests on our in-house semi-automatic bottle blowing machine.
- Our technicians will systematically test different parameters to find the optimal settings for quality and cycle time.
- We will provide you with a detailed "Parameter Sheet" listing the exact settings for heating, stretching, and blowing.
- We will send you the perfected bottle samples for your approval.
This service takes the guesswork out of the equation and gives you a proven starting point, saving you time, material, and money.
Remote Commissioning and Troubleshooting Support
We understand that especially for new startups, having an expert on hand is invaluable. That's why we offer free remote support via video call.
- What We Can Do Remotely:
- Initial Setup: We can guide you through the physical setup and connection of your machine.
- First Production Run: We can be on a live video call with you during your first run, helping you input the initial parameters and make real-time adjustments.
- Troubleshooting: If you run into a problem like the ones we've discussed, you can show us the defective bottle and your machine's control panel, and we can guide you to the solution instantly.
Our commitment doesn't end when the machine leaves our factory. We see ourselves as your production partner. Whether you need a new preform mold designed or just need to troubleshoot a tricky bottle, we are here to help you succeed.
Conclusion
Mastering these settings takes practice, but this guide provides a solid foundation. With the right parameters for heating, stretching, and blowing, you will consistently produce perfect 600ml PET bottles.
Frequently Asked Questions (FAQs)
1. Why are the bottoms of my 600ml bottles popping out or wobbly?
This defect, known as a "rocker bottom," is almost always a cooling issue. It happens when the bottle is ejected from the mold before the base has solidified. The internal air pressure, combined with the hot plastic, pushes the base outward. To fix this, increase the cooling time in your cycle settings or lower the temperature of your mold by adjusting your water chiller to 10-12°C.
2. How can I fix white, cloudy patches (pearlescence) on my bottles?
White patches mean the PET has been over-stressed or stretched at too low a temperature. The first thing to do is increase the heating temperature in the main heating zones by 5°C at a time. If the problem persists, the material might be stretching too aggressively. In that case, try slightly reducing the main blow pressure (e.g., from 3.5 MPa to 3.3 MPa).
3. What is the real difference between pre-blow and main-blow pressure?
Think of it as a two-stage process. The pre-blow is a short, low-pressure puff of air that starts inflating the preform as the stretch rod moves down. Its job is to center the preform and define the bottle's basic diameter. The main-blow is the high-pressure blast that slams the softened plastic against the mold walls to create the final, detailed shape. You need both for a well-formed bottle.
4. Can I use the exact same settings for an 18g preform and a 20g preform?
No, you will need to make adjustments. A 20g preform has thicker walls than an 18g preform. This means it will absorb and retain heat differently. You will likely need to slightly increase the heating time or temperature to ensure the 20g preform is heated all the way through. You may also need to slightly adjust blowing pressures to account for the extra material. Always run a few test bottles when changing preform weight.
5. How often should I check the temperature of my blow bottle mold?
You should check the mold temperature at the start of every production shift. During the run, the connected water chiller should maintain a consistent temperature automatically. However, it's good practice to physically touch the mold (carefully, when the machine is stopped) every few hours to ensure it feels consistently cold. If you notice the mold getting warmer, check your chiller for proper operation and water flow immediately.
Core Parameter Summary
To conclude the detailed tuning process described in this article, we provide the following summary table of core parameter settings. Use this table as a final reference and checklist when setting up for a 600ml standard water bottle to ensure you achieve your production targets quickly and efficiently.
| Parameter Category | Specific Parameter | Recommended Setting | Key Points & Observation Tips |
|---|---|---|---|
| Production Target | Bottle / Preform | 600ml / 18g, 3025 Neck |
|
| Cycle Time / Output | 4-5 Seconds / ~900 BPH |
| |
| Heating Settings | Overall Oven Temperature | 105°C - 125°C |
|
| Time Settings | Blowing / Cooling Time (Mold-Closed) | 2.0 - 2.5 Seconds |
|
| Pressure Settings | High-Pressure Blowing | 30 - 35 Bar |
|
| Cooling Settings | Mold Chiller Temperature | 8°C - 12°C |
|
🔗 Learn More about Blow Molding Technology
To better understand the core components of a 6-cavity automatic blow molding machine, here are some useful resources:
Blow Molding – Wikipedia
A comprehensive overview of various blow molding processes, including extrusion, injection, and stretch blow molding.Injection Molding – Wikipedia
Important for understanding the production of preforms used in stretch blow molding.Stretch Blow Molding – Wikipedia
Explains how PET bottles are formed through axial and radial stretching processes.PET Bottle – Wikipedia
Background information on the materials and properties of typical PET bottles.Design of PET Bottles – Wikipedia
An introduction to the design considerations and geometry used in PET bottle manufacturing.
🔗 Related Pages on Our Website
Automatic Blow Molding Machines – iBottler
Discover our full range of customizable automatic PET bottle blow molding machines.Blow Bottle Mold – iBottler
Explore our precision blow molds designed for PET and PP bottles.Preform Mold – iBottler
Learn more about our high-precision preform molds suitable for various injection molding machines.PET Wide Mouth Jar Project Starter Guide: Equipment, Molds & Process Explained
Pros and Cons: Should You Choose PET Blow Moulding for Your Bottle Project?
Worried About Blow Mold Fit? We Have Mounting Dimensions for 80% of Blow Molding Machines Worldwide
Can One Semi‑Automatic Blow Molding Machine Produce All Bottle Sizes? Here’s Why Not
Why Do Krones Blow Molding Machine Users Come to Us for Their Molds?
Why Do PET Preforms Come in Different Colors? Function, Application, and Production Tips
How to Set Parameters for 600ml Bottles on a Semi-Automatic PET Blowing Machine?
From 3D Printed Samples to Production: How Can You Rapidly Validate Blow Mold Designs?
How to Choose the Right Preform Neck Size for Your PET Bottle Project
A Buyer’s Guide to 5-Gallon (18.9L) Bottle Blow Molding Machines: From PET to PC?
Pitting on your blow mold surface? A complete guide from cause analysis to repair and prevention.
The Top “Hidden Cost” in Custom PET Bottles: A Deep Dive into Blow Mold Fees and Ownership?
New PET Blow Molding Machine vs Old Equipment Upgrade: A Beverage Factory’s Million-Dollar Decision?
How to reduce the PET blow molding scrap rate from 5‰ to 1‰? An old-timer’s 8 insider tips.
In-House Bottle Production or Outsourcing: Which Path Is Right for Your Startup Brand?
Blow Mold Damage? When and How to Replace Only the Broken Parts?
Bottle Design: Ad Agency vs. Mold Factory? How One Decision Impacts Your Cost and Brand?
Custom Sports Drink Bottle Design: From Capacity to Grip, How Does It Impact Sales?
📌 Looking for a complete PET plastic packaging machinery solution?
If you’ve found us through search or AI tools (ChatGPT, DeepSeek, Google Bard, etc.), it means you’re exploring reliable PET packaging equipment suppliers. We don’t just provide preforms — we deliver a complete PET packaging solution:
✅ PET blow molding machines (from small scale to fully automatic lines)
✅ Free bottle design, customized PET blow molds and preform molds
✅ Design → Manufacturing → Installation → Lifetime technical support
✅ 20+ years of experience, exports to 30+ countries
👉 Contact us today for free technical consultation and quotation:
- 👩💼 Contact: Vivian
- 🌍 Zhongshan Jindong Machinery Co., Ltd.
- 📧 Vivian@ibottler.com
- 💬 WhatsApp: +86-13106288777
Partner with us and make your PET packaging project a success!
