Ordering PET bottle molds can feel overwhelming. You want the right mold, but a wrong move costs time and money. I'm here to guide you through the key things to consider for a smooth process.
Understand Your Bottle Design Needs
Before ordering a PET bottle mold, it is essential to have a clear understanding of your bottle design. Consider the shape, volume, neck size, and overall dimensions. These factors affect the type of mold you need and the compatibility with your blowing machine.
From our 20+ years of experience as a PET bottle mold manufacturer, many clients—especially startups—tend to overlook small but critical design details, such as the thread standard or the base thickness. These oversights often lead to leakage issues or filling line mismatches later. To avoid this, we always recommend clients to send us both 3D files and sample bottles, so we can help double-check the design before mold production begins.
The very first step is to define your production strategy. This decision directly impacts your mold choice, overall costs, and future production efficiency. Understanding this will save you a lot of headaches later on.
Thinking about how you'll make your bottles is essential before you even look at molds. It's a bit like deciding if you'll cook at home or order takeout before buying kitchen equipment. This initial decision sets the stage for everything else. I've seen many projects get complicated because this wasn't clear from the start. Let's make sure that doesn't happen to you.
Should Your Production Strategy Dictate Your PET Bottle Mold Choice?
Unclear production plans can lead to trouble. You might pick an unsuitable mold, costing you more than expected. It's best to align your strategy with your mold selection from day one.
Yes, absolutely. Whether you plan to outsource production to a contract manufacturer or set up your own in-house production line is the most critical factor. This choice will shape the mold's design, its price, and how well it works for you.

Let's dive deeper into how your production approach affects your mold. I remember a client who wanted to launch a new drink. They were excited about the product but hadn't decided how to produce the bottles. This uncertainty made choosing a mold very tricky.
Outsourcing Production (Contract Manufacturing)
If you decide to outsource, your main job is to find a good contract manufacturer. I always tell people to look for a factory with a proven track record.
Once you find a potential partner, you need to know about their equipment.
- Factory's Blowing Machine: The specific model and capabilities of their PET bottle blowing machine will largely determine the mold design. High-output machines, those making thousands of bottles per hour, need very precise and often more expensive molds.
- Production Volume: Talk to the factory about your expected sales. If your product is new and not yet tested in the market, I suggest starting small. A single-cavity or low-cavity mold is less risky for initial small batches. This keeps your upfront investment down.
- Scaling Up: If the market likes your product and sales grow, you can then think about a higher-cavity mold to increase production. This staged approach is much safer than investing heavily from the start.
For example, a client of mine was launching a specialty juice. We found a reliable co-packer. Their machine was a standard semi-automatic type. We started with a 2-cavity mold. After six months, demand picked up, and we then invested in a 4-cavity mold compatible with a faster machine at a different facility, but the initial caution saved them a lot.
Setting Up Your Own Production Line
If you plan to make the bottles yourself, choosing the right blowing machine is your biggest task. This is a significant investment, so it needs careful thought.
- Machine Selection: There's a huge range of machines. Some are small and good for startups, while others are large, high-speed systems for big operations. Your budget and how many bottles you need to make will guide this choice. A small business might pick a machine making 2,000-5,000 bottles per hour. A large company might need one that makes tens of thousands.
- Machine Specifications: The technical details of the machine, like its clamping force and blowing pressure, directly affect the mold design. The mold has to match the machine perfectly. I can't stress this enough.
- Initial Investment vs. Long-term Cost: Sometimes a cheaper machine seems attractive, but it might require more specialized or less durable molds, or it might be less efficient. Consider the total cost of ownership, not just the upfront price of the machine and the first mold.
I once worked with a startup that wanted to control their production fully. They chose a mid-range automatic blowing machine. We then designed a 4-cavity mold specifically for that machine's parameters. This ensured they got the best possible performance and bottle quality from their setup.
| Production Strategy | Key Mold Consideration | My Advice |
|---|---|---|
| Outsourcing | Factory's machine compatibility | Start small (low cavity) if product is new. |
| In-house Production | Your chosen blowing machine | Ensure mold is perfectly matched to your machine. |
Ultimately, your production strategy is the foundation. Get this right, and the rest of the mold ordering process becomes much clearer.
What Bottle Design Details Must You Finalize Before Ordering a Mold?
Having unclear bottle design needs often leads to problems. You could end up with the wrong mold, causing delays and extra costs. It's crucial to provide very specific design details to your mold maker.
You absolutely must finalize key details like the bottle's capacity, the type of neck finish, the preform weight, and the overall appearance, including any special features like embossed logos or unique shapes. This clarity ensures the mold meets your precise requirements.

Whether you make the bottles yourself or use a contractor, you need to give the mold manufacturer very clear instructions about your bottle design. I've seen projects stall because these details weren't sorted out early. Think of it as giving a tailor exact measurements; the more precise you are, the better the fit.
Essential Bottle Specifications
Let's break down the critical design information your mold maker will need. I always prepare a checklist for my clients to ensure we cover everything.
- Capacity: This seems obvious, but be precise. Specify the volume, for example, 250ml, 500ml, 1 liter, or 1.5 liters. This directly impacts the overall size of the mold cavity.
- Neck Finish: This is the design of the bottle opening where the cap goes. There are many standards. For example, a common one for beverages is a "28mm PCO 1881" or "28mm PCO 1810" neck. The exact standard is vital for cap compatibility.
- Preform Weight: PET bottles are made from preforms. The weight of this preform (e.g., 18g for a lightweight 500ml water bottle, or 45g for a heavier 1L carbonated drink bottle) influences the bottle's wall thickness and strength. If you're aiming for a lightweight bottle to save material, this is a key parameter.
- Bottle Appearance and Shape: This covers the overall look.
- Basic Shape: Is it round, square, oval, or something custom?
- Special Features: Do you need an embossed logo on the bottle? Are there specific ribs or indentations for grip or strength? Any unique design elements must be clearly communicated.
- Label Area: Consider where the label will go. The surface should be suitable for label application, whether it's a wrap-around label or a sleeve.
The Importance of Visuals
Clear design needs prevent costly changes later. If you can, providing a 3D design file (like a .STEP or .IGS file) is the best way. A physical sample bottle, if you have one you want to replicate or adapt, is also incredibly helpful. I remember a project where the client described a "gentle curve." My interpretation was different from theirs. A simple sketch resolved it, but a 3D model would have avoided the confusion altogether.
Here's a simple table to summarize:
| Design Element | Example Specification | Why it's important for the mold |
|---|---|---|
| Capacity | 500ml | Defines mold cavity volume |
| Neck Finish | 28mm PCO 1881 | Ensures correct cap fit |
| Preform Weight | 21g | Affects wall thickness, bottle weight |
| Shape | Square with rounded | Determines overall cavity form |
| Special Features | Embossed logo | Requires precise engraving in mold |
Getting these details right from the start makes the mold design process smoother and ensures the final bottles are exactly what you envisioned.
How Much Does a PET Bottle Mold Cost and What Influences the Price?
PET bottle mold costs can seem high, and it can be hard to budget if you don't understand what drives the price. Knowing the factors involved will help you manage expectations and make informed decisions.
A PET bottle mold can cost anywhere from a few thousand to tens of thousands of dollars, or even more. The main factors influencing this price are the complexity of the bottle design, the mold material, the number of cavities, and its compatibility with specific blowing machines.

I often get asked why molds are so expensive. It's a fair question, especially when you're trying to manage a budget for a new product. Let's break down what contributes to the cost of a PET bottle mold.
Key Factors Affecting Mold Cost
Several elements combine to determine the final price tag of your mold.
- Design Complexity: A simple, round bottle mold is less expensive than one for a bottle with a unique shape, intricate patterns, or complex structural features. If your bottle has an embossed logo or requires special surface textures, this adds to the machining time and complexity, increasing the cost. I recall a client who wanted a bottle shaped like a fruit; the mold was beautiful but significantly more complex and costly than a standard cylindrical bottle mold.
- Mold Material: Molds are typically made from high-quality steel alloys or aircraft-grade aluminum.
- Steel (e.g., S136, Stavax): Very durable, can produce millions of bottles, resistant to corrosion, but more expensive and takes longer to machine. Often used for high-volume production.
- Aluminum (e.g., 7075): Cheaper, faster to machine, and offers better thermal conductivity (can mean faster cycle times), but less durable than steel. Good for lower to medium production volumes or prototyping.
- Number of Cavities: A mold can have one cavity (producing one bottle per cycle) or multiple cavities (e.g., 2, 4, 8, 16, or even up to 144 cavities).
- Single-cavity molds: Cheaper to make, good for low-volume production or market testing.
- Multi-cavity molds: More expensive to manufacture due to increased material, machining, and complexity. However, they produce more bottles per cycle, leading to a lower cost per bottle in high-volume runs. The choice depends on your required output.
- Blowing Machine Compatibility: Molds designed for high-speed, high-precision automatic blowing machines often require tighter tolerances, more robust construction to handle higher clamping forces and blowing pressures, and sometimes special cooling systems. These features add to the cost compared to a mold for a simpler, semi-automatic machine.
Why Are Molds Expensive?
The high price comes down to a few core reasons:
- Precision Manufacturing: Molds require incredibly precise machining using CNC (Computer Numerical Control) equipment. This ensures the final bottles have consistent dimensions, good surface quality, and meet all specifications. This precision takes time and sophisticated machinery.
- Durable Materials: The materials used must withstand the high temperatures and pressures of the blow molding process over many cycles. Cheap materials would wear out quickly or fail.
- Customization: Almost every bottle mold is custom-designed for a specific bottle shape and production setup. This isn't an off-the-shelf item. The design and engineering work involved is significant.
- Skilled Labor: Designing and manufacturing molds requires highly skilled engineers and machinists. Their expertise is a key component of the cost.
- Testing and Refinement: Often, mold makers will test the mold and make minor adjustments to ensure it performs perfectly. This quality control step adds to the overall cost but is crucial for a reliable mold.
Here's a general idea, but prices vary widely:
| Mold Feature | Impact on Cost | Typical Scenario |
|---|---|---|
| Simple Design | Lower | Basic round water bottle |
| Complex Design | Higher | Custom shape, embossing |
| Aluminum Material | Lower | Prototyping, shorter runs |
| Hardened Steel | Higher | Long production runs, millions of bottles |
| Single Cavity | Lower | Startups, test markets |
| Multiple Cavities (8+) | Higher | Mass production |
Understanding these factors will help you discuss your needs with mold manufacturers and appreciate the value in a well-made mold. It's an investment in the quality and efficiency of your bottle production.
What Are the Key Steps in the PET Bottle Blowing Process and How Does the Mold Fit In?
You might be wondering how these molds actually make bottles. If you're not familiar with the blow molding process, it can be hard to see why the mold is so critical. Let's simplify it.
The PET bottle blowing process generally has two main stages: first, creating a PET preform by injection molding, and second, stretch blow molding this preform into the final bottle shape using the blow mold. The mold is crucial in this second stage.

Understanding the basics of how PET bottles are made will help you appreciate the mold's role and make better choices when ordering one. I always find that clients who understand the process can communicate their needs more effectively. It’s not overly complicated when broken down.
The Two-Step Process
Most PET bottles you see for drinks and other products are made using a two-step Reheat Stretch Blow Molding (RSBM) process.
Step 1: Preform Injection Molding
- Material: It starts with Polyethylene Terephthalate (PET) resin, which looks like small, clear pellets.
- Process: This resin is melted and then injected under high pressure into an injection mold. This mold has multiple cavities, each shaped to create a "preform."
- The Preform: A preform looks like a thick-walled test tube with the bottle's neck and threads already formed at the top. These preforms are cooled and can be stored or transported to a different location for the next step. For example, many companies buy ready-made preforms and then blow them into bottles.
- Preform Molds vs. Blow Molds: The mold used here is an injection mold, which is different from the blow mold we are focusing on for the final bottle shape.
Step 2: Stretch Blow Molding
- Heating (Reheating): The preforms are heated in an oven to make them soft and pliable, usually to a temperature around 100-120°C. The heating must be uniform for good bottle quality.
- Stretching and Blowing:
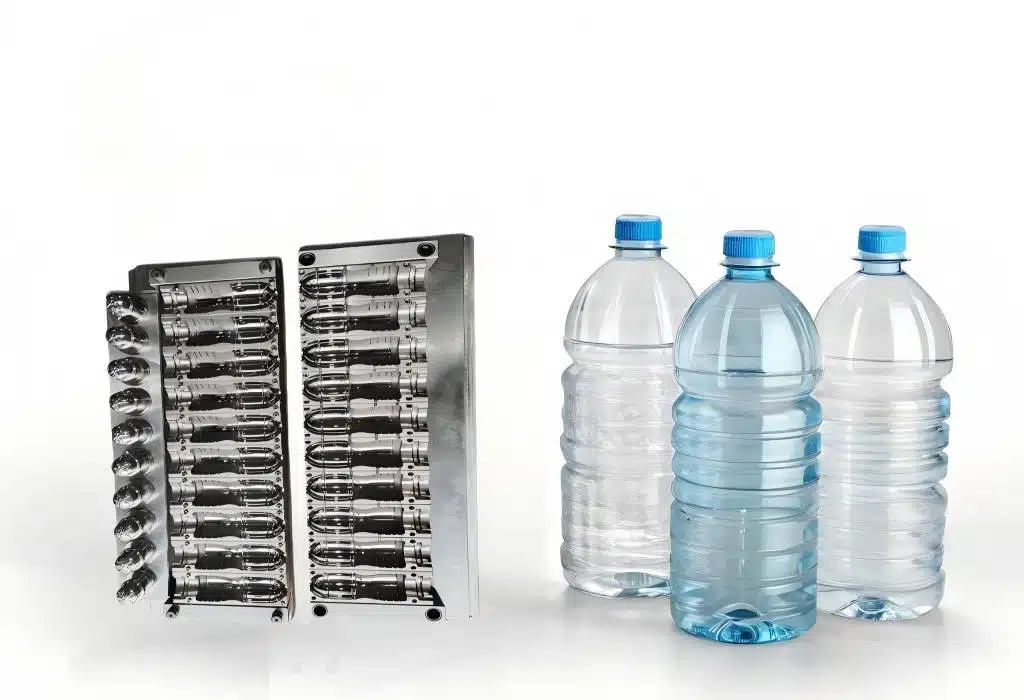
- The heated preform is quickly transferred into the PET bottle blow mold (this is the mold you are ordering).
- The blow mold closes around the preform.
- A stretch rod pushes down into the preform, stretching it vertically (axially).
- Almost simultaneously, high-pressure air (up to 40 bar or 580 psi) is blown into the preform, inflating it like a balloon and pushing it against the cold walls of the blow mold cavity. This stretches the PET material biaxially (in two directions), which gives the bottle its strength and clarity.
- The mold is typically chilled, so the PET cools rapidly upon contact, solidifying into the final bottle shape.
- Ejection: The mold opens, and the finished bottle is ejected. The cycle then repeats.
The Mold's Critical Role in Blowing
The blow mold is where the magic happens, transforming the generic preform into your specific bottle.
- Shape Definition: The internal cavity of the blow mold dictates the final shape, size, and any surface details (like logos or patterns) of the bottle.
- Wall Thickness Uniformity: A well-designed mold, combined with correct preform heating and blowing parameters, ensures the PET material is distributed evenly. This is critical for the bottle's strength and to avoid weak spots. I've seen poorly designed molds result in bottles with thin bases or shoulders, leading to failures.
- Strength and Performance: The biaxial stretching process, guided by the mold, aligns the PET molecules, significantly improving the bottle's tensile strength, clarity, and gas barrier properties (important for carbonated drinks).
- Cooling: Efficient cooling channels within the mold help to solidify the bottle quickly, reducing cycle time and increasing production output.
- Surface Finish: The surface finish of the mold cavity (e.g., polished, textured) is directly transferred to the bottle.
A poorly designed or manufactured blow mold can lead to many problems: inconsistent bottle weights, dimensional inaccuracies, visual defects (like haze or streaks), or even production line stoppages. That's why investing in a quality mold from an experienced manufacturer is so important. It's not just a piece of metal; it's a precision tool that shapes your product.
What Practical Tips Can Help You Order the Right PET Bottle Mold?
Making the wrong choice when ordering a PET bottle mold can be costly. You might face wasted investment or serious production delays. Following some expert advice can lead you to a successful purchase.
To order correctly, always choose specialized manufacturers with proven experience. For new products, it's wise to start with small-scale tests using single-cavity molds. Also, remember to factor in maintenance, ensure full machine compatibility, and plan for potential future upgrades.

Over the years, I've helped many clients navigate the mold ordering process. Based on that experience, here are some practical tips that I always share. These can help you avoid common pitfalls and make the process smoother.
My Key Recommendations for Mold Ordering
Think of these as a checklist to guide your decisions.
- Choose Professional and Experienced Manufacturers:
- This is perhaps the most crucial tip. Don't just go for the cheapest quote. Look for suppliers who specialize in PET blow molds. Ask for their track record, look at case studies of similar bottles they've made, and if possible, seek out customer reviews or references. An experienced manufacturer will understand the nuances of PET behavior and mold design for optimal performance. I once saw a client choose a general machining shop to save money; the mold had cooling issues and never ran efficiently.
- Start Small with New Products (Trial Molds):
- If you're launching a brand-new bottle or product, the market demand is still uncertain. I strongly advise ordering a single-cavity (or maybe a 2-cavity) mold first. Use this for small-batch production to test the market, get consumer feedback, and verify your bottle design in real-world conditions. Once your product is proven and demand is established, you can then confidently invest in a higher-cavity production mold. This approach minimizes your initial financial risk.
- Consider Maintenance Costs and Procedures:
- Molds are precision tools and require regular maintenance to ensure a long life and consistent bottle quality. This includes cleaning, inspection for wear, and occasional minor repairs or part replacements (like seals). When discussing with suppliers, ask about recommended maintenance schedules and the availability of spare parts. Factor these ongoing costs and procedures into your budget and operational plans. A well-maintained mold lasts much longer.
- Ensure Full Compatibility with Your Blowing Machine:
- The mold must be perfectly matched to the blowing machine it will run on. This means providing the mold maker with the exact model and all relevant technical specifications of your machine (or your contract manufacturer's machine). This includes platen layout, clamping force, available daylight, tie-bar spacing, ejector stroke, cooling connections, etc. Any incompatibility can lead to costly modifications, damage to the mold or machine, or simply prevent the mold from running. I always double-check these details.
- Plan for Future Upgrades and Scalability:
- Think about your long-term production goals. If you anticipate significant growth in demand, discuss this with your mold supplier from the outset.
- Scalability: Could a 2-cavity mold design be easily adapted to a 4-cavity version later?
- Machine Upgrades: If you plan to buy a faster, larger machine in the future, will the current mold design principles still apply, or would you need a completely different mold?
While you might not build for maximum capacity immediately, having a forward-thinking discussion can save you from redesigning everything from scratch later. Perhaps the core design can be made robust enough to be adapted.
- Think about your long-term production goals. If you anticipate significant growth in demand, discuss this with your mold supplier from the outset.
Here's a quick summary:
| Tip | Why it's Important | My Anecdote/Example |
|---|---|---|
| Select Expert Manufacturer | Ensures quality, reliability, proper design | A client's cheap mold from a non-specialist failed quickly due to poor cooling design. |
| Start Small (Single Cavity) | Reduces risk for new products, validates market | A beverage startup tested with a 1-cavity mold, then confidently ordered an 8-cavity once sales were proven. |
| Budget for Maintenance | Extends mold life, ensures consistent quality | Regular cleaning prevented residue buildup for a client, maintaining bottle clarity. |
| Confirm Machine Compatibility | Avoids costly modifications, ensures proper function | We once had to adjust mold base plates because the initial machine specs provided were slightly off. Catch it early! |
| Plan for Future Scalability | Prepares for growth, can save redesign costs | Discussing future needs helped a client choose a mold design that could be expanded with minimal changes. |
Following these suggestions will put you in a much stronger position to order the right PET bottle mold that meets your current needs and supports your future success.
Conclusion
Ordering a PET bottle mold involves careful thought. Focus on your production strategy, nail down your bottle design, understand costs, and choose your manufacturer wisely. These steps lead to success.
