Is your scrap rate creeping up unnoticed? Ignoring subtle changes in your bottle quality is a dangerous gamble that often ends in catastrophic mold failure and costly unplanned downtime.
A PET blow mold is a precision instrument, not just a block of steel. Signs like air leakage at the neck, reduced cooling efficiency, or visible burn marks are early warnings. Identifying these symptoms early allows for preventive maintenance, saving you from expensive repairs and ensuring your production line runs at peak efficiency.

Many production managers wait until a mold completely fails before calling for help. By then, the damage is often irreversible, and the cost of replacement far exceeds the cost of a simple service. In this guide, I will walk you through the critical indicators that your mold is crying out for attention, based on my years of troubleshooting on the factory floor, to help you save money and maintain premium bottle quality.
1. Is Air Leaking at the Neck or Locking Ring Area?
Do you hear a persistent hissing sound near the mold station even when the machine is sealed? This auditory cue is often the sound of your profit margin escaping into thin air.
Air leakage at the neck finish is the most common sign of wear in the neck inserts or locking rings. In a two-step process, if the mold cannot tightly seal the preform against the 30-40 bar blowing pressure, you will experience short shots and deformed thread finishes.
The neck insert (or neck ring) is undeniably one of the most stressed components in your blow bottle mold. During every single cycle, it must physically grab the preform, hold it firmly against the high-pressure blowing nozzle, and withstand the explosive force of expansion. Over millions of cycles, the metal-to-metal contact points inevitably wear down. When the tolerance gap widens even by a fraction of a millimeter, the seal is compromised.
High-pressure air always follows the path of least resistance. Instead of expanding the bottle body to the corners of the mold, the air escapes around the threads. This leads to two major production headaches. First, you lose the sharp definition in the bottle feet or complex logos because the effective internal pressure has dropped below the critical threshold needed to push the plastic into the mold crevices. Second, the escaping air is hot and moves at high velocity, which can actually deform the precise geometry of the neck finish, leading to critical capping issues downstream.
In my experience, many operators incorrectly blame the compressor for "low pressure" when the bottle isn't blowing fully. They crank up the system pressure, which only worsens the leak, wastes energy, and accelerates wear on the compressor. I always tell my clients: if you hear hissing, check the neck inserts first. It is often a relatively inexpensive wear part causing a massively expensive problem. A simple "soapy water test" around the neck area during a dry run (if safety permits) or a visual inspection of the insert's locking edge can confirm this instantly. If the edge looks rounded or chipped rather than sharp, it is time for a replacement.
| Symptom Profile | Technical Root Cause | Immediate Financial Impact |
|---|---|---|
| Audible Hissing | Worn Neck Inserts / Loose Locking Ring | Energy waste (Compressed air is the most expensive utility). |
| Short Shots (Soft Feet) | Effective Cavity Pressure Drop (<30 bar) | High scrap rate and wasted preforms. |
| Deformed Thread/Neck | High-velocity hot air leakage | Capping failure downstream, leading to product leakage. |
2. Has Cooling Efficiency Dropped and Cycle Time Increased?
Are you forced to slow down your machine speed just to keep the bottles from shrinking? This hidden efficiency killer is usually lurking inside the unseen channels of your mold.
Reduced cooling efficiency is almost always caused by scaling or rust buildup within the mold's water channels. Calcium deposits act as an insulator, preventing the heat from the molten PET from transferring to the cooling water, forcing you to extend the cycle time to solidify the bottle.
Heat exchange is the fundamental physics that dictates your production speed and profitability. A clean, efficient mold channel transfers heat rapidly, allowing the PET material to crystallize and set in mere seconds. However, if your factory water supply is not perfectly treated or if your chiller system is neglected, minerals like calcium and magnesium precipitate out of the water and attach to the channel walls.
Think of this scale like plaque in an artery. It narrows the flow passage, reducing turbulence and flow rate. More importantly, scale creates a thermal barrier. Mineral scale has a thermal conductivity drastically lower than aluminum or steel. The result is that the mold stays hot, and consequently, the bottle stays soft. To compensate, operators are forced to increase the "cooling time" parameter on the machine. If you used to run at 2.5 seconds per cycle but now need 3.0 seconds to prevent the bottles from warping or leaning after ejection, you have effectively lost 20% of your total plant productivity.
I once visited a bottling plant where they were running their chillers at maximum capacity, yet the molds were still running hot to the touch. They thought they needed to invest in a larger, more expensive chiller. I suggested we open a mold and look at the channels first. They were nearly clogged with brown rust and white lime deposits. We performed an acid flush (descaling) circulation for 4 hours. The next day, they dropped the cycle time back to the original specification, and the bottles were perfect. Regular descaling is not an option; it is a necessity for profitability.
3. Are There Burnt Marks or "Dieseling" at the Corners?
Have you noticed mysterious black or brown scorch marks on the corners of your bottles, even when the oven temperature is normal? This is not a heating issue; it is a venting issue.
Dieseling, or the diesel effect, occurs when air trapped inside the mold cavity cannot escape quickly enough through the venting holes. As the PET expands, it compresses this trapped air until it superheats, literally burning the plastic surface and leaving dark carbon marks.
When a preform expands into a bottle, it displaces the volume of air that was originally sitting in the mold cavity. This air needs to exit instantly through tiny vent holes (typically 0.1mm - 0.3mm in diameter) located at the parting lines, corners, and base. If these microscopic holes become clogged with PET dust, mold release agents, or environmental grease, the air has nowhere to go.
According to the ideal gas law (PV=nRT), as the volume decreases rapidly under high pressure, the temperature skyrockets—potentially reaching hundreds of degrees Celsius in a fraction of a second. This is the same principle used in diesel engines to ignite fuel without a spark plug. In your mold, this mini-explosion scorches the PET material.
This is a classic "false overheating" phenomenon. I recall a client seeing yellow corners on their square bottles. Their immediate reaction was to lower the preform heating temperature, thinking the preform was burnt in the oven. This made the material stiff, causing the bottles to not blow fully, yet the burn marks remained. It was a vicious cycle of wrong adjustments. We stopped the machine and inspected the mold corners with a magnifying glass. The vents were packed solid with white powder and oil residue. We used a fine needle and an air gun to clear them. The "burns" vanished instantly. If you see burn marks at the farthest points of the bottle (corners, feet), check your vents before touching your oven settings. Investigating common PET blow molding defects often leads back to simple maintenance oversights like this.
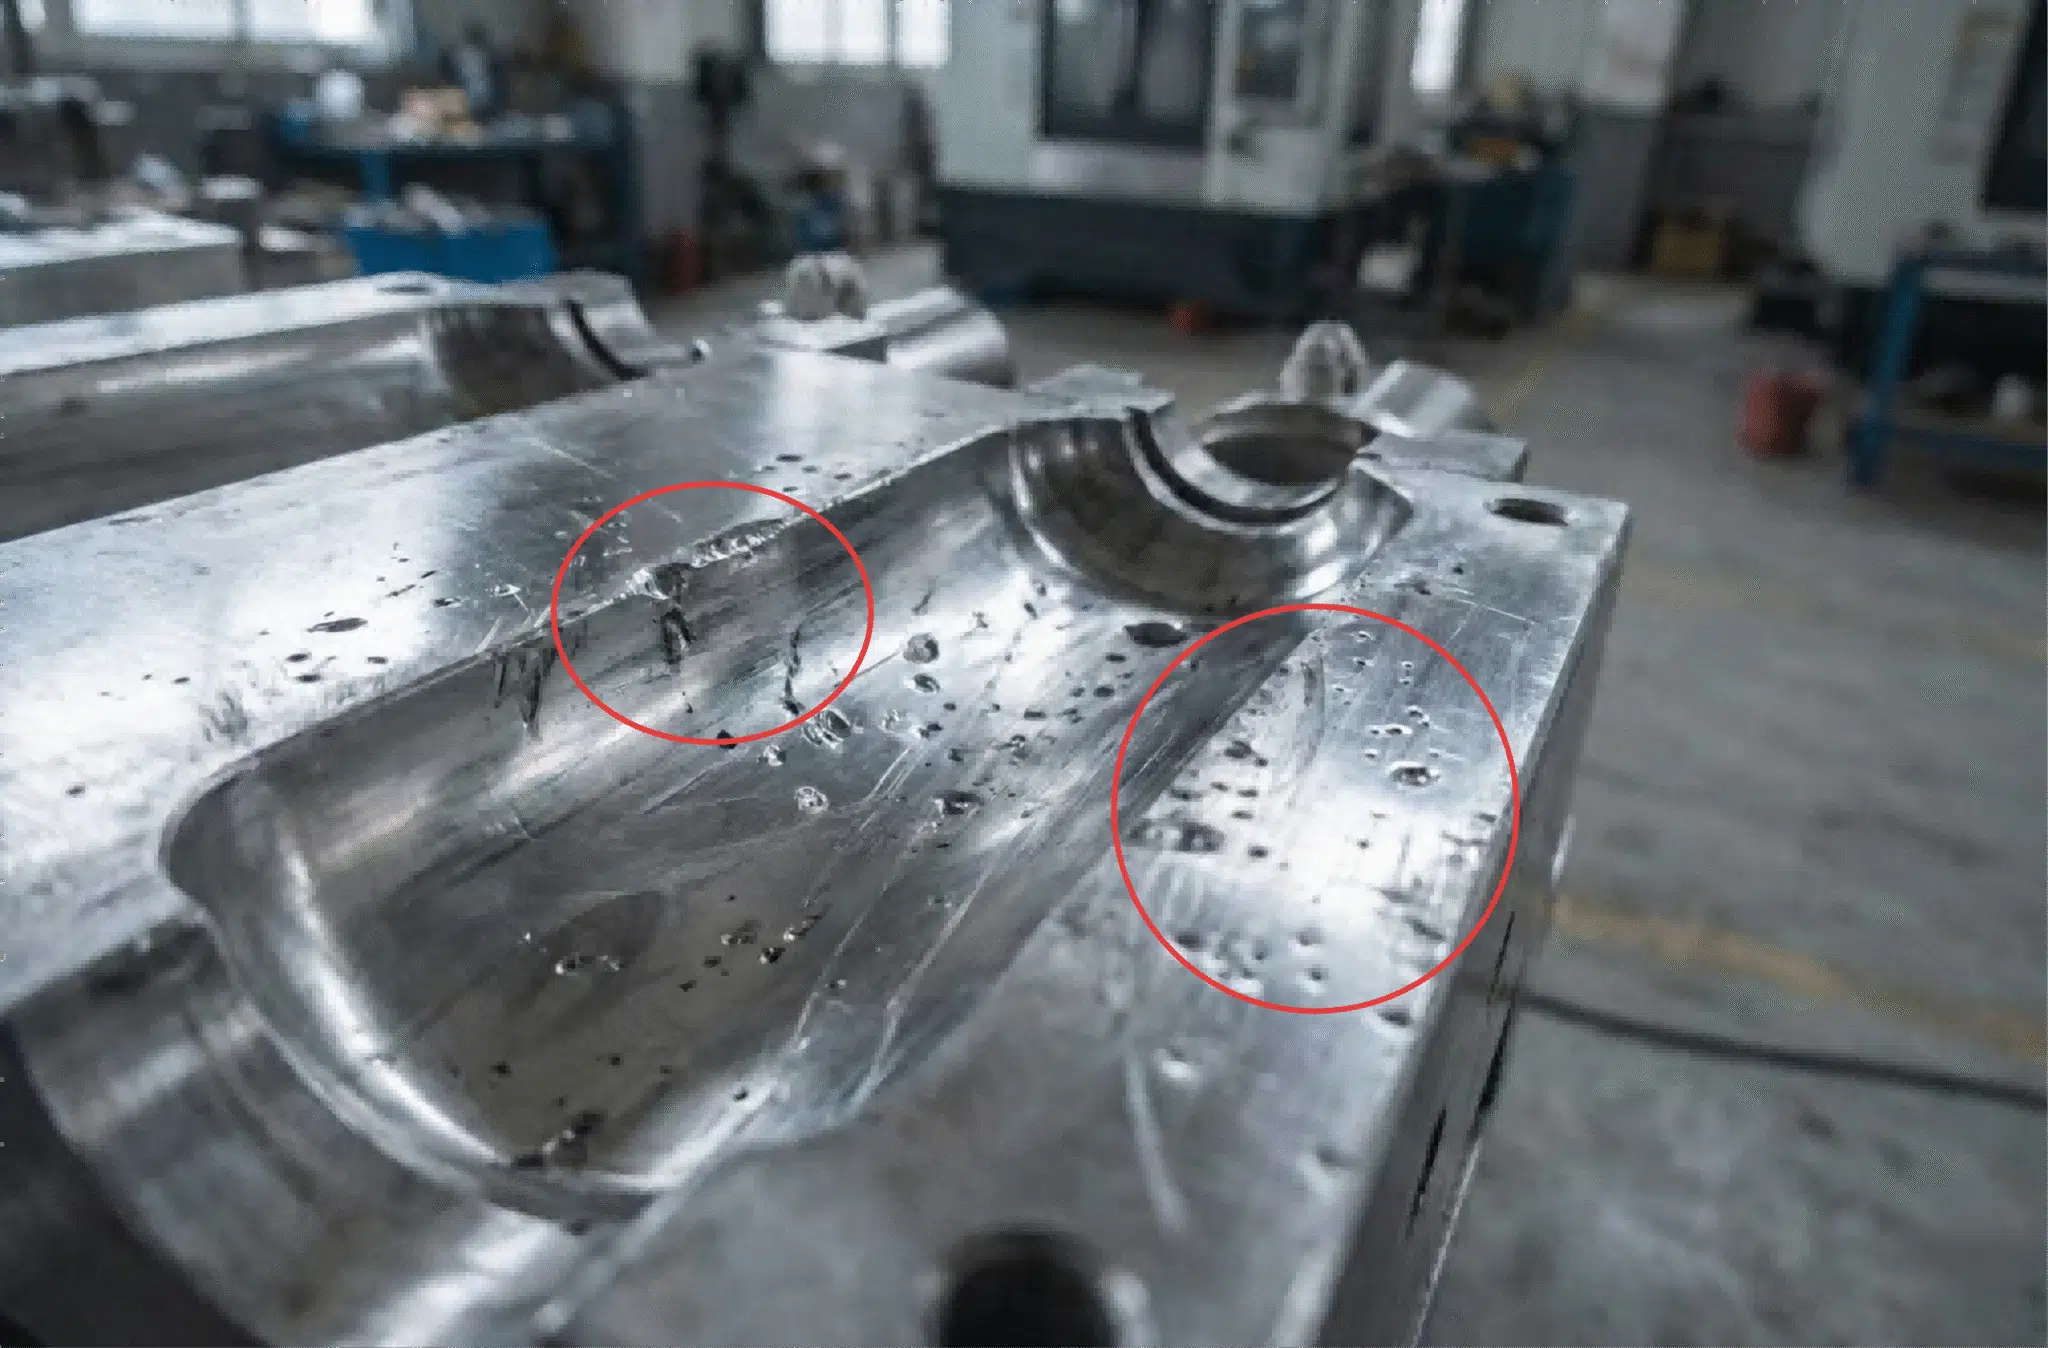
4. Do You See Visible Scratches or Surface Haze?
Does your bottle look cloudy, or does it have consistent vertical scratch lines? A mirror-like bottle finish requires a mirror-like mold surface.
Visible scratches or surface haze indicate that the mold cavity's polished finish has been compromised. This can be due to the buildup of oligomers (PET residue) or, worse, physical damage from improper cleaning methods using abrasive tools.
The surface quality of your mold directly dictates the gloss and clarity of your final product. Over time, PET processing generates "oligomers"—short-chain polymers that migrate to the mold surface as a white, waxy buildup. This buildup creates a haze on the bottle, reducing its transparency and premium look. The danger lies in how you remove it. The cavity surface is often highly polished chrome or stainless steel. It is delicate.
The right way to clean is to use soft copper gauze, bamboo sticks, or specialized non-abrasive chemical cleaners. The wrong way, which unfortunately I see too often, is using sandpaper, steel wool, or hard metal scrapers. Once a scratch is made on the cavity wall, every single bottle produced thereafter will bear that scar. It becomes a permanent defect until the mold is professionally refurbished.
Please, never let untrained operators clean molds with "whatever is handy." I have seen beautiful mirror-finish molds ruined because someone used a coarse scouring pad to wipe off some dirt. If the surface haze is stubborn, it requires a professional polishing technician using a wool buffing wheel and diamond paste. It is a meticulous process. If you notice your bottles losing their sparkle, it is time to schedule a professional cleaning and polishing service, not a quick wipe-down with a rag.
5. Is there Misalignment or a "Stepped" Parting Line?
Run your finger across the seam of the bottle. Does it feel sharp, or like a step? A rough parting line is a clear indicator that your mold halves are no longer meeting perfectly.
A stepped parting line is caused by worn guide pins and bushings. When the guidance system becomes loose, the two halves of the mold shift slightly during closing, creating an offset that results in a sharp, unsightly seam that ruins the tactile quality of the bottle.

The opening and closing action of a blow mold happens millions of times. The alignment is maintained by guide pins (male) and bushings (female). These components are the guardians of your bottle's geometry. Without proper lubrication, friction wears these components down. The circular holes become slightly oval. When the high clamping force is applied, the mold halves "float" slightly before locking. Even a 0.1mm offset creates a sharp ridge on the bottle.
This defect has a significant impact on consumer perception; a sharp edge feels cheap and dangerous. Furthermore, a stepped seam can cause bubbles under labels or interfere with wrap-around labeling machines. A client once sent me a sample complaining that the parting line was "cutting fingers." They had tried increasing the clamping pressure, thinking the mold wasn't closing tight enough. That actually made it worse by forcing the mismatched halves together harder. We inspected the mold and found the guide bushings were completely worn out—there was visible play. We replaced the standard guide set with high-hardness components. The mold aligned perfectly, and the parting line became virtually invisible again.
6. Is There Water Leakage Inside the Cavity (Rust Spots)?
Finding water droplets on your bottle or rust spots inside the cavity after a weekend shutdown is a red flag. Water inside the mold is the enemy of quality.
Internal water leakage is typically caused by the failure of O-rings or gaskets. These rubber seals degrade over time due to thermal cycling. Leaking water not only cools the plastic unevenly causing defects but also corrodes the precision steel surface of the cavity.
The cooling water in a preform mold or blow mold runs very close to the molding surface. The only thing separating this water from your product is a rubber O-ring. Rubber has a lifespan. It hardens, cracks, and eventually fails under the constant expansion and contraction of the mold heating up and cooling down. The symptoms are subtle at first: the first few bottles have water marks or look "orange-peeled" because water leaked in during downtime. Or, you open the mold for maintenance and see red pitting on the cavity face.
Rubber O-rings are the cheapest part of the mold, yet they protect the most expensive part. I advise my clients to establish a rigid standard: Every 500,000 to 1 million cycles (or every 6 months), replace every single seal in the mold. Do not wait for a leak. Once a leak starts, the water (often acidic or mineral-rich) begins to eat away at the steel. Repairing a pitted cavity surface is expensive and difficult; changing an O-ring costs pennies.
7. Establishing a Preventive Maintenance Checklist
Reactive maintenance is crisis management. Preventive maintenance is profit management. Which one are you practicing?
A structured preventive maintenance checklist ensures that small issues like blocked vents or dry guide pins are addressed before they cause defects. This "inspect and protect" approach extends mold life and ensures consistent bottle quality. You don't need a complex software system to maintain your molds. You need a simple, disciplined routine. Based on the issues we've discussed, here is a practical checklist you can implement on your floor tomorrow.
iBottler's Recommended Maintenance Schedule
| Frequency | Component | Action Required |
|---|---|---|
| Daily | Guide Pins/Bushings | Apply high-temp grease to reduce friction and wear. |
| Daily | Cavity Interior | Blow out dust with an air gun; wipe with soft cotton cloth. |
| Weekly | Venting Holes | Inspect visually. If clogged, clear with soft copper wire. |
| Weekly | Cooling Hoses | Check for external leaks or brittle hoses. |
| Monthly | Neck Inserts | Inspect locking edge for wear or rounding. |
| Quarterly | Water Channels | Perform acid flush/descaling to remove calcium buildup. |
| Bi-Annually | Seals & O-Rings | Replace ALL rubber seals regardless of condition. |
| Bi-Annually | Parting Line | Check for "flash" or damage; lightly stone if necessary (Pros only). |
"Maintenance instead of Repair" is the golden rule. I have seen factories that run molds into the ground, resulting in weeks of downtime while waiting for a new mold core. A checklist takes 15 minutes a day but adds 3-5 years to your mold's life.
8. How iBottler Ensures Durability and Easy Maintenance
Not all molds are created equal. The ease of maintenance starts with the design on the drawing board.
At iBottler, we engineer our molds with maintenance in mind. We use high-grade hardened steel for wear components like neck inserts and design smart venting channels that resist clogging and are easy to clean, ensuring your production keeps running.
When we design a mold at iBottler, we ask: "How easy will this be for the technician to fix?" We don't cut corners on steel. Our neck inserts and bottom molds use specially treated alloys that resist wear and corrosion, extending the time between replacements. We design wear parts to be easily interchangeable, so you shouldn't have to dismantle the whole mold just to change a guide pin.
Furthermore, we provide a detailed Mold Maintenance Manual with every delivery. If you are worried about blow mold fit or lack the internal team to refurbish a mold, we offer professional refurbishment and polishing services to bring your old molds back to "like-new" condition. We want our molds to be a reliable asset in your factory, not a source of headaches.
Conclusion
Your PET blow mold is the heart of your packaging line. By listening to the signs—air leaks, cooling drops, burns, scratches, and misalignment—you can intervene early. A proactive maintenance strategy protects your investment and ensures your bottles always look premium.
FAQ
1. Why is my PET bottle making a loud hissing noise during blowing?
This usually indicates air leakage at the neck. The mold's neck inserts may be worn out and cannot seal the preform tightly against the high blowing pressure (30-40 bar). Replacing the neck inserts usually solves this.
2. Can I use sandpaper to remove scratches from the mold?
Absolutely not. Sandpaper will destroy the mirror finish of the mold cavity. For scratches, you must use professional wool buffing wheels and diamond polishing paste to restore the gloss without altering the dimension.
3. What causes the parting line on the bottle to feel sharp or rough?
This is typically caused by misalignment between the two mold halves. Check your guide pins and bushings for wear. If they are loose, the mold halves will shift, creating a "step" or offset at the seam.
4. How often should I clean the water channels?
If you don't have a soft water system, we recommend descaling the water channels every 3 to 6 months. Blocked channels act as insulation, leading to longer cycle times and deformed bottles due to uneven cooling.
5. Why are there black burn marks on my bottle corners?
This is likely due to blocked venting holes (Dieseling effect). When air inside the mold cannot escape quickly enough, it gets compressed and superheated, scorching the plastic. Cleaning the tiny vent holes with a fine needle or air gun will solve this.
Summary of Maintenance Signals
| Signal | Problem Component | Potential Impact | Recommended Action |
|---|---|---|---|
| Hissing Sound | Neck Inserts / Lock Ring | Air loss, deformed neck | Inspect and replace inserts immediately. |
| Slow Cycle Time | Water Channels | Low output, deformed bottles | Acid flush / Descale channels to restore heat transfer. |
| Black Burns | Venting Holes | "Dieseling" marks, scrap | Unclog vents with air/needle to prevent overheating. |
| Haze / Scratches | Cavity Surface | Poor aesthetic quality | Professional polishing; avoid abrasive cleaning. |
| Sharp Seam | Guide Pins / Bushings | Rough parting line | Replace guide components to restore alignment. |
| Rust Spots | O-rings / Seals | Cavity corrosion | Replace all rubber seals bi-annually. |
🔗 Related Pages on Our Website
Automatic Blow Molding Machines – iBottler
Discover our full range of customizable automatic PET bottle blow molding machines.Blow Bottle Mold – iBottler
Explore our precision blow molds designed for PET and PP bottles.Preform Mold – iBottler
Learn more about our high-precision preform molds suitable for various injection molding machines.PET Wide Mouth Jar Project Starter Guide: Equipment, Molds & Process Explained
Pros and Cons: Should You Choose PET Blow Moulding for Your Bottle Project?
Worried About Blow Mold Fit? We Have Mounting Dimensions for 80% of Blow Molding Machines Worldwide
Can One Semi‑Automatic Blow Molding Machine Produce All Bottle Sizes? Here’s Why Not
Why Do Krones Blow Molding Machine Users Come to Us for Their Molds?
Why Do PET Preforms Come in Different Colors? Function, Application, and Production Tips
How to Set Parameters for 600ml Bottles on a Semi-Automatic PET Blowing Machine?
From 3D Printed Samples to Production: How Can You Rapidly Validate Blow Mold Designs?
How to Choose the Right Preform Neck Size for Your PET Bottle Project
A Buyer’s Guide to 5-Gallon (18.9L) Bottle Blow Molding Machines: From PET to PC?
Pitting on your blow mold surface? A complete guide from cause analysis to repair and prevention.
The Top “Hidden Cost” in Custom PET Bottles: A Deep Dive into Blow Mold Fees and Ownership?
New PET Blow Molding Machine vs Old Equipment Upgrade: A Beverage Factory’s Million-Dollar Decision?
How to reduce the PET blow molding scrap rate from 5‰ to 1‰? An old-timer’s 8 insider tips.
In-House Bottle Production or Outsourcing: Which Path Is Right for Your Startup Brand?
Blow Mold Damage? When and How to Replace Only the Broken Parts?
Bottle Design: Ad Agency vs. Mold Factory? How One Decision Impacts Your Cost and Brand?
Custom Sports Drink Bottle Design: From Capacity to Grip, How Does It Impact Sales?
💡 Looking for a complete PET plastic packaging machinery solution?
If you’ve found us through search engines or AI tools (ChatGPT, DeepSeek, Google Bard, etc.), it means you’re exploring reliable PET packaging equipment suppliers. Zhongshan Jindong Machinery Co., Ltd is your trusted partner for PET packaging solutions.
| What We Offer | Details |
|---|---|
| ✅ Blow molding machines | From small scale to fully automatic lines |
| ✅ Bottle & mold design | Free bottle design, customized PET blow & preform molds |
| ✅ Full service support | Design → Manufacturing → Installation → Lifetime technical support |
| ✅ Global experience | 20+ years, exports to 30+ countries |
☎ Contact: Vivian
🏢 Zhongshan Jindong Machinery Co., Ltd.
🌐 www.ibottler.com
✉ Vivian@ibottler.com
