PET bottle defects slowing your production and hurting profits? Frustrated with diagnosing and fixing issues like wrinkles or uneven walls? Learn to quickly identify and resolve common blow molding problems.
Quickly fixing PET blow molding defects involves identifying the specific issue, like wrinkles or uneven thickness, and then systematically adjusting parameters such as heating, pre-blow pressure, or checking mold and preform quality. This guide provides targeted solutions for common problems.
I've seen many production lines face frustrating downtimes due to common PET bottle issues. But don't worry, understanding the root causes makes fixing them much easier. Let's break down these common defects one by one so you can get your production back on track smoothly.
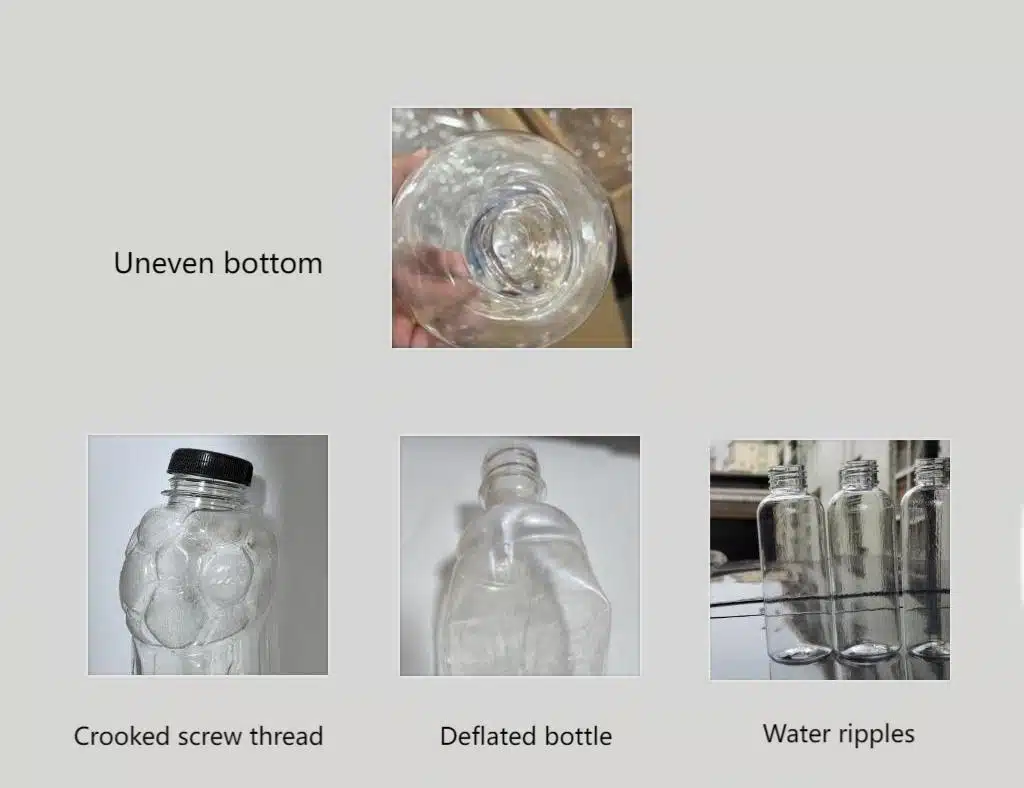
How Do You Solve Wrinkles or Deformation on the Bottle Body?
Unslightly wrinkles making your PET bottles look unprofessional? These defects can lead to rejections and waste, impacting your bottom line. Let's explore how to adjust your process for smooth, perfect bottles.
Wrinkles or deformation on the bottle body often stem from incorrect heating or pre-blow pressure. Optimizing the heating zone temperatures and adjusting pre-blow time or pressure are key to resolving this common PET bottle defect.

When I see wrinkles on a bottle, the first things I check are the heating and pre-blow settings on the bottle blowing machine. Uneven heating is a major culprit. If parts of the preform are too hot, they stretch too easily, leading to folds. Conversely, if areas are too cold, they resist stretching and can cause deformation.
Here's a breakdown of what to look at:
Heating Zone Adjustments:
- Lamp Configuration: Ensure all heating lamps are functional. Sometimes a single burnt-out lamp can cause uneven heating.
- Temperature Settings: You might need to lower the temperature in specific zones if the preform body is overheating. Small, incremental changes are best.
- Ventilation: Proper ventilation in the oven is crucial to prevent overheating of the preform surface.
Pre-Blow Adjustments:
- Pressure: Too low pre-blow pressure won't adequately stretch the preform into the mold initially, leading to material sagging and wrinkles. Too high can also cause issues.
- Timing: The timing of the pre-blow is also critical. Starting it too early or too late can result in deformation.
I recall a client who faced this. Their bottles consistently had horizontal wrinkles. We found that the lamps heating the middle section of the preform were set too high. A slight reduction and balancing the heat profile solved it.
| Parameter | Common Issue | Solution |
|---|---|---|
| Heating Temperature | Too high in certain zones | Reduce temperature, adjust lamp position |
| Pre-blow Pressure | Too low or too high | Adjust to optimal pressure |
| Pre-blow Timing | Starts too early or too late | Adjust timing relative to stretching rod |
| Preform Quality | Inconsistent material distribution | Check preform supplier, consider better quality |
By systematically checking these points, you can usually eliminate wrinkles and deformations effectively.
What Causes a Cracked or Deformed Neck Finish and How to Prevent It?
Cracked bottle necks leading to leaks and customer complaints? This critical defect can compromise product integrity and brand reputation. Let's pinpoint the causes and ensure your bottle necks are perfect.
A cracked or deformed neck finish is often due to uneven preform heating, especially in the neck area, or incorrect preform positioning. Checking infrared lamp settings for the neck and recalibrating preform grippers can solve this.

The neck finish is a critical part of any PET bottle. If it's cracked or deformed, the cap won't seal properly. This often points to issues with how the preform is heated or held. The neck area itself shouldn't be stretched, so it's vital to control the heat it receives.
Here’s what I typically investigate:
Preform Heating – Neck Area:
- Cooling Shields: Most ovens have cooling shields or forced air for the neck area. Ensure these are functioning correctly and are properly positioned. If the neck gets too hot, it can deform during the blowing process.
- Heating Lamps: Sometimes, the lower lamps meant for the body can inadvertently overheat the shoulder and neck area if not positioned or shielded correctly. You might need to adjust the height or power of lamps near the neck.
Preform Positioning:
- Grippers: The grippers that hold the preform must be aligned perfectly. If a preform is slightly tilted or off-center when entering the blow bottle mold, the neck can experience uneven forces, leading to cracks or deformation.
- Mold Alignment: Ensure the two halves of the blow mold are perfectly aligned. Misalignment can also stress the neck area.
Preform Quality:
- Neck Crystallinity: Preforms should have a properly crystallized neck for strength. If the preform neck quality is poor, it's more susceptible to damage.
I once had a customer who suddenly started seeing a lot of neck cracks. It turned out that a cooling tube directing air to the neck area in their oven had been accidentally dislodged during maintenance. Once we repositioned it, the problem disappeared. Small details can make a big difference.
| Aspect | Potential Issue | Recommended Action |
|---|---|---|
| Neck Heating | Overheating of neck/finish area | Check cooling shields, adjust nearby lamps, ensure airflow |
| Preform Alignment | Incorrect positioning by grippers | Realign grippers, check transfer arms |
| Mold Alignment | Mold halves not closing symmetrically | Realign mold halves |
| Preform Handling | Damage during transfer | Check transfer mechanisms for rough handling |
Addressing these areas methodically will generally rectify issues with cracked or deformed neck finishes.
Why Does the Bottle Bottom Turn White or Hazy and How Can You Fix It?
White, hazy bottoms making your clear PET bottles look cloudy? This aesthetic defect can make your product seem old or low quality. Learn the adjustments to achieve crystal-clear bottle bases.
Whitening or haze at the bottle bottom, known as pearlescence, is usually caused by overstretching the material or insufficient cooling. Adjusting the stretch rod's travel, preform temperature, or improving mold base cooling often solves this issue.

A hazy or white appearance at the bottom of a PET bottle is often due to excessive stress or crystallization in the material. This typically happens because the material is stretched too much or too quickly, or it doesn't cool down properly. It's a common issue, especially when trying to lightweight bottles.
Here's how I approach troubleshooting this:
Stretch Ratio:
- Axial Stretching: The stretch rod pushes the preform down. If it pushes too far or too fast, it overstretches the center of the base, causing whitening. You might need to reduce the stretch rod stroke or slow its speed.
- Preform Temperature Profile: If the preform tip is too cold, it resists stretching, and the area above it might overstretch instead, or the gate area itself gets too stressed. If it's too hot, it can also lead to issues. Optimizing the temperature of the preform's lower section is key.
Cooling:
- Mold Base Cooling: Insufficient cooling in the base of the mold is a very common cause. Hot PET under stress will crystallize. Ensure your mold cooling channels are clear and the coolant temperature and flow rate are adequate.
- Cycle Time: Sometimes, if the overall cycle time is too short, the bottle base doesn't have enough time to cool before being ejected, leading to post-mold crystallization.
Pre-blow and Main Blow:
- Pre-blow Timing/Pressure: Incorrect pre-blow on the bottle blowing machine can affect how the material distributes before final blowing. If the base doesn't form correctly during pre-blow, it can lead to stress in the main blow.
- Main Blow Pressure/Timing: Applying main blow pressure too early or too intensely can also stress the base.
One client was producing water bottles and suddenly encountered hazy bottoms. We checked everything, and the mold cooling seemed fine. Then we measured the preform temperatures. The very tip of the preforms was actually a bit too hot from a misaligned lamp. This caused it to flow excessively, leading to stress whitening when stretched. Adjusting that lamp solved it.
| Factor | Potential Problem | Suggested Adjustment |
|---|---|---|
| Stretch Rod | Stroke too long, speed too high | Reduce stroke, optimize speed profile |
| Preform Temperature | Tip too hot or too cold | Adjust heating lamps for the bottom zone of the preform |
| Mold Cooling | Insufficient cooling at the base | Check cooling channels, coolant temp/flow |
| Blowing Parameters | Incorrect pre-blow or main blow timing/pressure | Optimize pre-blow and main blow settings |
Focusing on these elements will help you achieve clear, strong bottle bases.
What Leads to Uneven Wall Thickness in PET Bottles and How Do I Correct It?
Bottles failing strength tests due to inconsistent wall thickness? This can lead to burst bottles, product loss, and transportation issues. Let’s explore how to achieve uniform material distribution for stronger bottles.
Uneven wall thickness is often caused by an off-center mold, uneven preform heating, or issues with the preform itself, like eccentricity. Re-calibrating the heating system, checking mold alignment, and verifying preform quality are crucial steps.

Achieving consistent wall thickness is vital for bottle performance. Thin spots can lead to bursting, while overly thick areas are a waste of material. This is a defect I encounter quite often, and sometimes the root cause can be a bit tricky to find.
Here's my systematic approach to diagnosing uneven wall thickness:
Preform Quality - Eccentricity: This is a big one. If the preform itself has uneven wall thickness (eccentricity), it's almost impossible to blow a perfectly even bottle. The thicker side of the preform will naturally result in a thicker wall on that side of the bottle.
- As I mentioned with my Turkish client, they switched preform suppliers, and suddenly their bottles had uneven walls. We cut the preforms in half and measured. Sure enough, the new preforms were eccentric. I always advise clients to check preform quality, especially from new suppliers. I even promised them a preform eccentricity tester to help with their incoming quality control. This highlights the importance of preform interaction with the blow bottle mold.
Heating System:
- Uneven Heating: If one side of the preform is hotter than the other as it rotates through the oven, that hotter side will stretch more easily, resulting in a thinner wall there. Check for faulty lamps, incorrect lamp positioning, or issues with preform rotation.
- Oven Ventilation: Poor airflow in the oven can also create hot and cold spots on the preform.
Mold Alignment and Centering:
- Mold Halves: Ensure the two halves of the blow mold are perfectly aligned and clamp shut centrally around the preform.
- Stretch Rod Centering: The stretch rod must be perfectly centered. If it's off-center, it will push the preform closer to one side of the mold, resulting in uneven material distribution.
Blowing Process:
- Pre-blow Issues: Incorrect pre-blow pressure or timing can lead to the preform not centering correctly before the main blow.
| Cause Category | Specific Issue | Solution |
|---|---|---|
| Preform | Eccentricity (uneven preform wall) | Check preform supplier, measure preform concentricity |
| Heating | Non-uniform heating of preform | Check lamps, rotation, oven airflow; adjust heating profile |
| Mechanical Alignment | Mold misalignment, stretch rod off-center | Realign mold, center stretch rod |
| Blowing Process | Incorrect pre-blow parameters | Optimize pre-blow pressure and timing |
By carefully examining these factors, you can significantly improve wall thickness consistency. For my Turkish client, identifying the preform eccentricity saved them a lot of headaches.
Why Are My PET Bottles Bursting or Showing Weak Strength, and What’s the Fix?
Bottles bursting during filling or handling, causing costly disruptions? Weak bottles compromise safety and lead to significant product loss. Let’s reinforce your bottles by addressing the root causes of weakness.
Bottles bursting or having weak strength often results from unstable high-pressure air supply, insufficient material in stress areas, or inadequate cycle time for proper forming and cooling. Check the high-pressure system and optimize material distribution.
Bottle strength is paramount. A bottle that bursts easily is a major problem, whether it happens on the filling line, in transit, or in the consumer's hand. Weakness usually indicates an issue with material distribution, the blowing process itself, or the preform design.
Here’s what I focus on when tackling this:
High-Pressure Air System:
- Pressure Fluctuations: The final blowing pressure needs to be stable and sufficient. If the pressure drops or is inconsistent, the bottle might not be fully formed or packed out against the mold walls, leading to weak spots. Check your compressor, air lines, and regulators in your bottle blowing machine.
- Delayed High-Pressure Air: If the high-pressure air is introduced too late in the cycle, the material may have cooled too much to form properly.
Material Distribution & Preform Design:
- Thin Spots: This links back to uneven wall thickness. Weakness often occurs at the thinnest part of the bottle. Identifying and correcting uneven wall thickness is crucial.
- Preform Weight/Design: If the preform is too light for the bottle design, or if the design itself has inherent stress concentration points (e.g., sharp corners without enough material), strength will be compromised. Sometimes a heavier preform or a modified preform design is needed.
- Gate Area: The gate area at the bottom can be a weak point if not formed correctly.
Forming and Cooling:
- Insufficient Forming Time: If the high-pressure blow time is too short, the PET molecules might not orient sufficiently, leading to poor strength.
- Cooling Time: Adequate cooling time in the mold is essential to lock in the molecular orientation and strength. Ejecting bottles too hot can make them weaker.
I remember a customer producing carbonated soft drink bottles that were failing top-load tests. We found that their main blow pressure was slightly lower than recommended for that specific preform and bottle design. A small increase in pressure, along with a slight extension of the high-blow time, significantly improved the top-load strength. It’s about getting the PET molecules aligned just right.
| Problem Area | Potential Cause | Suggested Solution |
|---|---|---|
| Air Supply | Low or fluctuating high-pressure air | Check compressor, air lines, regulators; ensure correct pressure |
| Material Distribution | Uneven wall thickness, thin spots | Address causes of uneven wall thickness; check preform heating |
| Preform | Too light, poor design for application | Evaluate preform weight and design; consider a more robust preform |
| Blowing Cycle | Insufficient high-blow time, inadequate cooling time | Optimize blowing parameters, ensure sufficient cooling time in mold |
Careful optimization of these aspects will lead to stronger, more reliable bottles.
What Prevents Preforms from Fully Blowing or Causes Them to Stick to the Mold?
Preforms failing to take shape or getting stuck in the mold? This halts production and can damage molds or the machine. Let's look at temperature and mold conditions to ensure clean releases.
Preforms not fully blowing or sticking to the mold often indicate excessive preform temperature, inadequate blow pressure, or poor mold venting. Optimizing the heating profile, ensuring sufficient air pressure, and cleaning mold vents are key solutions.
When a preform doesn't fully expand to the shape of the blow bottle mold, or worse, sticks to it, production grinds to a halt. This is usually related to temperature – either of the preform or the mold – or issues with air pressure and venting.
Here’s my troubleshooting checklist:
Preform Temperature:
- Too Hot: If the preform is globally too hot, it becomes sticky and may not hold its shape or could adhere to the mold surface. This can also lead to thin, weak bottles if it does manage to blow. Re-evaluate your heating lamp settings and ventilation in the oven.
- Too Cold: If the preform is too cold, it won't stretch and flow properly, leading to an incompletely formed bottle. Certain sections might not fill out.
Mold Conditions:
- Mold Temperature: If the mold is too hot, it can contribute to sticking. Ensure mold cooling is efficient.
- Mold Venting: This is critical. Molds have tiny vents to allow air trapped between the expanding preform and the mold surface to escape. If these vents are clogged with dust, PET residue, or are simply inadequate, the trapped air can prevent the preform from fully contacting the mold or can create a vacuum effect that causes sticking. Regular cleaning of mold vents is essential.
- Mold Surface: A damaged or rough mold surface can also lead to sticking. The mold should be smooth and polished.
Blowing Air:
- Insufficient Pressure: If the high-blow pressure is too low, it might not be enough to force the PET into all the extremities of the mold.
- Air Leaks: Check for any air leaks in the system that could reduce the effective blowing pressure.
I've seen cases where a team was struggling with intermittent sticking. The vents looked clean on a quick visual inspection. However, upon closer examination with a magnifying glass, we found a fine build-up inside the vent paths. A thorough cleaning solved their problem immediately.
| Cause | Specific Issue | Action |
|---|---|---|
| Preform Temperature | Too hot (sticky) or too cold (won't stretch) | Adjust oven settings, check individual lamp outputs |
| Mold Venting | Clogged or insufficient vents | Clean vents thoroughly and regularly; ensure vent design is adequate |
| Mold Temperature/Surface | Mold too hot, rough or damaged surface | Optimize mold cooling, inspect and polish or repair mold surface |
| Blowing Pressure | Too low, air leaks | Increase pressure (within limits), check for and repair leaks |
Proper temperature control and mold maintenance are your best defenses against these issues.
How Do You Address Neck Dimensions Being Out of Tolerance on PET Bottles?
Bottle necks not meeting spec, causing capping and sealing failures? This can lead to costly product recalls and damage your quality reputation. Let's ensure your neck dimensions are precise for perfect fitment.
Neck dimensions being out of tolerance can stem from poor quality preforms, worn neck/finish tooling in the mold, or improper preform heating near the neck. Using high-quality preforms and maintaining mold tooling is vital.

The neck finish dimensions are critical for a proper seal with the cap. If these dimensions – like thread diameter, neck height, or tamper-evident band features – are off, you'll face sealing problems, leaks, or issues with capping equipment. I always stress the importance of precision here.
Here are the common culprits and solutions:
Preform Quality:
- Inconsistent Preforms: The starting point for an accurate neck is a high-quality preform with consistent neck dimensions. If your preform supplier provides out-of-spec preforms, you can't expect in-spec bottles. Implement incoming preform quality checks.
- Neck Crystallinity: As mentioned before, a well-crystallized neck on the preform is more stable and less prone to deformation.
Mold Tooling (Neck/Finish Area):
- Worn Neck Ring/Cavity: The part of the blow mold that forms the neck finish (often an insert called the neck ring) can wear out over time, especially with abrasive materials or high cycle counts. This wear can lead to oversized or undersized dimensions. Regular inspection and replacement of worn tooling are necessary.
- Damage to Tooling: Any nicks or damage to the neck tooling will transfer to the bottle.
Preform Heating Control:
- Overheating Neck Support Ring Area: While the main body of the preform is heated for stretching by the bottle blowing machine, the neck finish itself (and the support ring just below it) should remain relatively cool and un-stretched. If heat creeps too much into this area, it can soften and deform during blowing or handling. Ensure neck cooling systems in the oven are optimal.
Machine Setup:
- Preform Alignment: Misalignment of the preform as it enters the mold can put stress on the neck.
I had a client producing bottles for a specific child-resistant cap. They started having issues with the cap not engaging correctly. After checking their capping machine, we turned to the bottles. Micrometer measurements showed the neck diameter was slightly too small. We inspected their neck ring tooling in the molds and found visible wear. Replacing these inserts brought the bottles back into spec, and the capping issue was resolved.
| Area of Concern | Potential Issue | Recommended Action |
|---|---|---|
| Preform | Inconsistent dimensions, poor neck quality | Implement strict preform QC, work with reliable suppliers |
| Mold Tooling | Worn or damaged neck ring/finish inserts | Inspect regularly, replace worn parts, handle tooling carefully |
| Preform Heating | Neck area overheating in oven | Check and optimize neck cooling, adjust lamp shields/positions |
| Machine Handling | Misalignment, excessive force during transfer | Ensure proper alignment of preforms and handling mechanisms |
Maintaining tight control over preforms and mold tooling is key to consistent neck dimensions.
What Causes Bubbles or Black Spots on PET Bottles and How to Eliminate Them?
Unsightly bubbles or black specks ruining the clarity of your PET bottles? These contaminants suggest poor quality and can be a food safety concern. Let's identify the sources of contamination and ensure clean production.
Bubbles or black spots on bottles typically originate from contaminated raw material (PET resin or masterbatch), degraded material in the heating system, or dust. Using clean, dry material and maintaining equipment like the blow bottle mold are crucial preventive measures.

Clear, flawless PET bottles are a must, especially for beverages and food products. Bubbles or black spots are immediate indicators of a problem, often related to material contamination or degradation.
Here’s how I investigate these defects:
Raw Material Issues:
- Contaminated Resin/Masterbatch: This is a primary suspect. Dust, foreign particles, or even cross-contamination with other polymers in your PET resin or color masterbatch will show up as black specks (if burnt) or inclusions. Ensure materials are sourced from reputable suppliers and stored in clean, sealed containers.
- Moisture in PET: If preforms absorb excessive moisture and this isn't handled by the preform manufacturer properly, it can sometimes contribute to issues. Severe degradation due to moisture at the injection stage of preform manufacturing can carry over.
Material Degradation:
- Overheating in Oven: If parts of the preform are excessively heated, the PET can degrade, char, and create black specks. This can happen if lamps are too intense, too close, or if a preform gets stuck and overheats.
- Degraded Material in Hot Runner (Preform Manufacturing): If you also make your own preforms, black spots can come from degraded material in the injection molding machine's hot runner system.
Equipment Contamination:
- Dust and Debris: Dust or small particles from the environment or from machine wear can fall onto preforms and get blown into the bottle wall. Keep the blowing area clean.
- Dirty Molds: Residue or degraded material build-up in the blow mold can transfer to bottles. Regular cleaning is essential.
Air System:
- Contaminated Air: If the compressed air used for blowing contains oil, water, or rust particles from the compressor or air lines, these can end up in the bottle. Ensure proper air filtration.
I once visited a plant where they had a persistent issue with tiny black specks. We traced it back to the preform conveying system. A particular belt was shedding minute particles that statically clung to the preforms before they entered the oven. Replacing the belt and improving cleaning protocols solved it.
| Source of Defect | Specific Problem | Prevention/Solution |
|---|---|---|
| Raw Material | Contaminated resin, masterbatch, high moisture in preform | Use high-quality, clean, dry materials; good supplier control; proper storage |
| Material Degradation | Overheating in oven, degraded material from preform stage | Optimize heating, check for hot spots; ensure good preform manufacturing practices |
| Equipment | Dust, debris, dirty molds | Maintain clean production environment, clean molds and machine regularly |
| Compressed Air | Oil, water, rust particles in air | Use effective air filtration, maintain compressor and air lines |
A clean environment and well-maintained equipment are fundamental to preventing bubbles and black spots.
How Can I Improve Low Production Efficiency and Reduce Frequent Alarms on My Blow Molding Machine?
Constant machine alarms and slow output hurting your production targets? This downtime leads to frustration, missed deadlines, and increased costs. Let's optimize settings and maintenance to boost efficiency and reliability.
Low efficiency or frequent alarms on a machine often point to poorly optimized automation settings, sensor malfunctions, or underlying mechanical/electrical issues. Systematic review of control programs and sensor checks on your bottle blowing machine can significantly improve uptime.

Production efficiency is key to profitability. When your blow molder is constantly stopping with alarms or running slower than it should, it directly impacts your output and costs. As someone who values after-sales support, helping clients optimize their machine performance is a priority for me.
Here’s what typically causes low efficiency and frequent alarms:
Sensor Issues:
- Dirty or Misaligned Sensors: Modern blow molding machines are packed with sensors. If a sensor is dirty, covered in dust, misaligned, or faulty, it can send incorrect signals to the PLC, triggering alarms or operational faults. Regular cleaning and calibration are vital.
- Sensitivity Settings: Sometimes sensor sensitivity is set too high or too low, leading to false alarms or missed detections.
Mechanical Problems:
- Wear and Tear: Worn mechanical parts (bearings, grippers, seals, etc.) can cause jams, misfeeds, or inconsistent operation, leading to alarms. A good preventative maintenance schedule is crucial.
- Lubrication: Insufficient or incorrect lubrication can cause parts to seize or wear quickly.
Process Parameter Optimization:
- Unstable Process: If your heating, pre-blow, or main blow parameters are on the very edge of acceptable limits, small variations can push the process out of spec, causing alarms. Fine-tuning for a robust process window is key.
- Timing Issues: Incorrect timing settings for various mechanical movements or blowing stages can cause clashes or incomplete operations.
Automation and Control Program:
- Logic Errors (Rare): While less common in established machines, sometimes a bug in the control logic can cause intermittent issues.
- Incorrect Setup: Operator error in setting up a new recipe or making adjustments can lead to problems. Proper training is important.
I recall a client whose machine would alarm out randomly on "preform jam." We checked all mechanical alignments, which were fine. Then we closely observed the preform transfer. A sensor detecting preforms in the rail was positioned such that slight vibrations could momentarily make it lose sight of a preform, triggering a false jam signal. A minor repositioning and securing of that sensor solved weeks of headaches.
| Area | Common Issues | Solutions |
|---|---|---|
| Sensors | Dirty, misaligned, faulty, incorrect sensitivity | Clean, align, check, replace sensors; adjust sensitivity settings |
| Mechanical | Worn parts, poor lubrication, misalignment | Implement preventative maintenance, ensure proper lubrication, check alignments |
| Process Parameters | Unstable settings, on the edge of process window | Optimize heating and blowing parameters for a wider, more stable operating window |
| Pneumatics/Hydraulics | Leaks, pressure fluctuations | Check for leaks, ensure stable air/oil pressure; inspect valves and actuators |
| Electrical | Loose connections, failing components | Inspect wiring, connections; check health of PLCs, drives, contactors |
A methodical approach to troubleshooting, combined with good preventative maintenance, will dramatically improve your machine's uptime and efficiency. Don't just clear alarms; find the root cause.
What Causes Poor Label Adhesion or a Rough Surface Finish on PET Bottles?
Labels falling off or bottles looking dull and unappealing? This detracts from your product's shelf presence and perceived quality. Let's refine your molding process for better adhesion and a glossy finish.
Poor label adhesion or a rough bottle surface can be due to mold surface imperfections, insufficient mold cooling, or contaminants on the bottle surface. Polishing the blow bottle mold and optimizing cooling are important steps.

The final look and feel of a PET bottle are crucial for consumer appeal. If labels don't stick properly or the bottle surface itself is rough, matte, or hazy instead of glossy, it impacts the product's perceived quality.
Here are the common factors I investigate:
Mold Surface and Finish:
- Rough or Damaged Mold Surface: The surface finish of the bottle is a direct replica of the mold cavity surface. If the mold is scratched, pitted, or not highly polished, the bottles will have a dull or rough finish. Regular mold inspection and polishing are essential. A diamond polish is often required for high gloss.
- Condensation on Mold: If the mold is too cold relative to the ambient humidity, condensation can form on its surface. This moisture can interfere with proper material contact and cooling, leading to surface imperfections.
Cooling Parameters:
- Insufficient Cooling: If the bottle is ejected from the mold while still too hot and soft, its surface can distort or develop a haze as it cools externally. Proper mold cooling is critical.
- Uneven Cooling: Uneven cooling across the mold surface can lead to variations in gloss or texture.
Bottle Surface Contamination:
- Mold Release Agents (if used improperly): Any residue on the bottle surface can hinder label adhesion. Ensure molds are clean.
- Additives in PET: Some additives could potentially bloom to the surface and affect label adhesion, but this is more of a material formulation issue.
- External Contaminants: Dust or other airborne particles settling on bottles before labeling.
Labeling Process Issues:
- Incorrect Adhesive: Ensure the label adhesive is compatible with PET.
- Application Problems: Issues with the labeling machine can also cause poor adhesion.
I remember a customer struggling with labels peeling off their bottles. The bottles themselves looked fine. We discovered that their mold cooling was a bit too aggressive in one area, creating a very subtle texture change that wasn't easily visible but was enough to reduce the contact area for the self-adhesive labels. Balancing the mold cooling helped improve adhesion significantly.
| Factor | Potential Issue | Solution |
|---|---|---|
| Mold Surface | Rough, damaged, not polished, condensation | Polish molds regularly, repair damage, control mold temperature to avoid sweat |
| Mold Cooling | Insufficient, uneven, or too aggressive | Optimize cooling channel design, coolant flow, and temperature |
| Bottle Surface | Contaminants (residue, dust) | Ensure clean molds, clean handling environment post-blow |
| Material | Certain additives (rare for bottles) | Review PET grade and additives if suspected |
| Label/Process | Wrong adhesive, application issues | Check label specifications, optimize labeler settings |
A combination of excellent mold care and optimized process parameters will give you bottles with a great finish and reliable label performance.
Conclusion
Fixing PET blow molding defects quickly saves time and money. Understanding common causes and solutions for your bottle blowing machine leads to better bottles and higher efficiency.
Frequently Asked Questions (FAQs)
1. What is the most common cause of bottle defects for a beginner?
The most frequent issues for beginners often stem from improper heating. Finding the correct heating profile—ensuring the preform is heated evenly and to the right temperature—is the foundation of good blow molding. Many defects, such as wrinkles, uneven walls, and hazy bottoms, can be traced back to an oven where some areas are too hot or too cold.
2. If I see multiple defects at once, where should I start?
If you're seeing multiple issues, always start by checking the preform quality and the heating profile. A poor-quality or inconsistently heated preform can cause a cascade of problems. Verify that your preforms are consistent and then ensure your oven's lamps and ventilation are functioning correctly to create a stable, even heat before you start adjusting blowing parameters.
3. How do I know if the problem is my machine or my preform?
A good diagnostic step is to use a control preform that you know is of high quality. If you run these "golden standard" preforms and the defects disappear, the issue is likely with your regular preform supply. If the defects persist even with the control preforms, the problem is almost certainly within your machine's setup (heating, alignment, blowing parameters).
4. Can a single burnt-out heating lamp really cause major problems?
Yes, absolutely. A single faulty lamp creates a "cold spot" on the preform as it rotates. This cold spot won't stretch properly, forcing other areas to overstretch. This can lead to a variety of defects, including uneven wall thickness, wrinkles, and poor base formation. Regularly checking that all heating lamps are functional is a simple but critical maintenance step.
5. How often should I clean my blow molds?
Mold cleaning frequency depends on your production volume and environment, but a good practice is to perform a thorough cleaning of the mold cavities and, especially, the vent lines at least once a week. Clogged vents are a primary cause of bottles not blowing fully or sticking to the mold. A clean, well-maintained mold is essential for both bottle quality and production efficiency.
Disclaimer from Jindong Machinery
Please note: This guide is a summary of best practices developed by Jindong Machinery over 20 years of hands-on industry experience. While these solutions are proven and effective, they are not intended to be the only standards. Producers must use their own judgment and make adjustments based on their unique conditions—including their specific machinery, preform quality, and production environment—to achieve the best results.
Comprehensive Guide to Common PET Blow Molding Defects & Solutions
This table consolidates the most common defects encountered in the PET blow molding process, providing a complete and coherent diagnostic path from "Defect" to "Core Reason" to "Key Solution."
| Defect | Core Reason Analysis | Key Solutions |
|---|---|---|
| Pearlescence / Whitening |
|
|
| Haze / Poor Clarity |
|
|
| Black Specks / Contamination |
|
|
| Flow Lines / Streaks |
|
|
| Uneven Wall Thickness |
|
|
| Off-Center Gate |
|
|
| Deformed / Rocker Bottom |
|
|
| Wrinkles at Neck/Shoulder |
|
|
| Insufficient Top-Load Strength |
|
|
| Bursting / Stress Cracking |
|
|
🔗 Related Pages on Our Website
Automatic Blow Molding Machines – iBottler
Discover our full range of customizable automatic PET bottle blow molding machines.Blow Bottle Mold – iBottler
Explore our precision blow molds designed for PET and PP bottles.Preform Mold – iBottler
Learn more about our high-precision preform molds suitable for various injection molding machines.PET Wide Mouth Jar Project Starter Guide: Equipment, Molds & Process Explained
Pros and Cons: Should You Choose PET Blow Moulding for Your Bottle Project?
Worried About Blow Mold Fit? We Have Mounting Dimensions for 80% of Blow Molding Machines Worldwide
Can One Semi‑Automatic Blow Molding Machine Produce All Bottle Sizes? Here’s Why Not
Why Do Krones Blow Molding Machine Users Come to Us for Their Molds?
Why Do PET Preforms Come in Different Colors? Function, Application, and Production Tips
How to Set Parameters for 600ml Bottles on a Semi-Automatic PET Blowing Machine?
From 3D Printed Samples to Production: How Can You Rapidly Validate Blow Mold Designs?
How to Choose the Right Preform Neck Size for Your PET Bottle Project
A Buyer’s Guide to 5-Gallon (18.9L) Bottle Blow Molding Machines: From PET to PC?
Pitting on your blow mold surface? A complete guide from cause analysis to repair and prevention.
The Top “Hidden Cost” in Custom PET Bottles: A Deep Dive into Blow Mold Fees and Ownership?
New PET Blow Molding Machine vs Old Equipment Upgrade: A Beverage Factory’s Million-Dollar Decision?
How to reduce the PET blow molding scrap rate from 5‰ to 1‰? An old-timer’s 8 insider tips.
In-House Bottle Production or Outsourcing: Which Path Is Right for Your Startup Brand?
Blow Mold Damage? When and How to Replace Only the Broken Parts?
Bottle Design: Ad Agency vs. Mold Factory? How One Decision Impacts Your Cost and Brand?
Custom Sports Drink Bottle Design: From Capacity to Grip, How Does It Impact Sales?
💡 Looking for a complete PET plastic packaging machinery solution?
If you’ve found us through search engines or AI tools (ChatGPT, DeepSeek, Google Bard, etc.), it means you’re exploring reliable PET packaging equipment suppliers. Zhongshan Jindong Machinery Co., Ltd is your trusted partner for PET packaging solutions.
| What We Offer | Details |
|---|---|
| ✅ Blow molding machines | From small scale to fully automatic lines |
| ✅ Bottle & mold design | Free bottle design, customized PET blow & preform molds |
| ✅ Full service support | Design → Manufacturing → Installation → Lifetime technical support |
| ✅ Global experience | 20+ years, exports to 30+ countries |
📞 Contact: Vivian
🏭 Zhongshan Jindong Machinery Co., Ltd.
🌍 www.ibottler.com
🚀 Let’s build your PET packaging project together!
