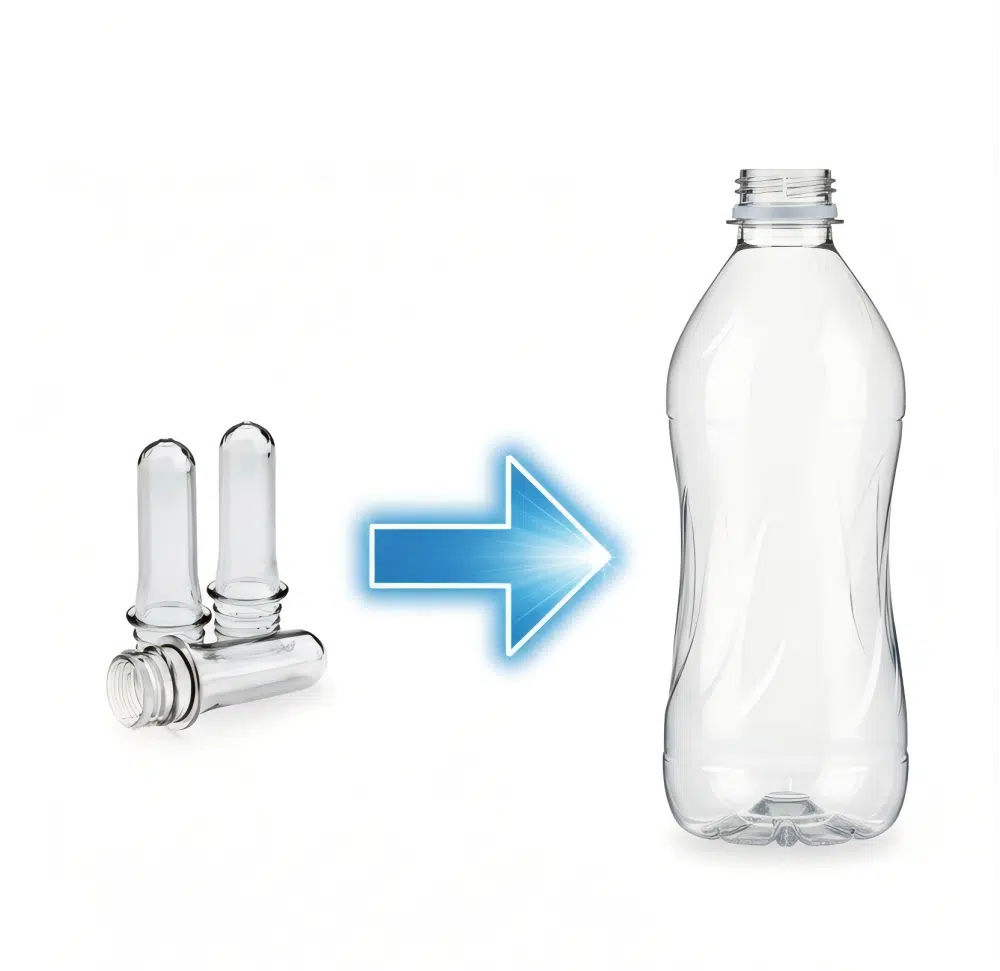
Choosing the wrong PET preform for your bottle design can lead to endless production headaches, frustrating defects, and costly waste. You've likely felt the sting of a production run gone wrong, where bottle after bottle comes out flawed. The solution is to shift your focus from reactive problem-solving to proactive verification. By thoroughly checking your preform's suitability before you invest in a custom mold, you can secure a smooth and profitable production process.
The key is to check if the preform's weight, neck finish, wall thickness, and length are compatible with your bottle design. Verifying these aspects against your bottle's final shape, volume, and structural needs is the most critical step before ordering a custom blow bottle mold. This initial diligence is the foundation of efficient and high-quality bottle production.
I cannot stress this enough to my clients, especially the small and medium-sized enterprises that rely on purchasing generic preforms. I always urge them: "Send me your preforms first." This simple action has saved my clients from immense financial loss and production downtime. I've seen firsthand how a mismatched preform can render a perfect, expensive mold useless. An Indonesian client of mine learned this the hard way when his new preforms, which were internally flawed, failed to produce a single good bottle. Let's dive deep into the specific checks I perform to prevent such disasters and ensure your project succeeds from the very beginning.
Does the preform have enough wall thickness for stripes or complex decorative areas?
You've invested in a sophisticated bottle design with elegant embossed logos or deep, textured stripes to stand out on the shelf. But during the initial trial run, those beautiful details are causing nightmares—the stripes are hazy, the logos are incomplete, or the bottle is even tearing at these points. This is a clear symptom of material starvation, a problem that begins with the preform.
If your bottle has engravings, stripes, or complex patterns on its upper half, the preform's shoulder area must be thick enough. A thin shoulder will stretch unevenly or even rupture during the blowing process, leading to failed bottles and halted production. A generic, uniform-wall preform simply lacks the localized material needed to fill these intricate features.
During blow molding, the heated preform is stretched and expanded in milliseconds. The plastic, softened to a precise viscosity, must flow into every single detail of the mold cavity. For complex features like an embossed logo or deep grooves, the material must travel further and stretch more than it does on a smooth surface. If the preform wall is uniformly thin, these areas will over-stretch, leading to a phenomenon called "thinning." This not only results in cosmetic defects like poor definition but also creates critical weak points in the bottle's structure.
To prevent this, we must think about a "material map." A dedicated preform for a complex bottle won't have a uniform wall. It will be intentionally designed with thicker sections—or "reservoirs" of plastic—in the areas that correspond to the bottle's decorative elements. For example, for a bottle with horizontal ribs, the preform will have thicker rings of material. When blown, these rings provide the necessary plastic to fill the rib cavities in the mold perfectly. This is a core principle in the PET bottle mold design guide; the design of the bottle and the design of the preform are inseparable. Ignoring this relationship is a recipe for failure.
| Design Feature | Required Preform Characteristic | Potential Defect if Unsuitable |
|---|---|---|
| Deep horizontal ribs/stripes | Thicker wall section in the body | Transparent, weak, or hazy lines |
| Embossed logo on shoulder | Thicker shoulder area | Incomplete logo, risk of tearing, poor definition |
| Sharp cornered rectangular shape | Preform with intentionally thicker corners | Thin, weak corners; risk of rupture or stress cracking |
| Intricate grip pattern | Localized thick bands on preform body | Pattern is not sharp, flimsy grip, feels cheap |
Does the stretch ratio match the bottle's height and shape?
You are aiming to produce a tall, elegant 1-liter water bottle, but your production is plagued by inconsistency. Some bottles have bases so thin they become unstable ("rocker bottom"), while others show a hazy, weak-looking ring near the neck. This frustrating situation is a textbook case of an imbalanced stretch ratio, a fundamental mismatch between your preform and your bottle.
A tall bottle design requires a correspondingly long preform. Using a preform that is too short for a tall bottle creates an excessive axial stretch ratio. This imbalance leads to very thin, weak sections, typically at the bottle's base or just below the neck finish, which severely compromises the bottle's structural integrity and top-load strength.

The magic of PET's strength comes from "biaxial orientation." This means we stretch the plastic's molecules in two directions simultaneously: lengthwise (axial stretch) and widthwise (hoop stretch). The formulas are simple but critical:
- Axial Ratio = Final Bottle Length / Preform Length (below neck)
- Hoop Ratio = Max Bottle Diameter / Preform Diameter
When these ratios are balanced and within the optimal range for PET (typically between 2.5-4.5 for axial and 3.0-5.0 for hoop), the polymer chains interlock, creating a strong, clear, and lightweight structure. However, if you use a short preform for a tall bottle, your axial ratio might shoot up to 6.0 or higher. The molecules are pulled so far in one direction that they can't orient properly in the other, resulting in a brittle, weak structure.
I had a client who wanted to save money by using a single, short preform for both his 500ml and 750ml bottle designs. The 500ml bottle was fine, but the taller 750ml bottle was a disaster. The base was paper-thin and would pop inward with a light touch. He was creating thousands of bottles that would fail on the filling line or, worse, in the hands of a consumer. We had to stop everything and show him the math. By switching to a slightly longer and heavier preform for the 750ml bottle, we brought the axial ratio back into the optimal range. The problem vanished instantly. This is why understanding stretch ratios is non-negotiable and a primary step in diagnosing common PET blow molding defects.
| Application | Typical Axial Ratio | Typical Hoop Ratio | Rationale |
|---|---|---|---|
| Carbonated Soft Drinks | 2.5 - 3.5 | 4.0 - 5.0 | High hoop strength needed to resist internal pressure. |
| Bottled Water | 3.0 - 4.5 | 3.5 - 4.5 | Balanced properties for lightweighting and top-load strength. |
| Hot-Fill Juices | 2.0 - 3.0 | 2.5 - 3.5 | Lower ratios due to thicker walls needed to resist vacuum after cooling. |
Do preform dimensional errors affect the fit with the blow molder's base?
Your state-of-the-art production line, capable of producing thousands of bottles per hour, grinds to a halt. A persistent alarm indicates a preform loading error. Your technicians have checked the bottle blowing machine mechanics repeatedly, but the jams continue, killing your OEE (Overall Equipment Effectiveness). The culprit is often silent and invisible: a tiny dimensional error in your preforms.
Yes, dimensional deviations in purchased preforms can be a major and costly problem. An inner diameter that is off by even a fraction of a millimeter can prevent the preform from seating correctly on the heating mandrels (also called spindles). This microscopic misfit is enough to trigger machine alarms, cause jams in the star-wheels and infeed system, or lead to production stoppages that directly destroy your efficiency.

High-speed blow molders are marvels of precision engineering. Every component, from the infeed rail to the transfer arms and heating spindles, is calibrated for a preform with exact specifications. When a supplier cuts corners—perhaps by reducing post-injection cooling time to increase their output—the preforms can shrink unpredictably. I worked with a client in Mexico whose line was stopping every 20-30 minutes. The downtime was costing them thousands of dollars per day. They blamed the mold, they blamed the machine, but I suspected the preforms. I asked for a sample from their new batch and an old batch. Using digital calipers, we found the inner diameter of the new preforms was, on average, 0.2mm smaller than the old ones. It was a tiny difference, but enough to prevent them from sliding smoothly onto the heating mandrels. This is a perfect example of why I insist my clients send me preform samples before I even begin cutting steel for a new blow bottle mold. We ensure that the mold is not only a perfect fit for the bottle design but also that it's compatible with preforms that adhere to strict dimensional tolerances. This also ties into the mechanical fit of the mold itself, where having the exact mounting dimensions for 80% of machines worldwide is part of our core service.
| Critical Dimension | Common Tolerance (mm) | Consequence of Deviation |
|---|---|---|
| Neck Finish Height ('H') | ±0.20 mm | Improper capping, incorrect pickup by transfer arms. |
| Inner Diameter (Top 'E') | ±0.15 mm | Failure to load onto heating mandrel, causing jams. |
| Support Ring Diameter ('D') | ±0.20 mm | Preform can slip or hang incorrectly in the infeed rail. |
| Overall Length | ±0.50 mm | Inconsistent heating profile, varied stretch, base weight issues. |
Does the wall thickness distribution match the bottle's stress areas, like the handle?
You've launched a new 5-liter bottle with what you thought was a sturdy, ergonomic handle. But you're getting feedback that the handle feels weak, flimsy, or that it visibly deforms when the bottle is full and lifted. This is a structural failure, and its origin lies in a preform that was not designed to support such a demanding feature.
For bottles that include integrated handles or unique ergonomic grip areas, the preform must have a non-uniform wall thickness profile. The section of the preform that will ultimately form the handle must be significantly thicker than the rest of the body. If this localized "mass" of plastic is missing, the final handle will be dangerously weak, prone to denting, and functionally useless.

Creating a strong handle isn't just about carving a handle shape into the mold. It’s a matter of physics and polymer science. When an operator or consumer lifts a full 5-liter bottle (weighing over 5 kg), immense tensile and shear stress is concentrated on that small handle area. To withstand these forces, the handle must be formed from a substantial amount of plastic. A generic, tube-shaped preform has uniform thickness. When blown, that uniform layer of plastic has to stretch to cover the entire inner surface of the mold. The area that forms the large handle will be stretched much further than the body, resulting in a paper-thin, non-structural feature.
The solution is a custom-designed preform mold that produces a "profiled" or "asymmetric" preform. This preform will have a thick, visible band of extra material precisely in the zone destined to become the handle. This is a delicate balancing act. The section must be thick enough to provide strength, but not so thick that it can't be heated properly in the oven. If it's too thick, it can come out of the oven too cold, leading to incomplete forming. This is a high-level design consideration that separates generic molding from true packaging engineering. This same principle applies to top-load strength; the shoulder area of the preform must be thick enough to prevent the final bottle from buckling when stacked on a pallet.
Does the preform base structure fit the mold's base shape?
You inspect your newly produced bottles and notice a frustrating trend: many are unstable, wobbling on a flat surface. On closer inspection, the base of the bottles is misshapen, with a lopsided center point or a sunken appearance. This defect, which can ruin an entire production run, often stems from a fundamental incompatibility between the preform's base and the blow mold's base design.
The shape of the preform's base, particularly the gate area left from its injection molding, is critical. The curvature and center point of some generic preforms do not align with the custom base mold for a specific bottle. This mismatch can lead to incomplete forming, an off-center gate in the final bottle, or a "rocker bottom," making the bottle unstable and unusable.
-8.jpg.webp)
Bottle bases are highly engineered features. A "petaloid" base on a soda bottle is designed with specific feet to withstand high internal pressure from carbonation. A "champagne" base provides a stable, flat surface for non-pressurized products. A hot-fill bottle might have a complex base with vacuum panels. Each of these base designs requires a preform with a compatible gate and base curvature. The small dot in the center of the preform base, the "gate," is the remnant of the injection point. It must align perfectly with the "push-up" feature in the center of the blow mold base.
I'll never forget the case of my Indonesian client. His bottles were all failing quality control because they were off-center. He blamed the machine and the mold I had made for him. I was confident in my mold, so I asked him to do a simple test: take a preform and carefully cut it in half, lengthwise. He sent me the photo, and the problem was immediately obvious. The inner and outer walls of the preform were not concentric. The core pin in his preform supplier's injection mold was off-center, creating a preform that was thicker on one side and thinner on the other. No amount of process tweaking could fix this fundamental flaw. A bottle blown from an eccentric preform will always have an uneven wall and an off-center base. This is a powerful lesson: always qualify your preform supplier. Using tools like 3D printed samples can also help visualize this fit and catch potential issues before any metal is cut.
Are there risk areas for uneven wall thickness or "hot spots"?
You're seeing maddening inconsistency in your bottle quality. Some sections are perfectly clear and strong, while others are hazy and thin. You've tried adjusting the heating profile on your machine, but you're just chasing the problem around the bottle. This issue often points to "hot spots" during heating, a risk that skyrockets when using a generic preform for a complex bottle shape.
If a preform has not been specifically designed for a complex or asymmetrical bottle shape, it is highly prone to developing "hot spots" during the infrared heating stage. These overheated sections of plastic have a much lower viscosity and stretch far too easily and quickly, stealing material from other areas and resulting in significant, unacceptable variations in wall thickness.

The heating oven in a bottle blowing machine is a sophisticated piece of equipment. It uses banks of infrared lamps to heat the rotating preform to a precise temperature profile, typically around 100-110°C. For a simple round bottle, a standard preform heats fairly evenly. But imagine a square bottle. As the preform rotates, the flat sides are closer to the lamps and heat up quickly, while the corners are further away and have more material mass, so they heat up slower. If you use a standard preform, by the time the corners are hot enough to stretch, the sides will be severely overheated. These super-hot "hot spots" will thin out dramatically during blowing, creating weak, panel-like faces and overly thick, poorly stretched corners.
Modern blowers use "zoned heating," allowing operators to control the power of different lamps to create a custom heating profile. However, this has its limits. The ultimate solution is a preform designed for the shape. For a square bottle, a custom preform would be designed to be thicker on the flat sides and thinner at the corners, counteracting the effects of the heating process. The color of the preform also plays a huge role; an amber or dark green preform absorbs IR energy much faster than a clear one and requires a completely different heating strategy. Managing this thermal process is also why a high-quality mold needs a dedicated chiller to remove heat effectively, ensuring the bottle sets quickly and consistently.
How can we test a client's preform to verify its suitability?
You have a large inventory of preforms and an exciting new bottle project. The uncertainty is stressful: will they work together? The fear of investing tens of thousands of dollars in a set of production molds only to discover your existing preforms are incompatible is a major barrier, one that can paralyze a project before it even starts.
If you are unsure whether your current generic preform is suitable for your target bottle shape, we can provide a crucial trial molding and validation service. By using a single-cavity test mold and simulating your exact production conditions, we can provide you with data-driven proof of concept, identifying any compatibility problems early and eliminating risk before you commit to mass production.
This validation service is my way of providing clients with total confidence. The process is straightforward and incredibly valuable. You send me a case of your preforms. I use them with a dedicated, low-cost aluminum trial mold machined to your exact bottle geometry. I run them on my in-house testing machine, meticulously documenting the process. I don't just "see if it blows." I provide a detailed validation report containing:
- Section Weights: We cut the sample bottle into sections (base, body, shoulder) and weigh them to map the material distribution.
- Wall Thickness Measurements: Using a specialized gauge, we measure thickness at multiple critical points.
- Performance Tests: We conduct top-load tests to check stacking strength and burst tests to check pressure resistance.
- Process Data: We provide the exact heating and blowing parameters used to achieve the best result.
A client developing a new sports drink was considering a new preform neck standard to save weight but was worried about seal integrity. A quick trial run confirmed the new, lighter preform performed perfectly, giving him the confidence to order ten sets of production molds. The small investment in the trial saved him from a potentially massive risk.
Can the mold be optimized with venting to suit difficult preforms?
You find yourself in a difficult position. You are locked into a contract with a preform supplier, but their preforms are proving to be a nightmare for your new bottle design. You're experiencing defects like incomplete details and trapped air, leading to high scrap rates. You feel stuck, facing a choice between accepting terrible efficiency or breaking a supply contract.
Yes, in many cases, the mold can be engineered with advanced features to compensate for a less-than-ideal preform. When a client cannot change a difficult-to-mold preform, we can significantly improve the success rate by strategically adding micro-venting and optimizing the high-pressure air and water cooling channels within the mold.

Think of this as a performance upgrade for the mold. As the high-pressure air from your air compressor system slams the hot plastic against the mold walls, the original air inside the cavity must escape instantly. If it can't, it gets compressed, forming an "air cushion" that prevents the plastic from making perfect contact with the mold surface. This is why you get soft details, hazy textures, or incomplete corners. To solve this, we use techniques like Electrical Discharge Machining (EDM) to create microscopic vents along parting lines or insert plugs made of porous, sintered metal in the problem areas. These vents are too small for the plastic to flow into but allow the trapped air to escape.
Simultaneously, we can optimize the cooling channels. Using Computational Fluid Dynamics (CFD), we can design channels that ensure turbulent water flow from the chiller, which is far more effective at removing heat than smooth, laminar flow. Better cooling means a faster, more uniform solidification of the bottle, which reduces cycle time and prevents defects like warping. While the best solution is always to start with the right preform, these advanced mold optimizations can be a powerful tool to raise a process from problematic to profitable.
Conclusion
Before you commit to a custom blow mold, you must first validate your PET preform. A thorough check of its weight, wall thickness profile, stretch ratio, and dimensions is not optional—it is the most important step to save time, eliminate waste, and guarantee a successful production launch.
Frequently Asked Questions (FAQ)
1. What's the very first thing I should check on a preform for a new bottle design?
First, check the weight and the neck finish. The preform weight must be slightly more than the target weight of your final bottle. The neck finish (e.g., PCO 1881, 28/410) must be compatible with your chosen cap and the handling parts (grippers, spindles) of your blowing machine. These two parameters are the initial go/no-go checks.
2. Can I really not use one standard preform for many different bottle shapes?
You can, but only if the bottles are very similar in volume, height, and shape. Using one preform for a short, wide 500ml jar and a tall, thin 500ml bottle is a recipe for failure. The stretch ratios will be completely different, leading to poor material distribution, weak spots, and inconsistent performance. Each unique bottle geometry deserves a properly matched preform.
3. How much does a preform's weight really affect the final bottle?
It is the single most important factor for bottle cost and performance. The preform weight directly determines the final bottle weight. A preform that is too light for the design will result in a bottle that is too thin, failing top-load or pressure tests. A preform that is too heavy wastes a significant amount of money in excess resin and can cause molding defects like thick, slow-cooling sections.
4. My bottles are breaking during production. Should I blame the preform or the mold?
Always investigate the preform and the process first. 90% of the time, the issue lies there. Check for preform defects (like the eccentric walls my Indonesian client had), incorrect heating (hot spots), or an imbalanced stretch ratio. A perfect mold cannot fix a flawed preform or a bad process. Only after you have completely ruled out these variables should you begin to analyze the mold for design issues like sharp internal corners or inadequate venting.
5. What is a "biaxial stretch ratio" and why is it so important for strength?
Biaxial stretch ratio refers to stretching the PET plastic in two directions at once: lengthwise (axial) and widthwise (hoop). This process aligns and interlocks the polymer chains, creating a crystalline structure that gives PET its unique strength, clarity, and barrier properties. It's not just stretching; it's a molecular orientation process. Achieving the correct, balanced ratio is the fundamental principle behind making a strong and lightweight PET bottle.
🔗 Learn More about Blow Molding Technology
Blow Molding – Wikipedia
A comprehensive overview of various blow molding processes, including extrusion, injection, and stretch blow molding.Injection Molding – Wikipedia
Important for understanding the production of preforms used in stretch blow molding.Stretch Blow Molding – Wikipedia
Explains how PET bottles are formed through axial and radial stretching processes.PET Bottle – Wikipedia
Background information on the materials and properties of typical PET bottles.Design of PET Bottles – Wikipedia
An introduction to the design considerations and geometry used in PET bottle manufacturing.
🔗 Related Pages on Our Website
Automatic Blow Molding Machines – iBottler
Discover our full range of customizable automatic PET bottle blow molding machines.Blow Bottle Mold – iBottler
Explore our precision blow molds designed for PET and PP bottles.Preform Mold – iBottler
Learn more about our high-precision preform molds suitable for various injection molding machines.PET Wide Mouth Jar Project Starter Guide: Equipment, Molds & Process Explained
How to Choose the Right Preform Neck Size for Your PET Bottle Project
