Are you tired of seeing your PET bottles fail at the final stage? A thin or collapsing bottom can ruin a perfect production run, causing waste and frustration.
A collapsing bottom is often due to a combination of factors, not a single error. Key areas to check are the preform design, mold compatibility, heating profile, process parameters, and cooling efficiency. A systematic approach to troubleshooting these areas will solve the issue.
I want to walk you through a complete troubleshooting guide. I recently helped a new engineer in Canada solve this exact problem with his wide-mouth jars. His story is a perfect example of how to diagnose and fix these issues step-by-step. By following this guide, you can learn to pinpoint the root cause of thin or collapsing bottoms and adjust your process for consistent, high-quality results. Let's dive in and turn that frustration into success.
Does your preform bottom design match the bottle's structure?
Struggling with bottle bottoms that just won't form correctly? The problem might start before you even begin blowing. An unsuitable preform design is a common hidden cause.
The preform's bottom design is critical. If its shape, like the arch or base size, is wrong for your final bottle, it won't stretch properly. This mismatch leads directly to weak, thin, or collapsed bottoms, no matter how much you tweak your machine settings.
Let's talk about my friend in Canada. He was making wide-mouth jars, but the bottoms kept collapsing. The first thing I asked for was a picture of his preform. He was using a generic, standard preform for a very specific, wide-based jar. This was the root of his problem. The small base and simple arch of the generic preform just didn't have enough material in the right places to stretch across the wide mold base. It’s like trying to make a large pizza from a small ball of dough; you’ll end up with a paper-thin center that tears easily. This is a classic example of a mismatch between the preform and the final product, a common issue for anyone new to the field. Many companies, trying to save costs, use one type of preform for many different bottles, but this often leads to quality issues like the common PET blow molding defects I've written about before. For my friend, the solution started with sourcing a more suitable preform.
Why a Generic Preform Bottom Fails
A generic preform is designed to be a jack-of-all-trades, but it's often a master of none. The bottom, known as the gate area, usually has a small, simple arched design. This works fine for standard soda bottles, but for bottles with wide bases, complex shapes, or flat bottoms, it's a recipe for disaster.
When the stretch rod pushes down, there isn't enough plastic in that small arch to properly stretch and flow outwards. The material is pulled too thin across the center, creating a weak spot. High-pressure air then causes this weak spot to either deform, collapse inwards after cooling, or even burst during molding. You can't fix this by just increasing heat or pressure; that often makes it worse by causing other defects. The foundation itself is flawed. You can find more about how design impacts the final product in my PET bottle mold design guide.
The Problem with Thin Pre-formulated Areas
Some preforms are designed with intentionally thinner sections to control material flow. However, if this thin area is too large or in the wrong place for your specific bottle shape, it can cause major problems. It can lead to an off-center gate, where the bottom is not symmetrical, or it can simply be too weak to withstand the stretching and blowing forces. This results in a bottom that isn't fully formed or has inconsistent thickness. For my Canadian friend's jar, the generic preform's base was simply too thin to begin with. It was designed for a bottle that needed less material at the bottom, not more. We needed to find a preform from a preform mold designed specifically for jars.
Using Ribs and Arcs for Stability
For custom bottle shapes, especially those that need to be stable and resist pressure, a custom preform is the best solution. What does a better preform look like?
- Reinforcing Ribs: These are small ridges or patterns molded into the preform base. They add structural integrity and help guide the material flow during stretching, ensuring a more uniform thickness.
- Optimized Arcs: Instead of a simple, small curve, a custom preform might have a wider, more complex, or flatter arc. This provides more material exactly where it's needed to form a strong, stable base.
By switching to a preform with reinforcing ribs and a broader base arc, my friend was able to provide the necessary material to properly form the jar's bottom. The cost of a better preform was easily offset by the reduction in wasted products and production downtime. Sometimes, testing a new design with 3D printed samples can help you visualize and confirm the right preform choice before committing to a large order.
Here is a table to simplify the comparison:
| Feature | Generic Preform | Custom/Optimized Preform |
|---|---|---|
| Base Shape | Small, simple arch | Wider, specific arc; may have ribs |
| Material Distribution | Concentrated in a small area | Distributed to match the final bottle base |
| Best For | Standard, narrow-base bottles | Wide-base, custom-shaped, or flat-bottom bottles |
| Common Problems | Thin center, collapse, off-center gate | Higher initial cost, but fewer defects |
Is your mold's bottom structure matched to the preform?
You've got the perfect preform, but the bottle bottom is still collapsing. What gives? The problem could be a mismatch between your preform and the mold base itself.
Even with the right preform, if the mold's bottom core height or center point doesn't align perfectly, the plastic won't be distributed evenly. This creates weak spots, thin areas, or an incomplete base, leading directly to the collapse you're trying to avoid.
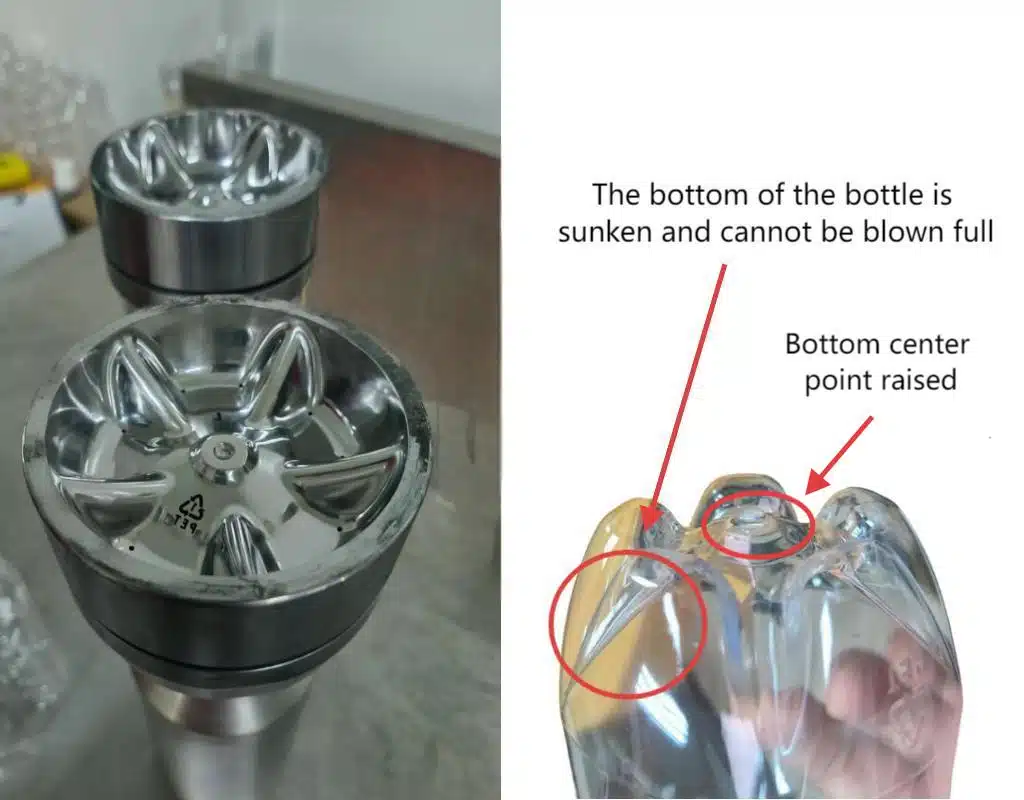
![]()
After we sorted out the preform for my Canadian friend, his results improved, but they weren't perfect yet. He was still getting some collapsed bottoms, about 1 in every 20 bottles. So, the next step in our troubleshooting was to look at his blow bottle mold. I asked him to send me the technical drawings for both his preform and his mold. When I overlaid them, I spotted a small but critical issue. The tip of the preform was sitting about 2 millimeters away from the center point of the mold base when the stretch rod was fully extended. This tiny gap was causing the initial puff of air to create an uneven bubble, pushing more material to one side. It’s a subtle problem, but in blow molding, millimeters matter. Ensuring your mold and preform are a perfect match is crucial. That's why I always stress the importance of checking the mounting dimensions for blow molding machines and components.
Mold Core Height and Center Point Misalignment
The bottom part of the mold, often called the "push-up" or "base core," is designed to shape the bottle's base. The height of this core and its center point must perfectly correspond to the preform's gate area after it has been stretched.
- If the core is too high or the stretch rod doesn't push the preform down far enough: A gap remains between the plastic and the mold base. When high-pressure air enters, the plastic stretches across this gap unpredictably, often resulting in a thin, weak center.
- If the core's center is misaligned with the preform's center: The material will be pushed to one side. This creates an off-center, lopsided base that is thick on one side and dangerously thin on the other. This is a common cause of both immediate collapse and bottles that fail later during filling or transport.
For my friend's jar, the 2mm gap was just enough to prevent the base from forming correctly every single time. We had to adjust the stretch rod's stroke length to close that gap, ensuring the preform tip made contact with the mold base at the perfect moment.
The Critical Role of Bottom Venting
Trapped air is a hidden enemy in blow molding. As the bottle expands to fill the mold, the air that was originally between the preform and the mold needs to escape. Molds have tiny vent holes to allow this. If the bottom of the mold lacks proper venting channels, a pocket of air gets trapped. This trapped air acts like a cushion, preventing the PET material from making full contact with the mold surface. The result? The base doesn't cool properly, details like reinforcing ribs aren't sharp, and the bottom can appear poorly formed or collapsed. It might look like a heating problem, but it’s actually a pressure problem caused by trapped air. You should always check and clean the vents on your mold base as part of regular maintenance.
Mold Base Material and Heat Transfer
The material of your mold base matters. It needs to have good thermal conductivity to draw heat away from the molded plastic quickly and evenly.
| Mold Material | Heat Transfer | Durability | Cost | Common Use |
|---|---|---|---|---|
| Aircraft Aluminum | Excellent | Good | Medium | Most common for PET, fast cycles |
| Stainless Steel | Good | Excellent | High | PVC, or when high durability is needed |
| Beryllium Copper | Superior | Very Good | Very High | Inserts for high-wear or critical cooling areas |
If your mold base is made from a material with poor thermal conductivity, or if the cooling channels within it are blocked, it won't cool the bottle bottom effectively. Hot spots can form, leading to areas that don't solidify properly. When the bottle is ejected, these soft spots can shrink unevenly or collapse under their own weight. We discovered that my friend's mold had some clogged cooling lines near the base. After flushing the cooling system of his chiller, the base cooling became more efficient and the final bottles were much more stable.
Is the preform heating uniform and appropriate?
Your preform and mold are perfectly matched, but the bottle bottoms are still thin. Now, it's time to look at the heating process. Uneven or incorrect heating is one of the most common culprits behind bottom defects.
If the bottom of the preform is too cold, the plastic won't be soft enough to stretch properly. If it's too hot, it will be too fluid and blow out too thin. Achieving the perfect, uniform temperature profile is key to a strong bottle bottom.

In our troubleshooting journey, my Canadian friend and I next turned our attention to his bottle blowing machine. He sent me a video of his machine in operation. I asked him to measure the surface temperature of the preforms as they came out of the oven, right before entering the mold. The readings were inconsistent. The upper body of the preform was hot, but the thick, gate area at the very bottom was significantly cooler. The infrared heating lamps in his oven were not angled correctly to penetrate and heat that dense part of the preform. It's a common oversight; people focus on heating the body of the preform and forget that the thickest part—the bottom—needs the most focused energy to reach the right temperature for stretching.
Incorrect Angle of Infrared Heaters
Most blow molding ovens use infrared (IR) lamps to heat the preforms. The positioning and angle of these lamps are critical. The preform wall is thinner, so it heats up quickly. The gate area at the bottom is much thicker and denser, requiring more direct and intense heat. If the lamps are positioned horizontally, they might heat the body perfectly but glance off the bottom. You often need to angle some lamps downwards, specifically targeting that thick spot at the base. Without this focused heat, the bottom remains too stiff. When the stretch rod tries to push it, it resists, and the softer, hotter body of the preform stretches instead, leaving the bottom thick and unstretched, or causing the material to stretch unevenly around the cold spot.
Aging Lamps and Uneven Heating Zones
Heating lamps don't last forever. Over time, their output diminishes, and they can create hot spots or cold spots in the oven. If you have an oven with multiple lamps, and one or two are old and weak, you'll get an uneven heating pattern. The preforms will rotate through these hot and cold zones, resulting in inconsistent temperatures from one preform to the next, or even on different sides of the same preform. This is why you might see one bottle come out perfect, and the next one have a collapsed bottom. It's essential to have a regular maintenance schedule for checking and replacing aging heater lamps. For my friend, we found that two lamps in the bottom zone of his oven were operating at only 60% of their capacity. Replacing them made a huge difference in the consistency of his heating.
Matching Heating Zones to Preform Thickness
A well-designed oven has multiple heating zones that you can control independently. You should map these zones to the different sections of your preform. The thickest part of the preform bottom (just above the gate) needs to pass through the highest temperature zone to absorb enough energy. If your oven setup or program has the highest heat focused on the middle of the preform body, you are starving the bottom of the heat it needs. You need to adjust the power settings of your heating zones so that the most heat is applied to the thickest areas.
Here’s a simplified guide to adjusting heat zones for bottom issues:
| Problem | Observation | Likely Cause | Solution |
|---|---|---|---|
| Thin/Collapsed Bottom | Bottom of finished bottle is too thin. Preform gate is still thick. | Insufficient heat at the preform bottom. | Increase power in the bottom heating zones. Angle lamps towards the preform base. |
| Off-Center Gate | Bottle bottom is lopsided, thick on one side, thin on other. | Uneven heating. One side of preform is hotter. | Check for faulty lamps. Ensure proper preform rotation in the oven. |
| Bottom Blowout | Bottom bursts during high-pressure blow. | Excessive heat at the preform bottom. | Decrease power in the bottom heating zones. Check for hot spots. |
We adjusted my friend's heating profile, increasing the power to the bottom two zones by 15% and slightly angling the lamps. This ensured the gate area was pliable enough to stretch evenly with the rest of the preform, finally solving the inconsistency in his jar bottoms. This is a common process I walk people through, and it's a key part of solving many common PET blow molding defects.
Are your blow molding process parameters set correctly?
You have the right preform, a perfect mold, and even heating. Yet, bottles still emerge with thin or collapsed bottoms. The final piece of the puzzle often lies in the process parameters—the precise timing and pressures that shape the bottle.
Incorrect settings for pre-blow, high-pressure blowing, or stretch rod speed can ruin a perfect setup. These parameters control how the plastic stretches and forms against the mold, and getting them wrong leads directly to defects.

This was the final major area we tweaked for my friend in Canada. After fixing the preform, mold alignment, and heating, his process was 99% stable. But he would still get an occasional bad bottle, especially when starting the machine from cold. We connected remotely, and I had him walk me through the settings on his bottle blowing machine. I noticed his pre-blow time was very short, and the switch to high-pressure was happening almost instantly. This rapid change was "shocking" the material, not giving it enough time to expand evenly. A small adjustment to these timings was the last step to get him to 100% perfect production.
The Role of Pre-Blow Air
Before the high-pressure blast, a gentle puff of low-pressure air, called the "pre-blow," is introduced. This starts to expand the preform into a small bubble, centering it in the mold and beginning the biaxial orientation process (stretching in both hoop and axial directions).
- Pre-Blow Time Too Short: If the pre-blow phase is too brief, the preform doesn't have time to expand evenly. The stretch rod might push the cold tip of the preform against the mold base before the sides have had a chance to move away. When the high-pressure air hits, it takes the path of least resistance, often blowing the sides out too quickly and leaving the base thick and poorly formed.
- Pre-Blow Pressure Too Low: If the pressure is too low, it won't be enough to start stretching the material effectively, especially at the stiffer gate area.
For the wide-mouth jar, we had to slightly increase the pre-blow time, from 0.2 seconds to 0.4 seconds. This tiny change gave the material the extra moment it needed to form a stable, even bubble before the main blow, which was critical for ensuring the material was evenly distributed before final forming.
High-Pressure Timing and Intensity
After the pre-blow, high-pressure air is blasted in to force the plastic against the mold walls. The timing and pressure here are critical.
- Insufficient High-Pressure: If the pressure is too low, it simply won't be enough to force the material into the sharp corners and details of the mold base. This will result in a soft, rounded, and incompletely formed bottom that is prone to collapse.
- Delayed High-Pressure Switch: If there's a delay between the end of the pre-blow and the start of the high-pressure blow, the partially expanded preform can start to cool and shrink away from the mold. When the pressure finally arrives, it has to re-stretch the material, leading to stress marks and weak spots.
We found my friend's machine had a slight delay in the valve switching to high pressure. By adjusting the machine's PLC settings to anticipate this and start the high-pressure signal a fraction of a second earlier, we ensured the force was applied at the exact right moment.
Stretch Rod Speed and Stroke
The stretch rod physically pulls the preform downwards, providing the vertical (axial) stretch. Its speed and travel distance (stroke) must be synchronized with the blowing process.
- Stretch Rod Too Slow: If the rod moves too slowly, the bottle sides will blow out before the bottom is fully stretched. This leaves too much material in the body and not enough at the base, resulting in a thin bottom.
- Insufficient Stroke: If the rod doesn't travel far enough, it won't push the tip of the preform all the way to the bottom of the mold. This creates a gap, leading to the problems we discussed in the mold section. The material at the very bottom never gets stretched mechanically, and it's left to be blown into shape, which is far less effective.
Here is a troubleshooting table for key process parameters:
| Parameter | Symptom of Incorrect Setting | Action to Take |
|---|---|---|
| Pre-Blow Time | Pear-shape bottle, thin shoulders, thick base. | Increase Pre-Blow time slightly (e.g., in 0.1s increments). |
| Pre-Blow Pressure | Bottom is not centered, lopsided base. | Increase Pre-Blow pressure slightly. |
| High-Pressure | Bottom is soft, not fully formed, details are missing. | Increase High-Pressure. Check for air leaks. |
| Stretch Rod Speed | Thin bottom, thick ring of material at the top. | Increase stretch rod speed. |
| Stretch Rod Stroke | Very thick spot in the center of the base. | Ensure stretch rod stroke is set to its maximum correct length for the mold. |
By fine-tuning these three areas—pre-blow, high-pressure, and stretch rod—we eliminated the last of the random defects. It shows that even with the right hardware, the software, or settings, is just as important. This holistic approach is key, something I emphasize when discussing how to solve common PET blow molding defects.
Is your stretch rod design coordinated with the bottle bottom height?
You’ve optimized your preform, mold, heating, and process timings, but a stubborn thin spot persists right in the center of the bottle base. The problem could be the final mechanical piece of the puzzle: the stretch rod itself.
If the stretch rod doesn't properly engage with the preform base, it can't do its job. An incorrect shape, length, or a failure to reach the center of the mold will prevent the material at the bottom from being stretched correctly, leading to a critical failure point.

During my troubleshooting sessions, I've seen many cases where the stretch rod was the overlooked culprit. It's a simple component, so people often forget to check it. In one particular case with a client making oval-shaped bottles, they had a persistent thin line across the bottom. We went through everything, and all seemed correct. Finally, I asked them to send me a photo of the tip of their stretch rod. It was a standard, conical tip. However, the preform they were using had a slightly raised, flat area in the gate. The conical rod tip was only making contact on the edges, not pushing the center. This caused the material to stretch unevenly. We had a new stretch rod tip machined with a flat profile to match the preform, and the problem vanished instantly. This highlights how crucial it is that this mechanical interaction is perfect.
Stretch Rod Not Reaching the Center
The primary job of the stretch rod is to mechanically stretch the PET material vertically. For this to happen effectively at the base, the tip of the stretch rod must make contact with the preform right at its center and push it all the way to the bottom of the mold cavity. If the rod is too short, or if its stroke is limited, it will stop before reaching the bottom. When this happens, the pre-blow air can get between the rod tip and the plastic, creating a "bubble" of air. This air pocket prevents the rod from properly stretching that central point. The surrounding material gets stretched, but the very center remains thick and unstretched, or it gets blown thin in an uncontrolled way. You must always verify that the stretch rod is physically capable of reaching the bottom of the mold and that its programmed stroke length uses that full capability.
Improper Stretch Rod Tip Design
Stretch rod tips are not one-size-fits-all. They come in various shapes—conical, rounded, flat, or custom profiles. The shape of the tip should be the "negative" of the inside of the preform gate area.
- Mismatched Shape: As in the story with the oval bottle client, if a pointed tip is used on a flat preform gate, it creates high-stress points and uneven stretching. The force is concentrated on a small area instead of being distributed evenly.
- Sharp Edges: A stretch rod tip with sharp edges or without a proper chamfer (beveled edge) can physically scratch or damage the inside of the preform base. This scratch creates a weak point that can easily tear or blow out under high pressure. The tip should be smooth and polished.
For bottles with complex bases, like those with integrated reinforcing ribs (e.g., for carbonated drinks), you might need a custom stretch rod with a special shape that fits into the preform's grooves. This helps to pre-form the base shape even before the high-pressure air is applied, ensuring the ribs are well-defined and strong. My friend with the wide-mouth jars was using a standard rod, which was sufficient once we fixed the stroke length. However, for more complex designs, a custom rod is often a non-negotiable part of the solution. Exploring options like 3D printed samples can help you test these interactions before manufacturing expensive metal parts.
The Dynamics of Stretch Rod and Air Flow
It's important to understand the interplay between the rod and the airflow. The stretch rod itself is often hollow to allow the high-pressure air to be injected through it. The timing of when the rod stops and when the air blows is critical. If the air is injected before the rod has fully seated the preform at the bottom, it can cause the preform to lift off the rod tip, again leading to an uncontrolled blow at the base. The process needs to be:
- Stretch rod descends and makes firm contact.
- Rod stretches the preform to the bottom of the mold.
- Pre-blow air is introduced to center the preform.
- High-pressure air is injected to form the final shape.
Any deviation from this sequence can compromise the integrity of the bottle base. Ensuring your bottle blowing machine is programmed correctly and its valves are responsive is key to maintaining this sequence.
Does your machine's air system have fluctuations or delays?
Everything seems perfect—preform, mold, heating, parameters, stretch rod. Still, you're plagued by inconsistent bottom defects. The issue might not be in the mold area at all, but further upstream in your compressed air system.
An unstable or slow-reacting air system will fail to deliver the right pressure at the right time. This inconsistency starves the molding process of the force it needs, leading to poorly formed and collapsed bottle bottoms.

This was a subtle problem we found with my Canadian friend's setup. His primary high-pressure compressor was strong, but it was supplying multiple machines. He noticed that his bottle quality would dip whenever another machine on the line started a cycle. His pressure gauge at the blower would show a slight but rapid drop for a fraction of a second. This pressure drop, right at the critical moment of high-pressure blowing, was just enough to prevent the bottle base from forming fully. It was a classic case of an undersized or poorly managed air system. The fix was to install a dedicated secondary air storage tank just for his machine, which acted as a buffer to provide consistent pressure, regardless of what other machines were doing.
Slow or Leaky Solenoid Valves
The blow molding process happens in fractions of a second. The solenoid valves that control the flow of pre-blow and high-pressure air must open and close almost instantly.
- Slow Reaction Time: If a solenoid valve is old, worn, or clogged with dirt or oil from the air lines, it may react slowly. This delay means the high-pressure air arrives late. In that short interval, the stretched preform has already started to cool and solidify in the air. When the pressure finally hits, the material is less pliable, resulting in an incompletely formed base.
- Leaky Valves: A leaky valve can cause two problems. It can leak low-pressure air into the chamber before it's supposed to, starting the blowing process too early. Or, it can leak high-pressure air, reducing the maximum pressure available when it's needed most. This is like trying to inflate a tire with a leaky pump; you can't build up enough force. Regular inspection and maintenance of these critical valves are essential.
Unstable Air Tank Pressure
The high-pressure air used for blowing comes from a storage tank, or receiver. This tank acts as a reservoir of ready-to-use energy. The compressor's job is to keep this tank pressurized within a specific range (e.g., between 38 and 40 bar).
If the compressor is too small for the production volume, or if the air consumption is inconsistent (like in my friend's case), the pressure in the tank can drop significantly during the blow cycle. If the pressure drops mid-blow, the force pushing the plastic against the mold lessens. The bottle base, which is the last and most difficult part to form, will not receive the sustained pressure it needs to become dense and stable. This results in weak spots, wrinkles, or a base that sags after molding. A properly sized air tank and compressor are the heart of a stable blow molding operation.
Inconsistent Performance Across Multiple Cavities
If you are running a multi-cavity machine, you might notice that the bottle bottom problem is concentrated in only one or two cavities. This points to a problem specific to that station. The air delivery path—the pipes, hoses, and valves—leading to each cavity must be identical. If one hose is longer, has more bends, or has a slightly blocked fitting, the pressure delivered to that cavity will be lower or slower than the others. This creates a synchronization difference. While Cavity 1 gets a perfect blast of air, Cavity 4 might get a slightly weaker one, leading to defects only in that position. Troubleshooting this requires checking the entire air path to the problematic cavity to ensure there are no restrictions. This level of detail is critical when you need to ensure every blow bottle mold in a set performs identically.
Here is a table outlining some common air system issues:
| Symptom | Possible Cause | How to Check | Solution |
|---|---|---|---|
| Inconsistent defects | Fluctuating tank pressure | Watch the high-pressure gauge during a cycle. Does it drop significantly? | Install a larger or dedicated air tank. Check compressor capacity. |
| Defects appear random | Slow solenoid valve | Listen for a crisp, sharp "click" from the valve. Time the valve's electrical signal vs. pressure rise. | Clean, repair, or replace the solenoid valve. |
| Defects in same cavity | Airflow restriction to one cavity | Compare air hoses and fittings for all cavities. Check for blockages. | Replace restricted hose or fitting. Ensure all paths are identical. |
| Overall weak formation | System-wide air leak | Pressurize the system and listen for hissing. Use soapy water on joints to find bubbles. | Tighten fittings, replace seals, and repair leaks. |
Does ambient temperature or preform storage time affect forming?
You've dialed in your machine perfectly, yet on Monday morning, the process is unstable, or it changes from summer to winter. The problem might not be your machine at all, but the environment around it.
PET plastic is sensitive to both moisture and temperature. How you store your preforms and the ambient temperature of your factory can significantly impact the heating process and, consequently, the quality of your bottle bottoms.

This was a key factor for my friend in Canada. His facility wasn't fully climate-controlled. In the summer, the plant could be 30°C (86°F), and in the winter, it could be 15°C (59°F). He found that the process settings that worked perfectly in July produced bad bottles in January. The cold preforms were not heating up to the target temperature using the same oven settings. We had to develop two separate "recipes" or sets of process parameters: a "summer" setting and a "winter" setting. This adjustment for ambient conditions is a sign of a mature and well-controlled process. It acknowledges that blow molding doesn't happen in a vacuum; it's part of a larger environment.
The Problem with Moisture Absorption (Hydrolysis)
PET (Polyethylene terephthalate) is hygroscopic, which means it naturally absorbs moisture from the surrounding air. When a moist preform enters the heating oven, the water molecules in the plastic also heat up. This can cause several problems:
- Slower Heating: The energy from the IR lamps is spent heating both the plastic and the water, meaning the preform heats up more slowly and may not reach the optimal molding temperature.
- Weakened Plastic: At high temperatures, the presence of water can cause hydrolysis, a chemical reaction that breaks the long polymer chains of the PET. This reduces the intrinsic viscosity (IV) of the plastic, making it weaker and more brittle.
A preform that has absorbed too much moisture will not stretch properly. It may become hazy, or the base may be brittle and weak, even if it looks fully formed. This is why preforms should be stored in a dry, climate-controlled area and should be used within a reasonable time after being opened. Leaving a bag of preforms open on the factory floor over a humid weekend is a common cause of sudden quality issues on Monday morning. Your preform choice, right down to the preform neck size, should come from a supplier who packages and ships them in sealed, dry containers.
Adapting to Seasonal Temperature Changes
As my Canadian friend discovered, a large difference between the preform's starting temperature and the oven's temperature requires process adjustments.
- Winter/Cold Preforms: A cold preform needs more energy to reach its target temperature. You may need to increase the power of your heating lamps or slow down the preform transit time through the oven to give it more time to soak up the heat. If you don't, the preform, especially the thick bottom, will be too cold, resulting in incomplete stretching and a collapsed base.
- Summer/Warm Preforms: A warm preform needs less energy. If you use your "winter" settings, you will overheat the preform. This can cause the material to become too fluid, leading to thin spots, blowouts, or a hazy appearance. You'll need to decrease the lamp power or increase the oven's ventilation.
The best practice is to have a thermometer near your preform staging area and adjust your heating recipe based on the starting temperature of the preforms. A 10°C change in ambient temperature is often enough to require a parameter adjustment.
The Issue with Cold Core Preforms
Even if the factory is warm, if preforms are brought in from a cold warehouse and used immediately, they can suffer from a "cold core." The outside of the preform might warm up quickly, but the dense plastic in the center, especially at the thick gate area, will still be cold. The oven's IR heat primarily heats the surface. While some heat will conduct inwards, it takes time. If a preform with a cold core enters the mold, the surface might be at the perfect temperature, but the inside will be too stiff. This leads to poor stretching and is a hidden cause of base defects. It's always best to let preforms acclimate to the factory's ambient temperature for several hours before loading them into the hopper. This ensures a more uniform starting temperature from surface to core.
Is your post-mold cooling efficient enough?
The bottle looks perfect when it comes out of the mold, but a few seconds later, the bottom sags or collapses. The problem isn't in the forming process, but in the final, critical step: cooling.
If the bottle bottom is not cooled sufficiently and quickly while still in the mold, it will be ejected while it's still too soft. The internal residual stress and heat will then cause it to deform.

This was the final, fine-tuning step in our comprehensive troubleshooting for the Canadian engineer. His bottles were forming well, but he noticed a slight drop or "suck-back" in the center of the base after they sat on the conveyor for a few moments. The bottle wasn't fully stable when it was ejected. We investigated his cooling system. His chiller was running, but when we checked the temperature of the mold base itself, it was warmer than the side walls. This pointed to an issue with the water flow specifically to the bottom of the mold. A partially blocked cooling channel was preventing this critical area from being cooled as effectively as the rest of the bottle.
Insufficient Cooling Time
In the drive for faster cycle times, it's tempting to shorten the cooling time—the period after the high-pressure blow where the bottle is held in the cold mold. This is often a mistake. PET needs a certain amount of time to "set" or crystallize enough to become structurally stable. The thickest part of the bottle, the bottom, takes the longest to cool. If the cooling time is too short, the bottle is ejected when its base is still semi-molten. The internal stresses from the orientation process will pull the soft material inwards, causing it to sag or collapse. Increasing the cooling time by just a tenth of a second can often be the difference between a stable bottle and a failure.
Blocked or Poorly Designed Mold Cooling Channels
Every blow bottle mold is equipped with channels through which cold water circulates to draw heat away from the plastic. The placement and efficiency of these channels are critical.
- Blocked Channels: Over time, scale, rust, or sediment from the water supply can build up inside these small channels, restricting water flow. This is like a clogged artery; the cooling fluid can't get to where it's needed. The mold base will get progressively hotter throughout a production run, leading to an increase in defects over time. Regular flushing and descaling of your molds is a critical maintenance task.
- Poor Design: In some molds, the cooling channels may be too far away from the surface of the base, or there may not be enough channels dedicated to cooling this thick area. This is a design flaw that is difficult to fix without re-making the mold. This is why it's so important to work with an experienced mold maker who understands the thermal dynamics of cooling. A good mold will have dedicated and optimized cooling circuits for the body, neck, and base.
This chart shows the importance of targeted cooling:
| Mold Area | Typical Thickness | Cooling Requirement | Result of Poor Cooling |
|---|---|---|---|
| Body Wall | Thin | Medium | Hazy appearance, poor rigidity |
| Neck/Finish | Very Thick (crystallized) | Low (already set) | N/A |
| Bottom/Base | Thick | High / Critical | Collapse, sagging, deformation |
Ineffective Air Cooling Assist
Some machines use jets of cool air to help cool the bottle base externally immediately after it is ejected from the mold. This can help to rapidly "skin" the surface and improve stability. However, this system needs to be aimed correctly. If the air jets are not precisely targeted at the center of the base, they will be ineffective. Or, if they only cool one side, they can cause uneven shrinkage, which can lead to warping. This external cooling is a supplement, not a replacement, for good in-mold cooling. The primary cooling must happen when the bottle is held firmly in shape by the mold.
For my friend, we found a small blockage in the water line feeding his mold base. After he disconnected the lines and flushed the mold with a descaling solution, the water flow was restored. The mold base became significantly cooler to the touch, and the post-mold collapse issue was completely resolved. It was the final step in a long journey, but one that took him from a new, struggling engineer to someone who deeply understood every aspect of his process.
Conclusion
By systematically checking the preform, mold, heating, process, air system, environment, and cooling, you can solve any bottle bottom issue. This step-by-step method turns a complex problem into a series of simple checks.
Frequently Asked Questions (FAQ)
1. Why does my bottle bottom collapse even if my machine settings seem perfect?
This often points to a problem outside of your process parameters. The most common hidden causes are a preform design that is not suitable for your bottle shape (e.g., a base that is too small or thin) or moisture absorption in the preforms from improper storage. Both issues prevent the material from stretching and forming correctly, regardless of the machine settings you use.
2. How can I tell if the problem is my heating or my mold cooling?
A heating problem usually shows up as an incorrectly formed base right out of the mold (e.g., a very thick, unstretched center). A cooling problem often appears after the bottle is ejected; it looks perfect at first, but then sags or collapses as it cools on the conveyor. If the base feels very soft or hot immediately after ejection, it's likely a cooling issue.
3. Is it better to use a generic preform or a custom preform?
For standard bottles with simple shapes like a typical water bottle, a high-quality generic preform is often sufficient and cost-effective. However, for bottles with wide bases, complex shapes, or specific performance requirements (like hot-fill or carbonation), a custom preform designed specifically for that bottle is almost always the better choice. The extra cost of the preform mold is usually recovered through lower defect rates and better bottle performance.
4. How often should I check my machine for air leaks or clogged cooling lines?
You should perform a quick check for audible air leaks at the start of every shift. A more thorough check using soapy water on all fittings should be part of a weekly preventative maintenance schedule. For cooling lines, they should be flushed and inspected at every mold change. A full chemical descaling of the mold's cooling channels should be performed at least every 6 months, or more frequently if you have hard water. A stable air system and an efficient chiller are vital for consistency.
5. Can the stretch rod really make that much of a difference?
Absolutely. The stretch rod provides the critical mechanical stretching of the material. If its length (stroke) is too short, its tip shape doesn't match the preform, or its speed is wrong, the material at the very center of the base will not be oriented correctly. This creates a fundamental weak point that no amount of air pressure can fix. It is one of the most overlooked but most critical components in the entire process.
🔗 Learn More about Blow Molding Technology
Blow Molding – Wikipedia
A comprehensive overview of various blow molding processes, including extrusion, injection, and stretch blow molding.Injection Molding – Wikipedia
Important for understanding the production of preforms used in stretch blow molding.Stretch Blow Molding – Wikipedia
Explains how PET bottles are formed through axial and radial stretching processes.PET Bottle – Wikipedia
Background information on the materials and properties of typical PET bottles.Design of PET Bottles – Wikipedia
An introduction to the design considerations and geometry used in PET bottle manufacturing.
🔗 Related Pages on Our Website
Automatic Blow Molding Machines – iBottler
Discover our full range of customizable automatic PET bottle blow molding machines.Blow Bottle Mold – iBottler
Explore our precision blow molds designed for PET and PP bottles.Preform Mold – iBottler
Learn more about our high-precision preform molds suitable for various injection molding machines.PET Wide Mouth Jar Project Starter Guide: Equipment, Molds & Process Explained
Pros and Cons: Should You Choose PET Blow Moulding for Your Bottle Project?
Worried About Blow Mold Fit? We Have Mounting Dimensions for 80% of Blow Molding Machines Worldwide
Can One Semi‑Automatic Blow Molding Machine Produce All Bottle Sizes? Here’s Why Not
Why Do Krones Blow Molding Machine Users Come to Us for Their Molds?
Why Do PET Preforms Come in Different Colors? Function, Application, and Production Tips
How to Set Parameters for 600ml Bottles on a Semi-Automatic PET Blowing Machine?
From 3D Printed Samples to Production: How Can You Rapidly Validate Blow Mold Designs?
How to Choose the Right Preform Neck Size for Your PET Bottle Project
