Feeling like your product volume is a bit lacking in a competitive market? You want to increase capacity, but you're hesitant about the high cost of a brand-new mold? Don't worry, this is a common problem many brands face.
Yes, in many cases, modifying an old blow mold to increase bottle capacity is completely feasible. The key is to assess the mold's existing design and material allowance. Through precise CNC re-machining, it's possible to expand the mold cavity's diameter or depth to achieve the volume increase, which is often cheaper and faster than making a new mold.

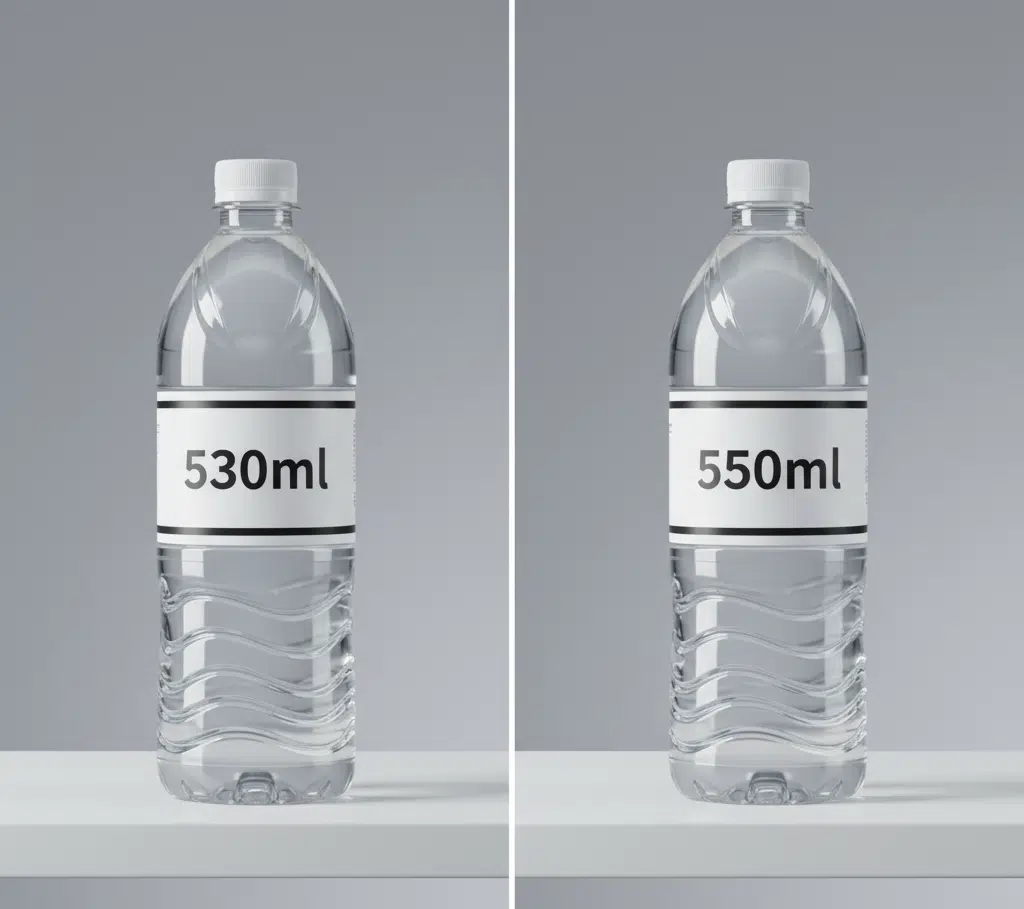
You might find it strange. How can a solid, shaped piece of metal be changed like clay to increase its capacity? It sounds a bit unbelievable. But behind this is a series of careful engineering assessments and precision machining techniques. This article will walk you through every detail of the process, from business reasons to technical execution and risk control. I'll use my 16 years of industry experience, especially a real case of helping a famous soda brand successfully upgrade its 530ml bottle to 550ml, to uncover the secrets of blow mold modification. After reading this, you will be able to clearly judge if modifying an old mold is the right path for your product.
Business Drivers: Why is Fine-Tuning Bottle Capacity a Growing Trend?
Does your product feel a bit "smaller" than your competitors' on the shelf? When consumers compare prices, a larger volume often creates a more direct sense of "value." Do you want to win this subtle psychological battle?
Fine-tuning bottle capacity is a trend driven by three main factors: market competition, cost-effectiveness, and consumer psychology. At the same price point, a larger volume directly improves the product's value proposition, attracting price-sensitive consumers. Also, modifying an old mold is cheaper and faster than developing a new one, helping brands respond quickly to market changes.
Seeking a Competitive Edge
In today's highly saturated fast-moving consumer goods market, especially in the beverage industry, competition is fierce. When formulas, flavors, and packaging designs become similar, some seemingly small details can become key factors in a consumer's purchasing decision. Volume is one of the most important factors.
The Consumer's Perception of "Value"
Imagine this scene: two consumers are standing in front of a supermarket beverage shelf, looking at two soda waters with similar designs and flavors. Brand A is 530ml, and Brand B is 550ml, but the price is identical. In most cases, the consumer will instinctively choose Brand B. Why? Because they feel they are "getting more for the same money." This is a very direct and simple value judgment. That extra 20ml might have a tiny cost, but in the consumer's mind, it builds a "better deal" brand image.
Many years ago, I experienced a case just like this. At that time, a major beverage brand in China launched a new 530ml soda water. The product received good market feedback and sales data after its launch, but they soon discovered a problem: the mainstream competitors in the market all had 550ml products. When their product was displayed next to others, it looked "disadvantaged." The brand's marketing department was very sharp and caught this point. They believed this small difference in capacity could become a long-term competitive disadvantage. So, they came to us with a very clear request: they hoped to increase the capacity of their existing 530ml bottles to 550ml, to match or even surpass their competitors.
A Strategy for Rapidly Responding to Market Changes
Market trends change quickly. Today, small portable packages might be popular, and tomorrow, the trend might shift to family-sized sharing packs. As a brand, if every market change requires a huge investment and several months to develop a brand new blow bottle mold, the reaction speed is too slow. Blow mold refurbishment offers a more agile and flexible strategy. It allows brands to fine-tune their products and quickly test market reactions while controlling costs and time. For example, they can first modify a small number of molds to launch a "more volume, same price" limited edition for market testing. If the results are good, they can roll it out fully. If the response is average, the loss is relatively small. This "small steps, fast iteration" strategy is especially valuable in today's uncertain market environment.
A Direct Look at Cost-Effectiveness
Besides the pressure of market competition, cost control is always at the core of business operations. Especially in manufacturing, any decision that can save money will be prioritized.
Modification vs. New Purchase: An Economic Calculation
Let's do the most direct math. A set of brand-new, high-quality multi-cavity PET blow molds can cost anywhere from a few tens of thousands to over a hundred thousand dollars, depending on the number of cavities, design complexity, and the grade of steel used. The entire manufacturing cycle, from design confirmation to final delivery, usually takes 6 to 10 weeks, or even longer.
Now, let's look at modifying an old mold. The cost to modify blow mold mainly includes the engineer's design assessment, CNC reprogramming and machining, manual polishing, and subsequent testing. In most cases, if the mold itself is suitable for modification, the total cost might only be 20% to 40% of making a new one. More importantly, the modification cycle is very short, sometimes taking only 1 to 2 weeks to complete.
In the 530ml to 550ml case I mentioned earlier, the client's initial concern was cost. They had just invested a large sum in molds for this new series. If they had to scrap them all so soon and order new ones, it would be a huge extra expense, and the finance department would be hard to convince. When we proposed the plan to modify the old molds, they were immediately interested. In the end, we successfully completed the modification for them, not only achieving the goal of increasing bottle capacity but also saving them over 60% of the cost and nearly two months of time. The client was very satisfied, and these modified molds have been running stably ever since.
Reducing Waste and Promoting Sustainability
From a broader perspective, choosing to modify an old mold instead of discarding it is also a responsible act towards resources and a practice of sustainable development. Mold manufacturing consumes a large amount of high-quality steel and energy. By extending the service life of existing molds, we actually reduce the consumption of new resources and lessen the environmental pressure from disposing of old molds. In today's world where companies are paying more and more attention to ESG (Environmental, Social, and Governance), this practice also aligns with a responsible corporate image.
In summary, the trend of fine-tuning bottle capacity is not accidental. It is a rational choice made by companies under fierce market competition to cater to consumer psychology, respond quickly to the market, and strictly control costs. The development of mold modification technology provides a feasible, efficient, and economical solution for this business need.
The Core Answer: Is It Truly Feasible to Modify an Old Blow Mold to Increase Its Capacity?
You might still be skeptical. Carving out a bit more from a hard piece of steel sounds simple, but can it really guarantee the blown bottle will be fine? Could the mold be ruined after the modification?
It is absolutely feasible, but this must be based on a strict scientific evaluation. I have handled many such projects, and the key to success is: first, confirming the mold cavity wall has enough thickness to be machined; second, assessing whether the existing preform can support a larger blow ratio. As long as these two core conditions are met, the capacity can be successfully increased through precision machining.

The Basic Logic of Feasibility
From the most basic physical principle, the cavity of a blow mold is a container with a fixed shape. A preform is inflated by high-pressure air inside this container, eventually taking the shape of the bottle. The bottle's capacity is entirely determined by the internal volume of this cavity. Therefore, to increase bottle volume, the most direct method is to increase the volume of the mold cavity.
This "increase" is usually achieved in two ways in engineering:
- Expanding the diameter: In the main body of the bottle, a CNC (Computer Numerical Control) machine is used to precisely cut the inner wall of the mold cavity, "pushing" the inner wall outwards, thus making the bottle's "waistline" thicker.
- Deepening/changing the base: Modifying the base insert of the mold (the push-up), for example, by lowering its height, can make the bottle bottom sink slightly, which also effectively increases the internal volume.
Sounds simple, right? Like using a spoon to dig out a bit more sand from a finished sandcastle. But the process is far more complex than it sounds. The feasibility judgment must be based on a series of rigorous evaluations, not just a simple "let's start digging" approach.
My Personal Experience: The Challenge of Going from 530ml to 550ml
Let me return to the case of modifying the mold for the soda brand. When the client proposed the need to "add 20ml of capacity," my first reaction was not "no problem," but "I need to see your mold first." This is the rigorous attitude every responsible engineer must have.
We first asked the client to provide the complete set of mold design drawings and the original bottle design files. If there were no drawings, we would need to ship the mold to our factory and use a Coordinate Measuring Machine (CMM) for precise 3D scanning to reconstruct a digital model. Fortunately, this client's documentation was very complete.
Step One: Assessing the Mold Structure
After getting the drawings, the first thing my team did was to analyze the mold's structure, especially the wall thickness of the cavity. We needed to expand the volume by 20ml. After calculation, if this was spread over the entire bottle body, the diameter needed to be expanded by about 0.8mm. This meant that each side of the mold cavity needed 0.4mm of steel to be machined away.
Next, we had to check if this 0.4mm cutting amount would cause fatal damage to the mold.
- Structural Strength: After cutting, would the remaining mold wall thickness still be able to withstand the high blowing pressure of up to 40 Bar (about 40 atmospheres)? Would it remain stable without deforming during high-frequency mold opening and closing?
- Cooling Channels: The mold is filled with complex cooling water channels to quickly remove heat and ensure production efficiency. We had to ensure that this 0.4mm cut would not hit or get too close to the cooling channels. If we cut through one, the entire mold cavity would be scrap. If it was too close, it would affect local cooling, leading to bottle defects, and could even cause the mold to crack due to localized thermal stress.
After careful calculation and simulation analysis, we confirmed that the steel of the client's mold was of good quality and the original design had sufficient wall thickness allowance. It could safely withstand the 0.4mm cutting amount and maintained a safe distance from the cooling channels. This was the first green light for the project to proceed.
Step Two: Assessing Preform Compatibility
The mold could be modified, but we can't forget that the bottle is blown from a preform. We had to evaluate whether the client's existing preform could adapt to this "fatter" new mold. This is a critical part of bottle mold engineering.
The design of the preform, especially its weight, wall thickness distribution, and the stretch properties of the PET material used, directly determines how much it can be stretched and blown. We call this the "Blow Ratio."
- Hoop Ratio: Bottle's maximum diameter / Preform's outer diameter
- Axial Ratio: Bottle's height / Preform's body length
If we expanded the mold diameter too much to increase capacity, exceeding the reasonable hoop ratio of the preform, the PET material would be over-stretched during the blowing process. What would be the consequences? The most common is that some parts of the bottle wall become too thin, like paper, seriously affecting the bottle's strength (especially top-load strength) and barrier properties (against carbon dioxide and oxygen). It could even lead to serious blow molding troubleshooting issues like incomplete formation or pearlescence (stress whitening).
For this case, we analyzed the client's 530ml bottle shape and the preform they were using. The calculation showed that after increasing the capacity to 550ml, the increase in the hoop ratio was still within a reasonable range. However, to be 100% sure, we recommended a two-pronged strategy:
- Achieve most of the capacity increase by expanding the bottle diameter.
- At the same time, slightly lower the height of the mold base.
This way, the added volume was distributed across both "horizontal" and "vertical" dimensions, avoiding excessive stretching in a single direction. This comprehensive technical solution finally eliminated the client's concerns about bottle performance and became the key to the project's success.
So, to answer the initial question: "Is it truly feasible?" My answer is: Yes, but it's not a simple "yes" or "no" question. It's a complex process that requires engineers to conduct a comprehensive, detailed, and multi-dimensional evaluation. Only after confirming the mold's own safety and the feasibility of preform stretching can we confidently say, "No problem, we can do it!"
Technical Deep Dive: How Do Engineers "Create" Extra Space on a Mold?
You might be curious about what the modification process actually looks like. Is it as precise as surgery, or more like an artistic carving? Does it require some secret "black technology" to accomplish?
The process is more like precise microsurgery. We first use 3D scanning and design software to accurately calculate the material to be removed. Then, we use high-precision CNC machines for automated cutting, and finally, experienced technicians perform manual polishing. The core of the entire process is data and precision, not brute force.
Taking a pre-formed hard steel mold and "creating" an extra 20ml of space inside it does sound a bit magical. But in reality, there's no magic involved, just a standardized, data-driven precision engineering process. As engineers, our job is to translate the client's abstract request of "increasing capacity" into a series of precisely executable physical operations. Now, I'll take you into our workshop to reveal this space-"creating" process step by step.
Step 1: Diagnosis and "Surgical" Plan Design (Digital Modeling)
Before any modification work begins, we must conduct a comprehensive "physical examination" of the "patient"—the old mold. This step is the foundation of the entire project, and its accuracy determines the final success or failure.
1. Precise Data Collection
- If original drawings are available: This is the ideal situation. We import the client's 2D or 3D drawings into our CAD (Computer-Aided Design) software. Just like a doctor with a complete medical record, we can clearly understand every dimension, every angle, and the crucial layout of the cooling channels.
- If there are no drawings: This is also common, especially for older molds or those purchased from third parties. In this case, we need to use our "CT scanner"—a high-precision Coordinate Measuring Machine (CMM) or an industrial-grade 3D laser scanner. We scan the entire cavity of the mold, capturing every detail of its inner surface with micron-level accuracy to generate a 1:1 digital 3D model. This process ensures that all our subsequent operations are based on the mold's actual condition, not guesswork.
2. "Virtual Surgery" and Solution Simulation
After obtaining an accurate 3D model, our design engineers begin the "virtual surgery" on the computer. Taking the 530ml to 550ml case as an example, our engineers would perform the following operations in the CAD software:
- Calculate Volume Increase: First, the software automatically calculates the exact volume of the current 530ml bottle model. Then, our goal is to create a new model with a volume of exactly 550ml based on this original model.
- Determine Modification Area: Based on the bottle's shape and our previous assessment, we determine the main areas for modification. For instance, we decided to expand the diameter of the main bottle body by 0.8mm and lower the base height by 0.5mm.
- Generate New vs. Old Comparison Model: The engineer directly modifies the original model in the software to generate a new 3D model of a 550ml bottle. Then, the new and old models are overlaid for comparison. The software highlights the material that needs to be machined away in a different color—this represents the physical space on the mold corresponding to that "extra 20ml." This visual result is very intuitive, allowing the client to clearly see the changes in bottle shape and which locations on the mold we need to process.
- Safety Check: On this virtual model, we again overlay the cooling channel layer to perform an interference check, ensuring our "scalpel" (CNC tool path) will not touch any "blood vessels" (cooling channels). This is like a surgeon repeatedly studying a patient's vascular and nerve distribution map before an operation. An excellent PET bottle mold design guide is not just about aesthetics; it's about solid engineering.
Only when this virtual surgery plan has been repeatedly verified and confirmed to be foolproof do we move on to the actual physical machining stage.
Step 2: Precision Machining (Automated CNC Cutting)
This is the core step of turning the design blueprint into reality. We use high-precision CNC machining centers, which can perform micron-level precise cutting under computer program control.
- Programming: Our CAM (Computer-Aided Manufacturing) engineer converts the confirmed 3D model from the previous step into command code that the CNC machine can "read," known as G-code. This code details the tool type, spindle speed, feed rate, and motion path, down to every point and line.
- Clamping and Tool Setting: The mold is securely fastened to the CNC machine's worktable. The operator uses precision edge finders and tool setters to establish an accurate workpiece coordinate system. This step is crucial; it ensures the machine's processing origin perfectly coincides with the origin in our design model. Any slight deviation could lead to processing failure.
- Automated Machining: Once everything is ready, the operator presses the start button, and the machine begins to automatically execute the program. The high-speed rotating carbide tool follows the preset path, slowly and layer by layer, cutting away the excess metal material inside the mold cavity. The entire process can last for several hours or even more than ten hours, depending on the amount of metal to be removed and the required surface finish. During this process, a large amount of cutting fluid is continuously sprayed onto the processing area for cooling and lubrication, ensuring processing accuracy and tool life.
Step 3: Surface Treatment and Detailing (Craftsman's Touch)
After CNC machining is complete, the dimensions of the mold cavity have reached the design requirements, but the surface still has machine tool marks and is not smooth enough. If we were to blow bottles with such a mold, the bottle surface would also be rough, affecting transparency and feel. Therefore, the final "finishing touch" needs to be done by an experienced technician.
- Manual Polishing: The technician uses sandpaper of different grits, from coarse to fine, oil stones, and diamond polishing paste to repeatedly polish the inner wall of the mold cavity. This is a job that requires extreme patience and skill. The technician needs to ensure that while removing the tool marks, the contour dimensions of the cavity are not damaged. Eventually, the inner wall of the cavity will become as smooth as a mirror, a finish we call "mirror polishing." This is not just for aesthetics but to ensure that the PET material flows smoothly during inflation and does not stick during demolding.
- Venting and Detail Inspection: While polishing, the technician also checks and cleans the mold's vent slots. Vent slots are micron-level grooves on the mold's parting line, used to exhaust the air between the preform and the mold during blowing. If the increased capacity leads to a larger bottle surface area, it may be necessary to add or deepen the vent slots to avoid blowing defects caused by poor venting.
When all these steps are completed, an "old" mold is successfully "reborn," with just the right amount of extra space "created" inside to meet the client's needs. This process is a perfect combination of modern automation technology and traditional craftsmanship.
Key Prerequisites: The 3 Critical Factors That Determine if a Mold Can Be Modified
Can every mold be so lucky to be modified? Of course not. Before we decide to start, we must carefully examine several key "limiting factors" like a detective. If these are ignored, forcing a modification will only lead to disastrous consequences.
Three hard conditions determine if a mold can be modified: first, whether the mold cavity wall has enough "meat" for us to cut; second, whether the original bottle design leaves room for modification; and third, most importantly, whether the existing preform can still perform well after being stretched further.
In my 16-year career, I've probably rejected as many modification requests as I've accepted. My primary responsibility is to ensure the feasibility and safety of the solution, not to blindly meet all of the client's requests. For every evaluation, we focus on the following three unavoidable critical factors. If any one of them shows a red light, I will tell the client directly: "Sir, this plan is too risky. I recommend we consider making a new mold."
Prerequisite 1: The Mold's Own "Physique"—Wall Thickness and Structure
This is the most physical and direct limitation. If we are going to cut material from the mold, it must have material to spare. After cutting, it must still be a "strongman," not a "weakling."
1. Cavity Wall Thickness Allowance
The cavity wall of the mold, the steel layer outside the bottle shape, needs to withstand the enormous impact of dozens of atmospheres of pressure during blowing, as well as the mechanical stress from the high-frequency opening and closing of the molding machine. Its thickness is directly related to the mold's strength and lifespan.
Before we decide how much material to cut (like the 0.4mm in the previous case), we must accurately measure or calculate the existing wall thickness at the thinnest point of the cutting area. Then we subtract our cutting amount from this existing thickness to get a "post-modification wall thickness." This value must be greater than a "safety threshold." This threshold doesn't have a universal absolute standard; it depends on the mold's size, material (e.g., S136 hardened steel is much stronger than P20 steel), and the blowing pressure.
Here is a simplified evaluation table to illustrate our thinking process:
| Mold Parameter | Evaluation Item | Standard/Calculation | Assessment Result | Conclusion |
|---|---|---|---|---|
| Mold Material | S136 (HRC48-52) | - | High-strength steel | Favorable |
| Bottle Diameter | Ø65mm | - | - | - |
| Planned Expansion | 0.8mm (0.4mm per side) | - | - | - |
| Cooling Channel to Cavity Distance | Measured Value | Must be > 5mm | Measured 8mm | Safe |
| Thinnest Cavity Wall Thickness | Measured Value | Must be > 25mm | Measured 30mm | Safe |
| Post-Modification Wall Thickness | 30mm - 0.4mm | Must be > 25mm | 29.6mm | Pass |
If any item in the table above resulted in "Dangerous" or "Fail," for example, if the post-modification wall thickness was less than the safety threshold, or if the cutting area was too close to a cooling channel, we would immediately stop this plan.
Prerequisite 2: The Bottle's "Genes"—Shape and Features
Not all bottles are suitable for "gaining weight." The bottle's own design can sometimes be a natural obstacle to modification.
1. Complex Surface Features
If a bottle has very complex, deep ribs, or a fine embossed logo on its body, and our planned expansion area passes through these features, the difficulty and risk of modification increase dramatically.
- Destroying the Original Design: Directly expanding the diameter might stretch or deform these ribs or logos, causing them to lose their original aesthetic and functional purpose.
- High Machining Difficulty: Trying to evenly expand the surrounding cavity wall while preserving these features is a huge challenge for CNC programming and machining. It might require making special forming tools, which would significantly increase cost and time.
- Stress Concentration Points: The junctions of these complex geometric shapes are often points of high stress concentration. After modification, the stress problems at these points could become more severe, leading to bottles that are prone to cracking in these areas.
An ideal candidate for modification is usually a bottle with a relatively simple and smooth body. For example, the soda bottle in our case had a smooth cylindrical body, which provided great convenience for us to expand the diameter.
Prerequisite 3: The Preform's "Potential"—Stretch Performance and Compatibility
This is the most critical and most easily overlooked of the three prerequisites. The mold can be modified, but if the original "seed" (the preform) is not good enough, you still won't get a good "fruit" (the bottle). You must have a deep understanding of how to choose the right preform neck size and weight, as this determines the project's upper limit.
1. The Limit of the Blow Ratio
As we mentioned before, every preform has its reasonable range for the blow ratio. When we increase the bottle capacity from 530ml to 550ml, the preform needs to be blown "fatter." This directly increases the "hoop ratio." We must perform precise calculations to ensure the new blow ratio is still within a safe range.
If the calculation shows that the blow ratio will exceed the limit (the hoop ratio is generally not recommended to exceed 4.5-5.0, depending on the preform design and PET resin grade), then forcing the mold modification will only produce a pile of scrap. You will see all kinds of problems:
- Uneven Wall Thickness: Material accumulates at the bottle's shoulder or base, while the middle of the body becomes paper-thin.
- Pearlescence: A pearly white haze appears at the base of the bottle, which is a typical sign of over-stretched PET material.
- Degraded Physical Performance: The bottle's top-load strength, drop resistance, and gas barrier properties will decrease significantly, failing to meet product quality requirements.
2. Is the Preform Weight Sufficient?
Increasing the capacity by 20ml means the bottle's surface area has increased, which also means more PET material is needed to fill this larger space to maintain the necessary average wall thickness. This leads to a question: is the existing preform weight sufficient?
If you continue to use the old preform, the total amount of material remains the same but needs to be distributed over a larger surface area. The inevitable result is that the bottle's average wall thickness becomes thinner. This could lead to insufficient bottle strength or, in carbonated beverage applications, a shortened shelf life due to a reduced gas barrier.
In our case, after calculation, the thinning of the wall caused by adding 20ml of capacity was still within an acceptable range and would not substantially affect the soda's shelf life. But in some projects, we have to tell the client explicitly: "If you want to modify the mold, you must also switch to a heavier preform mold product. Otherwise, the project cannot proceed." This adds extra cost that the client must consider when making a decision.
In conclusion, these three prerequisites are like three checkpoints that we must review strictly one by one. Only when the mold's "physique," the bottle's "genes," and the preform's "potential" all show feasibility will we press the start button and begin the actual blow mold modification.
Cost & Timeline: A Comprehensive Comparison Between Modifying an Old Mold and Investing in a New One
Alright, we now know that modification is feasible, but just how cost-effective is it? When you're hesitating between "modify" and "build new," a clear comparison of cost and timeline can help you make the smartest business decision.
In short, the core advantages of modifying an old mold are that it's "fast" and "economical." The cost is typically only 20%-40% of a new mold, and the timeline can be shortened from months to a few weeks. However, this comes with a price; you need to consider potential testing costs and the risk of failure.
As an engineer, I not only consider the technical perfection of a solution but also analyze the economic impact of different options from the client's perspective. A "good" solution isn't just about technical feasibility; it's about whether it makes business sense. Below, I will provide you with a very detailed, all-around comparison and, based on my experience, point out some often-overlooked "hidden costs."
Comprehensive Comparison Table
To give you a clear overview, I've created the comparison table below. This table covers almost every aspect you need to consider when making your decision. Let's assume we need to handle an 8-cavity mold for a 550ml bottle.
| Comparison Dimension | Option A: Modify Old Mold (from 530ml to 550ml) | Option B: Invest in a New Mold (Custom 550ml) | Notes & Interpretation |
|---|---|---|---|
| Upfront Investment | |||
| Design & Evaluation Fee | Low (approx. $1,000 - $3,000) | Included in total price, but actual cost is higher | Modification is mainly assessment and reverse engineering; new build requires full design from scratch. |
| Material Cost | None (uses old mold steel) | Very High (quality mold steel is a major cost driver) | This is one of the core reasons for the huge cost difference. |
| Core Costs | |||
| Machining & Labor Fee | Medium (approx. $5,000 - $15,000) | Extremely High (approx. $30,000 - $80,000+) | Modification is mainly CNC re-machining and polishing; new build includes all steps like roughing, finishing, heat treatment, drilling water lines, assembly, etc. |
| Total Estimated Cost | $6,000 - $18,000 | $35,000 - $90,000+ | The direct cost advantage of modification is very significant, typically saving 60%-80%. |
| Timeline | |||
| Design & Confirmation | 2-5 days | 1-2 weeks | |
| Production & Machining | 1-2 weeks | 6-10 weeks | This is another major core advantage. Modification allows for a quick response to market demand. |
| Testing & Fine-Tuning | 1-3 days | 3-5 days | |
| Total Estimated Timeline | Approx. 2-3 Weeks | Approx. 8-12 Weeks | Time is money, especially in the FMCG industry. Launching a month earlier can mean a huge first-mover advantage. |
| Risks & Uncertainties | |||
| Performance Risk | Medium (bottle performance needs verification) | Low (designed and manufactured to new standards) | The performance of the modified bottle (e.g., top-load) may have unknown changes and requires strict testing. |
| Failure Risk | Low to Medium (possibility of modification failure exists) | Extremely Low (mature manufacturing process) | If the assessment is improper or a machining error occurs, the old mold is at risk of being scrapped. |
| Assets & Depreciation | |||
| Asset Value | No new fixed asset | A new high-value fixed asset is added | A new mold can be booked as a company asset and depreciated. |
| Mold Lifespan | May be slightly shortened | A full new lifespan | The modification process itself is a form of wear on the mold, but the impact is usually minor. |
Deeper Interpretation: The Business Logic Behind the Numbers
This table provides the cold, hard data, but the business logic and my experienced interpretation behind the numbers might be more valuable to you.
1. Cash Flow Pressure
For many growing companies or large corporations focused on cost control, cash flow is the lifeline. Spending tens of thousands of dollars or more on a new blow bottle mold at once can put considerable pressure on the company's finances. Modifying an old mold solves the same problem at a much lower price, greatly easing cash flow pressure. This allows the company to invest precious funds into areas with more direct returns, like marketing and channel expansion.
In the soda brand case I worked on, the brand manager admitted that applying for the budget for a new mold would have taken at least a month for internal approval, with no guarantee of passing. The budget request for modifying the mold, being a smaller amount, was approved almost without issue, which significantly sped up their project timeline.
2. The Value of Time: Opportunity Cost
In the world of fast-moving consumer goods, time really is money. Suppose your competitor has already launched a 550ml "extra volume" pack and is getting a positive market response. If you choose to build a new mold, you will have a 2-3 month market window gap. During this time, how many customers might you lose? How much sales revenue will be lost? This is the "opportunity cost."
Modifying the old mold allows you to bring a similarly competitive product to market in just a few weeks, quickly catching up to or even surpassing your competitor's pace. In business competition, this rapid response capability is sometimes more valuable than the direct cost savings on the mold itself.
3. "Hidden Costs" and Risk Management
Of course, choosing the modification route is not without its worries. You must face the "hidden costs" and risks involved.
- Intensive Testing Costs: New molds undergo comprehensive testing by the manufacturer before delivery. For a modified mold, the responsibility for performance verification falls more on you. You need to conduct more intensive blowing tests and perform a full range of performance checks on the produced bottles, including capacity, wall thickness distribution, top-load strength, sealing, and drop tests. These all require time, labor, and material costs.
- Contingency Plan for Failure: Although we engineers will do the most thorough assessment, modification still carries a very small risk of failure (e.g., discovering an unforeseen internal material defect during machining). You must have a contingency plan for this. The worst-case scenario is that the old mold is ruined during modification, and you have to order a new one, sinking the money and time already spent. Therefore, choosing an experienced and reputable mold supplier is crucial, as they can minimize this risk. It's best to clarify the responsibility and solution for modification failure in the contract.
- Potential Impact on Production: A modified mold may have slight parameter changes, such as needing a minor adjustment in blowing pressure or cooling time. This requires your production team to adapt and adjust, which might briefly affect production efficiency initially.
My advice is:
If your budget is sufficient, you demand the ultimate in product performance, and the market competition allows you a 2-3 month preparation period, then investing in a brand-new, custom-made mold for your product is always the safest and most long-term option.
However, if you are facing significant cost pressure, need to react quickly to the market, and have confirmed through a professional assessment that the risks are manageable, then modifying an old mold is undoubtedly an extremely attractive and intelligent "high value" strategy.
Potential Risks: What Unexpected Issues Might Arise After Mold Modification?
We have successfully "created" space on the mold, and from a cost and time perspective, it seems like a good deal. However, just like any surgery, the post-operative recovery period can have complications. Understanding these potential risks and having a plan is the final barrier to ensuring the project's ultimate success.
After a mold modification, the most common risks are a decline in bottle performance, such as uneven wall thickness distribution, reduced top-load strength, or the appearance of new molding defects. These issues stem from the change in the blow ratio and require meticulous process tuning to resolve, and may even require re-evaluating the preform choice.
Never assume that once the mold comes out of the machining center and is installed on the bottle blowing machine, it will immediately produce perfect bottles. In many modification projects I've handled, the real challenge often begins during the trial molding stage after the modification is complete. These "unexpected" problems, though troublesome, are mostly solvable with adequate preparation and the right knowledge.
Risk 1: Decline in the Bottle's "Physical Fitness" (Weakened Physical Properties)
This is the most central and critical risk. We've changed the bottle's "figure," which could very well affect its "physique."
1. Uncontrolled Wall Thickness Distribution
This is the most frequent issue. The original 530ml bottle's preform stretching and blowing were optimized to ensure a relatively uniform wall thickness. Now that we've expanded the mold diameter, the preform needs to stretch more horizontally. If the process parameters (like pre-blow pressure, main blow time, stretch rod speed, etc.) are not adjusted accordingly, the following situations can easily occur:
- Thin Mid-Body: This is the most direct consequence. The material is over-stretched horizontally, causing the bottle's "waist" to become very thin. Such a bottle feels soft, lacks a quality feel, and more importantly, its barrier properties will be greatly reduced. For contents sensitive to oxygen and carbon dioxide, like carbonated drinks or juices, the shelf life will be significantly shortened.
- Material Accumulation Upwards or Downwards: To fill the widened body, the PET material may not distribute evenly, causing it to accumulate abnormally in the shoulder or base area, forming thick rings. This not only wastes material but also affects the bottle's overall performance and appearance.
2. Substandard Top-Load Strength
A bottle's vertical top-load strength is a key indicator of its ability to remain intact during warehouse stacking and transportation. If a modified bottle has uneven wall thickness distribution, or if certain key support areas (like the support ring under the shoulder) are weakened, the top-load strength will decrease.
Imagine your bottles are stacked five or six layers high in a warehouse. If the bottom layer of bottles collapses due to insufficient top-load strength, it would be a disaster. Therefore, conducting a strict top-load test after modification is an essential step. We use professional pressure testing machines to apply vertical pressure to the modified bottles until they collapse, recording the maximum force they can withstand and comparing it with the pre-modification standard.
3. Other Physical Performance Risks
- Drop Resistance: Thinner walls or uneven stress distribution can also make the bottle more prone to breaking when dropped.
- Thermal Stability (for hot-fill bottles): If it's a hot-fill bottle, its ability to resist high-temperature deformation (like mouth deformation or body shrinkage) after modification also needs to be re-validated.
Risk 2: Appearance of New "Facial Blemishes" (Blow Molding Defects)
Besides the internal "physical fitness," the bottle's "looks" can also be affected. Some common PET blow molding defects that never appeared before the modification might suddenly pop up.
| Common Defect | Cause | Solution |
|---|---|---|
| Pearlescence | The material at the base of the bottle is over-stretched beyond PET's elastic limit, causing material crystallization and whitening. | Optimize the stretch rod design, reduce stretching speed; appropriately increase the heating temperature of the preform base to increase its ductility; or consider a preform with better stretch properties. |
| Webbing/Stringing | Fine, web-like strands appear in some corners or recesses of the bottle. Usually caused by localized rapid cooling or poor material flow. | Check if venting in the corresponding mold area is adequate; appropriately increase the mold temperature; optimize the preform heating profile. |
| Off-center Gate | The injection point (gate) at the bottom of the bottle is not in the center, causing one side of the bottle wall to be thick and the other thin. | After modification, the alignment of the stretch rod with the mold center may be off. The centerline of the stretch rod and mold needs to be recalibrated. |
| Sunken Bottom | Insufficient blowing pressure or time, preventing the bottle base from fully conforming to the mold shape. | Increase the main blow pressure or extend the main blow time; check the high-pressure air line for leaks. |
How to Address and Mitigate These Risks?
Faced with these potential problems, we can't be helpless. A professional modification service is not just about getting the mold modified correctly, but more importantly, providing subsequent process support to help clients solve these "complications."
- Conduct a Thorough Trial Mold and Validation: This is the most critical step. Use your own preforms and bottle blowing machine on your production line to run a small batch trial. Don't just blow a few dozen bottles and think everything is fine. It's recommended to run continuously for at least a few hours to observe production stability.
- Systematic Process Optimization: For the problems that arise, our engineers will work with your on-site technicians to systematically adjust the blowing process parameters. This is a fine-tuned "combination" work, which may involve adjusting the power percentage of each lamp in the heating oven, modifying the pressure and timing of the pre-blow and main blow, changing the speed of the stretch rod, etc. Our goal is to find a new set of "optimal process window" parameters that perfectly match the modified mold.
- Have a Contingency Plan: In rare cases, if fundamental issues still cannot be resolved through process tuning (e.g., the preform's stretch ratio has indeed reached its physical limit), we must initiate a contingency plan. This might mean you have to accept a slightly imperfect bottle (e.g., top-load strength is 5% lower than the original but still meets the minimum standard), or you need to make the decision to switch to a preform that is better suited for the new mold. This is why we conduct the preform compatibility assessment at the very beginning of the project.
In short, the risks after mold modification are real, but they are predictable, manageable, and solvable. The key is that both you and your mold supplier need to have a clear understanding and be willing to invest the necessary time and resources for detailed validation and tuning.
Beyond the Mold: Don't Forget to Check Your Production Line Equipment After Increasing Capacity
We've focused all our attention on the mold and the bottle itself, which is of course the core. However, please do not forget that after the bottle is produced, it's not the end of the line. It still needs to go through a series of conveying, labeling, filling, and packaging processes. A seemingly minor change in the bottle's diameter can trigger a "butterfly effect" in these subsequent stages.
After the bottle gets bigger, you must systematically check the entire production line. From the mold installation in the blowing machine to the downstream conveyors, star wheels, labelers, and packers, any size mismatch in any link can lead to a full line stoppage. This is an often-overlooked but crucial checkpoint.

In my many years of experience, I've seen many clients get into an awkward situation because they neglected to check their production line's auxiliary equipment. The mold modification was successful, and perfect 550ml bottles were produced. Everyone was happy. But when the bottles entered the next process, problems arose: bottles got stuck, labels were crooked, or they wouldn't fit into the original cartons. The mold modification project, originally intended to save money and time, ended up causing longer downtimes and additional modification costs due to these "small issues."
So, before you celebrate the successful mold modification, please take a sample of the new bottle and, like an inspector, walk your production line from start to finish.
Critical Checklist
I've compiled a list of critical equipment that you must check. You can go through it one by one.
1. The Blow Molding Machine Itself
- Mold Mounting Dimensions: This is the first step. Although we are modifying an old mold and the overall external dimensions (length, width, height) and mounting bolt holes generally don't change, it's best to reconfirm. Especially for some very compact rotary blowing machines, you need to ensure the modified mold won't interfere with any part of the machine. We know how important it is that the blow mold fit the blowing machine, so we pay special attention to this.
- Mold Open/Close Stroke: A larger bottle diameter means the two halves of the mold need to open wider for the bottle to be ejected smoothly. Please confirm if your blowing machine's opening stroke is sufficient.
- Bottle Gripper and Transfer: After being blown, the bottle is usually removed from the mold by a gripper and placed on an air conveyor or belt. This gripper is designed based on the neck or body dimensions of the original 530ml bottle. Now that the body is fatter, can the gripper still hold it securely? Will it cause the bottle to drop or tilt due to an incorrect gripping position?
2. Downstream Conveying and Handling Equipment
This is where problems are most likely to occur because many parts are "custom-made."
- Air Conveyor/Conveyor Belt Guide Rails: From the blowing machine, bottles are usually transported via air conveyors or conveyor belts. The width of the guide rails on these channels is fixed. If the bottle diameter increases from 65mm to 65.8mm, it might get stuck at turns or in some narrow places, causing the entire line to jam.
- Star Wheels: In equipment like fillers, cappers, and labelers, bottle infeed and positioning often rely on a component called a "star wheel." Star wheels have many pockets customized for the bottle's shape. If the bottle gets "fatter," it might not fit into the original sized pockets or could get stuck during rotation. This means you might need to order a new set of star wheels for these core machines.
- Labeler:
- Positioning: The labeler is very sensitive to bottle positioning. A change in bottle diameter can affect the start and end position of the label, causing the seam to be misaligned.
- Label Size: The bottle's circumference has increased. Your original labels might not be long enough to "wrap" the new bottle, requiring a redesign and reprinting of longer labels.
- Inkjet Coder: The coder needs to print the production date at a specific location on the bottle. A change in diameter also changes the surface curvature, which might affect the clarity and position of the code.
- Packaging Machine:
- Shrink Wrapper: If you use shrink wrap for packaging (e.g., a 6-pack), the original arrangement might no longer work with bigger bottles, or you might need to use a wider PE film.
- Case Packer: Whether it's a robotic arm or a drop packer, the grippers and the dividers inside the carton are designed for the old bottle size. The new bottles might not be gripped properly or fit into the original cartons. You will need to adjust the machine or redesign your shipping cartons.
3. Auxiliary Equipment
- Air Compressor System: An increased capacity of 20ml theoretically means a slight increase in high-pressure air consumption. If your high-pressure air compressor system was already running at full capacity, this small increase could be the last straw, leading to unstable air pressure and affecting blowing quality.
- Chiller: Similarly, a larger bottle means more heat needs to be removed from the mold. Check if your chiller has enough spare cooling capacity to ensure the mold can be adequately cooled to maintain a stable production cycle.
My advice is: When you decide to modify the mold, immediately form a cross-departmental evaluation team, including colleagues from production, maintenance, purchasing, and quality. Take the 3D drawing of the new bottle (or we can quickly provide you with 3D printed samples) and have the person in charge of each stage assess the potential impact and modification needs. List all potential modification points and costs. This will give you a comprehensive and realistic understanding of the total project cost and help you avoid unexpected troubles and expenses later in the project.
Making a Smart Decision: A Self-Checklist for Evaluating Your Mold Modification Needs
So far, we have explored all aspects of mold modification, from business motives to technical details, risks, and supporting facilities. It's a lot of information, and you might feel a bit overwhelmed. To help you think about this issue systematically, I have prepared a simple and practical self-checklist for you.
Before contacting a mold supplier, please ask yourself a few questions using this checklist. It will help you organize your thoughts, clarify your needs and bottom line, and allow you to take the lead in subsequent communications, thus making the smartest decision in your own best interest.
This checklist is like the list of questions I run through in my head when I receive a new inquiry. It helps me quickly judge the feasibility and complexity of a project. Now, I'm sharing it with you. You can try to answer these questions yourself. If the answers to most of the questions are positive, or if you have a clear direction on how to find the answers, then the "modify old mold" option is likely a direction worth serious consideration for you.
Mold Modification Needs Self-Checklist
Please answer the following questions based on your actual situation.
| Category | Question | My Answer (Yes/No/Unsure) | Thoughts & Actions |
|---|---|---|---|
| 1. Business Motive | |||
| 1.1. Is the main purpose of increasing capacity clear? (e.g., to match a competitor, improve value, test the market) | A clear motive is the foundation of a successful project. | ||
| 1.2. Do you have a rough estimate of the expected benefits from the modification (e.g., sales increase)? | This relates to the project's Return on Investment (ROI). | ||
| 1.3. Is your need for cost and time savings very urgent? (e.g., limited budget, need for a quick launch) | If the answer is "yes," the modification option becomes more attractive. | ||
| 2. Technical Prerequisites | |||
| 2.1. Do you have the original design drawings (2D/3D) of the old mold? | If yes, it will greatly facilitate the evaluation work, saving time and cost. If not, 3D scanning will be necessary. | ||
| 2.2. Do you know the steel type and heat treatment hardness of the old mold? | This affects the mold's strength and machinability. If unknown, a hardness test is needed. | ||
| 2.3. Do you have the detailed specification sheet or samples of the existing preform? | This is key to assessing PET preform compatibility. We need info like weight, neck finish, height, wall thickness, etc. | ||
| 2.4. Is the body shape of the bottle you plan to modify relatively simple and smooth? | If the body has complex ribs or logos, the modification difficulty and cost will increase. | ||
| 2.5. Do you have the capability to conduct trial molding and bottle performance testing in your factory? | The validation work after modification is crucial and requires your resources. | ||
| 3. Risk & Budget | |||
| 3.1. Have you set a clear upper limit for the project budget? | This helps you make a more realistic trade-off between "modify" and "build new." | ||
| 3.2. Can you accept potential minor changes in bottle performance after modification? (e.g., a 5% decrease in top-load strength) | A minimum acceptable quality baseline needs to be set. | ||
| 3.3. Have you considered the risk of modification failure and have a backup plan? (e.g., if it fails, can you immediately initiate a new mold plan) | Having a Plan B gives you more confidence in your decision. | ||
| 4. Production Line Fit | |||
| 4.1. Have you preliminarily assessed the compatibility of downstream equipment (e.g., star wheels, labeler, case packer)? | It's recommended to do an actual test using 3D printed samples of the new bottle. | ||
| 4.2. Have you confirmed that your auxiliary equipment (e.g., air compressor, chiller) still has spare capacity? | Avoid letting small issues disrupt overall production efficiency. |
How to Use This Checklist?
- Be Honest with Yourself: Answer each question as truthfully as possible. For the "Unsure" options, these are the areas you need to focus on researching next.
- As a Starting Point for Communication: When you approach a mold supplier like us with this completed checklist, the communication will be much more efficient. You can clearly express your current situation, needs, and concerns. We can then provide you with more accurate and targeted advice and quotations based on this information.
- Adjust Your Decision Dynamically: During your communication with the supplier, you may get clear answers to some of your "Unsure" questions. For example, by analyzing the drawings, we can tell you "it's technically feasible with low risk." Or, we might point out that "your preform may need to be changed, which will add an extra cost." You can dynamically update your assessment based on this new information and ultimately make the most comprehensive decision.
In my view, a successful project stems from honest, transparent, and efficient communication between the client and the supplier. This checklist is the key to unlocking that kind of good communication. It cannot replace a professional engineering evaluation, but it ensures that you have done your "homework" thoroughly before seeking professional help.
Taking my experience with the soda client as an example, when they first came to me, they didn't know the technical details, but their business motive was very clear (to match a competitor), their time and cost requirements were very urgent, and they could provide complete mold and preform data. This made our initial assessment very smooth and laid a solid foundation for the success of the entire project.
Conclusion
In summary, modifying an old blow mold to increase capacity is not only technically feasible but also a commercially smart choice under certain conditions. It can save you significant costs and valuable time, allowing you to respond quickly to market changes.
FAQ
1. What is the biggest risk in modifying an old mold to increase capacity?
The biggest risk is a decline in the bottle's physical properties. Due to the change in the blow ratio, the most likely problem is uneven wall thickness distribution (especially a thinner mid-body), leading to reduced vertical top-load strength. This affects the safety of product stacking during storage and transportation. Therefore, after modification, rigorous performance testing of the new bottle is essential, along with process tuning to optimize wall thickness.
2. I don't have any drawings or data for my mold. Can it still be evaluated for modification?
Absolutely. This is a situation we encounter frequently. We would have your mold (or one of its cavities) shipped to our facility and perform reverse engineering using a high-precision Coordinate Measuring Machine (CMM) or a 3D laser scanner. We will reconstruct an accurate digital 3D model, including the mold cavity and cooling channel locations. Based on this model, we can perform the same evaluation and modification design as we would with drawings.
3. Will modifying a mold affect its lifespan?
It might have a slight impact, but it's usually not significant. The modification process itself, especially CNC machining, is a cutting process on the metal, which is theoretically a form of wear. However, if done correctly and if the mold itself is made of high-quality material and has a robust structure, this impact is negligible compared to the mold's total lifespan of several million cycles. In comparison, improper daily use and maintenance (like corrosion or impact damage) have a much greater effect on mold life.
4. If I'm only increasing the volume by a small amount, like 10ml, is the risk basically zero?
The risk is lower, but it is definitely not zero. Even a small increase in volume will change the blow ratio and material flow. While the likelihood of severe defects decreases, a full trial molding and performance validation process is still necessary. Especially for bottles whose original designs are already at a critical limit, any minor change can upset the existing balance and trigger unexpected problems. You can't be complacent.
5. Which is more expensive: modifying a blow mold or ordering new preforms?
It depends on the specific situation. Generally, modifying one set of blow molds is much cheaper than commissioning a brand-new preform mold. Preform molds usually have many more cavities (e.g., 32, 48, or more), are more complex in structure, and therefore more expensive. However, if you have a massive production volume, the long-term increase in raw material costs from a heavier preform also needs to be calculated. The decision should be based on a comprehensive consideration of the one-time investment cost and the long-term operational costs.
🔗 Related Pages on Our Website
Automatic Blow Molding Machines – iBottler
Discover our full range of customizable automatic PET bottle blow molding machines.Blow Bottle Mold – iBottler
Explore our precision blow molds designed for PET and PP bottles.Preform Mold – iBottler
Learn more about our high-precision preform molds suitable for various injection molding machines.PET Wide Mouth Jar Project Starter Guide: Equipment, Molds & Process Explained
Pros and Cons: Should You Choose PET Blow Moulding for Your Bottle Project?
Worried About Blow Mold Fit? We Have Mounting Dimensions for 80% of Blow Molding Machines Worldwide
Can One Semi‑Automatic Blow Molding Machine Produce All Bottle Sizes? Here’s Why Not
Why Do Krones Blow Molding Machine Users Come to Us for Their Molds?
Why Do PET Preforms Come in Different Colors? Function, Application, and Production Tips
How to Set Parameters for 600ml Bottles on a Semi-Automatic PET Blowing Machine?
From 3D Printed Samples to Production: How Can You Rapidly Validate Blow Mold Designs?
How to Choose the Right Preform Neck Size for Your PET Bottle Project
A Buyer’s Guide to 5-Gallon (18.9L) Bottle Blow Molding Machines: From PET to PC?
Pitting on your blow mold surface? A complete guide from cause analysis to repair and prevention.
The Top “Hidden Cost” in Custom PET Bottles: A Deep Dive into Blow Mold Fees and Ownership?
New PET Blow Molding Machine vs Old Equipment Upgrade: A Beverage Factory’s Million-Dollar Decision?
How to reduce the PET blow molding scrap rate from 5‰ to 1‰? An old-timer’s 8 insider tips.
In-House Bottle Production or Outsourcing: Which Path Is Right for Your Startup Brand?
Blow Mold Damage? When and How to Replace Only the Broken Parts?
Bottle Design: Ad Agency vs. Mold Factory? How One Decision Impacts Your Cost and Brand?
Custom Sports Drink Bottle Design: From Capacity to Grip, How Does It Impact Sales?
