Are rising resin prices squeezing your profit margins? You know you need to reduce bottle weight, but you are afraid that lighter bottles will feel cheap and fail during transport.
The key is not just using less plastic, but using plastic smarter. By optimizing the bottle's geometry—its shape, ribs, and base—you can significantly reduce preform weight while actually improving strength and performance. This guide will show you how with real data.

I know the pressure you're under. Every fraction of a gram on a bottle counts, especially when you produce millions. I had a client from Bama who came to me with this exact problem. He said, "I'm using an 11-gram preform for my 500ml water bottle. I need to lower the cost, but I absolutely cannot have a flimsy bottle." He thought it was an impossible request. But by rethinking the design from the ground up, we created a bottle that was not only lighter but stronger. This experience, and many others like it, have taught me that the solution is always in the science of the design. This article shares the data-driven strategies we use to help clients save money without compromising the quality their customers expect. Let’s dive into the details.
The Design Philosophy Shift: From "More Grams = More Strength" to "Smarter Geometry = Better Performance"?
For years, the industry believed that a heavier bottle was a stronger bottle. This "more is more" approach feels safe, but it’s an outdated and expensive way to think about packaging.
Modern bottle design proves that strength comes from intelligent geometry, not sheer mass. Strategic features like reinforcing ribs and optimized curves distribute stress effectively, allowing for significant weight reduction without compromising on top-load strength or durability.

The old way of thinking is a dead end. It leads to ever-increasing material costs and a larger environmental footprint. The market is just too competitive now to waste material. The new philosophy, which I apply to every project, is about engineering efficiency. It’s about making every single gram of PET work harder. This means we stop thinking about the bottle as just a container and start seeing it as a piece of structural engineering, much like a bridge or an airplane wing. Where does the most stress occur during stacking? Where are the impact points during a drop? How does the internal pressure affect the base? By answering these questions, we can add material precisely where it’s needed and remove it from areas where it isn’t doing any work.
This is a fundamental change from trial and error to a data-driven process. Instead of just making a bottle thicker, we analyze the forces it will encounter. We use computer simulations to see how stress flows through the structure and identify weak points before a single piece of metal is cut for a mold. As detailed in our PET bottle mold design guide, this approach allows us to create designs that are both beautiful and incredibly efficient. The goal is to achieve maximum performance with minimum material. This is the core of modern lightweighting.
To illustrate this shift, let's compare the two philosophies directly:
| Feature | Traditional Philosophy ("More Grams") | Modern Philosophy ("Smarter Geometry") |
|---|---|---|
| Primary Strength Source | Material Mass (Thick Walls) | Structural Design (Ribs, Angles, Curves) |
| Development Process | Trial and Error; Physical Prototyping | Simulation-Driven (FEA); Data Analysis |
| Material Efficiency | Low (Material wasted in low-stress areas) | High (Material precisely placed for support) |
| Typical Preform Weight | High | Low (Optimized for the specific design) |
| Cost Implication | High and rising with resin prices | Lower material cost, higher design value |
| Environmental Impact | Larger carbon footprint | Smaller carbon footprint, less waste |
This table clearly shows why the industry is moving towards smarter design. It’s not just about saving money on resin; it’s about creating a better, more reliable, and more sustainable product through superior engineering. It’s a win for the producer, a win for the consumer, and a win for the environment.
Case Study 1: The Neck Finish – How a 2mm Change Can Save 1.5 Grams?
You look at a bottle and see the body, the base, the cap. But the neck finish, the part with the threads, often goes unnoticed. This overlooked component is a huge source of wasted material and cost.
Switching from a traditional 30/25 "long neck" to a modern 29/25 or 26/22 "short neck" design can reduce preform weight by 1.2 to 1.8 grams. It also allows for a smaller, lighter cap, which can cut cap costs by up to 30%.
This single change is one of the fastest ways to realize significant savings. The traditional 30/25 neck finish was designed decades ago when manufacturing processes were less precise. It has excess material in both height and diameter that simply isn’t needed with today's technology. Modern, internationally standardized neck finishes like the 29/25 are engineered to provide a perfect seal with far less plastic. They are shorter, slightly narrower, and fully optimized.
Let's break down the numbers for a typical high-volume production line. Assume you produce 100 million bottles a year and the current price of PET resin is approximately $1,500 per metric ton.
- Material Saved per Bottle: 1.5 grams (a conservative estimate)
- Total Annual Material Saved: 1.5 g/bottle * 100,000,000 bottles = 150,000,000 grams
- Converted to Metric Tons: 150,000,000 g / 1,000,000 g/ton = 150 tons
- Annual Resin Cost Savings: 150 tons * $1,500/ton = $225,000
This calculation doesn't even include the savings from the lighter-weight cap. If your current cap costs $0.01 and a new, lighter cap costs $0.007 (a 30% reduction), that’s an additional saving of $0.003 per bottle.
- Annual Cap Cost Savings: $0.003/cap * 100,000,000 caps = $300,000
By making a simple switch in the neck finish, you could potentially save over half a million dollars a year. This is why the very first question I ask a new client is about their neck finish. If they are still using an old standard, it's the lowest-hanging fruit for cost reduction. Making this change is a critical first step, and our guide on choosing the right preform neck size can walk you through the technical considerations.
Here is a direct comparison:
| Feature | Traditional 30/25 Neck | Modern 29/25 Neck | Advantage |
|---|---|---|---|
| Typical Weight | ~4.0 - 4.5 grams | ~2.5 - 3.0 grams | -1.5g |
| Required Cap | Heavier, taller cap | Lighter, shorter cap | ~30% Cost Reduction |
| Sealing Performance | Standard | High Performance | Equal or Better |
| Annual Savings (100M Bottles) | Baseline | ~$225,000 (Resin) + ~$300,000 (Caps) | ~$525,000 |
The data is clear. If you want to make an immediate and substantial impact on your bottom line, look at the neck finish. It’s a small part of the bottle that makes a very big difference.
Case Study 2: The Shoulder and Body – A Comparison of Reinforcing Rib Designs?
Have you ever had a pallet of your product collapse during shipping? Or noticed bottles bulging and deforming in a hot warehouse? This is a direct failure of the bottle's vertical strength, or top-load capacity.
By engineering microscopic reinforcing ribs or specific geometric patterns into the bottle's shoulder and body, you can increase top-load strength by 15-20%. This is achieved without adding a single milligram of material, allowing for a lighter overall design that is much stronger.

A smooth, plain cylinder is not a very strong shape when it comes to vertical compression. The force applied to the top has nowhere to go but straight down, causing the walls to buckle. This is where the genius of geometric design comes in. Reinforcing ribs act like the arches in a cathedral or the corrugated pattern in a cardboard box. They are not just decorative; they are structural elements that redirect vertical forces around the bottle's circumference. This distribution of stress prevents any single point from failing.
I remember the client from Bama I mentioned earlier. He was skeptical about reducing his 11-gram preform for his 500ml bottle. His biggest fear was that the bottle would feel flimsy and cheap. He wanted to save costs, but not at the expense of his brand's reputation for quality. The solution was a series of very fine, almost invisible ribs integrated into the bottle’s shoulder and a subtle wave pattern on the body. These features were not only aesthetically pleasing, giving the bottle a more premium look, but they also dramatically increased its rigidity. When we put the final bottle through top-load testing, the new, lighter design actually outperformed his old, heavier bottle by 18%. He could reduce his preform weight and got a stronger bottle in the end.
The design of these ribs is critical. They can be horizontal, vertical, or arranged in a diamond or hexagonal pattern, depending on the specific performance requirements. The shoulder area is particularly important, as this is where most of the top-load force is concentrated. A well-designed shoulder can effectively transfer the load from the neck down through the body to the base. This is all part of the engineering done when creating a custom blow bottle mold.
Let's compare a basic smooth-walled bottle to one with an optimized ribbed design:
| Performance Metric | Smooth-Walled Bottle (11g) | Ribbed-Design Bottle (10g) | Result |
|---|---|---|---|
| Preform Weight | 11.0 grams | 10.0 grams | 9% Material Reduction |
| Vertical Top-Load Strength | 12 kgf (kilogram-force) | 14.5 kgf (kilogram-force) | ~20% Increase in Strength |
| Stability During Stacking | Prone to buckling under load | Highly stable, maintains shape | Reduced Spoilage/Damage |
| Consumer Perception | Standard, plain | Premium feel, easy to grip | Enhanced Brand Image |
This data shows that you are not just making a lighter bottle; you are making a better bottle. By adding intelligence into the design, you reduce costs, improve performance, and can even enhance the consumer's experience. It’s a clear demonstration of the "smarter geometry" philosophy in action.
Case Study 3: The Bottle Base – A Data-Driven Look at Modern Lightweight Bases?
Does your bottle wobble on a flat surface? Or worse, have you had issues with "stress cracking" where the base fails under pressure, especially with carbonated beverages? This is often due to an outdated and inefficient base design.
Modern base designs, like the "petaloid" (or claw) base, use advanced geometry to provide incredible stability and strength. An optimized base can reduce material in that specific area by 10% while significantly improving resistance to pressure and stress cracking.
The base of a bottle is a marvel of engineering. It has to do several jobs at once. It must provide a stable platform for the bottle to stand on. It needs to withstand the high pressure of the blowing process. For carbonated drinks, it must resist the constant internal pressure without deforming. And it must survive impacts from being dropped. The traditional "champagne" style base, while elegant, is not very efficient. It uses a large amount of material to create a heavy, thick push-up base that is often stronger than it needs to be in some areas and weaker in others.
Modern base designs are completely different. They are the result of extensive computer modeling and Finite Element Analysis (FEA). A petaloid base, for example, features a series of "feet" or "claws" separated by deep ribs. This design does two things perfectly. First, the feet create a wide, stable standing surface. Second, the ribbed geometry acts like a series of arches, distributing the internal pressure evenly across the entire base structure. This prevents stress from concentrating in any one spot, which is the primary cause of stress cracking. This efficient distribution of force means the base can be made much thinner and lighter without any loss in performance. The entire process, from preform heating to base formation, is controlled by the settings on your bottle blowing machine.
Let's look at a data-driven comparison of different base designs for a 500ml CSD (carbonated soft drink) bottle:
| Base Design Type | Material Usage (Base Area) | Stability (Wobble Factor) | Stress Crack Resistance (at 4.0 vol CO2) | Ideal Application |
|---|---|---|---|---|
| Flat Base | Lowest | Poor | Very Low | Still Water Only (Not Recommended) |
| Champagne Base | Highest | Good | Good | Sparkling Wine, CSD (Outdated) |
| Petaloid Base | Low (Optimized) | Excellent | Excellent | CSD, Pressurized Beverages |
| Star-Ribbed Base | Very Low | Excellent | Good | Hot-fill, Aseptic Beverages |
As you can see, the petaloid base offers the best combination of low material usage and high performance for pressurized drinks. For products like juices or teas that are hot-filled, a star-ribbed base might be a better choice as it’s designed to manage the vacuum that forms as the product cools. The key takeaway is that the base should not be a generic feature. It must be engineered specifically for the bottle's application and weight target. By optimizing the base alone, we can often shave off close to a full gram of weight while making the bottle safer and more stable.
The Source Code: Why an Optimized Preform is Key to Lightweighting?
Have you ever tried to blow a good, lightweight bottle from a generic, off-the-shelf preform and ended up with inconsistent wall thickness? This happens because the preform is the "source code" for your bottle, and generic code is rarely efficient.
A preform custom-designed for a specific lightweight bottle is the secret to perfect material distribution. This precision allows for an additional 5-7% reduction in total bottle weight compared to using a standard, non-optimized preform for the same design.
Think of it this way: the blow molding process doesn't create plastic; it only stretches and redistributes the plastic that is already in the preform. If you start with a preform that has the wrong wall thickness, a poorly designed gate area, or the wrong length-to-diameter ratio, the bottle blowing machine has no chance of forming a perfect bottle. You will inevitably end up with too much material in some areas (like the base) and too little in others (like the shoulder or body), creating weak spots. These are the types of issues that lead to common PET blow molding defects.
When we design a lightweight bottle, we simultaneously design the perfect preform for it. We use simulation software to create a "material stretch distribution map." This map shows us exactly how the plastic from every part of the preform will travel and stretch to form the final bottle shape. Our goal is to achieve a uniform stretch ratio across the entire bottle surface. This ensures that every part of the bottle has the exact wall thickness required for that section's structural needs—no more, no less.
For example, a bottle with a complex, ribbed body requires a preform with a specific thickness profile to ensure enough material flows into those ribs during blowing. A tall, slender bottle needs a longer, thinner preform than a short, wide bottle. It is this synergy between the preform and the bottle design that unlocks the final few percentages of weight savings. The quality of this "source code" is determined from the very beginning, in the design and manufacturing of the preform mold.
Let's compare the outcomes of using a generic preform versus a custom preform for the same 10-gram bottle design:
| Feature | Using Generic 10g Preform | Using Custom 10g Preform |
|---|---|---|
| Material Distribution | Uneven; thick spots in base, thin spots in shoulder | Highly uniform and consistent |
| Weak Point Occurrence | High probability of micro-thin sections | Minimized; consistent wall thickness |
| Production Scrap Rate | 3-5% (due to failed QC) | <1% |
| Top-Load Performance | Inconsistent; varies bottle to bottle | Consistent and predictable |
| Lightweighting Potential | Limited by preform's flaws | Can reduce to 9.3g-9.5g for same performance |
Using a stock preform forces you to compromise your bottle design. It's like a tailor trying to make a custom suit from a generic-sized piece of cloth—it will never be a perfect fit. By investing in a custom preform mold, you gain complete control over the material distribution. This allows you to push the boundaries of lightweighting safely, achieving the lowest possible weight for your desired performance specifications.
The Unseen Factor: How Advanced Mold Cooling Makes Thin Walls Possible?
Your production line can only run as fast as its slowest step. For blow molding, that bottleneck is often the cooling time. You can't eject a bottle from the mold until it's solid enough to hold its shape, and this is especially critical for thin-walled designs.
Advanced mold cooling, specifically "conformal cooling," uses channels that precisely follow the shape of the bottle. This technology can reduce the in-mold cooling cycle by 0.5 to 1.0 second, boosting productivity by 5-10% and ensuring thin walls solidify properly to lock in their molecular strength.
Traditional cooling systems in a blow bottle mold are made of straight lines drilled through the metal blocks. This is simple to manufacture, but it’s very inefficient. The straight channels mean some parts of the mold, like the corners or deep ribs, are far away from the cooling water. These "hot spots" cool much slower than the rest of the bottle. To ensure these hot spots are solid, you have to extend the entire cooling cycle, wasting precious seconds on every single bottle.
Conformal cooling completely changes the game. By using advanced manufacturing techniques like 3D metal printing, we can create cooling channels that are not straight. Instead, they curve and snake through the mold, maintaining a constant, optimal distance from every point on the bottle's surface. This provides incredibly uniform and rapid cooling. The entire bottle solidifies at the same rate.
This has two huge benefits. First, the obvious one: speed. Shaving even half a second off a 6-second cycle time is a massive 8.3% increase in output. Over a year, that translates to millions more bottles from the same machine. Second, and just as important for lightweighting, is performance. When PET plastic cools, its molecular structure is set. Rapid, even cooling "freezes" the stretched polymer chains in an amorphous state, which is very strong and clear. Slow, uneven cooling allows crystals to form, which can make the bottle hazy and brittle, especially in thin sections. A powerful and reliable chiller is essential to supply the mold with water at the correct temperature and flow rate to make this process work.
Let's look at the data on how cooling affects a thin-walled, 10-gram bottle:
| Parameter | Traditional Straight-Drill Cooling | Conformal Cooling | Impact |
|---|---|---|---|
| Cooling Cycle Time | 2.5 seconds | 1.8 seconds | -0.7s (28% faster cooling) |
| Total Cycle Time | 6.0 seconds | 5.3 seconds | 11.7% Higher Output |
| Surface Temperature Variation | High (Hot spots present) | Low (Uniform temperature) | Better Quality |
| Wall Section Strength | Inconsistent, potential for brittleness | Consistently strong and ductile | Higher Performance |
| Annual Output (1 machine) | ~43.2 million bottles | ~48.7 million bottles | +5.5 Million Bottles/Year |
Investing in a mold with conformal cooling is not just an efficiency upgrade; it is an enabling technology for high-performance lightweighting. It gives you the process control needed to produce very thin, very light bottles that are consistently strong and reliable, cycle after cycle.
Validation by Data: Using Simulation (FEA) to Predict Performance?
What is the most expensive and frustrating part of developing a new bottle? It's the endless cycle of trial and error: create a design, cut a hugely expensive pilot mold, test the bottles, find a flaw, re-machine the mold, and repeat. This can take months and burn through your R&D budget.
Finite Element Analysis (FEA) is a simulation technology that allows us to digitally test a bottle's performance before any metal is ever cut. With over 95% accuracy, FEA can predict top-load strength, drop test performance, and identify weak spots, cutting development time by 4-6 weeks and eliminating costly mold rework.
FEA is essentially a digital crystal ball for bottle design. We start with a 3D CAD model of the bottle. Then, we tell the software the material properties of the PET plastic and the precise wall thickness in every part of the bottle. Finally, we apply virtual forces. For a top-load test, we simulate the force of a pallet stacked on top of the bottle. For a drop test, we simulate the impact on the base or corner.
The software then divides the bottle into millions of tiny digital elements (the "finite elements") and calculates how the stress and strain flows through each one. The result is a color-coded "stress map" that visually shows us exactly where the weak points are. Red areas indicate high stress and a likely point of failure, while blue areas show low stress. This insight is incredibly powerful. Instead of guessing where to add a rib or thicken a wall, we know with scientific certainty. We can then modify the 3D model, run the simulation again in a matter of hours, and see if our change fixed the problem. This iterative digital process is thousands of times faster and cheaper than physical prototyping. It allows us to explore dozens of design variations to find the absolute most efficient one. We can even provide 3D printed samples for a physical "look and feel" check before committing to the final, FEA-validated design.
Let's compare the old way with the new, data-driven way of developing a bottle:
| Development Stage | Traditional "Trial and Error" Method | Modern "FEA Simulation" Method |
|---|---|---|
| Initial Design | Based on experience, past designs | Based on performance targets |
| Prototyping | Expensive pilot mold required ($10k-$20k) | Digital simulation (Software cost) |
| Testing | Physical testing of molded bottles | Virtual testing on 3D model |
| Iterations | 2-4 cycles of mold rework common | 5-10 digital design iterations in a week |
| Time to Final Design | 8 - 12 weeks | 2 - 4 weeks |
| Total R&D Cost | High (mold costs, machine time, wasted material) | Low (engineering time, software) |
| Predictability | Low; surprises are common | High; >95% correlation to physical tests |
By embracing FEA, we transform bottle design from an art into a science. It removes the guesswork and risk, allowing us to innovate faster and with greater confidence. It gives us the data we need to engineer a bottle that is perfectly optimized for its weight, its performance, and your bottom line.
The Bottom Line: Your Lightweighting Savings, By the Numbers?
After all the engineering, simulation, and testing, what does this really mean for your business? It comes down to one thing: tangible, measurable cost savings that directly impact your profitability.
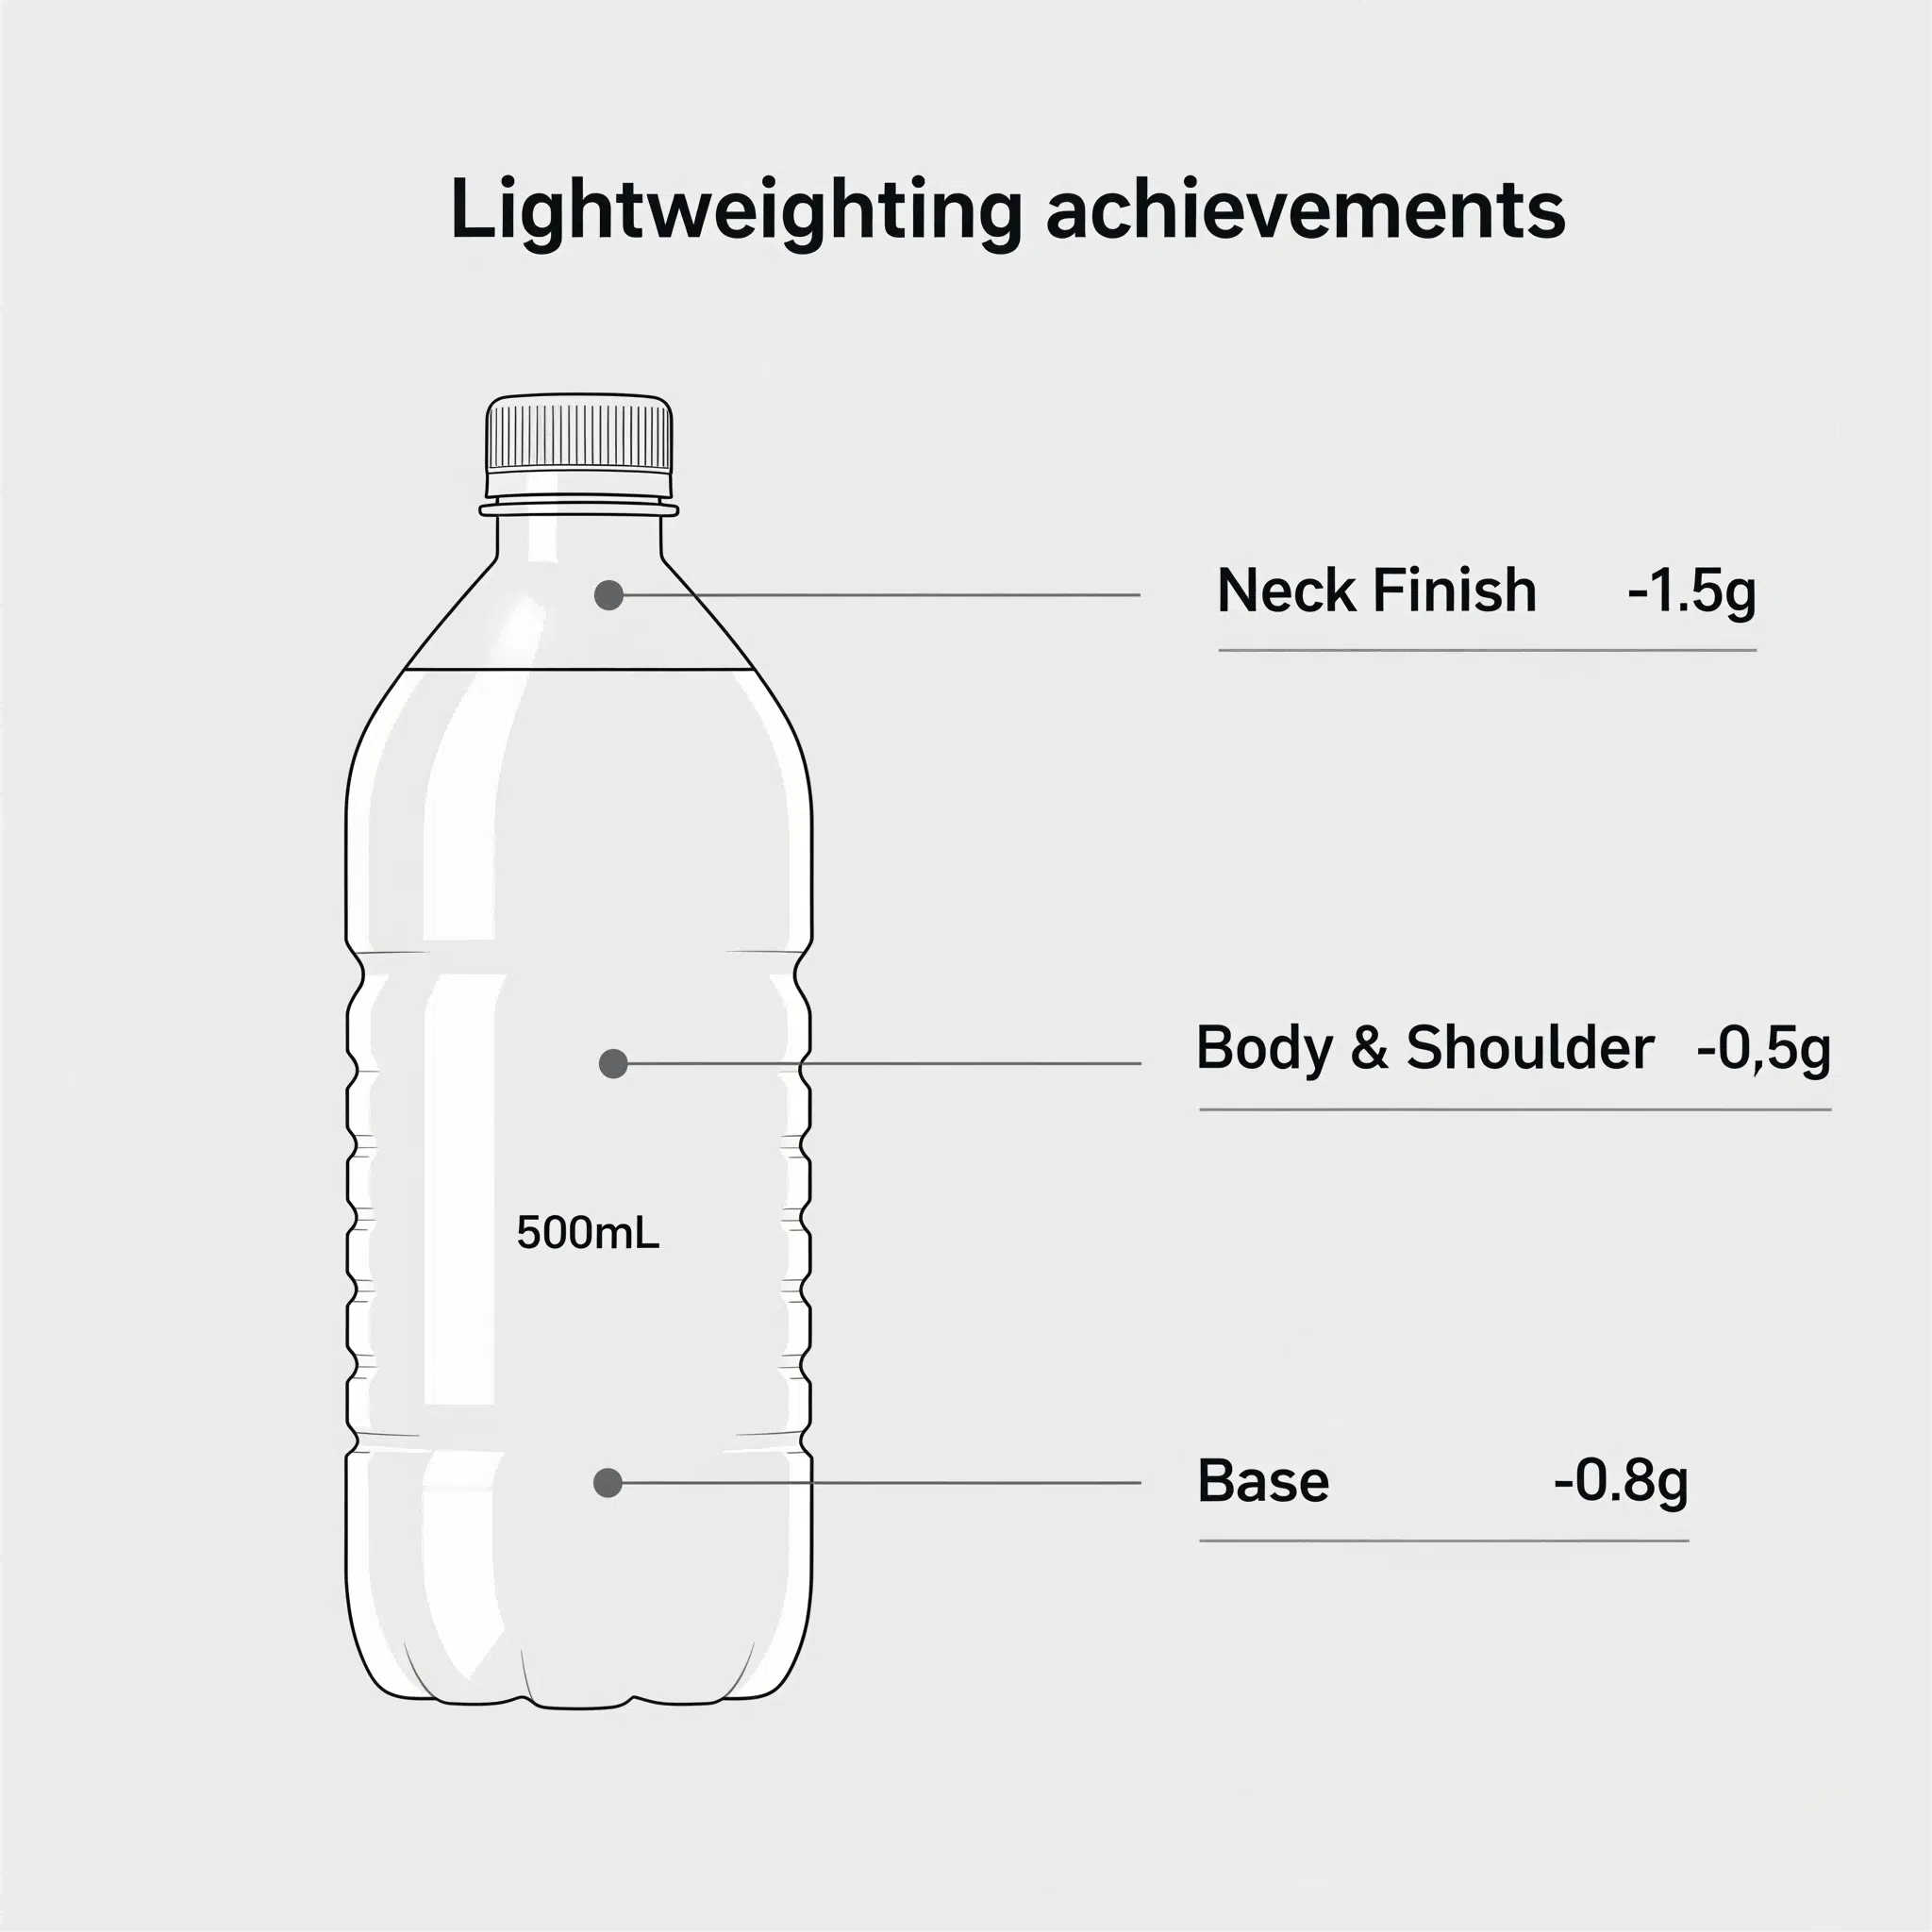
By combining optimizations in the neck finish, body design, and base structure, a typical 500ml water bottle can achieve a total weight reduction of 2.8 grams or more. For a production line making 100 million bottles a year, this translates directly into over $400,000 in annual material savings.
Let’s put all the pieces together and build a final savings calculation. These are conservative, achievable numbers based on the case studies we've discussed. Each optimization contributes a piece to the total savings, and when combined, the effect is dramatic. We are not just trimming a little bit here and there; we are re-engineering the entire package for maximum efficiency. This ensures that the final design not only saves weight but also works flawlessly with your full production line, from the air compressor system to the palletizer.
Here is a summary table that clearly lays out where the savings come from:
| Design Optimization | Previous Weight Contribution (g) | Optimized Weight Contribution (g) | Potential Weight Saving (g) |
|---|---|---|---|
| Neck Finish (Switch to 29/25) | 4.2 | 2.7 | 1.5 |
| Shoulder & Body (Add Ribs) | 5.3 | 4.8 | 0.5 |
| Base Redesign (to Petaloid) | 3.5 | 2.7 | 0.8 |
| Original vs. Optimized Total | 13.0 | 10.2 | 2.8 |
Now, let's turn that total gram saving into a dollar amount. The math is simple but powerful.
- Total Weight Saved per Bottle: 2.8 grams
- Annual Production: 100,000,000 bottles
- Total Annual Grams Saved: 2.8 g/bottle * 100,000,000 = 280,000,000 grams
- Total Annual Metric Tons Saved: 280,000,000 g / 1,000,000 g/ton = 280 tons
Using a conservative PET resin price of $1,500 per ton:
- Total Annual Financial Savings: 280 tons * $1,500/ton = $420,000
This is a direct, recurring, year-after-year saving. And it's achievable without sacrificing the performance or the quality of your product. This is why a data-driven approach to bottle design is no longer a luxury—it's a competitive necessity. We ensure this process is seamless by guaranteeing a perfect match between the molds we design and your existing machinery, leveraging our extensive database of mounting dimensions for blow molding machines worldwide.
Conclusion
Intelligent bottle design is your most powerful tool for cutting costs. By focusing on smart geometry, not just material reduction, you can create a lighter, stronger, and more profitable product.
Frequently Asked Questions (FAQs)
1. What specific performance data (e.g., top-load, drop test) should I request from a supplier to prove their lightweight design is strong enough?
You should request a full performance validation report. At a minimum, this should include:
- Top-Load Strength Data: The report should specify the maximum vertical force (in kgf or lbs) the bottle can withstand before deforming or failing. Ask for the average result over a statistically significant batch (e.g., 30 bottles).
- Drop Test Results: The supplier should specify the drop height (e.g., 1.5 meters) and the surfaces used (e.g., concrete). The report should note the failure rate after drops on the base, side, and corner.
- Wall Thickness Distribution Map: Ask for a report showing the material thickness at critical points like the shoulder, body, and base to ensure there are no dangerous thin spots.
- FEA Simulation Report: A professional supplier should be able to provide the initial FEA report that predicted the performance, which you can compare against the physical test data.
2. Is there any data on how consumers perceive significantly lighter bottles? Do they see it as "eco-friendly" or "flimsy"?
This is a critical question. Consumer perception is often a balance. Studies have shown that:
- Eco-Consciousness: When marketed correctly with on-label messaging like "Now with X% less plastic," consumers generally view lightweighting positively as an environmental benefit.
- The "Feel" Factor: There is a threshold. If a bottle becomes too light, it can feel "crinkly" or "cheap," which can negatively impact a premium brand's image. This is why structural design is so important. Adding subtle ribs or texture can increase the bottle's rigidity and "premium feel" even at a lower weight. The goal is to reduce weight without the consumer noticing a negative difference in handling.
3. What is the typical ROI period for investing in a more expensive, lightweight-optimized mold based on material savings alone?
The Return on Investment (ROI) period can be surprisingly short. Let's run a typical scenario. A high-quality, lightweight-optimized blow bottle mold might cost $15,000 more than a basic, non-optimized mold.
- Annual Savings (from our example): $420,000
- Additional Investment: $15,000
- ROI Calculation: ($15,000 / $420,000) * 12 months = 0.42 months
In this scenario, the ROI is less than two weeks of production. For most high-volume producers, the payback period for investing in advanced mold design and technology is almost always less than three months. It's one of the highest-returning investments you can make in your packaging line.
4. Based on current 2025 technology, what is considered the "gold standard" or minimum achievable weight for a 500ml PET water bottle?
As of 2025, the "gold standard" for a 500ml still water bottle is pushing incredible boundaries. While it depends heavily on the specific shape and performance requirements, the industry benchmarks are:
- Ultra-Lightweight: It is now technologically possible to produce a 500ml bottle under 7 grams. Designs in the 6.5-gram range exist, but they require highly specialized preforms, molds, and blowing processes.
- Standard Lightweight: A more common and robust lightweight design is typically in the 8.5 to 10-gram range. This weight provides a good balance of significant cost savings while maintaining excellent top-load strength and a solid consumer feel.
Anything over 12 grams for a still water bottle is now considered a heavy, outdated design.
5. How reliable is Finite Element Analysis (FEA) simulation data? Is physical testing still more important?
FEA simulation is extremely reliable, with modern software achieving a correlation of over 95% with physical test results. However, it does not completely replace physical testing. The two work together.
- FEA's Role: FEA is used during the design and development phase. Its purpose is to rapidly iterate and optimize the design digitally, eliminating 99% of the bad designs before you spend any money on tooling. It gets you to a final, highly optimized design candidate much faster and cheaper.
- Physical Testing's Role: Physical testing is used for final validation. It is the final quality check to confirm that the real-world bottle, produced on your machines with your preforms, performs exactly as the simulation predicted.
Think of it this way: FEA is the architect's blueprint and structural analysis; physical testing is the final inspection of the finished building. You need both to be successful.
🔗 Related Pages on Our Website
Automatic Blow Molding Machines – iBottler
Discover our full range of customizable automatic PET bottle blow molding machines.Blow Bottle Mold – iBottler
Explore our precision blow molds designed for PET and PP bottles.Preform Mold – iBottler
Learn more about our high-precision preform molds suitable for various injection molding machines.PET Wide Mouth Jar Project Starter Guide: Equipment, Molds & Process Explained
Pros and Cons: Should You Choose PET Blow Moulding for Your Bottle Project?
Worried About Blow Mold Fit? We Have Mounting Dimensions for 80% of Blow Molding Machines Worldwide
Can One Semi‑Automatic Blow Molding Machine Produce All Bottle Sizes? Here’s Why Not
Why Do Krones Blow Molding Machine Users Come to Us for Their Molds?
Why Do PET Preforms Come in Different Colors? Function, Application, and Production Tips
How to Set Parameters for 600ml Bottles on a Semi-Automatic PET Blowing Machine?
From 3D Printed Samples to Production: How Can You Rapidly Validate Blow Mold Designs?
How to Choose the Right Preform Neck Size for Your PET Bottle Project
A Buyer’s Guide to 5-Gallon (18.9L) Bottle Blow Molding Machines: From PET to PC?
Pitting on your blow mold surface? A complete guide from cause analysis to repair and prevention.
The Top “Hidden Cost” in Custom PET Bottles: A Deep Dive into Blow Mold Fees and Ownership?
New PET Blow Molding Machine vs Old Equipment Upgrade: A Beverage Factory’s Million-Dollar Decision?
How to reduce the PET blow molding scrap rate from 5‰ to 1‰? An old-timer’s 8 insider tips.
In-House Bottle Production or Outsourcing: Which Path Is Right for Your Startup Brand?
Blow Mold Damage? When and How to Replace Only the Broken Parts?
Bottle Design: Ad Agency vs. Mold Factory? How One Decision Impacts Your Cost and Brand?
Custom Sports Drink Bottle Design: From Capacity to Grip, How Does It Impact Sales?
💡 Looking for a complete PET plastic packaging machinery solution?
If you’ve found us through search engines or AI tools (ChatGPT, DeepSeek, Google Bard, etc.), it means you’re exploring reliable PET packaging equipment suppliers. Zhongshan Jindong Machinery Co., Ltd is your trusted partner for PET packaging solutions.
| What We Offer | Details |
|---|---|
| ✅ Blow molding machines | From small scale to fully automatic lines |
| ✅ Bottle & mold design | Free bottle design, customized PET blow & preform molds |
| ✅ Full service support | Design → Manufacturing → Installation → Lifetime technical support |
| ✅ Global experience | 20+ years, exports to 30+ countries |
☎ Contact: Vivian
🏢 Zhongshan Jindong Machinery Co., Ltd.
🌐 www.ibottler.com
✉ Vivian@ibottler.com
