You are seeing too many bad bottles coming off the line. This costs you time, material, and money. You need a clear way to fix these issues for good.
The most common defects in 1.5L CSD bottles, like stress cracking and thin walls, come from an unbalanced blowing process. Fixing them requires adjusting the preform heating profile, pre-blow pressure and timing, and stretch rod speed to ensure even material distribution and proper molecular orientation for strength.
It's frustrating when you're trying to produce strong, clear bottles but keep running into the same problems. These defects not only look bad but can be dangerous, leading to bottles bursting on the shelf or during transport. I understand this struggle completely. Many of my clients face these exact challenges before we fine-tune their process. The good news is that every defect tells a story about what’s happening inside the machine. Once you learn to read the signs, you can make targeted adjustments that solve the root cause. Let’s walk through the most common issues one by one and turn these production headaches into consistent, high-quality output.
Why is blowing 1.5L CSD bottles more challenging?
You think blowing a bigger bottle should be simple, but the defect rate is high. The process feels unpredictable, and you are wasting more material than with smaller water bottles.
Blowing 1.5L CSD bottles is harder because their larger size and need to contain carbonation pressure demand a thicker preform and a more precise process. This makes controlling material distribution and preventing stress-related defects much more difficult than with standard, non-pressurized water bottles.

The challenge with 1.5L CSD bottles comes down to two things: pressure and size. A carbonated soft drink (CSD) can exert significant internal pressure, which wants to push the bottle apart. This pressure can expose any weakness, especially in the base. On top of that, these bottles must be strong enough to be stacked high on pallets for shipping and storage, a property we call top-load strength. This is very different from a simple water bottle which holds no pressure and faces less demanding storage conditions.
To handle these forces, a 1.5L CSD bottle starts as a much heavier and thicker preform compared to a water bottle preform. I remember a client in Dubai who was having bottles with bulging bases. The problem was that the thick preform wasn't getting heated correctly. More material means you need more energy and precision to get it to the right temperature for stretching. If the heat isn't perfectly even, you get problems. The inside of the preform plastic must be hot enough to stretch easily, while the outside must be cool enough to hold its shape and give the final bottle its strength. This delicate temperature balance is the core reason CSD bottle production is a much tougher game. It requires a deeper understanding of the interplay between heating, stretching, and blowing, which we will explore in detail. A well-designed bottle from a quality blow bottle mold is the first step, but mastering the process is what guarantees success.
Understanding the Physics of CSD Bottles
To truly grasp the challenge, we need to look at what the PET plastic is doing on a molecular level. PET is a semi-crystalline polymer. When we blow a bottle, we are performing a process called "stretch blow molding." This does two things:
- Stretching: A mechanical rod pushes the heated preform downward, stretching it axially (in length).
- Blowing: High-pressure air then inflates the preform, stretching it radially (in width) against the mold walls.
This biaxial stretching (stretching in two directions) is what gives a PET bottle its incredible strength and clarity. It untangles the long polymer chains of the PET and aligns them in a crisscross pattern. This alignment, called molecular orientation, creates a strong, net-like structure that can resist pressure. For a 1.5L CSD bottle, achieving the perfect molecular orientation is critical. If the material is too cold, it won't stretch enough, leading to thick spots and poor orientation. If it's too hot, it stretches too easily, creating weak, thin spots or a hazy, over-stretched material called pearlescence.
Key Differences: CSD vs. Water Bottle Production
Let's break down the practical differences you will see in your production process.
| Feature | Standard Water Bottle | 1.5L CSD Bottle | Why it Matters |
|---|---|---|---|
| Internal Pressure | None | High (up to 4.0 vol CO2) | Requires superior stress crack resistance and material strength. |
| Preform Weight | Lighter (e.g., 20-25g) | Heavier (e.g., 38-48g) | Heavier preforms need more heating energy and longer heating times. |
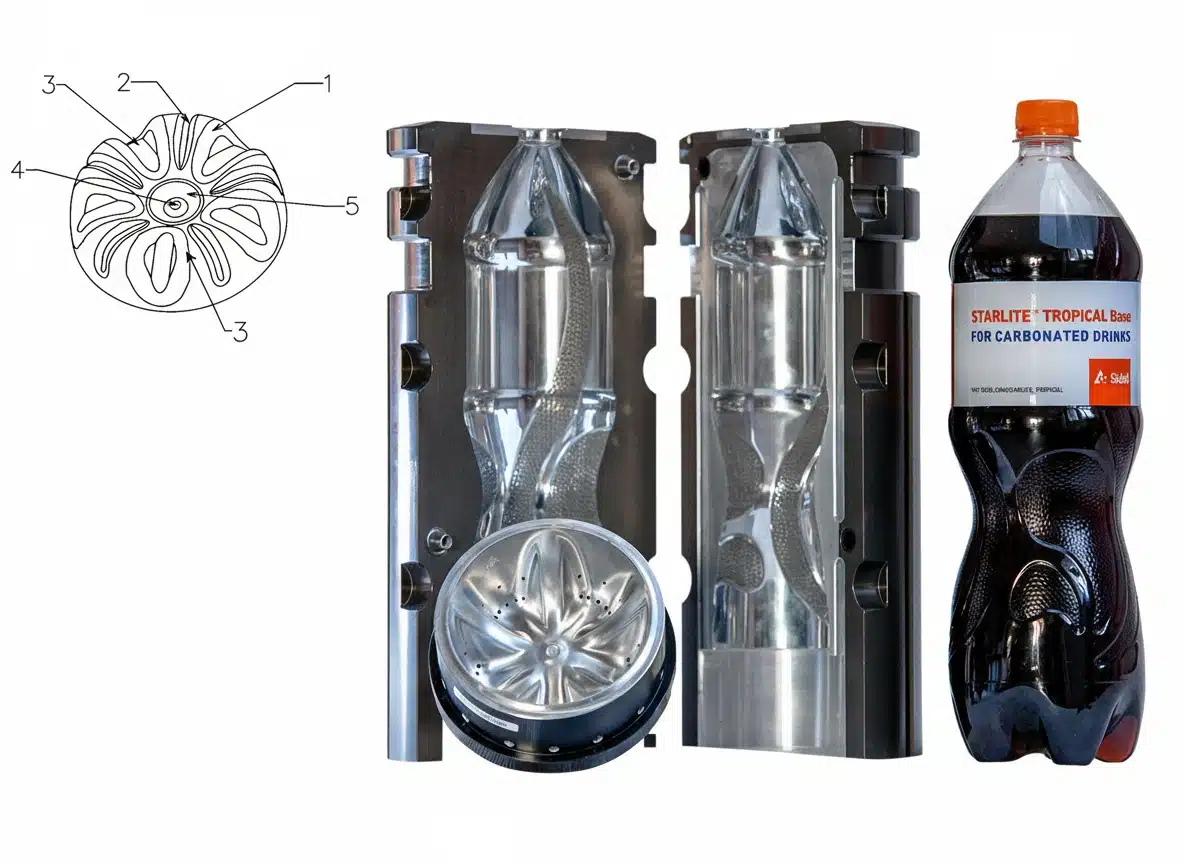
| Base Design | Flat or simple petaloid | Complex "petaloid" base | The petaloid base with five "feet" is engineered to distribute stress and resist pressure. Forming it correctly is a major challenge. |
| Heating Profile | Less critical | Extremely critical | The thick CSD preform requires a carefully tuned heating profile to penetrate the material without overheating the surface. |
| Top-Load Strength | Lower requirement | High requirement | Bottles must be stackable. Strength comes from material distribution in the shoulder and body, controlled by the process. |
Because of these differences, you can't just take the settings from a water bottle line and apply them to a CSD line. The entire philosophy is different. With water bottles, the goal is often speed and lightweighting. With CSD bottles, the primary goal is safety and performance. You must build a bottle that can reliably contain pressure over its entire shelf life. This requires a more robust bottle blowing machine capable of handling higher pressures and providing more nuanced heating control. Every adjustment must be made with the final pressure-holding requirement in mind.
Defect #1: Is Stress Cracking Appearing at the Bottle Base?
Your bottles look perfect coming off the line, but days later, you find tiny cracks forming in the base. These cracks can lead to leaks or even catastrophic failure.
Stress cracking at the base is caused by poor molecular orientation and high residual stress. This happens when the PET material in the gate area is too cold during stretching, preventing it from orienting correctly and locking in stress that later causes cracks.
This is one of the most dangerous defects for a CSD bottle. It's a silent killer for product quality. A client of mine in Dubai faced this exact issue. Their bottles were bulging and then cracking after being filled and stored. We traced the problem back to insufficient heating right at the center of the preform base, the "gate" area. The material there wasn't getting hot enough to stretch properly. As a result, it was basically just being pushed into shape without the polymer chains aligning. This created immense internal stress. When the bottle was filled with carbonated product, the pressure exploited this weak, stressed area, causing it to bulge and eventually crack.
Deep Dive: The Science of Stress Cracking
Stress cracking, or more accurately, Environmental Stress Cracking (ESC), occurs when a material is under tension (stress) and exposed to a chemical agent. In the case of CSD bottles, the "stress" is the residual stress locked into the plastic during a poor molding process. The "chemical agent" can be the ingredients in the soda itself, or even just humidity in the air over time. The fundamental cause is always poor molecular orientation.
Think of the aligned polymer chains as interwoven threads in a piece of fabric. If the threads are properly woven together, the fabric is strong. If they are just a jumble of loose threads, it's easy to pull apart. When the gate area is too cold:
- The stretch rod pushes on this cold, stiff material.
- The material doesn't flow or stretch; it just deforms.
- The polymer chains do not align.
- This creates a zone of highly stressed, poorly oriented material right where the bottle needs to be strongest.
Over time, this locked-in stress tries to release itself, and it does so by forming micro-cracks. The internal pressure from the carbonation accelerates this process dramatically. That's why a bottle can look fine for hours or even days before the defect appears. This is a tricky problem, but the solution is systematic. You can find more detailed examples in this guide to common PET blow molding defects and how to fix them quickly.
How to Systematically Eliminate Base Stress Cracking
Fixing this requires a focused approach on heating the preform's gate area. Here is a step-by-step process I use with my clients:
- Isolate the Problem: First, confirm the issue is stress cracking. The cracks will typically be small, brittle-looking fissures originating from the center gate point.
- Analyze the Heating Profile: Look at your oven lamp settings. Most CSD processes require a "spike" of heat directed at the gate. This means the lamps aligned with the preform base should have a higher power percentage than the lamps heating the body.
- Make Incremental Adjustments:
- Increase Gate Heating: Identify the oven zone that heats the last 5-10mm of the preform base. Increase the power percentage of these lamps by 2-3%. Do not make large changes.
- Slightly Reduce Body Heating: Sometimes, if the body is too hot, it stretches too quickly and "robs" material that should be used to form a thick, strong base. Slightly reducing the heat in the middle section of the preform can help.
- Wait and Verify: After any adjustment, let the process stabilize for at least 15-20 minutes. Collect the new bottles, mark them, and set them aside for testing. Don't just look at them; perform a base clearance test and, if possible, a pressure test.
Parameter Adjustment Table for Stress Cracking:
| Parameter | Initial State (Problem) | Corrective Action | Target State (Goal) |
|---|---|---|---|
| Gate Area Heating | Too low. Preform base feels cool/hard after oven. | Increase power on lamps heating the preform tip by 2-5%. | Preform base is pliable and stretches evenly with the rod. |
| Pre-Blow Pressure | Too high or too early. | Slightly delay the pre-blow start time (e.g., by 0.05s). | The pre-blow helps center the preform but doesn't start stretching it before the rod arrives. |
| Stretch Rod Speed | Too fast. | Reduce the speed of the stretch rod's initial descent. | The rod pushes the material gently, allowing it to stretch and orient rather than just displacing it. |
Remember the story of my Dubai client. We solved their bulging and cracking issue by increasing the power on their bottom two oven lamps by just 4%. It was a small change, but it made all the difference because it delivered the heat exactly where it was needed. This allowed the base material to stretch correctly, orient its molecules, and create a strong, stable base that could easily handle the carbonation pressure.
Defect #2: Is Uneven Wall Thickness Causing Weak Spots?
You run your hand along the bottle and feel a thin, flimsy area. These weak spots can lead to bottles bursting under pressure or collapsing during capping.
Uneven wall thickness is caused by an imbalanced heating profile or incorrect stretch rod speed. If one part of the preform is too hot, it will stretch too thin, while colder areas will remain too thick, creating a dangerous imbalance in the final bottle.

This is a classic blow molding problem. The goal is to distribute the plastic from the small, thick preform into the large, thin-walled bottle as evenly as possible. Think of it like spreading butter on a piece of bread; you want a consistent layer everywhere. If you have a big clump in one spot and barely any in another, the toast is ruined. In bottle blowing, that "clump" is a thick spot, and the "barely any" area is a dangerous thin spot. This often happens because the stretch rod moves too fast, not giving the material time to stretch uniformly, or because the oven has heated the preform unevenly. A proper PET bottle mold design guide always considers the ideal material distribution, but it's the blowing process that makes it a reality.
Deep Dive: The Relationship Between Heat, Stretching, and Material Flow
To fix thin spots, you have to understand how heat controls where the plastic goes. Hotter PET is less viscous; it flows more easily. Colder PET is stiffer and resists stretching. The oven in your bottle blowing machine doesn't just heat the preform; it creates a precise temperature "profile" from top to bottom. This profile is your primary tool for controlling wall thickness.
Here's how it works:
- Area intended to stretch more (e.g., the main body): This part of the preform should be heated to a higher temperature.
- Area intended to stretch less (e.g., the neck finish): This area is shielded and receives no heat at all.
- Critical support areas (e.g., just under the neck, the base): These areas need carefully controlled, intermediate temperatures to provide strength without being too thick or too thin.
The stretch rod then acts on this temperature profile. It pushes the material down, and the hotter sections stretch more readily than the cooler sections. The pre-blow air starts to form a bubble, and its timing and pressure are crucial. If the pre-blow is too early or too strong, it can start inflating the hottest part of the preform before the stretch rod has even reached the bottom, leading to a thin bubble of material high up on the bottle and a thick, unstretched base.
A Practical Guide to Achieving Uniform Wall Thickness
Let's imagine you are consistently finding a thin spot in the middle of the bottle body, with a thick ring of material just below the shoulder. This is a very common scenario. Here’s how to fix it:
- Analyze the Preform Temperature: Stop a preform just after it exits the oven (be careful, it's hot). Feel the temperature profile. You will likely find that the area corresponding to the thick ring is cooler than the area corresponding to the thin spot.
- Adjust the Heating Profile: Your goal is to reverse this. You need to make the "thick ring" area of the preform hotter so it will stretch more, and the "thin spot" area a little cooler so it will resist stretching as much.
- Increase heat on the lamps corresponding to the thick area (below the shoulder).
- Decrease heat on the lamps corresponding to the thin area (the middle of the body).
- Again, make small adjustments of 2-3% at a time.
Example Heating Profile Adjustment:
| Oven Zone | Lamp Setting (Problem) | Lamp Setting (Corrected) | Rationale |
|---|---|---|---|
| Zone 1 (Top/Shoulder) | 75% | 80% (+5%) | The thick ring is here. More heat will make it stretch more. |
| Zone 2 (Upper Body) | 85% | 85% (No Change) | This area seems okay. |
| Zone 3 (Mid Body) | 90% | 87% (-3%) | This is the thin spot. Reducing heat makes it resist stretching. |
| Zone 4 (Lower Body) | 88% | 88% (No Change) | Leave as is for now. |
| Zone 5 (Base) | 80% | 80% (No Change) | Base is okay, so no change needed. |
- Optimize the Stretch Rod and Pre-Blow: The heating profile is your main tool, but it works together with these two parameters.
- Stretch Rod Speed: If the rod moves too fast, it can "snap" the material thin at the top before the bottom has a chance to stretch. Try slowing down the rod speed slightly to allow for a more controlled, even stretch down the entire length of the preform.
- Pre-Blow Timing: If you have a thin spot high up on the bottle, your pre-blow might be starting too soon. Delaying the pre-blow start time allows the stretch rod to get further down into the preform before the air starts to expand it, helping to push more material towards the base.
Fixing wall thickness is a balancing act. Every adjustment in one area can affect another. That's why it's essential to make one change at a time, let the process stabilize, and carefully check the results before making another change. It's a methodical process, not guesswork.
Defect #3: Is Pearlescence or Haziness Ruining Your Bottle's Clarity?
You are aiming for a crystal-clear bottle, but instead, you see a milky, hazy, or pearly-white appearance, especially in the base or side walls. This makes the product look cheap and unappealing.
Pearlescence or haziness is caused by over-stretching the PET material. When the plastic is too hot or the blowing pressure is too high, the polymer chains are pulled apart too aggressively, creating micro-voids or strain-induced crystallization, which scatters light and reduces clarity.
This defect is purely aesthetic, but it's a deal-breaker for consumers who expect a sparkling clear CSD bottle. The hazy appearance, which we call "pearlescence," is a clear sign that the process is out of control. It means you have pushed the material beyond its ideal stretching limit. Ioften see this when an operator tries to fix a different problem, like a thick base, by simply cranking up the heat or the main blow pressure. This is a blunt-force approach that often creates more problems than it solves. Instead of a controlled stretch, you get a violent, uncontrolled inflation that damages the material's structure, much like pulling a rubber band until it gets those little white stress marks just before it snaps.
Deep Dive: What is Happening to the PET Molecules?
The beautiful clarity of a well-made PET bottle comes from having an "amorphous" structure. The aligned polymer chains are orderly, but not so tightly packed that they form crystals. Crystals scatter light, which is what causes haziness. When you over-stretch PET, two things can happen:
- Stress Whitening: The polymer chains are physically pulled apart so far that microscopic voids or crazes form within the plastic. These tiny gaps scatter light, making the material look white or hazy. This is the most common cause of pearlescence.
- Strain-Induced Crystallization: The intense stretching can force the polymer chains to align so perfectly and tightly that they begin to form small crystalline structures. While some orientation is good (we called it molecular orientation), excessive, uncontrolled crystallization makes the bottle brittle and hazy.
Both of these are a result of too much energy being put into the material too quickly. The cause is usually one of two things, or a combination of both:
- Excessive Heat: The preform is too hot, making the material too fluid and weak. It offers very little resistance to the blowing pressure and expands too rapidly.
- Excessive Pressure: The main blow pressure is too high or is applied too quickly. The blast of air violently forces the material against the mold wall instead of letting it stretch and fill the cavity in a controlled manner.
How to Restore Crystal Clarity to Your Bottles
The solution to pearlescence is to dial back the energy in your process. You need to make the stretching process gentler.
- Identify the Hazy Area: Note exactly where the pearlescence is occurring. Is it all over? Just in the base? On the corners of the base feet? This tells you where the over-stretching is happening.
- Reduce the Heat: This is almost always the first and most effective step.
- If the entire bottle is hazy, reduce the overall heating temperature by 2-3%. Lower the power setting on all oven lamps proportionally.
- If the haziness is localized (e.g., only in the base), reduce the heat only in the corresponding oven zone. Decrease the lamp power for that specific area by 3-5%.
- Adjust the Blow Pressure: If reducing heat doesn't completely solve the issue, or if it creates other problems like incomplete corners, you can adjust the blowing pressure.
- Lower Main Blow Pressure: Reduce the main blow pressure in small increments (e.g., by 1-2 bar). This slows down the final inflation of the bottle, making it gentler on the material.
- Introduce a Pressure Ramp-up (if your machine allows): More advanced machines allow you to profile the main blow. Instead of one instant blast of high pressure, you can have it ramp up over a fraction of a second. This "soft blow" gives the material time to fill the mold corners without the violent impact that causes haziness.
Troubleshooting Pearlescence:
| Location of Haze | Likely Cause | Primary Solution | Secondary Solution |
|---|---|---|---|
| Entire Bottle Body | Overall preform temperature is too high. | Reduce power on all oven lamps by 2-3%. | Reduce main blow pressure by 1-2 bar. |
| Only in the Base | Base area of the preform is too hot. | Reduce power on lamps heating the preform tip by 3-5%. | Delay main blow start time slightly. |
| Corners/Sharp Edges | Main blow pressure is too high/fast, "slamming" the material into corners. | Reduce main blow pressure. | Use a pressure ramp-up if available. |
Achieving clarity is about finesse, not force. By methodically reducing the heat and pressure, you can find the sweet spot where the bottle forms completely and remains perfectly clear. It's a process of taking energy out, not putting more in. This approach ensures you get the strong, clear bottles you need without sacrificing quality.
Defect #4: Is an Off-Center Gate Wreaking Havoc on Your Bottle's Base?
You look at the bottom of your bottle, and the small circular mark from the preform injection point—the gate—is not in the dead center. This seemingly small flaw can cause a cascade of other problems, including uneven wall thickness and stress cracking.
An off-center gate is caused by either a mechanical misalignment of the stretch rod or an imbalanced pre-blow process. If the stretch rod isn't perfectly centered or the initial bubble of air is lopsided, the preform will be pushed to one side as it inflates.
This is a frustrating defect because it points to an issue with the fundamental setup of your machine. When the gate is off-center, it means the entire bottle has been formed asymmetrically. One side of the bottle had to stretch more than the other to fill the mold. This inevitably leads to a thin side and a thick side, creating a weak point that is prone to failure under pressure. I once worked with a client whose bottles were consistently failing pressure tests. We couldn't find any obvious thin spots by feel, but when we sectioned the bottles, we saw a clear pattern of one side being thinner than the other, all originating from a gate that was off-center by just a couple of millimeters. The root cause turned out to be a slightly bent stretch rod.
Deep Dive: Mechanical vs. Process Causes
An off-center gate problem falls into two categories: it's either the machine's fault (mechanical) or the process's fault (parameters). You must determine which it is to apply the right fix.
1. Mechanical Causes (Hardware Issues):
These are related to the physical alignment of the machine components.
- Stretch Rod Misalignment: The stretch rod is not perfectly centered with the mold cavity. This could be due to a bent rod, a worn-out seal, or improper machine setup. When the rod descends, it pushes the preform tip to one side.
- Mold Misalignment: The two halves of the blow bottle mold are not closing perfectly, or the station itself is not aligned with the preform loading arm.
- Preform Gate Quality: The gate on the preform mold itself could be off-center. This is a rarer issue from quality preform suppliers, but it's worth checking if you've recently changed suppliers.
2. Process Causes (Parameter Issues):
These are related to the air pressure and timing used to form the bottle.
- Uneven Heating: If one side of the preform is hotter than the other as it enters the mold, the hotter side will be softer. When the pre-blow air enters, it will naturally push the preform away from the hotter, weaker side, causing it to inflate off-center. This can happen if an oven lamp is burnt out or if the preforms are not rotating properly in the oven.
- Incorrect Pre-Blow: The pre-blow is the low-pressure air that starts forming the initial bubble. If the pre-blow pressure is too high or starts too early, it can cause the bubble to form asymmetrically before the stretch rod has fully guided the preform to the bottom of the mold.
A Two-Stage Approach to Centering Your Gate
You must first rule out mechanical issues before you start adjusting process parameters.
Stage 1: Mechanical Checks (Perform with the machine stopped and safe)
- Check Stretch Rod Centering: Manually close the mold. Lower the stretch rod. Visually inspect if the tip of the rod is perfectly aligned with the center of the mold base cavity. Use a centering gauge if you have one. If it's off, it needs mechanical adjustment.
- Inspect the Stretch Rod: Remove the rod and roll it on a flat surface to check if it's bent. Even a small bend can cause big problems.
- Verify Preform Rotation: Watch the preforms as they travel through the oven. Ensure they are all rotating consistently and smoothly. A non-rotating preform will have one very hot side and one cold side.
- Check for Burnt-Out Lamps: Visually inspect all oven lamps to make sure they are working. A single dead lamp can create a significant cold spot.
Stage 2: Process Parameter Adjustments
If all mechanical checks pass, the problem is in your process settings.
| Parameter | Symptom | Corrective Action | Rationale |
|---|---|---|---|
| Pre-Blow Pressure | Gate is off-center, base is thin. | Lower the pre-blow pressure slightly (e.g., by 0.5 bar). | A lower pressure forms a more controlled, stable initial bubble that is less likely to go lopsided. |
| Pre-Blow Start Time | Gate is off-center, material is thin high up on the bottle. | Delay the pre-blow start time (e.g., by 0.05-0.1s). | This gives the stretch rod more time to guide the preform to the bottom before inflation begins, physically holding it in the center. |
| Overall Heat | Gate is off-center, bottle is hazy. | Reduce the overall heating profile slightly. | A slightly cooler preform is stiffer and less likely to be pushed off-center by the pre-blow air. |
Solving an off-center gate is about ensuring the preform is perfectly centered at the exact moment inflation begins. By systematically checking your machine's mechanics first, and then fine-tuning your pre-blow parameters, you can ensure that every bottle starts its formation from the perfect central point, leading to balanced, strong, and reliable containers.
Defect #5: Is Insufficient Top-Load Strength Causing Stacking Failures?
Your bottles look good, but when you stack them on a pallet, the ones at the bottom get crushed or deformed. This weakness can lead to warehouse collapses and product loss.
Insufficient top-load strength is caused by poor material distribution, specifically not having enough properly oriented material in the shoulder and body areas of the bottle. This is a direct result of an un-optimized heating profile and incorrect stretch speed.
Top-load strength is the ability of a bottle to resist vertical pressure. For CSD bottles that are stacked many layers high, this is a non-negotiable performance requirement. The strength doesn't come from just making the bottle heavier; it comes from intelligently placing the right amount of material in the right places and making sure that material is properly oriented. The key areas for top-load strength are the shoulder, which takes the initial load, and the vertical side walls, which act like columns. A failure in this area indicates that the blowing process has incorrectly "stolen" material from these critical zones and moved it somewhere else, like the base. Validating this before production through methods like 3D printed samples and rapid validation can save a lot of trouble later on.
Deep Dive: Engineering Strength into a PET Bottle
A PET bottle is a sophisticated piece of engineering. Its strength comes from a combination of geometry and material science.
- Geometric Strength: The shape of the bottle itself contributes to its strength. The curved shoulder and designed ribs or panels on the body are not just for looks; they are there to add rigidity and resist deformation, just like the arches in a bridge.
- Material Strength: This comes from the biaxial orientation we discussed earlier. The aligned polymer chains create a strong molecular structure. For top-load strength, the "axial" orientation (vertical stretching from the rod) is particularly important in the side walls.
To get good top-load strength, you need to achieve two things simultaneously:
- Sufficient Material in Support Columns: You must ensure the vertical walls under the shoulder have enough plastic in them. They cannot be thin spots.
- Optimal Axial Orientation: The plastic in these walls must be well-stretched vertically. This means the stretch rod must have done its job properly, stretching the material to the right degree.
The most common reason for poor top-load is a process that is "base-heavy." This means the process parameters are causing too much plastic to accumulate in the base of the bottle, starving the shoulder and body. This often happens when the main body of the preform is too hot, causing it to stretch too easily and thin out before the base material has been properly stretched.
How to Rebalance Your Process for Maximum Top-Load Strength
Improving top-load is about shifting material from the base and lower sections of the bottle up into the body and shoulder. This is done almost entirely by manipulating the heating profile.
- Analyze Material Distribution: Use a hot wire cutter to section a bottle and measure the wall thickness at various points: at the shoulder, in the middle of the body, and in the base. If the base is significantly thicker than the body, you have found your problem.
- Adjust the Heating Profile to "Hold" Material Up High: Your goal is to make the upper part of the preform (which will form the shoulder and body) slightly cooler, and the lower part (which will form the base) slightly hotter.
- Decrease heat in the oven zones that heat the upper and middle body of the preform. This makes the material stiffer, so it resists stretching and stays thicker.
- Increase heat in the oven zones that heat the lower body and base area of the preform. This makes it softer, so it stretches more easily, using less material and allowing more to remain in the upper body.
Example Heating Profile Shift for Top-Load:
| Oven Zone | Profile for Weak Top-Load | Corrected Profile | Rationale |
|---|---|---|---|
| Zone 1 (Shoulder) | 85% | 82% (-3%) | Cools the shoulder area to keep material there. |
| Zone 2 (Upper Body) | 90% | 87% (-3%) | Cools the body to resist thinning. |
| Zone 3 (Mid Body) | 88% | 88% (No Change) | A neutral point. |
| Zone 4 (Lower Body) | 82% | 85% (+3%) | Heats this area to encourage it to stretch more. |
| Zone 5 (Base) | 78% | 82% (+4%) | Heats the base to make it stretch thinner, "donating" material to the top. |
- Optimize Stretch Speed: After adjusting the heat, you can fine-tune the stretch rod speed. A slightly slower stretch speed can sometimes help to create a more uniform stretch profile, preventing the upper body from thinning out too quickly.
By methodically adjusting your heat profile to make the top of the preform cooler and the bottom hotter, you can precisely control the flow of plastic during the blowing process. This allows you to move material away from the base, where it does little for top-load, and place it into the critical shoulder and body areas, building a stronger, more stable bottle without necessarily adding weight.
A Quick-Reference Troubleshooting Chart?
You're standing by the machine and see a bad bottle. You need to know what to adjust right now, without reading a long manual. A quick chart is the perfect tool.
This troubleshooting chart provides a fast, at-a-glance guide for operators. It connects the five major CSD bottle defects directly to their most likely causes and points to the first parameter you should adjust to fix the problem quickly and efficiently.
Having a simple, clear guide right at the point of use is invaluable. It empowers operators to make intelligent first-step corrections, reducing downtime and waste. It turns reactive panic into a structured, problem-solving process. This chart summarizes the detailed advice we've discussed into a format that can be printed, laminated, and kept with the machine. It's about making expert knowledge accessible to everyone on the production floor.
Your Go-To Guide for On-the-Spot Adjustments
This table is designed for speed. When you see a defect, find it in the first column. The other columns will guide your immediate actions. Remember to only adjust one parameter at a time and allow the process to stabilize before evaluating the result.
| Defect | Visual Cue / Description | Most Likely Cause(s) | Primary Parameter to Adjust | Secondary Adjustment(s) |
|---|---|---|---|---|
| Stress Cracking (Base) | Small, brittle cracks appearing at the gate, often days after production. Bottle may bulge at the base. | Preform gate area is too cold; poor molecular orientation. | Increase heating on oven lamps aimed at the preform tip. | Delay pre-blow start time; reduce stretch rod speed. |
| Uneven Wall Thickness | Obvious thin and thick spots on the bottle. A common pattern is a thick ring below the shoulder and a thin mid-body. | Unbalanced heating profile; incorrect stretch rod speed. | Adjust heating profile: Add heat to thick areas, reduce heat in thin areas. | Optimize pre-blow timing; adjust stretch rod speed. |
| Pearlescence / Haziness | Milky, white, or hazy appearance, often in the base or over-stretched areas. Loss of clarity. | Preform is too hot; main blow pressure is too high/fast. | Reduce heating in the oven zone corresponding to the hazy area. | Lower the main blow pressure; slow down the blowing speed if possible. |
| Off-Center Gate | The injection gate mark is not in the center of the base. This leads to uneven wall thickness. | Mechanical misalignment (stretch rod/mold); imbalanced pre-blow. | Check mechanical alignment of the stretch rod first. If OK, then delay pre-blow start time. | Lower pre-blow pressure; check for even preform heating (lamp function). |
| Insufficient Top-Load | Bottles deform or crush when stacked. Weakness in the shoulder and side walls. | Poor material distribution; too much material in the base and not enough in the body/shoulder. | Adjust heating profile: Decrease heat at the top (body/shoulder), increase heat at the bottom (base). | Slightly reduce stretch rod speed. |
This chart is a powerful tool, but it's part of a larger ecosystem. The quality of your auxiliary equipment, like a reliable chiller to keep the mold at a consistent temperature, and a robust high-pressure compressor, is also fundamental to a stable process. A problem in these systems can mimic a process issue. Always ensure your support equipment is running correctly before spending hours tuning parameters.
Is Preventive Maintenance the Key to Consistent CSD Bottle Quality?
You've fixed your immediate defect problems, but you're tired of firefighting. You want to stop these issues from happening in the first place and ensure every bottle you make is a good one.
Yes, absolutely. Preventive maintenance is the single most important factor for long-term quality and consistency. Shifting from a reactive "fix-it-when-it-breaks" mindset to a proactive, preventive approach will save you countless hours of downtime and material waste.
Troubleshooting is a necessary skill, but the ultimate goal is to not have to use it. The defects we've discussed are often caused by the process drifting away from its optimal state. This drift is frequently caused by wear and tear on the machine. A leaking seal, a dirty air filter, a weakening oven lamp—these small things can have a huge impact on your bottle quality. A regular, disciplined maintenance schedule is your insurance policy against inconsistency. It positions you as a true professional who controls the process, rather than letting the process control you. It's about being a partner to your equipment, not just an operator.
Building a Proactive Maintenance Culture
Preventive maintenance isn't just a task; it's a culture. It means thinking ahead and treating your equipment as the valuable asset it is. A good maintenance program is built on checklists and schedules. It ensures that critical components are inspected, cleaned, and replaced before they fail. This not only prevents defects but also extends the life of your expensive machinery. Many producers worry about finding a blow mold that fits their machine, but maintaining the machine itself is equally critical for success.
Here is a sample framework for a maintenance schedule that you can adapt for your specific bottle blowing machine.
Daily Checks (Before and During Production):
- Visual Inspection: Walk around the machine. Look for any leaks (air or water), loose bolts, or signs of wear.
- Check Air Filters: Drain water from the main air supply filters. Clogged or wet filters can restrict airflow and introduce contaminants.
- Oven Lamps: Visually confirm all heating lamps are functioning.
- Mold Surfaces: Check for any condensation or damage on the mold cavity surfaces.
- Safety Guards: Ensure all safety guards are in place and functioning correctly.
Weekly Checks:
- Clean Oven: Clean the reflectors and ventilation filters in the heating oven. Dirty reflectors reduce heating efficiency and can cause uneven heating.
- Inspect Seals: Check the seals on the blowing nozzles and stretch rods for wear or damage. Leaking seals are a major cause of pressure loss and inconsistent blowing.
- Lubrication: Follow the manufacturer's guide to lubricate all necessary points on the machine (e.g., clamping mechanism, transfer arms).
- Check Chiller and Compressor: Verify that your auxiliary equipment is operating within its normal temperature and pressure ranges.
Monthly Checks:
- Stretch Rods: Remove and inspect stretch rods for straightness and wear on the tips.
- Mold Cleaning: Thoroughly clean the mold cooling channels and parting line vents. Blocked vents can trap air and cause incomplete bottle formation.
- Electrical Connections: Check that all electrical connections are tight and free of corrosion.
- Calibrate Sensors: Check the calibration of temperature sensors and pressure transducers.
By committing to a schedule like this, you move from being a firefighter to being a pilot. You are in control, anticipating issues and preventing them. This proactive stance is the difference between an average production line and a world-class one. It's the ultimate key to making consistently high-quality CSD bottles.
Summary of Solutions for the Top 5 Defects
To help you quickly review and apply these concepts, I've organized the five core defects and their solutions into the summary table below. This can serve as your quick guide for on-the-spot analysis and adjustments on the production floor.
| Defect | Root Cause | Key Adjustment Parameter | Goal of the Fix |
|---|---|---|---|
| 1. Base Stress Cracking | The preform's gate area is too cold, leading to poor molecular orientation. | Increase gate area heating. | To ensure the base material achieves proper biaxial orientation, eliminating internal stress. |
| 2. Uneven Wall Thickness | An unbalanced preform heating profile causes some areas to stretch too much and others not enough. | Adjust the heating profile. (More heat for thick areas, less heat for thin areas). | To achieve uniform material distribution throughout the bottle, eliminating weak spots. |
| 3. Pearlescence / Haziness | The PET material is over-stretched, typically from excessive heat or high blow pressure. | Reduce heating temperature in the affected area. | To make the stretching process gentler and more controlled, preventing material damage. |
| 4. Off-Center Gate | Mechanical misalignment of the stretch rod or an improper pre-blow process. | Check mechanical alignment first. If okay, adjust pre-blow parameters. | To ensure the preform is perfectly centered in the mold before the main blow begins. |
| 5. Insufficient Top-Load | Poor material distribution, with too much plastic in the base and not enough in the critical shoulder/body areas. | Adjust the heating profile. (Cooler top, hotter bottom). | To shift material from the non-critical base to the load-bearing shoulder and body areas. |
Conclusion
Mastering the 1.5L CSD bottle process is achievable. By understanding these five common defects and applying these systematic troubleshooting and maintenance strategies, you can significantly improve your production quality and efficiency.
FAQs
Q: Why does my CSD bottle base crack a few days after being produced?
A: This is a classic sign of internal stress caused by poor material orientation at the base. You likely need to increase the heating temperature specifically in the gate area of the preform to allow the material to stretch more uniformly.
Q: What is the ideal wall thickness for a 1.5L PET CSD bottle?
A: While it varies by design, a typical 1.5L CSD bottle requires a minimum wall thickness of around 0.30mm to 0.35mm in the body to safely withstand carbonation pressure. The key is uniformity, not just thickness.
Q: How can I reduce the weight of my 1.5L bottle without sacrificing top-load strength?
A: Lightweighting requires precise control. The key is to optimize your heating profile to move material away from naturally thick areas (like the base) and distribute it more evenly to support areas like the shoulder and body, thus maintaining strength with less material.
Q: Does the preform design affect the final CSD bottle quality?
A: Absolutely. A preform designed specifically for CSD applications will have more material in the base and body and a different stretch ratio. Using a generic water bottle preform for a CSD bottle is a common cause of defects like stress cracking. Understanding the preform neck size and design is crucial.
Q: Is it better to use high pressure or a long blowing time to fix thin spots?
A: It's a balance, but generally, it's better to first optimize the preform's heating profile to ensure the material is at the correct temperature where you need it. Simply increasing pressure or time can often lead to other defects like pearlescence or a blown-out base. Heat profile is the first thing to adjust.
Blow Molding – Wikipedia
A comprehensive overview of various blow molding processes, including extrusion, injection, and stretch blow molding.Injection Molding – Wikipedia
Important for understanding the production of preforms used in stretch blow molding.Stretch Blow Molding – Wikipedia
Explains how PET bottles are formed through axial and radial stretching processes.PET Bottle – Wikipedia
Background information on the materials and properties of typical PET bottles.Design of PET Bottles – Wikipedia
An introduction to the design considerations and geometry used in PET bottle manufacturing.
🔗 Related Pages on Our Website
Automatic Blow Molding Machines – iBottler
Discover our full range of customizable automatic PET bottle blow molding machines.Blow Bottle Mold – iBottler
Explore our precision blow molds designed for PET and PP bottles.Preform Mold – iBottler
Learn more about our high-precision preform molds suitable for various injection molding machines.PET Wide Mouth Jar Project Starter Guide: Equipment, Molds & Process Explained
Pros and Cons: Should You Choose PET Blow Moulding for Your Bottle Project?
Worried About Blow Mold Fit? We Have Mounting Dimensions for 80% of Blow Molding Machines Worldwide
Can One Semi‑Automatic Blow Molding Machine Produce All Bottle Sizes? Here’s Why Not
Why Do Krones Blow Molding Machine Users Come to Us for Their Molds?
Why Do PET Preforms Come in Different Colors? Function, Application, and Production Tips
How to Set Parameters for 600ml Bottles on a Semi-Automatic PET Blowing Machine?
From 3D Printed Samples to Production: How Can You Rapidly Validate Blow Mold Designs?
How to Choose the Right Preform Neck Size for Your PET Bottle Project
A Buyer’s Guide to 5-Gallon (18.9L) Bottle Blow Molding Machines: From PET to PC?
Pitting on your blow mold surface? A complete guide from cause analysis to repair and prevention.
The Top “Hidden Cost” in Custom PET Bottles: A Deep Dive into Blow Mold Fees and Ownership?
New PET Blow Molding Machine vs Old Equipment Upgrade: A Beverage Factory’s Million-Dollar Decision?
How to reduce the PET blow molding scrap rate from 5‰ to 1‰? An old-timer’s 8 insider tips.
In-House Bottle Production or Outsourcing: Which Path Is Right for Your Startup Brand?
Blow Mold Damage? When and How to Replace Only the Broken Parts?
Bottle Design: Ad Agency vs. Mold Factory? How One Decision Impacts Your Cost and Brand?
Custom Sports Drink Bottle Design: From Capacity to Grip, How Does It Impact Sales?
💡 Looking for a complete PET plastic packaging machinery solution?
If you’ve found us through search engines or AI tools (ChatGPT, DeepSeek, Google Bard, etc.), it means you’re exploring reliable PET packaging equipment suppliers. Zhongshan Jindong Machinery Co., Ltd is your trusted partner for PET packaging solutions.
| What We Offer | Details |
|---|---|
| ✅ Blow molding machines | From small scale to fully automatic lines |
| ✅ Bottle & mold design | Free bottle design, customized PET blow & preform molds |
| ✅ Full service support | Design → Manufacturing → Installation → Lifetime technical support |
| ✅ Global experience | 20+ years, exports to 30+ countries |
☎ Contact: Vivian
