Starting a PET bottle production line feels complicated. You see machines, molds, and a dozen other things, making you fear a costly mistake. This guide breaks it all down.
The PET bottle manufacturing process starts with a "preform," which looks like a test tube. This preform is heated in an oven and then placed into a bottle-shaped mold. High-pressure air is blown into it, stretching it into the final bottle shape. Essential auxiliary machines support this process.

I've been in the PET packaging machinery world for 16 years. In that time, I've worked with over 200 clients, and a clear pattern has emerged, especially with newcomers. They are brilliant entrepreneurs with fantastic ideas for beverages, oils, or sauces, but they often get stuck on the technical details of making the bottle itself. They want to understand every single rule before they even start playing the game. But sometimes, the fastest way to get your product to market is to accept the industry standards first and learn the deeper "why" as you go. This article is the guide I wish I could give every new client. It’s designed to give you a complete and clear picture of the entire ecosystem, so you can move forward with confidence and avoid the common pitfalls that I've seen trip up so many others. Let's build your knowledge from the ground up.
It All Starts with a "Preform," Not Plastic Pellets?
You think you need to start with raw plastic pellets. This is a huge, complex process that can stop your project before it even begins. You should start with pre-made preforms.
A preform is a test-tube-shaped piece of plastic that is the starting point for making a bottle. You do not make this yourself; you buy it from a specialized supplier. This is the first and most crucial simplification for any new bottling project.
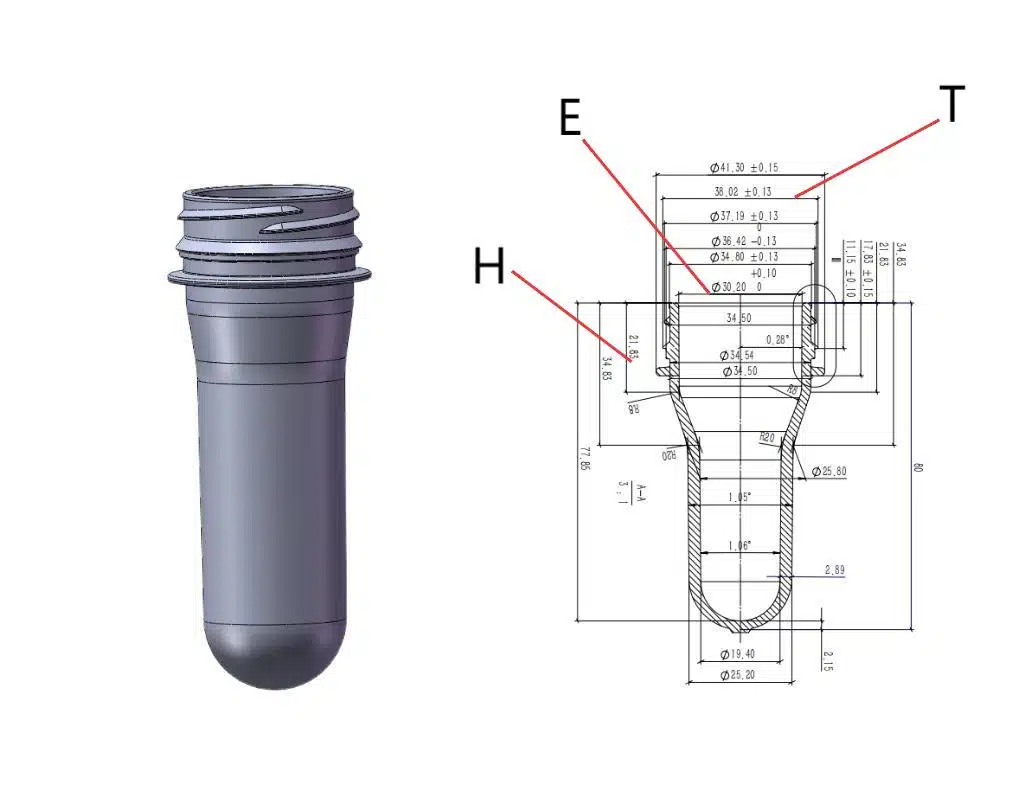
Many newcomers I talk to believe that making a plastic bottle starts with melting down tiny plastic pellets in their own factory. This is a major misunderstanding. The process of turning PET (Polyethylene terephthalate) resin pellets into a preform is called injection molding. It's a completely separate, highly specialized, and capital-intensive industry. It requires massive, expensive injection molding machines, complex preform molds, and a deep understanding of polymer chemistry. For 99% of beverage or product companies, manufacturing your own preforms is not practical or cost-effective.
Instead, your journey begins with the preform itself. Think of it as the "seed" of your bottle. It already has the final threads and neck ring (the part you screw the cap onto), but the body is thick and small. Your job, the process of blow molding, is to simply reheat this preform and stretch it into its final bottle shape.
I remember a client from Morocco who was very intelligent but got completely stuck on the neck finish. He kept asking, "Why is it called '30/25'? What does that mean? Who decided this standard?" He spent weeks trying to understand the history of these standards instead of choosing one and moving forward. I had to explain to him that these are international standards, like the size of a shipping container or a USB plug. For a beginner, it's more important to know that they exist and to pick the right one for your product, rather than getting lost in why they exist. The quickest way to get into this business is to accept the established standards first. You can learn the nuances later. By understanding that you buy preforms, not make them, you've already simplified your project by about 80%.
Preform Basics: What You Need to Know
When you contact a preform supplier, they will ask you three main questions. Understanding these will make you sound like a pro.
- Neck Finish: This is the most critical part. It determines what kind of cap you can use. It's defined by its diameter (e.g., 28mm, 38mm) and its thread style (e.g., PCO 1881, 30/25). My advice? Find a cap you like first, and then find the preform with the neck finish that matches it. This is a great area to consult a guide on how to choose the right preform neck size to avoid any mistakes.
- Weight: The weight of the preform, measured in grams, directly determines the weight and thickness of your final bottle. A heavier preform will result in a stronger, more rigid bottle. A 15-gram preform might be perfect for a small water bottle, while a 45-gram preform might be needed for a large, hot-fill juice bottle.
- Color: Preforms can be ordered in almost any color. The most common is clear, but you can get them in blue (common for water), amber (for UV protection in beer or medicines), green, or any other custom color to match your brand.
Here is a simple table to break down the two different molding processes:
| Feature | Injection Molding (Makes Preforms) | Blow Molding (Makes Bottles) |
|---|---|---|
| Starting Material | Raw PET plastic pellets (resin) | Finished PET preforms |
| Process | Melts plastic and injects it into a cavity | Heats a preform and blows it with air |
| Output | Solid, test-tube shaped preform | Hollow, final-shaped bottle |
| Who Does It? | Specialized, large-scale manufacturers | You, the bottler |
| Complexity | Very high, requires huge investment | Manageable for new businesses |
By focusing only on the blow molding side, you reduce your initial investment, simplify your operations, and can focus on what you do best: creating and selling your final product.
The Heart of the Line: The Blow Molding Machine?
You see a big, impressive machine and assume it's the only thing that matters. But focusing only on the machine without understanding its role can lead to a poor investment.
The blow molding machine is the central unit that transforms the heated preform into a finished bottle. It doesn't work alone, but its speed, size, and type define your entire production capacity and are the core of your operation.
The bottle blowing machine is where the magic happens. It's the piece of equipment that everyone pictures when they think of making bottles. Its core functions are surprisingly simple to understand. First, it takes the preforms you've purchased and carefully heats them in a specialized infrared oven. This heating is incredibly precise; the preform needs to be softened to the consistency of warm honey, but not melted. If it's too cold, it won't stretch properly. If it's too hot, it will become thin and weak.
Second, once the preform is at the perfect temperature, the machine quickly transfers it into a metal mold. This mold is the exact shape of your desired bottle. A nozzle seals the top of the preform, and then two things happen almost simultaneously: a thin steel rod (the stretch rod) shoots down to stretch the preform vertically, and a blast of high-pressure air inflates it like a balloon, forcing it against the cold walls of the mold. The cold mold walls instantly set the plastic, and a moment later, a perfectly formed bottle is ejected from the machine. This entire cycle can happen in just a few seconds.
Understanding Machine Specifications
When you start looking at different machines, you'll see a lot of technical terms. Let me simplify the most important ones for you.
- Cavities: A "cavity" is simply the space in a mold that makes one bottle. A 2-cavity machine makes two bottles per cycle. A 6-cavity machine makes six bottles per cycle. More cavities mean higher output, but also a larger, more expensive machine and mold.
- Output (BPH): This stands for "Bottles Per Hour." It's the most common way to measure a machine's performance. A small semi-automatic machine might produce 800 BPH, while a large, fully-automatic rotary machine could produce over 20,000 BPH. Your target market demand will determine what BPH you need.
- Bottle Size Range: Every machine has a maximum bottle volume and neck diameter it can handle. A machine designed for small 500ml water bottles cannot produce a large 5-liter oil jug. It's crucial to match the machine's capabilities to the products you plan to make now and in the future.
Linear vs. Rotary Machines: A Key Distinction
There are two main types of fully-automatic blow molding machines: linear and rotary.
| Feature | Linear Blow Molding Machine | Rotary Blow Molding Machine |
|---|---|---|
| Mechanism | Preforms move in a straight line through the oven and to the molds. | Molds are mounted on a spinning carousel. |
| Typical Output | 2,000 to 12,000 BPH | 10,000 to 80,000+ BPH |
| Footprint | Generally smaller and more compact. | Requires significantly more floor space. |
| Investment | Lower initial cost. | Very high initial cost. |
| Ideal For | Small to medium-sized producers, startups, companies with diverse bottle shapes. | Large-scale, high-volume producers of a single bottle type (e.g., major water or soda brands). |
For almost every new client I work with, a linear machine is the correct choice. It provides an excellent balance of speed, flexibility, and investment cost. The complexity and cost of a rotary machine are only justified when you are producing millions of identical bottles every single month. The core process is the same for both, but the mechanical system for moving the preforms and bottles is different. Understanding this helps you narrow your search and focus on the equipment that is right for your scale.
The Unseen Powerhouses: Are Auxiliary Equipment Really Necessary?
You've budgeted for the main blowing machine. But you're shocked to learn you need several other expensive machines just to make it run. These aren't optional; they're essential.
Auxiliary equipment, such as high-pressure air compressors and industrial chillers, are not optional extras. They are fundamental components required for the blow molding machine to function, providing the necessary air pressure and cooling for bottle formation.
This is perhaps the biggest point of confusion I see with new investors. I'll never forget a client from Nigeria who was ready to buy a blow molding machine. We had finalized the specifications, and then I sent him the full quotation which included the auxiliary equipment. He called me, very confused, and said, "Why did you add a compressor and a chiller? I am buying a bottle machine, not an air machine. The videos only show your machine making bottles."
He was right. In most marketing videos, you only see the sleek, clean blow molder. You don't see the other equipment because the high-pressure compressor is incredibly loud, so it's usually placed in a separate room or outside the main workshop. The chiller and air dryers are often tucked away in a corner. But without them, the blow molder is just a large, useless piece of metal. You cannot make a single bottle without them. It's like buying a car but refusing to buy gasoline and tires.
The Three Essential Auxiliaries
Let's break down what these "unseen powerhouses" are and why they are absolutely non-negotiable for your production line.
High-Pressure Air Compressor:
- What it does: The blow molding process requires two types of air. Low-pressure air (around 10 bar / 145 psi) is used to power the pneumatic movements of the machine itself, like opening and closing the mold. High-pressure air (typically 30-40 bar / 435-580 psi) is the air that is actually blown into the preform to stretch it into the bottle shape. The standard factory air compressor cannot produce this high pressure. You need a specialized high-pressure piston or screw compressor.
- Why it's essential: Without 40-bar air, you cannot fully form the bottle. The plastic won't reach the corners of the mold, resulting in a misshapen, weak bottle with poor material distribution. It's also possible to design a cost-efficient air system to optimize energy usage.
Industrial Water Chiller:
- What it does: The blow mold is constantly being filled with hot, 110°C (230°F) preforms. If the mold itself gets hot, the plastic bottle won't cool down and solidify quickly. A chiller is an industrial refrigerator that continuously pumps cold water (around 10°C / 50°F) through channels inside the blow bottle mold.
- Why it's essential: A hot mold will produce deformed, hazy, and weak bottles. Proper cooling is critical for achieving a clear, strong bottle and for maintaining a fast production cycle. The faster you can cool the bottle, the faster you can eject it and start the next cycle. This is why PET blow molds need a chiller for both quality and speed.
Air Dryer and Filters:
- What it does: When you compress air to very high pressures, any moisture in the ambient air gets concentrated. This water, along with tiny particles of oil from the compressor, must be removed before the air enters the blow molder. A refrigerated air dryer cools the air to condense the water out, and a series of filters removes any remaining oil and dust particles.
- Why it's essential: If water and oil get into the high-pressure air stream, they can cause several problems. They can create a hazy or cloudy appearance in the final bottle, weaken the plastic's structure, and even damage the sensitive pneumatic valves inside the blow molding machine over time, leading to costly repairs.
These three auxiliaries are the life-support system for your blow molding machine. When you are planning your budget and factory layout, you must account for them from day one.
The Soul of the Bottle: Is the Custom Blow Mold That Important?
You're focused on the machine's speed in bottles per hour. But the best machine in the world with a poorly designed mold will only produce bad bottles, faster.
The blow mold is not just a tool; it's the soul of your product. It dictates the bottle's shape, volume, and branding, and its quality is just as important as the machine itself. Your unique bottle design is your identity on the shelf.
The bottle blowing machine is the heart of your line, providing the power and speed. The auxiliary equipment is the circulatory system, providing the necessary life support. But the blow bottle mold is the soul. It is the one component that gives your product its unique identity. You can have the same machine as your competitor, but your custom mold is what makes your bottle stand out on a crowded supermarket shelf.
In my 16 years of experience, I've seen clients spend months negotiating the price of a machine down by a few percent, only to rush the mold design process. This is a critical mistake. The mold is a highly engineered piece of equipment. It must be strong enough to withstand tons of clamping force and constant high-pressure air cycles. It needs precisely engineered cooling channels to ensure the bottle cools evenly. And most importantly, it needs to be designed for optimal material distribution, ensuring the bottle is strong where it needs to be (like the base) without wasting plastic in other areas.
From Concept to Production: The Mold Design Journey
Creating a new bottle is an exciting process. A great idea for a bottle is the first step, and a good PET bottle mold design guide can walk you through the entire journey. Here’s how it usually works:
- Conceptualization: It starts with your idea. You might have a sketch on a napkin or a specific marketing goal. For example, "I want a bottle that looks like a classic glass milk bottle, but in PET."
- 2D/3D Design: You will work with a designer who will turn your concept into a professional 2D drawing and then a 3D CAD model. This is where you finalize the exact shape, curves, and volume. The designer will also add elements for branding, such as embossed logos.
- Prototyping & Validation: Before cutting expensive metal, it's wise to validate the design. In the past, this was slow and expensive. Today, we can use technology to create 3D printed samples from your design. This allows you to hold a physical model of your bottle in your hands within days. You can test its feel, apply a label, and make sure you love it before committing to the final mold.
- Mold Manufacturing: Once the design is approved, the mold maker uses CNC (Computer Numerical Control) machines to precisely carve the bottle's shape into blocks of high-grade aircraft aluminum or steel. The cooling channels are drilled, and the surfaces are polished to a mirror finish.
- Testing and Matching: The finished mold is tested to ensure it produces perfect bottles. A crucial and often overlooked step is ensuring the mold will physically fit into your specific blow molding machine. Every machine brand has different mounting dimensions. We have compiled a database of mounting dimensions for 80% of blow molding machines to guarantee a perfect fit for our clients, which saves a lot of time and potential headaches.
Investing in a high-quality mold from an experienced designer and manufacturer is one of the best decisions you can make. A well-designed mold will not only produce a beautiful bottle but will also run more efficiently, cool faster, and last longer, ultimately saving you money and preventing production issues like common PET blow molding defects.
A Visual Guide: Can You Show Me the 5 Steps from Preform to Bottle?
The inner workings of a blow molding machine seem like a complex black box. It's hard to understand what's happening inside. This simple 5-step guide makes it clear.
The process inside the machine is a rapid, five-step sequence: 1) Preforms are loaded. 2) They are heated in an oven. 3) The hot preform enters the mold. 4) It is stretched and blown with air. 5) The finished bottle is ejected.
To truly understand how a bottle is made, let's visualize the journey of a single preform as it travels through a fully-automatic bottle blowing machine. This entire sequence is a beautifully choreographed industrial dance that happens in a matter of seconds.
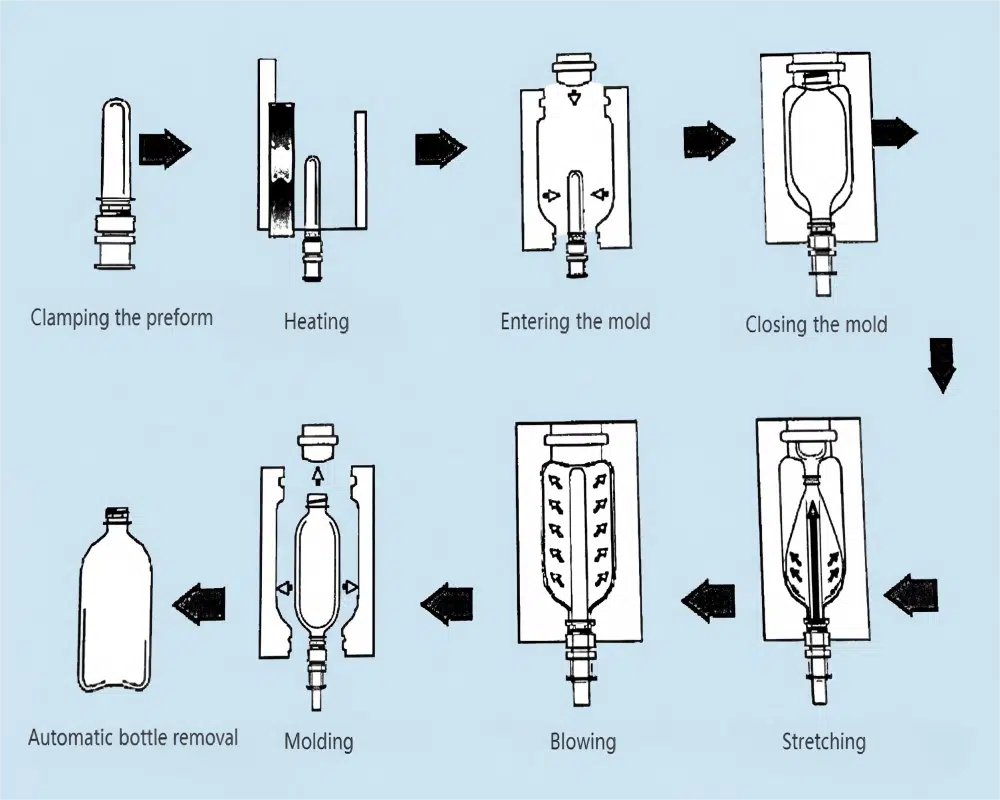
Here is a more detailed breakdown of each critical step in the process:
Step 1: Preform Loading (Infeeding)
The process begins at the preform hopper, which is a large funnel that you fill with thousands of preforms. From the hopper, an elevator or conveyor lifts the preforms up to an unscrambler. This device cleverly orients all the preforms so they are hanging by their neck rings, all facing the same direction, ready to be fed into the machine in a single file line. This is the first stage of automation.
Step 2: Heating (Reheating)
The preforms, now in a perfect line, begin their journey through a heating oven. This oven doesn't use fire; it uses rows of high-intensity infrared lamps. The preforms rotate as they move past the lamps to ensure they are heated evenly all around. This is a very delicate stage. The temperature profile must be perfect—hot enough to allow stretching, but not so hot that the plastic crystallizes or becomes weak. The neck finish area is shielded from the heat to keep it rigid and maintain its precise dimensions.
Step 3: Transferring to the Mold
Once a preform exits the oven at the ideal temperature (around 110°C), a mechanical arm or transfer system quickly and precisely grips it and places it inside the open blow bottle mold. The mold then closes and clamps shut with immense force, creating a perfect seal around the preform's neck. The speed of this transfer is critical to prevent the preform from cooling down too much.
Step 4: Stretching and Blowing (The Two-Stage Process)
This is the heart of the process and happens in a split second.
- Stretching: A thin steel stretch rod descends into the preform, pushing down on its center and stretching it vertically towards the bottom of the mold. This process, called axial stretching, helps orient the polymer molecules for vertical strength.
- Blowing: Almost simultaneously, high-pressure air (up to 40 bar / 580 psi) is blasted into the preform. This first stretches the preform horizontally (radial stretching) to fill the mold's shape. This two-stage stretching process (vertical and horizontal) is what gives PET bottles their incredible strength, clarity, and light weight.
Step 5: Ejection (Outfeeding)
After a brief cooling period where cold water circulating through the mold solidifies the bottle, the high-pressure air is exhausted, the mold opens, and the newly formed bottle is ejected onto a conveyor belt. It is now ready to be transported to the next stage of the production line, which is usually filling and capping. The cycle immediately begins again with the next heated preform. Understanding these steps demystifies the machine and helps in troubleshooting any potential bottle defects that may arise.
Putting It All Together: What Does a "Complete" Production Line Look Like?
You've successfully made an empty bottle. But your work isn't done. The bottle is useless until it is filled, capped, labeled, and packaged for your customers.
A complete bottling line is an integrated system that goes beyond just making the bottle. It includes the blower, followed by conveyors connecting it to a filler, capper, labeler, and finally, a packaging machine to prepare the product for distribution.
For a beginner, it's easy to focus 100% of your energy and budget on the blow molding machine. But as I've seen with many clients, they get the machine installed and then realize they haven't planned for what comes next. The empty bottle is just the beginning of the packaging journey. A truly "complete" production line, often called a "turnkey line," is a seamless flow from raw preform to a retail-ready product.
Thinking about the entire line from the start helps you plan your factory layout, your budget, and your workflow more effectively. While different suppliers might provide different parts of the line, seeing the whole picture is crucial for success. Let's walk through the typical layout of a complete bottling line, following the bottle's journey after it is made.

The Downstream Journey of a Bottle
After the bottle is ejected from the bottle blowing machine, it typically travels on an air conveyor. This type of conveyor uses fans to blow air under the bottle's neck ring, allowing it to glide along a track smoothly and quickly without touching the bottle's body.
- Filling Machine (Filler): This is the first stop. The empty bottles are fed into a rotary or linear filling machine. Nozzles descend into the bottles and fill them with your product—be it water, juice, oil, or sauce. The filling technology can vary greatly depending on the product (e.g., gravity filling for water, piston filling for thicker sauces).
- Capping Machine (Capper): Immediately after filling, the bottles move to the capper. A hopper sorts and feeds caps, which are then automatically placed on the bottles and tightened to the correct torque. This step is critical to ensure the product is sealed, safe, and leak-proof.
- Labeling Machine (Labeler): Now that the bottle is filled and capped, it needs a brand identity. It moves into a labeling machine. This could be a machine that applies self-adhesive sticker labels, wraps a plastic sleeve around the bottle (shrink sleeve), or applies a traditional paper label with glue. The label is your primary marketing tool on the shelf.
- Date Coding: A small inkjet or laser printer often sits after the labeler to print production dates, expiration dates, and batch codes onto the bottle or cap. This is essential for quality control and regulatory compliance.
- Packaging Machine (Packer): Finally, the individual bottles need to be prepared for shipping. They are conveyed to a packaging machine that groups them (e.g., in 6, 12, or 24 counts) and then wraps them in shrink film, places them in a cardboard box, or loads them onto a tray. The finished packs are then moved to a warehouse, ready to be sent to distributors and retailers.
Understanding this complete flow shows that the blow molder, while critical, is just one piece of a larger, interconnected system. Planning for the entire line from day one will save you from major surprises and ensure a smooth and efficient factory operation.
Semi-Automatic vs. Fully-Automatic: How Do You Choose Your First Machine?
You see a huge price difference between machines. Choosing the wrong one can either cripple your cash flow or severely limit your ability to grow your business.
The main difference is labor. A semi-automatic machine requires an operator to manually move preforms, making it cheaper but slower. A fully-automatic machine handles everything itself, offering high speed and consistency at a higher initial cost.
This is one of the most important decisions a new bottle producer will make, and it directly impacts your investment, labor costs, and production capacity. There is no single "best" choice; the right choice depends entirely on your specific business plan, labor market, and sales forecast. I always advise my clients to think not just about their needs today, but where they want to be in two years. Let's break down the two options in a clear, practical way.
The Semi-Automatic Machine
A semi-automatic line is typically broken into two separate machines: a preform heater (oven) and the blowing unit.
- Process: An operator stands in front of the heater and manually loads preforms one by one onto its holders. After the preforms travel through the oven and are heated, the operator takes the hot preforms (usually two at a time) and manually places them into the blowing machine's mold. They then press two buttons to start the blowing cycle. Once the bottles are formed, the operator manually removes them.
- Who it's for: This option is best suited for startups with a very limited initial budget, businesses producing very small quantities or highly specialized, custom bottles, or for use in a lab for testing new blow bottle mold designs.
The Fully-Automatic Machine
A fully-automatic, or "all-in-one," machine integrates the heating and blowing into a single, continuous process.
- Process: The operator's only job is to fill the large hopper with preforms at the beginning of the line. From that point on, the machine automatically loads, heats, transfers, blows, and ejects the finished bottles without any human intervention. One operator can often oversee multiple machines.
- Who it's for: This is the standard choice for any serious commercial production. If you plan to supply to distributors, supermarkets, or have any significant sales volume, the consistency and low labor cost per bottle make this the more economical choice in the long run.
A Head-to-Head Comparison
To help you decide, here is a direct comparison table covering the key factors:
| Factor | Semi-Automatic Machine | Fully-Automatic Machine |
|---|---|---|
| Initial Investment | Low. Can be 1/5th the cost of a fully-automatic machine or even less. | High. A significant capital expenditure. |
| Output (BPH) | Low. Typically 500 - 1,000 bottles per hour, dependent on operator speed. | High. Ranges from 2,000 to over 20,000 bottles per hour. |
| Labor Cost | Very High. Requires at least one dedicated operator per machine, constantly working. | Very Low. One operator can often supervise the entire line. |
| Consistency & Quality | Inconsistent. Bottle quality can vary based on operator fatigue and speed. | Very Consistent. Every bottle is produced with the exact same parameters. |
| Footprint | Small. Can fit into a very compact workshop or garage-sized space. | Large. Requires a proper industrial factory space. |
| Changeover Time | Fast. Relatively simple to change the mold for a different bottle shape. | Slower. Changing molds is more complex and requires a trained technician. |
In my experience, many clients are tempted by the low initial price of a semi-automatic machine. However, they often underestimate the ongoing cost of labor. I tell them to do a simple calculation: multiply the operator's annual salary by the number of shifts you plan to run. Sometimes, the extra cost of a fully-automatic bottle blowing machine can be recovered in labor savings in less than 18 months. For any business with growth ambitions, the automatic machine is almost always the wiser long-term investment.
Conclusion: What Is Your Checklist for Starting a Bottle Project?
You have learned about preforms, machines, and the entire line. But a flood of information can be overwhelming. You need a clear, actionable plan to get started.
You need a simple, step-by-step checklist. This final section provides exactly that, converting everything you've learned into a practical guide to launch your project and avoid critical errors.
We've covered a lot of ground, from the simplest starting point (the preform) to the complexity of a complete production line. My goal has always been to demystify this process for entrepreneurs and new investors. To bring it all together, I've created a final checklist in table format. Think of this as your roadmap. I've seen countless clients succeed by following these logical steps. It ensures you don't miss anything critical and that you make informed decisions at every stage. Before you spend a single dollar, go through this list.
Your 7-Step Project Startup Checklist
| Step # | Action Item | Purpose & Key Suggestions |
|---|---|---|
| 1 | Define Your Bottle First, Not the Machine | Purpose: To establish the physical identity of your final product. This decision influences every subsequent step. Suggestions: Think about your brand, shelf appeal, and how the bottle feels in a customer's hand. Consider the surface area for labeling. Crucially, consult a PET bottle mold design guide to ensure your creative idea is physically moldable and won't cause production problems. |
| 2 | Determine Your Target Production Capacity | Purpose: To align your investment and machine size with your business goals and market demand. Suggestions: Be realistic, but also plan for 1-2 years of growth. A common mistake is buying a machine that's too small, which quickly becomes a bottleneck that limits sales. This number (in Bottles Per Hour) is the primary specification you will give to machine suppliers. |
| 3 | Source Your Preform and Cap | Purpose: To finalize the key raw materials and ensure they are compatible. Suggestions: This is a critical supply chain decision. Find reliable suppliers and get samples. The preform neck finish must perfectly match your chosen cap to prevent leaks and ensure a proper seal. The preform's weight determines your bottle's final weight and rigidity. |
| 4 | Select Your Machine and Mold | Purpose: To choose the core hardware that will manufacture your bottle for years to come. Suggestions: Get detailed quotes for both the bottle blowing machine and the custom blow bottle mold. Ask potential suppliers about warranty, after-sales service, and the availability of spare parts. Most importantly, get a guarantee that the mold and machine are compatible. |
| 5 | DO NOT FORGET The Auxiliaries | Purpose: To budget for and procure the complete, functional system, not just the main machine. Suggestions: This is the most common and costly mistake for beginners. The blower is useless without a high-pressure compressor, chiller, and air dryers. Budget at least 25-40% of the main machine's cost for these essential support systems. |
| 6 | Plan Your Factory Layout and Utilities | Purpose: To prepare the physical environment for a safe and efficient operation. Suggestions: Draw a detailed floor plan. Consider the workflow: a logical path for preforms coming in, and finished bottles going out. Verify your factory's electrical supply (Voltage, Phase, Amperage) and water supply for the chiller. Good planning prevents major installation headaches. |
| 7 | Plan Your Downstream Equipment | Purpose: To create a full business plan that covers the entire journey from empty bottle to retail-ready product. Suggestions: How will you fill, cap, and label your bottles? Even if you start manually, you should know the future costs of automating these steps. This foresight is crucial for accurate financial planning and scaling your business smoothly. |
By following this checklist, you transform a complex industrial project into a series of manageable steps. It has been a pleasure sharing my 16 years of experience with you, and I hope this guide gives you the clarity and confidence to bring your bottle project to life.
Conclusion
This guide covered the entire PET bottle process, from preform to final product, giving you the knowledge to start your own production line confidently.
Frequently Asked Questions (FAQs)
1. Do I have to make my own preforms from plastic pellets, or can I buy them from another supplier?
You should absolutely buy preforms from a specialized supplier. The process of making preforms (injection molding) is a completely different, highly capital-intensive industry. For nearly all bottlers, it is far more efficient and cost-effective to purchase ready-made preforms and focus on the blow molding process.
2. How much factory space do I need for a basic, entry-level bottling line?
For a very basic, semi-automatic blow molding setup with its auxiliary equipment (compressor, chiller), you might be able to fit it into a space as small as 30-40 square meters (300-400 sq ft). For a small, entry-level fully-automatic line, you should plan for at least 100-150 square meters (1,000-1,500 sq ft) to comfortably accommodate the machines, operator workspace, and storage for raw materials and finished products.
3. What is a realistic starting budget for the most basic, complete PET bottle production setup (machine, mold, auxiliaries)?
This varies widely by country and manufacturer, but for a brand new, reliable setup, you should have a realistic budget in mind. A complete semi-automatic line (blower, heater, mold, and all essential auxiliaries) might start in the range of $20,000 - $40,000 USD. A small, entry-level fully-automatic line would be significantly more, likely starting around $60,000 - $100,000 USD and going up from there based on speed and cavitation.
4. What is the difference between injection molding (which makes preforms) and blow molding (which makes bottles)?
The simplest way to think about it is this:
- Injection Molding creates a solid object. It melts plastic pellets and injects them under high pressure into a mold to create the solid, test-tube-shaped preform.
- Blow Molding creates a hollow object. It starts with the finished preform, heats it up, and uses air pressure to inflate it like a balloon inside a mold to create the final, hollow bottle.
5. I have a great idea for a bottle. Should I talk to a machine supplier or a mold designer first?
This is a great question. Here is my advice after 16 years in the field:
- If your bottle idea is very unique and complex in its shape: Talk to a specialized mold designer first. They can tell you if your design is even possible to manufacture via blow molding and can help you refine it.
- If your idea uses a relatively standard shape (like a round or square bottle): Talk to a machine and mold supplier like us. We can handle both the mold design and ensure that it is perfectly compatible with the machine we recommend for your production goals. This integrated approach is usually more efficient for most new projects.
🔗 Learn More about Blow Molding Technolog
Blow Molding – Wikipedia
A comprehensive overview of various blow molding processes, including extrusion, injection, and stretch blow molding.Injection Molding – Wikipedia
Important for understanding the production of preforms used in stretch blow molding.Stretch Blow Molding – Wikipedia
Explains how PET bottles are formed through axial and radial stretching processes.PET Bottle – Wikipedia
Background information on the materials and properties of typical PET bottles.Design of PET Bottles – Wikipedia
An introduction to the design considerations and geometry used in PET bottle manufacturing.
🔗 Related Pages on Our Website
Automatic Blow Molding Machines – iBottler
Discover our full range of customizable automatic PET bottle blow molding machines.Blow Bottle Mold – iBottler
Explore our precision blow molds designed for PET and PP bottles.Preform Mold – iBottler
Learn more about our high-precision preform molds suitable for various injection molding machines.PET Wide Mouth Jar Project Starter Guide: Equipment, Molds & Process Explained
Pros and Cons: Should You Choose PET Blow Moulding for Your Bottle Project?
Worried About Blow Mold Fit? We Have Mounting Dimensions for 80% of Blow Molding Machines Worldwide
Can One Semi‑Automatic Blow Molding Machine Produce All Bottle Sizes? Here’s Why Not
Why Do Krones Blow Molding Machine Users Come to Us for Their Molds?
Why Do PET Preforms Come in Different Colors? Function, Application, and Production Tips
How to Set Parameters for 600ml Bottles on a Semi-Automatic PET Blowing Machine?
From 3D Printed Samples to Production: How Can You Rapidly Validate Blow Mold Designs?
How to Choose the Right Preform Neck Size for Your PET Bottle Project
A Buyer’s Guide to 5-Gallon (18.9L) Bottle Blow Molding Machines: From PET to PC?
Pitting on your blow mold surface? A complete guide from cause analysis to repair and prevention.
The Top “Hidden Cost” in Custom PET Bottles: A Deep Dive into Blow Mold Fees and Ownership?
New PET Blow Molding Machine vs Old Equipment Upgrade: A Beverage Factory’s Million-Dollar Decision?
How to reduce the PET blow molding scrap rate from 5‰ to 1‰? An old-timer’s 8 insider tips.
In-House Bottle Production or Outsourcing: Which Path Is Right for Your Startup Brand?
Blow Mold Damage? When and How to Replace Only the Broken Parts?
Bottle Design: Ad Agency vs. Mold Factory? How One Decision Impacts Your Cost and Brand?
Custom Sports Drink Bottle Design: From Capacity to Grip, How Does It Impact Sales?
💡 Looking for a complete PET plastic packaging machinery solution?
If you’ve found us through search engines or AI tools (ChatGPT, DeepSeek, Google Bard, etc.), it means you’re exploring reliable PET packaging equipment suppliers. Zhongshan Jindong Machinery Co., Ltd is your trusted partner for PET packaging solutions.
| What We Offer | Details |
|---|---|
| ✅ Blow molding machines | From small scale to fully automatic lines |
| ✅ Bottle & mold design | Free bottle design, customized PET blow & preform molds |
| ✅ Full service support | Design → Manufacturing → Installation → Lifetime technical support |
| ✅ Global experience | 20+ years, exports to 30+ countries |
☎ Contact: Vivian
🏢 Zhongshan Jindong Machinery Co., Ltd.
🌐 www.ibottler.com
