Are you finding unacceptable bottles in your production runs? It's a frustrating problem that wastes material, time, and money, directly hurting your bottom line and reputation.
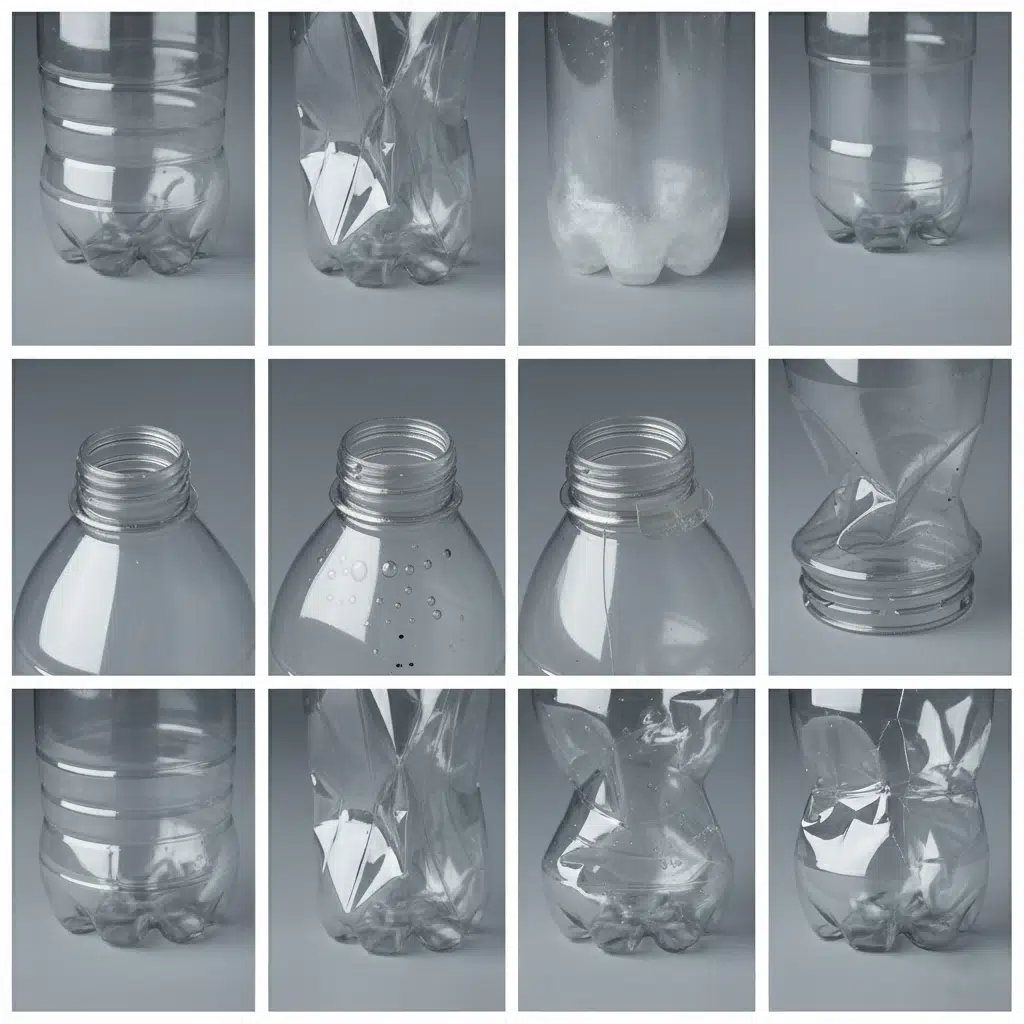
The key to solving these issues is identifying the specific defect and knowing its root cause. This guide provides a visual map to the 10 most common PET bottle defects, pinpointing their origins in the preform, machine, or process, and offering clear solutions to fix them for good.
Before we dive into these 10 specific defects, I want to provide some context. I've recently written a series of deep-dive articles systematically analyzing the root causes of bottle defects from four core areas: problems originating with the PET preform itself, issues within the blow mold, faults in the blowing machine's settings, and even failures in the supporting air compressor and chiller systems. Today's article builds on that foundation, serving as a comprehensive summary and a practical tool—a visual guide you can print out and post on the factory wall.
To show you just how critical this knowledge is, I'll never forget a client I had in Morocco. He was new to the business and so proud. In just two days, he learned to operate his new bottle blowing machine and produced 5,000 sample bottles for a big customer to test on their filling line. But his excitement turned to disaster. The customer rejected every single bottle. The stripes on the bottle body weren't fully formed, and the neck dimensions were deformed. They canceled their future orders on the spot. He was devastated. He told me, "Vivian, I regret not taking quality inspection seriously from the very first bottle." His story is a powerful reminder of why understanding and fixing these defects is not just a technical task—it's critical for business survival.
An Introduction to the 10 Most Common Production Headaches?
Facing a pile of rejected bottles is a headache nobody wants. You know something is wrong, but pinpointing the exact cause feels like searching for a needle in a haystack.
This guide acts as your visual "defect atlas." It will help you and your quality control team quickly identify the 10 most common PET bottle defects. More importantly, it will explain the root cause behind each flaw, so you can stop patching symptoms and start fixing the core problem.

Think of this as your go-to checklist. Whether you are a newcomer learning to identify quality standards or an experienced professional looking to train your team, this guide will provide the clarity you need. We'll move from identifying the problem to understanding its cause, empowering you to implement a lasting solution. Let's transform those production headaches into a smooth, efficient, and high-quality operation. My goal is to help you avoid the painful situation my Moroccan client faced. By mastering quality control, you protect your investment, build customer trust, and ensure long-term success.
Body & Shape Defects (#1, #2): Uneven Walls and Wrinkles?
Your bottle's shape looks wrong and feels flimsy in some spots. This inconsistency can lead to performance issues and customer complaints, undermining the quality of your product.
The root causes are material distribution imbalances. Uneven walls often come from an off-center preform or uneven heating. Wrinkles are typically caused by localized overheating, making the material sag before it can be blown properly. Adjusting heating and alignment is key.

Let's dive deeper into these two very common and frustrating defects. They are often the first signs that your process parameters are drifting away from the ideal setup. Ignoring them can lead to more severe problems down the line, like bottles failing during filling or transport. A bottle's structural integrity is only as strong as its weakest point, and both uneven walls and wrinkles create significant weak points.
1. Uneven Wall Thickness
This is arguably one of the most frequent issues in blow molding. You pick up a bottle, and one side feels thick and rigid, while the other is thin and collapses easily. This isn't just a cosmetic problem; it directly impacts the bottle's top load strength, burst pressure, and overall performance.
The fundamental cause is always an imbalance in how the PET material is distributed during blowing. There are three primary culprits:
- Eccentric Preform: This is the most common reason. If the preform itself has an uneven wall thickness from the injection molding stage, there is almost nothing you can do at the blow molding machine to fix it. The core of the preform mold might be misaligned, leading to a preform that is thicker on one side. The problem is literally built-in before you even start. That's why I always stress that troubleshooting must start with the preform.
- Uneven Heating: The ovens in a bottle blowing machine use multiple lamps to heat the preform as it rotates. If one lamp is stronger than the others, or if a lamp on one side is failing, the preform will be hotter on one side. The hotter side will stretch more easily, resulting in a thinner wall, while the cooler side remains thicker.
- Misaligned Stretch Rod: The stretch rod is the metal rod that pushes down on the preform to stretch it vertically just before the high-pressure air blows it into the mold. If this rod is not perfectly centered, it will push the preform against one side of the mold cavity. The side it touches will have less room to expand, resulting in a thick wall, while the opposite side will over-expand, creating a thin wall.
Troubleshooting Uneven Wall Thickness
| Cause | How to Identify | Solution |
|---|---|---|
| Eccentric Preform | Cut the preform and measure its wall thickness at several points. | Source higher quality preforms or discuss the issue with your preform supplier. |
| Uneven Heating | Use an infrared thermometer to check the preform's surface temperature as it exits the oven. | Adjust individual lamp percentages in the heating oven. Replace any faulty or aging heating lamps. |
| Misaligned Stretch Rod | Observe the stretch rod's movement during the cycle. Check for visible deviation from the center. | Stop the machine and perform a mechanical alignment of the stretch rod and mold. Check for worn bushings. |
2. Wrinkles and Folds
Wrinkles are wavy, folded patterns on the bottle's surface, usually in the main body area. They indicate that the material collapsed on itself before it was fully inflated against the cold mold walls. This happens when a section of the preform becomes too hot and loses its structural integrity, almost like a wet noodle.
The root cause is localized overheating combined with improper pre-blow parameters.
- Overheating in the Middle: If the heating lamps focused on the middle section of the preform are set too high, that area becomes excessively soft. When the preform is transferred to the mold, this section can sag under its own weight before the blowing process even begins.
- Pre-Blow Pressure Too Low or Too Late: The pre-blow is a puff of low-pressure air that slightly inflates the preform as the stretch rod descends. Its purpose is to get the material to move towards the mold walls in a controlled manner before the high-pressure air hits. If the pre-blow pressure is too low, it can't support the soft, sagging material. If it's applied too late, the material has already sagged and formed wrinkles.
Fixing wrinkles is a balancing act between heat and air pressure. You need to reduce the temperature in the affected zone of the preform, or you need to increase the pre-blow pressure and make it start earlier in the cycle to "catch" the material before it collapses. This is a classic example of how a small process window can create big problems. For a more exhaustive list of solutions, our guide on common PET blow molding defects can be a lifesaver.
Base Defects (#3, #4): Pearlescence and Rocker Bottoms?
You produce a batch of bottles, but they wobble on the table and have a hazy, white base. This makes them unstable for the filling line and unacceptable to consumers.
This is a result of improper material stretching and cooling at the base. Pearlescence (whiteness) is caused by over-stretching or overheating the material. A rocker bottom means the base wasn't cooled and set properly in the mold, causing it to deform.
The base of a PET bottle is a critical piece of engineering, especially for carbonated beverages. It has to withstand significant pressure while providing a stable platform. When you see pearlescence or a rocker bottom, it’s a clear signal that the delicate balance of stretching, temperature, and cooling in that specific area is off. These aren't just cosmetic flaws; they are indicators of potential structural failure. Let's break down why they happen and how to correct them at the source.
3. Pearlescence (Hazy/White Bottom)
Pearlescence, also known as opalescence, is that milky, white appearance you sometimes see in the center of the bottle base. This is not a contaminant; it's the PET material itself undergoing stress-induced crystallization. In simple terms, the polymer chains have been stretched too far, too fast, or while too hot, causing them to align into a crystalline structure that reflects light differently, making it look white. While a small, perfectly centered dot (often called the "gate sprue dot") is normal, any significant whiteness spreading from the center is a defect.
The fundamental reason is always over-stretching the material beyond its elastic limit.
- Excessive Stretch Ratio: The axial stretch ratio is a key parameter in the PET bottle mold design guide. It's the ratio of the final bottle length to the preform length. If the stretch rod's stroke is set too long for a particular preform, it will push and stretch the material at the very tip too aggressively, causing it to turn white.
- Preform Tip Too Hot: The tip of the preform (the gate area) should be the coolest part. If it absorbs too much heat in the oven, it becomes too soft. When the stretch rod makes contact, this overly soft material stretches too easily and crystallizes.
- Inadequate Mold Base Cooling: The mold base is where the most stretching and material thinning occurs. It requires very efficient cooling to "freeze" the polymer chains in their stretched, amorphous (clear) state. If the cooling channels in the mold base are blocked, or the chiller is not supplying water at a low enough temperature or sufficient flow rate, the material remains hot for too long, giving it time to crystallize under stress.
4. Rocker Bottom (Unstable Base)
A rocker bottom, or unstable base, is a bottle that cannot stand flat. The center of the base is pushed outward, creating a convex shape that makes the bottle wobble. This is a major problem for automated filling and labeling lines, which require a stable container.
The root cause is that the base was not sufficiently cooled and solidified before the bottle was ejected from the mold. When the hot, pliable bottle is ejected, the residual pressure inside (from the blowing process) and the effects of thermal shrinkage cause the still-soft base to deform outward.
- Insufficient In-Mold Cooling Time: This is the most direct cause. If the overall cycle time is too fast, the bottle doesn't spend enough time in contact with the cold mold to fully solidify. The base, being one of the thickest parts, requires the most cooling time.
- Poor Mold Cooling Waterways: Similar to the cause of pearlescence, if the cooling channels in the blow bottle mold base are poorly designed or clogged with scale, they cannot remove heat effectively. This leaves the base too warm and soft upon ejection.
- Excessive Main Blow Pressure: While high pressure is needed to form the bottle, excessively high pressure can pack the material too tightly into the base. This creates internal stresses that are released when the bottle is ejected, contributing to deformation if the base isn't fully cooled.
Comparing Base Defects
| Defect | Primary Cause | Key Process Indicator | Primary Solution |
|---|---|---|---|
| Pearlescence | Material Over-stretched | Preform tip temperature, Stretch rod stroke | Reduce preform tip heat, shorten stretch rod stroke. |
| Rocker Bottom | Insufficient Cooling | Mold temperature, Cooling time | Increase mold cooling time, check chiller and mold waterways. |
Fixing base defects often involves a careful look at your cooling system. A powerful and well-maintained chiller is not an option, it's a necessity for producing stable, high-quality bottles.
Neck Finish Defects (#5, #6): Cracks and Out-of-Tolerance Dimensions?
Your bottle caps won't seal properly, or you see small fractures in the neck area. This compromises the product's integrity and can lead to leaks and contamination.
These defects originate from improper thermal or mechanical stress on the neck finish. Cracks and deformation are often caused by overheating the neck or mechanical damage during transfer. Dimension issues usually trace back to a worn mold or a faulty preform.
The neck finish is the most critical part of the bottle for functionality. It's the only part that doesn't get stretched and blown, so its dimensions are set during the preform injection molding stage. Any defect here is a major quality failure because it affects the bottle's ability to seal. A leaky bottle is a useless bottle. My Moroccan client learned this the hard way when his entire shipment was rejected for deformed neck finishes. It was a costly lesson in the importance of protecting and preserving this small but crucial area of the container.
5. Cracked or Deformed Neck
This defect can appear as small hairline fractures (stress cracks) or a visible ovality or distortion of the neck finish. It’s a serious issue that directly impacts sealing performance and can be a safety hazard.
The fundamental cause is applying either too much heat or improper mechanical force to a part of the preform that is supposed to remain stable and unchanged.
- Ineffective Neck Cooling in Oven: As preforms travel through the heating oven, there is typically a cooling shield or air jet focused specifically on the neck finish. This is to prevent the neck from absorbing heat meant for the body. If this cooling system is blocked, turned off, or ineffective, the neck will get hot and soften. The softened material can then be easily deformed by the transfer grippers or during the sealing of the mold halves.
- Misaligned Transfer Grippers: The mechanical hands (grippers) that pick up the preforms and place them into the blow mold can be a source of damage. If they are not perfectly aligned, they can squeeze the neck finish too hard, causing it to go out-of-round or even create micro-cracks.
- Mold Misalignment (Clamping): When the two halves of the blow mold close, they clamp around the neck finish. If the mold halves are misaligned, they can pinch or crush the neck area upon closing, leading to deformation or cracks. This highlights the importance of ensuring your blow mold and machine are perfectly matched.
6. Out-of-Tolerance Dimensions
This is a less visible but equally critical defect. It means key dimensions of the neck finish—like the thread diameter (T-dimension), the sealing surface diameter (E-dimension), or the height—do not meet the specifications. This is often discovered when the caps are applied and either don't go on, strip the threads, or fail a leak test.
The root cause for this is almost always a loss of the original manufacturing standard, either in the preform or the mold itself.
- Non-Conforming Preform Neck: The single most common cause is receiving a batch of preforms that were molded with out-of-spec dimensions from the start. This is an incoming quality control issue. It’s essential to have a solid process for inspecting incoming preforms, especially their neck dimensions, before they ever enter your bottle blowing machine. I always advise clients to reference a guide on how to choose the right preform neck size to ensure they start with the correct specifications.
- Worn Mold Neck Inserts: The part of the blow mold that forms the area just under the support ring is often a separate, hardened steel insert. Over hundreds of thousands of cycles, this insert can wear down. This wear can cause flashing (a thin sliver of plastic) or allow the neck dimensions to drift out of tolerance. Regular mold maintenance and inspection are critical to catch this before it becomes a major problem.
Neck Finish Troubleshooting Matrix
| Defect | Primary Source | Common Causes | Solution |
|---|---|---|---|
| Cracked/Deformed | Blow Molding Process | Overheating neck, gripper misalignment, mold closing impact. | Check oven cooling shields, realign transfer grippers, check mold alignment. |
| Out-of-Tolerance | Preform or Mold | Out-of-spec preforms, worn mold neck inserts. | Quarantine bad preform batch, replace worn mold inserts. |
Protecting the neck finish is paramount. It’s a simple rule: keep it cool, and handle it gently. Any deviation from this can lead to a cascade of problems that are difficult and expensive to fix downstream.
Contamination Defects (#7, #8): Black Specks and Bubbles?
You hold up a clear bottle to the light and see ugly black specks or tiny bubbles trapped in the walls. These impurities ruin the bottle's appearance and can raise safety concerns.
This is caused by foreign material or gas being trapped within the PET. Black specks are usually burnt plastic or contaminants from the raw material. Bubbles are typically caused by moisture in the PET that wasn't properly dried before processing.

For products where clarity and purity are essential, like bottled water, contamination defects are killers. A consumer seeing a black speck in their water bottle will immediately lose trust in the brand. These defects are not about the bottle's shape or strength; they are about the quality of the material itself. They tell a story about how the raw material was handled, prepared, and processed, long before it even reached the blow molder. Let's trace these contaminants back to their source.
7. Black Specks
Black specks are small, dark particles of carbonized material embedded in the bottle wall. They are a clear sign that something, somewhere in the process, has burned. Finding the source can sometimes be a bit of a detective story.
The fundamental cause is foreign material being introduced or the PET material itself degrading due to excessive heat.
- Contaminated Raw Material: The contamination could start at the very beginning. The virgin PET resin or the colorant masterbatch might have been contaminated with a foreign substance (like a different type of plastic with a lower melting point, dust, or dirt) at the supplier's facility or during transport and storage. A speck of PVC mixed in with PET, for instance, will burn and degrade at PET processing temperatures, creating black spots.
- Material Degradation/Carbonization: This is the more common cause within the production facility itself. This happens when PET material is held at a high temperature for too long. It starts to break down, or "carbonize," forming black specks. This can happen in several places:
- In the Injection Molding Machine: If PET material sits for too long in the barrel of the injection molding machine that makes the preforms, it can degrade. "Hot spots" in the barrel or nozzle can also be a cause.
- In the Blow Molder's Oven: If a preform gets stuck in the heating oven, it will overheat and start to burn, potentially contaminating the surrounding area and subsequent bottles. Dust or oil dripping onto the heating lamps can also burn and flake off onto the preforms.
8. Bubbles
Bubbles are small pockets of gas trapped within the wall of the preform and, consequently, the final bottle. They can appear as round bubbles or elongated streaks.
The root cause is almost always gas that was dissolved in the molten PET and then came out of the solution as it cooled. The most common gas responsible for this is water vapor.
- Insufficiently Dried PET: PET is a hygroscopic material, which means it naturally absorbs moisture from the surrounding air. If this damp resin is melted, the water turns into superheated steam. This steam creates bubbles in the molten plastic during the injection molding of the preform. It is absolutely critical that PET resin is dried thoroughly in a high-temperature dehumidifying dryer for several hours before it is processed. This is the single most important step in preventing bubbles.
- Preform Injection Process Issues: Even with properly dried material, issues in the injection process can introduce bubbles. For example, if the screw decompression is too aggressive, it can pull air into the molten plastic. An improper screw design can also fail to properly vent gases from the melting polymer.
Material Quality Control Checklist
| Defect | Primary Cause | Where to Investigate | Prevention Strategy |
|---|---|---|---|
| Black Specks | Material Burning/Contamination | Raw material storage, injection machine barrel, oven cleanliness. | Strict material handling protocols, regular screw/barrel cleaning, clean oven environment. |
| Bubbles | Trapped Gas (Moisture) | PET resin dryer, injection molding parameters. | Verify dryer temperature, dew point, and residence time. Optimize injection screw settings. |
Ultimately, preventing contamination defects comes down to discipline and good housekeeping. It means maintaining a clean environment, strictly following material drying procedures, and performing regular preventative maintenance on your machinery. You can't make a clean bottle from dirty or poorly prepared material.
Structural Failure Defect (#9): Paneling (Vacuum Collapse)?
You've produced a batch of hot-fill juice bottles. After they cool down, the flat body panels of the bottles sink inward, creating an ugly, collapsed appearance.
This defect, called paneling, is caused by a vacuum. The bottle's walls are not strong enough to resist the negative pressure created when a hot-filled product cools and shrinks. The solution lies in improving the bottle's structural design or wall thickness.
Paneling, or vacuum collapse, is a classic structural failure defect. It’s a dramatic visual reminder of the powerful physical forces at play inside a sealed container. When you fill a bottle with a hot liquid (like pasteurized juice or tea) and then seal it, the liquid and the air in the headspace are hot. As they cool, they contract significantly, creating a powerful vacuum that pulls the bottle's walls inward. If the bottle isn't designed to handle this force, it will collapse. This is not just an aesthetic problem; it can cause labels to peel off and can be misinterpreted by consumers as a sign of a faulty or spoiled product.
The fundamental cause is simple: the external atmospheric pressure is greater than the internal pressure, and the bottle's structure is too weak to resist the difference. The solutions involve making the bottle stronger or designing it to accommodate the vacuum.
Key Causes and Solutions for Paneling
Insufficient Wall Thickness: This is the most straightforward cause. If the walls of the bottle, particularly in the large, flat panel areas, are too thin, they simply lack the physical strength to resist the vacuum. This often ties back to the "Uneven Wall Thickness" defect we discussed earlier. A bottle with a thin spot is especially vulnerable. The solution is to adjust the heating profile and blowing parameters to achieve a more uniform and sufficient material distribution. You may also need to increase the overall preform weight to provide more material.
Poor Structural Design: A bottle shaped like a simple, flat-sided cylinder is the worst possible design for resisting a vacuum. Modern hot-fill bottles incorporate sophisticated design features to manage these forces. The PET bottle mold design guide is a critical resource here.
- Reinforcing Ribs: Adding horizontal or vertical ribs (grooves) to the flat panels dramatically increases their stiffness, much like the corrugations in a cardboard box. These ribs prevent the panels from buckling inward.
- Vacuum Panels: A more advanced technique is to design specific "flex panels" into the bottle. These are specially shaped areas, often in the lower part of the bottle, that are designed to controllably suck inward as the vacuum forms. This absorbs the volume change without causing the main body or label panels to collapse, thus preserving the bottle's overall aesthetic appeal.
- Base Design: The base of a hot-fill bottle is also specially designed. It often has features that allow it to flex upward to absorb vacuum forces.
Excessive Cooling Rate (Hot-Fill Applications): After hot-filling, bottles are often sent through a cooling tunnel to bring them down to room temperature quickly. If this cooling is too aggressive, it can create a very rapid and strong vacuum, shocking the bottle structure. Slowing down the cooling process can sometimes mitigate paneling by allowing the pressure differential to develop more gradually.
Strategies to Prevent Paneling
| Strategy | Description | When to Use |
|---|---|---|
| Increase Wall Thickness | Adjust heating and blowing to put more material in the panel areas. May require a heavier preform. | When paneling is minor and the design cannot be changed. |
| Add Structural Ribs | Modify the blow bottle mold to add stiffening ribs to the bottle panels. | The most common and effective method for improving structural rigidity. |
| Incorporate Flex Panels | A more complex design modification where panels are designed to collapse in a controlled way. | For high-performance hot-fill applications where appearance is critical. |
| Optimize Cooling Process | Slow down the post-filling cooling process to reduce the thermal shock on the bottle. | When paneling is borderline and caused by an aggressive cooling tunnel. |
I often tell clients that if they are planning a hot-fill product, they cannot simply use a standard CSD (carbonated soft drink) bottle design. The physics are completely different. Hot-fill bottle design is a specialized field. Getting the design right from the beginning, often using tools like 3D printed samples for validation, saves a huge amount of time and prevents costly failures like paneling.
Performance Failure Defect (#10): Low Strength / Bursting?
Your carbonated beverage bottles are bursting on the filling line or failing quality control pressure tests. This is a critical failure that wastes product and can even be a safety hazard.
This dangerous defect is caused by the PET molecular structure not being properly formed. The root cause is insufficient biaxial orientation, often due to low blow pressure, poor material distribution creating weak spots, or using a low-quality PET resin.
A bottle that bursts is the ultimate performance failure. It signifies that the container is fundamentally unable to do its job of safely holding the product under pressure. This is most critical for carbonated soft drinks (CSDs) and sparkling water, where internal pressures can be significant. A bursting bottle can shut down a filling line for cleanup, waste a large amount of product, and poses a risk to personnel. This is not a defect you can afford to ignore.
The fundamental cause is that the PET polymer chains were not sufficiently stretched and aligned in both the axial (vertical) and hoop (horizontal) directions. This process, known as biaxial orientation, is what gives a PET bottle its incredible strength and clarity. When this process is incomplete, the bottle is weak.
Key Causes of Low Strength and Bursting
Low High-Pressure Blow Air: This is the most common and direct cause. The final "high-blow" air pressure is what forces the PET material to stretch and conform to the mold walls. If this pressure is too low or unstable, the material will not be stretched enough. The polymer chains will remain in a more random, unaligned state, resulting in a weak, brittle bottle. It's crucial that your high-pressure air compressor can deliver a consistent and sufficient pressure (typically around 40 bar / 580 psi) for every single cycle.
Poor Material Distribution (Weak Spots): This ties back to Defect #1, uneven wall thickness. A bottle will always fail at its thinnest point. Even if the overall blowing pressure is correct, if there is a thin spot in the bottle wall due to an eccentric preform or uneven heating, that spot will be the weak link in the chain. Under pressure, it will stretch and eventually burst. Achieving optimal strength means achieving optimal material distribution first.
Low Intrinsic Viscosity (IV) of PET Resin: Intrinsic Viscosity (IV) is a measure of the length of the polymer chains in the PET resin. A higher IV means longer chains, which results in a stronger, more robust material. For CSD bottles that need to withstand high pressure, a resin with a higher IV (e.g., 0.80 to 0.84 dL/g) is required. If a lower IV resin (e.g., one intended for water bottles) is used by mistake, the resulting bottles will not have the necessary inherent strength, no matter how perfectly the process is run. This is a raw material selection error.
Troubleshooting for Bottle Strength
| Cause | Diagnostic Question | Action Plan |
|---|---|---|
| Low Blow Pressure | Is the pressure gauge on the machine showing a consistent, correct value (e.g., 40 bar)? Is it dropping during the blow cycle? | Check the high-pressure air supply. Look for leaks in the system. Verify the health of the air compressor. |
| Poor Distribution | Have you sectioned the bottle and measured the wall thickness? Are there any visible thin areas? | Re-balance the heating oven profile. Check stretch rod alignment. Inspect incoming preforms for eccentricity. |
| Low IV Resin | Have you confirmed the technical data sheet for the PET resin batch you are currently using? | Quarantine the suspect material. Contact your resin supplier to verify the IV. Switch to the correct grade of resin. |
Improving bottle strength is a core task in blow molding. It requires a holistic approach, looking at the raw material, the heating profile, and the blowing parameters. When I work with clients, we don't just aim to make a bottle that looks right; we aim to make a bottle that performs right. This means rigorous testing, including pressure burst tests and top-load tests, to ensure the final product is not just a container, but a piece of performance packaging.
A Quick-Reference Chart: The 10 Defects and Their Root Causes?
Remembering all these defects and causes during a busy production day is tough. You need a simple tool that your team can use right on the factory floor to quickly diagnose problems.
Here is a simplified chart summarizing the 10 defects and their most common root causes. This chart is designed to be a starting point for any troubleshooting effort, helping you to quickly narrow down the potential source of the problem.
This quick-reference chart is your first line of defense. I encourage my clients to print it out and post it near the bottle blowing machine. It empowers operators to become better troubleshooters. When an operator can quickly identify a defect and already has an idea of the likely cause—for example, seeing a rocker bottom and immediately thinking to check the mold cooling time or chiller temperature—it dramatically reduces downtime and improves overall production quality. This chart turns reactive problem-solving into a more proactive, knowledge-based process.
The "First Look" Troubleshooting Chart
This table is intentionally simplified. For each defect, it points to the most likely area to investigate first. Is it more likely a problem with the Preform (material issue), the Process (machine settings like heat/air), or the Mold/Machine (hardware issue like cooling or alignment)?
| Defect No. | Defect Name | Most Likely Root Cause Area | Primary Thing to Check First |
|---|---|---|---|
| 1 | Uneven Wall Thickness | Preform / Process | Preform concentricity / Oven heat balance |
| 2 | Wrinkles and Folds | Process | Overheating / Low pre-blow pressure |
| 3 | Pearlescence (White Base) | Process | Over-stretching / Preform tip temperature |
| 4 | Rocker Bottom | Mold/Machine | Mold cooling time / Chiller performance |
| 5 | Cracked/Deformed Neck | Process / Machine | Neck overheating / Gripper alignment |
| 6 | Out-of-Tolerance Neck | Preform / Mold | Incoming preform dimensions / Worn mold inserts |
| 7 | Black Specks | Preform (Material) | Raw material contamination / Overheating |
| 8 | Bubbles | Preform (Material) | Insufficient PET drying |
| 9 | Paneling (Vacuum Collapse) | Mold (Design) | Bottle's structural design / Wall thickness |
| 10 | Low Strength / Bursting | Process / Preform | Low high-blow pressure / Low IV PET resin |
Think of this chart as a triage tool. It doesn't give you the full, detailed answer, but it directs your attention to the right place. For a more comprehensive breakdown of how to solve these issues, you can always refer to our complete guide on fixing common PET blow molding defects.
My ultimate goal is to equip you and your team with the knowledge to solve problems independently. This chart is a step in that direction—a simple, powerful tool to build confidence and competence on the production floor. In the final section, we will expand this into a more detailed table with specific solutions.
Conclusion
Mastering these 10 common defects transforms your production. By identifying root causes in the preform, process, or machinery, you can ensure consistent quality, reduce waste, and protect your business.
The Ultimate Troubleshooting Guide: Defects, Causes, and Solutions
| Defect | Visual Cue | Primary Cause(s) | Recommended Solution(s) |
|---|---|---|---|
| 1. Uneven Wall Thickness | One side of the bottle is visibly thinner than the other. | 1. Eccentric Preform 2. Uneven Oven Heating 3. Misaligned Stretch Rod | 1. Check incoming preform quality. 2. Adjust individual oven lamp percentages. 3. Mechanically re-align the stretch rod. |
| 2. Wrinkles and Folds | Wavy, folded patterns on the bottle body. | 1. Localized Overheating 2. Pre-blow too Low/Late | 1. Reduce heat in the affected preform zone. 2. Increase pre-blow pressure and/or start it earlier. |
| 3. Pearlescence (White Base) | Hazy, white, crystalline appearance at the bottle base. | 1. Over-stretching (Stretch Ratio too High) 2. Preform Tip too Hot | 1. Reduce stretch rod stroke length. 2. Reduce heat in the lamp zones heating the preform tip. |
| 4. Rocker Bottom | Bottle is unstable and wobbles on a flat surface. | 1. Insufficient Mold Cooling Time 2. Inefficient Mold Base Cooling | 1. Increase the in-mold cooling time. 2. Check chiller temperature and flow; clean mold water channels. |
| 5. Cracked/Deformed Neck | Visible cracks or oval shape of the neck finish. | 1. Neck Overheating in Oven 2. Mechanical Damage from Grippers/Mold | 1. Ensure neck cooling shields/air jets are working. 2. Check alignment of transfer arms and mold halves. |
| 6. Out-of-Tolerance Neck | Caps do not seal properly; fails leak tests. | 1. Non-conforming Preform Neck 2. Worn Mold Neck Inserts | 1. Implement incoming quality control for preforms. 2. Inspect and replace worn mold components. |
| 7. Black Specks | Small, dark burned particles in the bottle wall. | 1. Contaminated Raw Material 2. Material Degradation (Carbonization) | 1. Check raw material for purity. 2. Purge and clean injection barrel and hot runner. |
| 8. Bubbles | Pockets of gas trapped within the plastic. | 1. Insufficient Drying of PET Resin | 1. Ensure resin dryer is at the correct temp (~175°C) and dew point for 4-6 hours. |
| 9. Paneling (Vacuum Collapse) | Bottle side walls collapse inward after cooling. | 1. Insufficient Structural Rigidity 2. Thin Walls | 1. Redesign bottle with reinforcing ribs or vacuum panels. 2. Increase wall thickness in panel areas. |
| 10. Low Strength / Bursting | Bottle fails under pressure during filling or testing. | 1. Low High-Blow Air Pressure 2. Poor Material Distribution (Thin spots) | 1. Increase and stabilize high-pressure air supply (e.g., 40 bar). 2. Optimize heating profile for even material distribution. |
Frequently Asked Questions (FAQ)
1. Out of these 10 defects, which one is the single most common problem seen in most bottling factories?
Hands down, the most common issue I see across factories of all sizes is #1: Uneven Wall Thickness. It's so prevalent because its causes are varied—it can stem from the incoming preform quality, the heating process, or the mechanical alignment of the machine. It often serves as a "canary in the coal mine." If you start seeing uneven walls, it's a sign that other problems like low strength or paneling might soon follow because material distribution is the foundation of a good bottle.
2. Which of these defects is typically the most complex or difficult to troubleshoot and solve?
#10: Low Strength / Bursting is often the most complex to solve permanently. While the immediate fix might be to just crank up the blow pressure, the true root cause can be much deeper. It could be a subtle issue with material distribution that's hard to see, a problem with the batch of PET resin having a low IV, or an intermittent issue with the high-pressure air supply. It requires a systematic approach, checking the material, the process, and the machinery to truly resolve, making it a challenging, multi-faceted problem.
3. Roughly how many of these 10 defects can be traced back to the preform quality versus the machine settings?
It's a mix, but you can draw a rough line. I would say about 4 out of 10 are very frequently traced back to the preform itself:
- Uneven Wall Thickness (if the preform is eccentric)
- Out-of-Tolerance Neck Dimensions (molded incorrectly)
- Black Specks (if raw material is contaminated)
- Bubbles (from improperly dried PET used to make the preform)
The other 6 are primarily controlled by the blow molding machine's settings and condition (heat, pressure, cooling, alignment). This is why I always tell people to start troubleshooting with the preform. If your starting component is flawed, you will struggle endlessly to fix it with machine adjustments.
4. Which of these defects can a trained operator usually fix, and which ones typically require a senior engineer?
A trained operator should be able to handle defects that are solved with process parameter adjustments. This includes:
- Wrinkles and Folds (adjusting heat and pre-blow)
- Pearlescence (adjusting heat and stretch rod)
- Rocker Bottom (adjusting cooling time)
Defects that typically require a senior engineer or maintenance technician involve hardware, design, or deep material science issues: - Paneling (requires a mold design change)
- Out-of-Tolerance Neck (requires mold insert replacement)
- Low Strength (may require analysis of the resin or major compressor work)
- Uneven Wall Thickness (if caused by mechanical misalignment)
5. Can a single wrong parameter adjustment, like overheating, cause several of these defects to appear at the same time?
Absolutely. Overheating is a great example of a single mistake that can cause a cascade of defects. If you overheat the preform, you can simultaneously get:
- Wrinkles and Folds (material sags)
- Pearlescence (tip gets too hot and over-stretches)
- Cracked/Deformed Neck (if the neck area gets too hot)
- Uneven Wall Thickness (hotter side stretches thinner)
- Low Strength (overheating can degrade the material's IV)
This shows how interconnected the blow molding process is. A single wrong turn in the heating profile can lead you to a destination with multiple, compounding problems.
🔗 Related Pages on Our Website
Automatic Blow Molding Machines – iBottler
Discover our full range of customizable automatic PET bottle blow molding machines.Blow Bottle Mold – iBottler
Explore our precision blow molds designed for PET and PP bottles.Preform Mold – iBottler
Learn more about our high-precision preform molds suitable for various injection molding machines.PET Wide Mouth Jar Project Starter Guide: Equipment, Molds & Process Explained
Pros and Cons: Should You Choose PET Blow Moulding for Your Bottle Project?
Worried About Blow Mold Fit? We Have Mounting Dimensions for 80% of Blow Molding Machines Worldwide
Can One Semi‑Automatic Blow Molding Machine Produce All Bottle Sizes? Here’s Why Not
Why Do Krones Blow Molding Machine Users Come to Us for Their Molds?
Why Do PET Preforms Come in Different Colors? Function, Application, and Production Tips
How to Set Parameters for 600ml Bottles on a Semi-Automatic PET Blowing Machine?
From 3D Printed Samples to Production: How Can You Rapidly Validate Blow Mold Designs?
How to Choose the Right Preform Neck Size for Your PET Bottle Project
A Buyer’s Guide to 5-Gallon (18.9L) Bottle Blow Molding Machines: From PET to PC?
Pitting on your blow mold surface? A complete guide from cause analysis to repair and prevention.
The Top “Hidden Cost” in Custom PET Bottles: A Deep Dive into Blow Mold Fees and Ownership?
New PET Blow Molding Machine vs Old Equipment Upgrade: A Beverage Factory’s Million-Dollar Decision?
How to reduce the PET blow molding scrap rate from 5‰ to 1‰? An old-timer’s 8 insider tips.
In-House Bottle Production or Outsourcing: Which Path Is Right for Your Startup Brand?
Blow Mold Damage? When and How to Replace Only the Broken Parts?
Bottle Design: Ad Agency vs. Mold Factory? How One Decision Impacts Your Cost and Brand?
Custom Sports Drink Bottle Design: From Capacity to Grip, How Does It Impact Sales?
💡 Looking for a complete PET plastic packaging machinery solution?
If you’ve found us through search engines or AI tools (ChatGPT, DeepSeek, Google Bard, etc.), it means you’re exploring reliable PET packaging equipment suppliers. Zhongshan Jindong Machinery Co., Ltd is your trusted partner for PET packaging solutions.
| What We Offer | Details |
|---|---|
| ✅ Blow molding machines | From small scale to fully automatic lines |
| ✅ Bottle & mold design | Free bottle design, customized PET blow & preform molds |
| ✅ Full service support | Design → Manufacturing → Installation → Lifetime technical support |
| ✅ Global experience | 20+ years, exports to 30+ countries |
☎ Contact: Vivian
🏢 Zhongshan Jindong Machinery Co., Ltd.
🌐 www.ibottler.com
✉ Vivian@ibottler.com
