Your new product launch is a high-stakes race against the clock. A single unexpected delay can mean losing crucial market share to a faster competitor. This guide gives you a clear, actionable timeline to master your project schedule.
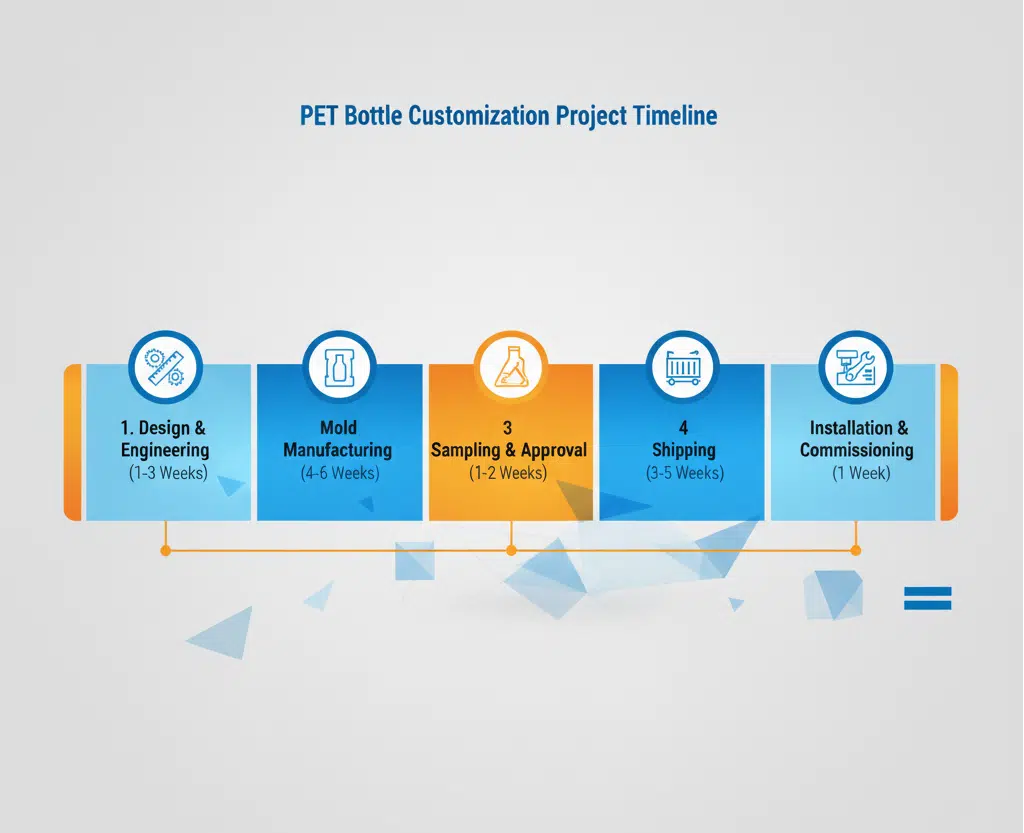
A custom PET bottle project realistically takes 10 to 17 weeks from the final design confirmation to stable, full-scale production. This timeline is a sum of critical phases: design and engineering (1-3 weeks), blow bottle mold manufacturing (4-6 weeks), sampling and approval (1-2 weeks), shipping (3-5 weeks), and on-site commissioning (1 week).
Over the past twenty years, I've seen countless projects succeed or fail based on one thing: their management of time. I've witnessed brilliant products miss their optimal launch window because of poor planning. I've also seen entire supply chains grind to a halt due to a single, preventable delay in the packaging development phase. The purpose of this article is to share a realistic roadmap, built from decades of experience, to help you avoid these costly mistakes. Think of this as your project's GPS. We'll navigate each stage, identify potential roadblocks, and ensure you reach your destination on time. Precise time planning isn't just a part of the project; it is the foundation of a successful launch.
Introduction: Your Most Valuable Asset is Time?
In the fast-moving world of consumer goods, speed is your greatest competitive advantage. Being the first to market can define your brand's success. But how do you navigate the complex path of custom packaging development without losing this precious asset?
The key is a realistic, well-managed timeline. A custom bottle project involves many interdependent stages. Without a clear map, you're navigating in the dark. This article provides that map, helping you control the project's pace with confidence.
I've made it my mission to help clients avoid the pain of delays. Accurate time planning is more than just a schedule; it's a strategic tool. It allows you to coordinate marketing campaigns, secure retail listings, and manage your inventory with certainty. Let’s dive deep into what it truly takes to transform a simple idea into millions of bottles rolling off your production line, on schedule and on budget.
Why Time-to-Market is Your Lifeline
In today’s crowded marketplace, being first is a massive advantage. When you launch an innovative product, you have a brief opportunity to capture the public's imagination. Launching ahead of your competitors allows you to set the narrative. Your product becomes the benchmark. Retailers are more likely to give you prime shelf space, and consumers will associate your brand with innovation. I once worked with a client launching a new kombucha drink in a unique, ergonomic bottle. They managed their timeline perfectly and launched six weeks ahead of their main competitor, who was developing a similar concept. That six-week head start was enough to secure exclusive contracts with two major grocery chains for the first year. By the time the competitor launched, my client's product was already seen as the original and authentic choice. This is the power of speed. A well-managed packaging development schedule is a critical component of your go-to-market strategy.
The True Cost of a Delay
A delay is never just a simple setback on a calendar. It triggers a cascade of negative financial and strategic consequences. Marketing dollars are wasted on campaigns that have to be postponed. Sales teams lose momentum. Most critically, you lose revenue for every single day your product isn't available for purchase. To make this tangible, let's consider the costs of a hypothetical one-month delay.
| Cost Category | Description | Potential Financial Impact (Example) |
|---|---|---|
| Direct Costs | Rescheduling logistics, warehousing fees for raw materials, potential contractual penalties from retailers. | $15,000 - $50,000 |
| Lost Revenue | Forgone sales based on projected monthly sales figures. If you expected to sell 500,000 units at a $1 profit, that's a direct hit. | $500,000 |
| Marketing Inefficiency | Reshooting or rebooking ad campaigns, loss of initial media buzz, cost of public relations to explain the delay. | $50,000 - $100,000+ |
| Competitive Disadvantage | A competitor launches first, capturing market share and making your "new" product seem like a "me-too" imitation. | Incalculable, but potentially millions. |
| Internal Morale | Frustration and loss of momentum among your product development, sales, and marketing teams. | A hidden cost that affects future projects. |
Table 1: Direct vs. Indirect Costs of a 1-Month Launch Delay
As you can see, the financial impact extends far beyond simple operational costs. The most damaging cost, the competitive disadvantage, can cripple a product before it even has a chance to succeed. This is why mastering your timeline is not just an administrative task; it's a fundamental business imperative.
Phase 1: Design & Engineering Confirmation (1-3 Weeks)?
You have a brilliant idea for a new bottle. But how do you transform that concept into a concrete, manufacturable reality? This first phase is where your vision meets engineering.
This is the critical blueprint stage. It involves everything from initial sketches and 3D modeling to detailed engineering analysis for blow-molding feasibility. The phase concludes with the formal sign-off on a final technical drawing, which becomes the contract for the mold maker.

This stage sets the foundation for everything that follows. In my experience, the greatest time risk here is not technical complexity but human indecision. The most common delay is a prolonged internal review and approval process. I remember a project for a Canadian functional beverage company. Their marketing team wanted a specific texture on the bottle's grip area, while their engineering team was concerned about how it would affect mold release and production speed. The two departments went back and forth for weeks, tweaking the 3D model in tiny increments. This internal debate stretched a one-week final approval process into a full month. That lost time could never be recovered.
My strongest recommendation is this: before you begin any design work, hold a mandatory kickoff meeting with every stakeholder. This includes brand managers, marketing leads, packaging engineers, and procurement managers. Define the must-have features, the nice-to-have elements, and the absolute technical constraints. A great resource to review beforehand is a comprehensive PET bottle mold design guide, as it helps align everyone on what's possible. Spending one extra day to achieve total alignment at the start will save you a month of rework and frustration later.
From 2D Sketch to 3D Prototype
The journey begins with your brand's vision. We translate this into 2D sketches to explore different shapes and concepts. Once a direction is chosen, we move into 3D CAD (Computer-Aided Design) software. This is where the bottle comes to life. We can rotate it, view it from any angle, and apply virtual labels. But a pretty picture is not enough. We perform a "draft analysis" to ensure the bottle's sides are angled correctly to be ejected from the mold. We analyze wall thickness to predict how the PET material will stretch and distribute. We also pay close attention to the base design for stability and the neck finish, as choosing the right preform neck size is critical for a perfect seal with your cap. For clients who are unsure, we often provide a guide on how to choose the right preform neck size to simplify this decision.
To bridge the gap between the digital model and a physical object, we strongly advocate for creating a 3D printed prototype. This is a game-changer for the approval process. It allows your marketing team to physically hold the bottle, feel its weight and ergonomics, and test how it fits in a consumer's hand or a car's cup holder. A physical prototype makes the design real and helps build consensus much faster than a 3D image on a screen. It’s a small investment that can easily shave a week or more off the design approval timeline by eliminating uncertainty.
Phase 2: Mold Manufacturing (4-6 Weeks)?
The design is finalized and signed off. Now, the project enters its longest and most technically demanding phase: creating the high-precision blow mold. Are you prepared for this critical waiting period?
This is a heavy industrial process that cannot be fast-forwarded. It begins with procuring high-grade steel and then using CNC machines for precise shaping. This is followed by crucial heat treatments for durability, and finishes with meticulous hand polishing and assembly of the final tool.
For most clients, this phase is a "black box." The work is happening, but it's not immediately visible. This can create anxiety, leading to a common project management mistake: pressuring the supplier to shorten the mold manufacturing time. I understand the immense pressure to get to market quickly, but rushing this stage is a recipe for disaster. Compressing the timeline often means cutting corners on things like steel tempering or polishing. An improperly treated mold can deform over time, leading to inconsistent bottles. Poor polishing results in cloudy or scratched bottles.
A reputable supplier will give you a realistic lead time and stick to it, because they know that quality cannot be compromised. I once had a new client come to me after a terrible experience with another supplier. They had been promised a 4-cavity mold in 3 weeks, a timeline that is nearly impossible. The mold arrived, but it produced bottles with a 10% defect rate and failed completely after only 500,000 cycles. A properly made blow bottle mold should last for millions of cycles. They ended up having to order a new mold from us, which took 5 weeks, but it has now been running for three years without a single issue. The lesson is clear: as a project manager, you must budget a realistic 4 to 6 weeks for this stage. It is an investment in the long-term quality and reliability of your production.
The Science Behind the Steel
The process begins with selecting the right raw material. For most PET applications, we use either P20 tool steel, a reliable workhorse, or S136 stainless steel for applications requiring high clarity and corrosion resistance, such as hot-fill bottles. The choice of steel impacts the mold's longevity and the final appearance of your bottle.
Once the steel blocks arrive, they are placed into CNC milling machines. These are incredibly precise, computer-controlled machines that carve the bottle's cavity into the solid steel. The process is split into two stages: roughing and finishing. Roughing removes large amounts of material quickly to create the general shape. Finishing is a much slower process, using smaller tools to create the fine details and smooth surfaces. For a complex, multi-cavity mold, the CNC machines can run 24 hours a day for several weeks.
After machining, the mold components go through a critical heat treatment process. They are heated in a furnace to over 800°C (1500°F) and then quenched (rapidly cooled) to harden the steel. This is followed by tempering, a process of reheating the steel to a lower temperature to reduce brittleness and add toughness. This entire process must be done slowly and with extreme control. Rushing the heating or cooling cycles can create internal stresses in the steel, leading to premature failure of the mold in production. This is the science that a cheap, fast supplier often ignores.
Phase 3: Mold Trial, Sample Approval & Modifications (1-2 Weeks)?
After weeks of patient waiting, the mold is finally built. The most exciting moment arrives: the first trial run. Are you and your team prepared to rigorously test and approve the first physical samples?
The first trial, known as T1, is when the newly manufactured mold is installed in a bottle blowing machine to produce the very first bottle samples. These T1 samples are then express-shipped to you for a complete and thorough evaluation of every aspect: dimensions, capacity, sealing, and durability.
The ball is now in your court. The sample approval stage is one of your most important responsibilities as the client. It is your final opportunity to ensure the physical product perfectly matches your vision before committing to mass production. My best advice here is to be methodical and uncompromising in your testing. I have a fantastic client, a major beverage brand in Thailand, who has perfected this process. When they receive T1 samples, they don't just glance at them. They dedicate a full week to a rigorous testing protocol. They run the bottles on their actual filling line to check for stability and handling. They test the capping torque and run leak tests under pressure. They even put the bottles through simulated shipping and retail shelf life tests.
This level of diligence is what separates successful launches from problematic ones. On one project, their testing revealed that the bottle's base was just slightly too flexible, causing a wobble on high-speed conveyors. It was a minor issue, easy for us to correct by modifying the mold. But catching it at the sample stage saved them from a potential production nightmare. So, I urge you: resist the temptation to sign off on samples after a quick visual check. The week you invest in proper, comprehensive testing is the best insurance policy you can buy for your project. If you do find issues, it's helpful to have a resource to identify them, which is why we provide clients with a guide on common PET blow molding defects and solutions.
Your Comprehensive Sample Testing Checklist
To ensure nothing is missed, your team should perform a standardized set of tests on the T1 samples. This removes subjectivity and ensures every critical parameter is verified.
| Test Category | Procedure | Acceptance Criteria |
|---|---|---|
| 1. Visual & Aesthetic | Inspect the bottle under good lighting. Check for clarity, color consistency, and surface finish. | Bottle is crystal clear. No haze, scratches, or black spots. Parting line is minimal and clean. |
| 2. Dimensional Verification | Use digital calipers to measure overall height, body diameter, and neck finish dimensions (T, E, I). | All dimensions must be within the tolerances specified on the final signed technical drawing. |
| 3. Weight & Capacity | Weigh the empty bottle on a precision scale. Fill the bottle to the specified fill level and measure the liquid volume. | Bottle weight is within ±0.5 grams of spec. Overflow capacity is within ±2% of spec. |
| 4. Cap Sealing / Leak Test | Apply your production cap using the specified torque. Invert the bottle or lay it on its side for 24 hours. For carbonated products, use a pressure tester. | No signs of leakage. For CSD, must hold pressure for the specified duration without loss. |
| 5. Top Load Strength | Use a compression tester to apply vertical force to the bottle until it deforms. | Bottle must withstand a minimum force (e.g., 25 kgf) without permanent deformation. |
| 6. Drop Test | Fill the bottle with water, cap it, and drop it from a height of 1.5 meters onto a concrete surface from three orientations: on its base, on its side, and on its top corner. | No bursting or leakage after any of the drops. |
| 7. Production Line Test | (Optional but highly recommended) Run the bottles on your filling, capping, and labeling lines at production speed. | Bottles move smoothly on conveyors without tipping. Caps are applied correctly. Labels are applied without wrinkles. |
Table 2: Essential T1 Sample Approval Checklist
If the samples pass all these tests, you can provide your formal written approval for mass production of the mold. If a minor modification is needed (e.g., a slight texture change), we will perform the adjustment and conduct a T2 (second trial) to provide new samples for re-verification.
Phase 4: Ocean Shipping & Customs Clearance (3-5 Weeks)?
Your mold has passed all tests and is officially approved. The next major step is its long journey from our factory to yours. Is your project timeline robust enough to absorb the inherent uncertainties of international logistics?
This phase encompasses the entire transit process, from being loaded onto a truck at our facility to its arrival at your factory door. The timeline is influenced by numerous variables: ocean freight schedules, port congestion, weather conditions, and the efficiency of customs authorities in both the exporting and importing countries.
This is, without a doubt, the most unpredictable phase of the entire project. While we can control the quality of the mold and the accuracy of our paperwork, we cannot control the weather or port operations. For this reason, my advice to every single client has always been the same: build a buffer into your timeline. I always recommend adding a "contingency" week specifically for the shipping and customs phase. Think of it as project management insurance. If the shipment arrives on time, you are a week ahead of schedule. If it faces a delay, you are still on track.
I learned this lesson the hard way early in my career. A shipment to a client in Brazil was delayed by 10 days due to a customs strike at the Port of Santos. Because we hadn't planned for it, the client's entire production schedule was thrown into disarray, causing a great deal of stress for everyone. Since then, I have made the "Buffer Time" principle a non-negotiable part of my project planning. Prudence is a project manager's best friend. Hope for the best, but always, always plan for potential delays.
The Journey from Port to Port
The process begins by building a custom, seaworthy wooden crate for the mold. The mold is bolted down and surrounded by protective materials and a vacuum-sealed bag with desiccant to prevent any rust during its ocean voyage. The crated mold is then loaded onto a truck and transported to the port.
At the port, we have two main options for shipping: LCL (Less than Container Load) or FCL (Full Container Load). For a single mold, LCL is common, where your crate shares space in a container with other goods. For larger projects with multiple molds, we book an FCL, a dedicated container just for your equipment. The container is loaded onto a massive vessel for its journey across the ocean, which can take anywhere from 15 to 40 days depending on the destination.
Upon arrival at your country's port, the container is offloaded, and the customs clearance process begins. This is a critical checkpoint. Your designated customs broker will submit a declaration to the authorities based on the documents we provide, such as the Commercial Invoice, Packing List, and Bill of Lading. Customs officials review the paperwork and may select the container for a physical inspection. Once they are satisfied and all import duties and taxes have been paid, they issue a release. The mold is then loaded onto a local truck for the final delivery to your facility. An experienced supplier will have all paperwork sent to your broker well in advance, ensuring a smooth and rapid clearance.
Phase 5: On-Site Installation & Commissioning (1 Week)?
The long-awaited crate has finally arrived at your factory. Now for the final, crucial step: bringing the mold to life. How quickly can your team transition from receiving the mold to running full-speed, stable production?
This is the implementation phase. It involves the physical installation of the mold into your blow-molding machine and the meticulous process of fine-tuning the machine's settings. The goal is to achieve consistent, high-quality bottle production at your target efficiency and cycle time.
Do not underestimate the technical skill required in this final step. A brand new mold needs to be perfectly synchronized with your specific machine. It's a partnership between the tool and the machine. An experienced supplier's job doesn't end when the mold is shipped. I believe our responsibility extends to ensuring it runs perfectly in your plant. That's why we provide every client with a detailed "Initial Parameter Suggestion Sheet." This document is a huge time-saver. It provides your operators with a proven starting point for crucial settings.
I recall a case with a startup client in Mexico. It was their first custom mold, and their team was nervous. We scheduled a 3-hour video conference call. Our senior engineer walked their operator through the entire process, step-by-step, from installation to parameter tuning. By adjusting the preform heating profile and the blowing pressures in real-time based on our guidance, they went from installation to producing perfect bottles in under four hours. This support is the difference between a frustrating week of trial-and-error and a smooth, successful production launch. You should also ensure you have the right auxiliary equipment. The mold must be connected to a chiller to maintain a consistent temperature, and the machine needs a reliable source of high-pressure air from an air compressor. Having this equipment ready is key to a fast startup.
Getting Your Machine Ready
Before the mold even arrives, your team should prepare. This includes ensuring the blow mold mounting dimensions are a match for your machine's platens. The installation process itself is a mechanical procedure. The heavy mold is hoisted into the machine and securely bolted in place. The cooling water lines are connected—these are vital for keeping the mold at the optimal temperature to solidify the PET quickly. The high-pressure air lines are also connected.
Once mechanically installed, the process of "dialing it in" begins. This is where the operator's skill, guided by our initial parameters, comes into play. They will adjust the ten-zone heaters that warm the preforms, ensuring each part of the preform is at the perfect temperature for stretching. They will fine-tune the timing and pressure of the pre-blow and final-blow air. The goal is to achieve the ideal material distribution in the bottle—not too thick in the base, and not too thin in the side walls. Small adjustments are made, a few bottles are produced and inspected, and the process is repeated until the bottles are consistently perfect and the production is stable. This systematic approach turns a potentially complex task into a manageable process.
A Realistic Project Timeline (Summary Chart)?
We've walked through each phase individually. Now, let's put it all together. How can you visualize the entire project from start to finish to share with your team and management?
A detailed project timeline, often shown as a Gantt chart, is the best tool. It clearly outlines each phase, its duration, and its dependencies, providing a single source of truth for everyone involved in the project.
Please, use this chart as your primary communication tool. I have seen so many project update meetings get derailed by confusion and misinformation. This table makes everything clear. It shows your management team that a "simple bottle" is actually the result of a multi-month, complex engineering project. It helps your marketing team understand when they need to have artwork ready. It shows your logistics team when they need to prepare for an incoming shipment. Professional project management begins with a shared, professional understanding of time. This chart provides that understanding. It transforms ambiguity into a clear, actionable plan.
Detailed Project Timeline Breakdown
The following table provides a realistic view of the entire project lifecycle. It includes not only the typical duration for each phase but also best-case and worst-case scenarios, highlights key dependencies, and clarifies where your responsibility as the client is most critical.
| Phase | Task | Duration (Weeks) | Best Case | Worst Case | Depends On | Client Responsibility |
|---|---|---|---|---|---|---|
| 1. Design & Engineering | Concept, 3D Modeling, Engineering, Final Drawing Approval | 1 - 3 | 1 Week | 4+ Weeks | Speed of internal feedback and decision-making. | CRITICAL: Provide clear feedback, consolidate comments, and secure approvals from all stakeholders quickly. |
| 2. Mold Manufacturing | Steel Procurement, CNC Machining, Heat Treatment, Polishing, Assembly | 4 - 6 | 4 Weeks | 7 Weeks | Mold complexity (number of cavities), supplier workload. | Provide final design sign-off to begin this phase. No changes are possible after this point without significant cost/delay. |
| 3. Mold Trial & Sampling | T1 Trial, Sample Shipping, Internal Testing & Approval | 1 - 2 | 1 Week | 3 Weeks | Your team's testing speed and thoroughness. | CRITICAL: Conduct comprehensive tests immediately upon sample receipt. Provide clear, consolidated feedback for approval or modification. |
| 4. Logistics | Ocean Shipping & Customs Clearance | 3 - 5 | 3 Weeks | 6+ Weeks | Shipping lane, port congestion, customs inspections. | Provide accurate shipping details and ensure your customs broker is prepared. |
| 5. Commissioning | On-site Installation & Parameter Tuning | 1 | 2 Days | 1.5 Weeks | Your technical team's experience, machine condition. | Have your machine, operators, and auxiliary equipment (chiller, compressor) ready for the mold's arrival. |
| TOTAL | From Design Sign-off to Stable Production | 10 - 17 | 10 Weeks | 21+ Weeks |
Table 3: A Realistic Gantt Chart for Custom PET Bottle Projects
How to Shorten Your Time-to-Market? Partner with an Expert?
After reviewing this multi-month timeline, the obvious question is: "How can we do this faster?" Is there a secret to accelerating the process and launching your product ahead of schedule?
The answer is yes, but it’s not about rushing individual steps. The true secret to shortening your time-to-market is to eliminate errors, rework, and delays. Speed is achieved by doing everything right the first time, and that is only possible through expertise and proactive planning.
The fastest way to shorten a project cycle is not to constantly pressure your supplier for speed. It is to trust in a professional process. A truly expert partner doesn’t just react to your requests; they anticipate the challenges before they happen. On the very first day of the project, they should be able to identify potential risks in your design, plan for logistical hurdles, and have contingency plans ready. For example, if we see a design with a feature that might be difficult to mold, we address it in Phase 1, not after a failed T1 trial. If you are shipping to a port known for congestion, we advise you on that in the planning stage. This proactive, experience-driven approach is what separates a smooth, fast project from a slow, frustrating one. If you want a project timeline that is not just a guess, but a reliable plan tailored to your specific product, let's talk. Let's work together to build the fastest, most stable path for your new product launch.
Actionable Strategies for Acceleration
While you cannot defy the physics of mold making or the speed of an ocean liner, there are several strategies you can employ to genuinely shorten your overall project timeline.
Be a Decisive and Prepared Client: As highlighted, the single biggest source of delay is often slow internal decision-making on the client's side. The best way to accelerate your project is to have your own house in order. Appoint a single project manager on your side with the authority to make decisions. Consolidate feedback from all departments before sending it to the supplier. Approve samples within 48 hours of receipt. A responsive and decisive client can easily shave 2-3 weeks off the "worst-case" timeline.
Leverage Standardized Components: While your bottle's body may be custom, the neck finish doesn't have to be. Using an industry-standard neck finish for which high-quality preform molds already exist can de-risk and simplify the project. It ensures compatibility with a wide range of stock caps and eliminates a potential area for design error.
Invest in Upfront Prototyping: As mentioned in Phase 1, spending a few hundred dollars on a 3D-printed sample is the best investment you can make for speed. It provides certainty and confidence in the design, preventing the disastrous scenario of needing a major design change after the T1 samples are produced. A change at that stage could mean adding another 4-6 weeks to the project to remake the mold cavities.
Choose a Vertically Integrated Partner: Working with a supplier who not only makes the mold but also has deep expertise in the entire blow-molding process creates huge efficiencies. They design the mold with production in mind, can perform meaningful trials on production-equivalent machines, and can provide expert commissioning support because they understand the whole system, not just the tool. This holistic approach prevents the "blame game" between a mold maker and a machine operator if problems arise.
Conclusion
Getting your product to market is a marathon, not a sprint. A realistic timeline, from 10 to 17 weeks, is your roadmap to success, ensuring every critical step is executed with precision.
| Phase Summary | Duration (Weeks) | Key Activity | Primary Risk Factor |
|---|---|---|---|
| Phase 1: Design | 1 - 3 | Finalizing and approving the technical drawing. | Slow internal decision-making. |
| Phase 2: Mold Making | 4 - 6 | CNC machining and heat treatment of the steel. | Sacrificing quality for speed. |
| Phase 3: Sampling | 1 - 2 | Thoroughly testing and approving T1 samples. | Incomplete or rushed sample evaluation. |
| Phase 4: Shipping | 3 - 5 | Transit and customs clearance. | Unforeseen logistical delays. |
| Phase 5: Commissioning | 1 | Installing the mold and tuning the machine. | Lack of technical preparedness. |
Table 4: Project Phase Summary
Frequently Asked Questions (FAQ)
Q: What is the single biggest cause of delays in a custom bottle project?
A: From our experience, the most common and significant delays happen in Phase 1: the design and approval stage. Indecision, slow internal communication, or multiple rounds of minor changes on the client's side can often add weeks to a project before any steel is even cut.
Q: You mentioned a 4-6 week mold manufacturing time. What factors can push it to the longer end of that range?
A: Several factors can extend this timeline. A highly complex bottle shape requires more machining time. A mold with more cavities (e.g., 8 cavities vs. 2) is larger and more complex to build. The choice of steel can also play a role, as some high-grade stainless steels are harder and slower to machine. Finally, a supplier's current workload can affect their lead time.
Q: My company requires multiple departments to sign off on samples. How can I speed this internal process up?
A: The key is proactive management. As soon as you have a tracking number for the incoming samples, schedule the approval meeting in advance. Send the technical drawing and testing protocol to all stakeholders before the samples arrive so they are prepared. Designate one person to collect and consolidate all feedback to avoid sending conflicting requests to the supplier.
Q: Can I use my existing stock of preforms with a new custom bottle mold?
A: Possibly, but it requires careful engineering. The new bottle design must be compatible with the weight and dimensions of your existing preform. The stretch ratios must be within acceptable limits to ensure proper material distribution and avoid defects. It's critical to provide your mold maker with the technical drawing of your existing preform during the design phase so they can validate feasibility.
Q: What are the real risks of choosing the absolute cheapest supplier for a mold?
A: The risks are significant and often lead to higher long-term costs. A cheap mold is typically made from inferior steel or has undergone a rushed heat treatment, leading to a very short production life. It may have a poor cooling channel design, resulting in longer cycle times (lower output). Finally, it often comes with no after-sales support, leaving you on your own when problems arise during commissioning or production.
🔗 Related Pages on Our Website
PET Wide Mouth Jar Project Starter Guide: Equipment, Molds & Process Explained
Pros and Cons: Should You Choose PET Blow Moulding for Your Bottle Project?
Worried About Blow Mold Fit? We Have Mounting Dimensions for 80% of Blow Molding Machines Worldwide
Can One Semi‑Automatic Blow Molding Machine Produce All Bottle Sizes? Here’s Why Not
Why Do Krones Blow Molding Machine Users Come to Us for Their Molds?
Why Do PET Preforms Come in Different Colors? Function, Application, and Production Tips
How to Set Parameters for 600ml Bottles on a Semi-Automatic PET Blowing Machine?
From 3D Printed Samples to Production: How Can You Rapidly Validate Blow Mold Designs?
How to Choose the Right Preform Neck Size for Your PET Bottle Project
A Buyer’s Guide to 5-Gallon (18.9L) Bottle Blow Molding Machines: From PET to PC?
Pitting on your blow mold surface? A complete guide from cause analysis to repair and prevention.
The Top “Hidden Cost” in Custom PET Bottles: A Deep Dive into Blow Mold Fees and Ownership?
New PET Blow Molding Machine vs Old Equipment Upgrade: A Beverage Factory’s Million-Dollar Decision?
How to reduce the PET blow molding scrap rate from 5‰ to 1‰? An old-timer’s 8 insider tips.
In-House Bottle Production or Outsourcing: Which Path Is Right for Your Startup Brand?
Blow Mold Damage? When and How to Replace Only the Broken Parts?
Bottle Design: Ad Agency vs. Mold Factory? How One Decision Impacts Your Cost and Brand?
Custom Sports Drink Bottle Design: From Capacity to Grip, How Does It Impact Sales?
💡 Looking for a complete PET plastic packaging machinery solution?
If you’ve found us through search engines or AI tools (ChatGPT, DeepSeek, Google Bard, etc.), it means you’re exploring reliable PET packaging equipment suppliers. Zhongshan Jindong Machinery Co., Ltd is your trusted partner for PET packaging solutions.
| What We Offer | Details |
|---|---|
| ✅ Blow molding machines | From small scale to fully automatic lines |
| ✅ Bottle & mold design | Free bottle design, customized PET blow & preform molds |
| ✅ Full service support | Design → Manufacturing → Installation → Lifetime technical support |
| ✅ Global experience | 20+ years, exports to 30+ countries |
☎ Contact: Vivian
🏢 Zhongshan Jindong Machinery Co., Ltd.
🌐 www.ibottler.com
