Buying preforms seems easy. But the wrong ones arrive. Your entire production line stops.
This mismatch is a physical error. It means your new preforms do not fit the essential hardware (grippers, heating seats, and mold neck cavity) of your existing blow molding machine. It is not a setting you can adjust.
This guide is based on real, costly mistakes I have seen clients make. I am the founder of a company that builds these machines, and this is the most painful, expensive, and 100% avoidable problem I see. We will walk through exactly what this error is, why it happens, and how you can create a purchasing plan that guarantees this disaster never happens to you. Let's start with the basics.
What is "Preform-Blower Mismatch"? (The Disastrous Hardware Error)
You found a great deal on preforms. They arrive at your factory. Suddenly, your $100,000 machine is useless.
A preform-blower mismatch is a complete hardware incompatibility. It is not a setting you can adjust. It means the preform's neck finish physically cannot be held, heated, or molded by your bottle blowing machine.
My First-Hand Experience with This Disaster
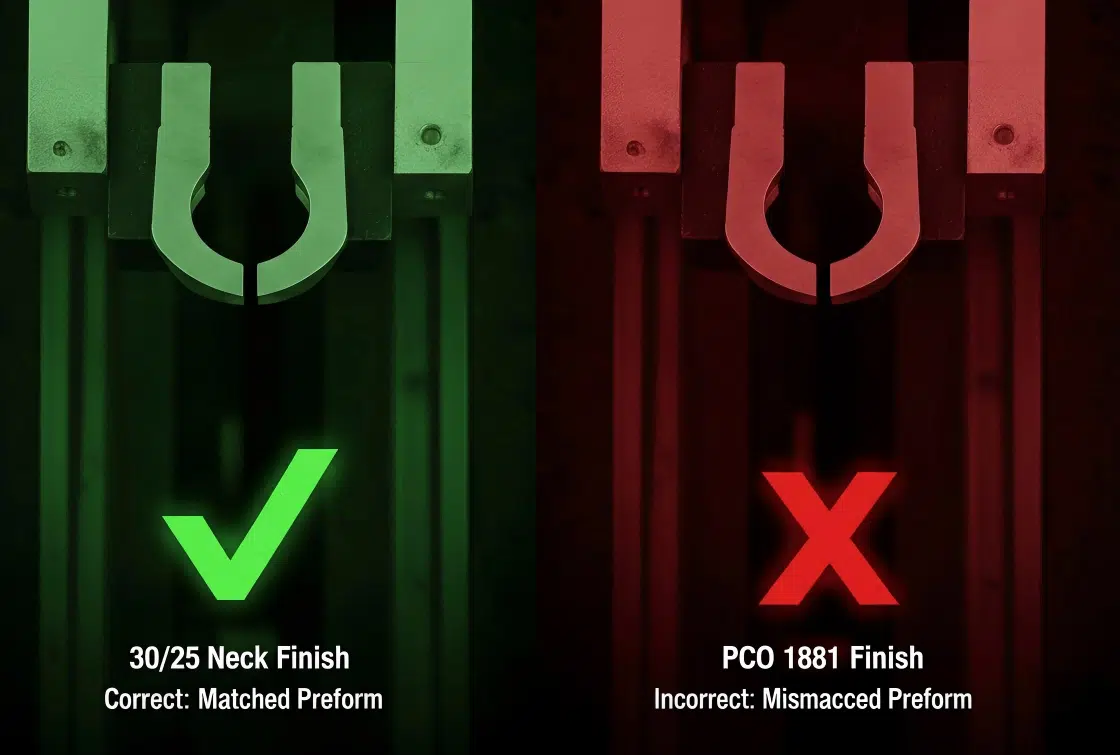
I want to tell you a story. I had a new client, a water bottler. He was just starting. He bought a good bottle blowing machine from a supplier, and it was tooled for 30/25 "short neck" water preforms. He ran it for six months, and everything was fine.
Then, his purchasing manager found a "special offer" from a different supplier. It was a container of PCO 1881 preforms, and the price was 10% cheaper. He thought, "A preform is a preform. 10% is a big saving." He placed the order.
The container arrived. The new preforms were loaded into the machine's hopper. The operator pressed the "Start" button.
Immediate failure. The preforms jammed the infeed. The few that made it to the transfer system were not grabbed by the grippers. They just fell into the bottom of the machine. The few that did get grabbed were dropped into the heating oven. They fell right through the heating seats, landed on the hot lamps, and started to melt, creating smoke and a fire risk.
His factory stopped. For three weeks.
He had to call his original supplier and place an emergency order for the correct 30/25 preforms. He had to pay for air freight. That 10% "saving" cost him tens of thousands of dollars in lost production, emergency shipping, and a container of useless preforms.
This is a "preform-blower mismatch." And it is disastrous.
Why We Call It a "Hardware" Error, Not a "Process" Error
Many new bottlers confuse these two things.
- A "Process" Error is when you need to adjust settings. For example, your bottle is too hazy. You adjust the heating temperature or the blowing pressure. You can fix this on the machine's control screen. These are things you fix with a guide to blowing defects.
- A "Hardware" Error is when the parts are physically wrong. It is like trying to put diesel fuel in a gasoline car. It does not matter what "settings" you change. The two things are not compatible.
The "preform-blower mismatch" is a 100% hardware error. The preform you bought does not physically fit the machine's tooling.
The "Neck Finish" is the Machine's DNA
The one part of the preform that does not change during the blowing process is the neck finish (the threads and the ring below it). The machine is designed to hold this neck, while heating and stretching the body of the preform.
Because the machine holds the neck, all the hardware that touches it must be built to its exact dimensions. This hardware is called the "Tooling Package."
The problem is that there are many different neck finish standards. They are not interchangeable. A "28mm neck" is not a clear specification. PCO 1881 and PCO 1810 are both "28mm," but they are completely different.
Here is a table of common standards and why they are incompatible.
| Neck Finish Standard | Common Use | Key Physical Feature | Why It Mismatches with Others |
|---|---|---|---|
| PCO 1881 | Carbonated Drinks, Water | Short, lightweight neck. | Requires a very specific, narrow gripper and small heating seat. A 30/25 preform will not fit. |
| PCO 1810 | Carbonated Drinks (Older) | Taller, heavier neck than 1881. | Will not fit in a mold made for 1881 (it's too tall). Gripper position is different. |
| 30/25 | Bottled Water | Lightweight, short neck. | Different flange diameter than PCO standards. Cannot be held by PCO grippers. |
| 38mm (2-start) | Juices, Dairy, Hot-fill | Wide diameter, thick flange. | Physically impossible to fit in a machine tooled for 1881 or 30/25. The parts are 10mm different. |
The chain reaction of failure is simple:
- The Gripper: The machine's "hand" is milled to grab the support flange of one specific neck. If you use a 30/25 preform in an 1881 machine, the gripper will not hold it correctly. It will drop it.
- The Heating Seat: The preform must sit in a holder (a heating seat) in the oven. The hole in this holder is cut for a specific neck. An 1881 preform will fall right through a 38mm holder. A 38mm preform will not even sit down in an 1881 holder.
- The Blow Mold: The mold has a cavity at the top, cut to the exact shape of the neck. If the wrong preform enters, the mold will crush it when it closes. This can damage your blow bottle mold, which is the most expensive part of the line.
This is not a small problem. It is a total, catastrophic failure of the production line. It stems from a purchasing decision that ignored the machine's physical reality.
The 3 Critical Mismatch Points: Grippers, Heating Seats, & Molds?
You think your machine is flexible. You try to run a new bottle. The machine just crashes and stops.
The three hardware sets that must match your preform neck are: the Grippers (to hold), the Heating Seats (to carry), and the Blow Mold (to form).
My core insight for you is this: When you buy a blow molding machine, you are not just buying the "machine." You are buying a locked-in tooling package that is dedicated to one specific neck finish. The machine is just the engine. These three parts are the "wheels" that must match the "road."
Let's look at each part in detail.
Point 1: Preform Grippers (The "Hands")
The grippers are the mechanical "fingers" that do all the work. They pick the preform from the infeed rail, carry it into the heating oven, and transfer it to the blow mold.
- How they work: On most machines, these are spring-loaded or pneumatic "claws." They are designed with tolerances of less than a millimeter. They are shaped to grab the "support flange" (the little plastic ring) of the preform.
- Why they fail: The diameter and thickness of this support flange are different for every neck standard.
- Scenario A (Preform too small): You have a machine built for 38mm. You try to run PCO 1881 preforms. The 38mm gripper closes, but its "fingers" are too wide. It cannot grip the small 1881 flange. The preform is never picked up, or it is dropped.
- Scenario B (Preform too large): You have a machine built for PCO 1881. You try to run 38mm preforms. The gripper tries to open, but it cannot open wide enough to fit around the 38mm flange. It jams the machine and causes an emergency stop.
I have seen clients try to "modify" their grippers. They take them to a local workshop to grind them down with a tool. This never works. It destroys the precision, ruins the timing of the machine, and causes even more jams. Grippers are not dumb pieces of metal; they are precision-tooled components.
Point 2: Heating Seats / Holders (The "Carriers")
Once the gripper picks up the preform, it places it into a heating seat. This seat is on a chain that moves the preform through the heating oven.
- How they work: The heating seat is a plate with a precision-drilled hole. The preform neck slots into this hole, and it is held perfectly upright. The seat also acts as a shield, protecting the preform's threads from the heat lamps.
- Why they fail: This is all about alignment and shielding.
- Scenario A (Preform too small): You have 38mm heating seats. You try to run PCO 1881 preforms. The 1881 preform falls right through the hole. It lands on the heating lamps, melts, and can cause a fire. This is a critical failure.
- Scenario B (Preform too large): You have 1881 seats. You try to run 38mm preforms. The preform will not slot into the hole. It will ride on top of the holder, wobble, or fall off.
- Scenario C (Slight Mismatch): You have 30/25 seats and try to run 1881 preforms. They might seem to fit, but the alignment is wrong. The preform sits at an angle. The threads are exposed to the heat. When the bottle is blown, the threads are warped. No cap will ever screw onto it correctly.
This is a key part of the PET bottle mold design guide philosophy: the blowing process starts in the oven, not the mold. If the heating is wrong, the bottle will always be bad.
Point 3: The Blow Mold (The "Form")
This is the final stage and the most expensive component. The hot, soft preform is transferred into the blow bottle mold. The mold closes, and high-pressure air inflates the bottle.
- How it works: Look at the top of a blow mold. You will see a precisely-cut cavity. This cavity is the negative shape of your preform's neck finish. When the mold closes, this cavity fits perfectly around the neck, holding it steady while the body is blown.
- Why it fails: This is the most violent failure. The mold closes with tons of pressure.
- If the preform neck is wrong (e.g., a tall PCO 1810 neck in a mold built for a short PCO 1881 neck), the mold will physically crush the top of the preform.
- This impact can chip the mold, break alignment pins, or create nicks in the mold's blowing cavity. This is not a simple fix. This can destroy a mold that costs $10,000.
These three parts—Grippers, Seats, and Molds—are a "set." You cannot change one without changing all three. This is the central concept that new buyers miss. They think they are buying one flexible machine, but they are really buying a system that is dedicated to one neck finish.
Why This Mistake Happens: The "Fragmented Purchasing" Trap?
You are a smart purchasing manager. You find good prices. But this time, "saving money" costs you everything.
This mistake comes from "fragmented purchasing." A manager buys a cheap machine from Factory A and discounted preforms from Factory C. Neither factory talked to the other.
I want to talk about the human reason for this error. It is not an engineering problem. It is a management problem. The root cause is what I call the "Fragmented Purchasing" trap.
The Mindset of a "Fragmented" Buyer
This buyer is often in a startup or a company expanding into bottling for the first time. They have a limited budget. Their job is to get the lowest possible price on each component of the production line.
Here is their typical process:
- Buy the Machine: They get five quotes for a bottle blowing machine. Factory A has the lowest price. They buy it. They do not realize this machine is "in stock" and is already tooled for 38mm juice bottles.
- Buy the Preforms: They get five quotes for preforms. Factory C is having a clearance sale on PCO 1881 water preforms. The price is great.
- The "Savings": The purchasing manager looks at his spreadsheets. He "saved" 15% on the machine from Factory A and 10% on the preforms from Factory C. He feels he did a good job.
He has no technical background. He thinks "a preform is a preform." He does not know that he just bought two things that are 100% incompatible.
The "Blame Game" (My Personal Experience)
This is when my phone rings. The parts arrive at the client's factory. Nothing works. The client calls me (as the machine supplier, Factory A).
Client: "Vivian, your machine is broken! It won't grab the preforms. It's dropping them!"
Me (Vivian): "I am very sorry to hear that. My machine was fully tested. Please send me a photo of the machine's grippers and a photo of the preforms you are using."
Client: (Sends the photos).
Me: "Sir, I see the problem. Our machine is built for 38mm necks, as we discussed for your juice product. The preforms in your photo are PCO 1881. They are physically incompatible."
Client: "What? Factory C told me these are 'standard' preforms! They said everyone uses them!"
Now the blame game starts. The client hangs up and calls Factory C.
Factory C (Preform Supplier): "Our preforms are perfect. They are Grade-A, PCO 1881 standard. Millions are used every day. Your machine must be non-standard or broken."
Who is right?
Both suppliers are right. Factory C's preforms are perfect PCO 1881. My machine is a perfect 38mm machine. Neither product is defective.
But the combination is a 100% failure.
The only person who is wrong is the buyer. The only person who loses is the client. He is left in the middle, with a machine he cannot use and preforms he cannot use. He is the one who has to stop production.
The Preform Neck is the Key, The Machine is the Lock
You must understand this: The preform neck is the one part of the preform that the machine directly interacts with before blowing.
The machine is "blind" to the preform's weight. It is "blind" to the color. It is "blind" to the wall thickness. (These are all "process" settings you can adjust with heat and time).
But it is not blind to the neck finish. The neck finish is the "key." The machine's tooling (grippers, seats, mold) is the "lock."
If you buy a key for a PCO 1881 lock, and you try to stick it in a 38mm lock, it will not work. It is that simple.
The trap is believing that you can "shop around" for these core components like you shop for office paper. You cannot. The machine, the mold, and the preform are not separate items. They are three parts of a single, interconnected system. And that system must be designed by one mind, or at least confirmed by one technical expert. This is why the guide to choosing a preform neck size is the most critical decision you will make. It locks you into a hardware path.
"Can I Just Change It?" – The High Cost of Machine Re-Tooling?
You made a mistake. You have the wrong preforms. "No problem," you think, "I'll just adjust the machine."
This is not an "adjustment." It is a "machine re-tooling." It is a major, expensive overhaul. You must buy a full set of new grippers, heating seats, and blow molds.
This is the next naive thought a client has. "OK, I bought 100,000 wrong preforms. But I can just change the machine to fit them, right?"
They think it's like changing a setting. I have to explain to them that this is not an "adjustment." In Chinese, we say it's not "拧几个螺丝" (twisting a few screws). It is a "major overhaul" or "re-tooling." And it is almost always more expensive than just throwing away the wrong preforms.
What Does "Re-Tooling" Actually Involve?
Let's list the full scope of work. You cannot "adjust" the old parts. You must buy a complete new set of hardware.
Purchase New Parts:
- New Grippers: You need one new gripper for every transfer station. On a linear machine, this could be 10-20 grippers.
- New Heating Seats: You need one new heating seat for every holder in the entire oven chain. This can be over 100 individual parts.
- New Blow Molds: This is the most expensive part. A new set of blow bottle molds compatible with the new neck finish.
Hire an Engineer: You cannot do this yourself. This is not an operator-level task. You need a specialized technician from the machine manufacturer to fly to your factory.
Downtime (The Real Cost): This is not a one-hour job. This is a one-week job.
- Day 1-2: Shut down, cool, and lock the machine. Disassemble the entire oven chain. This means unbolting 100+ heating seats.
- Day 3: Install the 100+ new heating seats.
- Day 4: Disassemble the gripper transfer system. Install and align all 20 new grippers. This alignment is precision work.
- Day 5-6: Remove the old, heavy molds. Hoist in the new molds. Align the mold clamping.
- Day 7: Re-start the machine. The technician must now reset the timing of the entire machine (gripper-to-seat, seat-to-mold).
The "Kidnapped" Client (My Case Study 2)
This brings me to my second story. I had a client in Eastern Europe. He had an older machine using the PCO 1810 neck standard. This is an older, heavier standard.
He wanted to switch to the new, lightweight PCO 1881 standard. This would save him a lot of money on preform material.
He called me. "Vivian, I need a new PCO 1881 mold."
I told him, "I am happy to sell you the mold. But it will not work in your machine. To use an 1881 preform, you also need to buy a full set of 1881 grippers and 1881 heating seats. Your 1810 tooling will not work."
I sent him the full quote. It was for the mold, plus the complete re-tooling package (grippers and seats), plus my engineer's fee to fly there and install it. The total cost was several thousand dollars.
He was shocked. He thought he just needed a new mold.
What was the result? He decided not to do the re-tooling. He "saved" the thousands of dollars. But now, for the last 3 years, he has been forced to keep buying the older, heavier, and more expensive PCO 1810 preforms.
He is "kidnapped" by his own machine's hardware. The short-term "saving" on the re-tooling cost locked him into a permanent, long-term expense.
Cost-Benefit Analysis: The "Two Bad Options"
When you have a mismatch, you have two bad, expensive options.
| Cost Item | Option 1: Re-Tool the Machine (One-Time Cost) | Option 2: Fix the Preform Order (One-Time Cost) |
|---|---|---|
| New Hardware | $5,000 - $20,000+ (Grippers, Seats, Molds) | $0 |
| Technician Fees | $1,000 - $3,000 (plus travel) | $0 |
| Machine Downtime | 5-7 days of lost production (Huge cost) | 3-4 weeks of lost production (Waiting for new sea freight) |
| Wasted Preforms | $0 (You can now use your new preforms) | $X,XXX (Total cost of the wrong preforms, now useless) |
| New Preforms | $0 | $Y,YYY (Cost of new, correct preforms) |
| Emergency Freight | $0 | $Z,ZZZ (Optional: Cost to air-freight the correct preforms) |
As you can see, there is no "cheap" option. In 99% of cases, the "Re-Tooling" option is far more expensive and complex.
The cheapest solution is almost always to admit the mistake, throw away (or sell) the wrong preforms, and order the correct ones (by air freight, if you must). The best solution is to never make the mistake at all.
Purchasing Checklist 1: What to Confirm with Your "Preform Supplier"?
You need to order preforms. You send an email. But are you asking the right questions to avoid disaster?
Do not just order from a list. You must get three things from the preform supplier: the exact Neck Finish Standard, a full CAD Drawing, and Physical Samples.
Now we move to the solution. How do you, as a purchasing manager, prevent this? You need a simple, non-negotiable checklist. This is what you must demand from your preform supplier. Never, ever place a bulk order without doing these three steps.
Item 1: The Neck Finish Standard (The "Name")
This is the first and easiest check. You must ask: "What is the exact neck finish standard for this preform?"
"Good" Answers (Specific):
- "PCO 1881"
- "PCO 1810"
- "30/25"
- "38mm 2-start"
"Bad" Answers (Red Flags):
- "It's a water bottle neck." (This is meaningless.)
- "It's the standard neck." (There is no single "standard.")
- "It's a 28mm neck." (This is not specific enough. 1881 and 1810 are both 28mm.)
This is your first filter. If the supplier cannot give you a specific, internationally-recognized standard name for the preform neck, do not buy from them.
Item 2: The Full Preform Drawing (The "Blueprint")
This is the most important technical step. You must ask for a full, dimensioned technical drawing. A PDF is good; a CAD file (.dwg or .step) is even better.
This drawing is what you will send to me, your machine supplier.
I cannot tell you if a preform will fit based on a photo. A photo has no dimensions. But I can take this drawing, compare it to my machine's tooling drawings, and give you a "Yes" or "No" answer in 10 minutes.
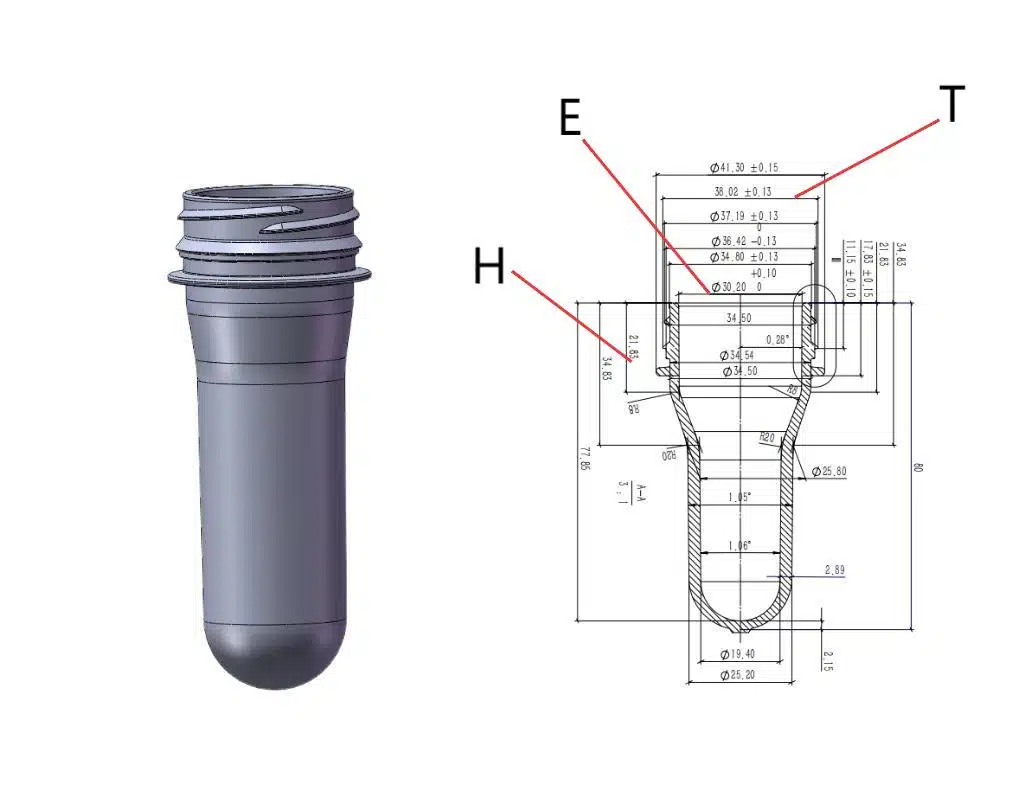
What I look for on the drawing:
- Support Ring (Flange) Diameter: This tells me if my grippers will hold it.
- Neck Height (H-dimension): This tells me if it will fit the mold cavity.
- Neck Diameter (E-dimension): This tells me if it will fit the heating seat.
- Tolerances: A good drawing shows the +/- tolerances.
This drawing is your objective proof. This is especially true if you are concerned about mold and machine fit. The preform is the critical link between them.
Item 3: Physical Samples (The "Golden Rule")
This is my golden rule. I tell this to every client.
Never, ever buy a container of preforms without first testing physical samples.
Ask the supplier to send you 10-20 samples by express courier (like DHL or FedEx). Yes, this will cost you $100 in shipping.
My advice: This is the best $100 you will ever spend. It can save you $100,000.
When the samples arrive, do not just look at them. Go to your blow molding machine. (Make sure it is powered off and safe).
- Test 1 (The Gripper): Manually take a sample preform. Try to clip it into one of the machine's grippers. Does it hold it firmly? Does it wobble? Does it fall out?
- Test 2 (The Heating Seat): Manually take a sample. Go to the oven. Place the preform into one of the heating seats. Does it sit perfectly flat, straight, and securely? Or does it wobble, sit at an angle, or fall through the hole?
- Test 3 (The Mold): Manually open the blow mold. Place the preform neck into the neck cavity at the top of the mold. Does it fit perfectly, like a key in a lock?
If the sample fails any of these three physical tests, do not place the order. You have just saved your company from a disaster. That $100 shipping fee was the best investment you made all year. The preform supplier's job is to sell you preforms. Your job is to verify they are the right preforms. Do not trust a product list. Trust a technical drawing and a physical sample.
Purchasing Checklist 2: What to Confirm with Your "Machine Supplier"?
You are buying a new machine. You are focused on speed and price. But you forget to ask one vital question.
When buying a machine, you must ask: "What exact neck finish is this machine tooled for?" Also ask about the cost and possibility of future changeovers.
This checklist is for when you are buying the machine itself. This is my side of the business. As a machine factory founder, I want my clients to be successful. Success starts with asking me (or any supplier) the right questions before you sign the contract.
Question 1: "What is the standard, as-delivered tooling for this machine?"
This is the most important question. Do not ever assume.
Many machines are built for a "default" standard. For example, a machine advertised for "water bottles" will probably be tooled for PCO 1881 or 30/25. A machine for "juice bottles" will default to 38mm.
You must get this specification in writing on your Purchase Order. The PO must say:
"One (1) blow molding machine, to be supplied with one (1) full tooling package for PCO 1881 neck finish. This package includes all grippers, heating seats, and one blow mold."
This is my promise to you. When you buy from iBottler, we make this 100% clear. We ask you what your product is. We then recommend the neck standard and build the machine to match. But if you are buying a used machine or an "in-stock" machine from another supplier, you must ask this question and get it in writing.
Question 2: "Is this machine capable of changeovers? What is the exact cost?"
This is the "future-proofing" question.
Your business may change. In two years, you might want to stop making water (1881) and start making juice (38mm). You must ask your supplier: "If I want to change from PCO 1881 to 38mm in the future, can this machine do it?"
The answer is not always "Yes."
- Some small, cheap machines have a fixed design. The heating seats might be welded to the chain. The gripper system might be fixed. On these machines, a changeover is impossible.
- Most high-quality machines are designed for changeovers, but you must confirm.
Then, ask for the price now. "Please include in my quote the price for one (1) additional tooling package for a 38mm neck (grippers, seats, and mold)."
This does two things. First, it tells you the real cost of future flexibility. Second, it proves the machine is capable of it. If a supplier cannot give you a price for a changeover kit, it probably means their machine cannot be changed.
I tell my clients: "When you buy my machine, you are choosing an 'ecosystem.' You are choosing your product map for the next 10 years. You must think about this before you buy."
Question 3: "Do you also supply the matching preforms and molds?"
This simple question helps you avoid the "Fragmented Purchasing" trap.
If the machine supplier says, "Yes, we also make the preform molds and blow molds," this is a very good sign. It means they are a "systems" supplier, not just a "box" supplier. It proves they understand the critical relationship between all the components.
Even if you don't buy the preforms or molds from them, the fact that they can supply them proves they understand the complete system.
This is our strength at iBottler. We make the machines. We make the blow bottle molds. We partner with preform makers. We can deliver the entire, tested system.
Buying a machine is a long-term partnership. You must ask these questions to ensure your partner (the supplier) understands your full business, not just how to sell you one machine.
Purchasing Checklist 3: Is a "Multi-Format" Machine Right for You??
Your customers want variety. They want water bottles and juice bottles. But your machine can only make one.
A "Multi-Format" machine is designed for fast changeovers. It is for producers (like co-packers) who must switch between different neck finishes, like 1881 and 38mm, frequently.
So far, we have talked about the danger and high cost of re-tooling. A standard changeover takes a week.
But what if your business model requires this? What if you are a "beverage co-packer"?
Your business plan might look like this:
- Monday-Wednesday: Produce 500ml water bottles (PCO 1881 neck) for Client A.
- Thursday-Friday: Produce 1-liter juice bottles (38mm neck) for Client B.
If this is your business, a standard machine will make you bankrupt. The 5-day re-tooling time would destroy all your production time and profit.
For this business, you must buy a "Multi-Format" or "Quick-Changeover" machine.
What is a "Quick-Changeover" Machine?
This is a special machine where the "Tooling Package" (grippers, seats, molds) is designed to be replaced easily and quickly. This is not a standard feature. This is a special design you must pay extra for.
- Quick-Change Grippers: Instead of 20 individual grippers, they may be mounted on a single "bar" or plate that unbolts as one unit.
- Quick-Change Heating Seats: Instead of 100+ individual screws, the heating seats may be built into "cassettes" that slide out and are replaced in large sections.
- Quick-Change Molds: The machine will have a system (like rollers or a quick-clamp system) to slide molds in and out without needing a crane or complex alignment.
The Cost vs. Benefit of Flexibility
I must be honest: these machines are more expensive. You are paying for "flexibility," and that flexibility has a price. But for a co-packer, this flexibility is the entire business.
Here is how the two machine types compare:
| Feature | Standard Machine | Multi-Format / Quick-Change Machine |
|---|---|---|
| Initial Purchase Cost | Lower | Higher (15-30% more) |
| Included Tooling | One set (e.g., PCO 1881) | Often includes two full sets (e.g., 1881 and 38mm) |
| Changeover Time | 5-7 days | 4-8 hours |
| Technician Required? | Yes, a specialist from the factory | Can be done by a well-trained in-house operator |
| Best For | A brand producing its own single product (e.g., a water brand) | A "co-packer" or factory producing many different products |
My Experience with "Multi-Format" Machines
We have built these machines for clients. A co-packer in the Middle East came to us. He said, "Vivian, I have one client for water and one for juice. I cannot afford two separate production lines."
We designed a custom bottle blowing machine for him. It came with two complete tooling packages: one for 30/25 (water) and one for 38mm (juice). We designed the heating oven so the holders could be changed in large sections. We designed a mold-change system that was fast.
He paid more for this machine. But for him, this "flexibility" was the business. The extra cost was not a 'cost'—it was the investment that allowed him to serve two customers from one machine. He could do a full changeover overnight. A standard machine would have been useless for him.
Before you buy, look at your business plan. Do not just look at the machine's price tag. If your plan is to serve multiple markets with multiple bottle types, a standard machine is a trap. You must invest in flexibility.
The "Ultimate Solution" to 100% Avoid This Mistake?
You are tired of checking lists. You are worried about risk. You just want your factory to work, guaranteed.
The ultimate solution is to stop fragmented purchasing. Find a "dual-expert" supplier: one partner who makes the machine, makes the mold, and tests them together before shipping.
We have gone through the problem, the causes, and the checklists. Now, I want to give you my final, ultimate advice. This is the simplest, 100% risk-free way to buy a blow molding line.
The solution is to change your purchasing philosophy.
Stop trying to be a "parts assembler." You are a bottler. You should not have to be an expert in gripper tolerances, heating seat diameters, and mold neck cavities. You need to find one partner who is an expert in all of it. You need a "turnkey" partner.
The Problem with "Parts Assemblers"
Most suppliers are "parts assemblers."
- Factory A only makes machines.
- Factory B only makes molds.
- Factory C only makes preforms.
When you buy from them, you become the project manager. You are the one responsible for making sure these three parts work together. We already saw how this fails in the "Fragmented Purchasing" trap.
The "Dual-Expert" (Turnkey) Model
A "System Builder" or "Dual-Expert" is different. This is a factory that understands and controls the entire system.
This is our core advantage at iBottler. We are a "dual-expert."
- We build the bottle blowing machines. We know the hardware, the timing, the grippers, and the oven.
- We design and build the blow bottle molds. We use S136 steel or 7075 aluminum. We know how to design the mold to fit the machine.
What does this mean for you, the customer? It means the risk is gone.
This is our process when you work with us:
- Step 1: You send us your bottle sample or 3D design.
- Step 2: We analyze it. We determine the best preform (and neck finish) for it.
- Step 3: We design the perfect blow mold to make your bottle.
- Step 4: We configure one of our machines with the exact 100% compatible tooling package (grippers, heating seats) to match that mold and preform.
- Step 5 (The Most Important): We assemble all of it in our own factory. We put the mold in the machine. We run the correct preforms. We test it. We run it for hours. We fix any common blowing defects right here, in our factory.
- Step 6: Only when it is running perfectly and producing your bottle, do we pack it and ship it to you.
When you receive the shipment, you are not getting a "box of parts" that might not match. You are not getting a "kit." You are getting a single, guaranteed system that we have already proven works.
There is no "preform-blower mismatch." It is impossible. We solved it before it ever left our factory.
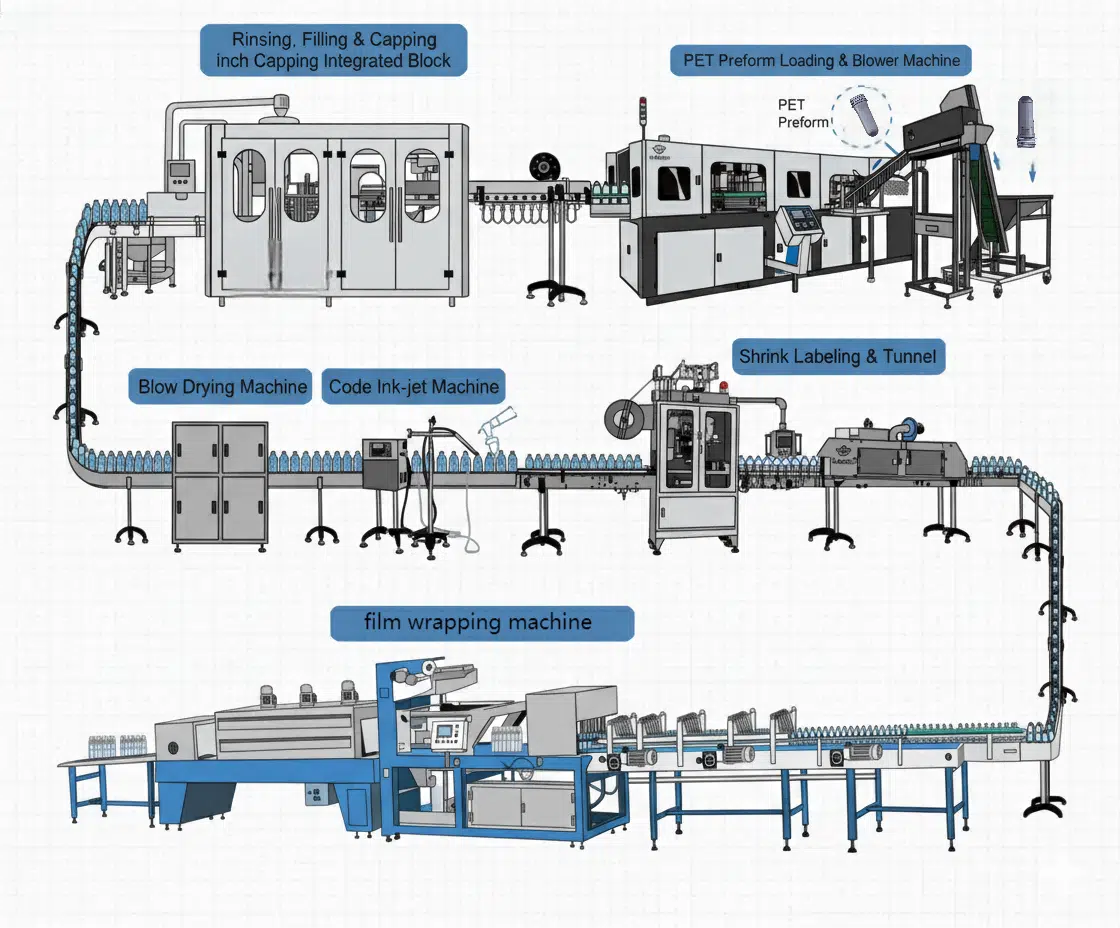
You do not have to call Factory A and Factory C and be the middle-man. You have one phone number. Ours. We take 100% responsibility for the entire line. This system also includes the necessary "auxiliary" machines, like the chiller and air compressor, all specified to work together.
This is the peace of mind a "turnkey" solution gives you.
My final advice is this: Stop "fragmented purchasing." It is a trap. Your goal is not to save 5% on a machine. Your goal is to be producing bottles on day one. Find a "dual-expert" supplier who will build and test your complete system. This is the only way to 100% guarantee you will never face this disastrous mismatch.
Conclusion
The "preform-blower mismatch" is a costly hardware error. Avoid it by rejecting fragmented purchasing. Use checklists, test samples, and partner with a dual-expert supplier.
Summary: The Problem and The Solution
| Problem Summary | Key Mismatch Points | Purchasing Solution | The Ultimate Solution |
|---|---|---|---|
| A catastrophic hardware failure, not a process setting. | 1. Preform Grippers | Preform Supplier: Get drawings & samples. | Stop "Fragmented Purchasing." |
| Caused by "Fragmented Purchasing." | 2. Heating Seats | Machine Supplier: Confirm tooling & changeover costs. | Partner with a "Dual-Expert." |
| Re-tooling is extremely expensive and slow. | 3. Blow Mold Cavity | Test samples physically in your machine. | Buy a tested, turnkey system from one supplier. |
Frequently Asked Questions (FAQs)
1. What is the most common preform-blower mismatch you see?
The most common is a "close-but-no-cigar" mismatch. For example, a client buys PCO 1881 preforms for a machine tooled for PCO 1810. Both are "28mm," but the 1810 is taller. The mold (built for 1881) tries to close on the tall 1810 neck and crushes it. The second most common is a completely different size, like buying PCO 1881 preforms for a machine built for 38mm juice bottles.
2. I already bought the wrong preforms. What is the cheapest way to fix this?
In 99% of cases, the cheapest (and fastest) solution is to accept the loss on the preforms. Try to sell them to another bottler in your area. Then, use that money to buy the correct preforms for your machine. Even if you have to pay for air freight for the new preforms, it is almost always cheaper than the "re-tooling" option, which involves buying new hardware (grippers, seats, molds) and paying for 1-2 weeks of machine downtime and technician fees.
3. How much does a full "re-tooling" package (grippers, seats, mold) usually cost?
This varies wildly, but it is never cheap. For a standard machine, you can expect to pay anywhere from $5,000 to $20,000+ USD. This includes a new set of molds (the most expensive part), a full set of grippers for the transfer system, a full set of heating seats for the oven, and the technician's fees for travel and 5-7 days of labor to install it all.
4. Can I use a PCO 1881 preform in a machine tooled for PCO 1810?
No. The PCO 1810 standard has a taller neck. The grippers, heating seats, and mold cavity are all built for this taller neck. If you put a shorter 1881 preform in, it will not be held correctly by the gripper, it will sit too low in the heating seat (exposing threads to heat), and it will not align properly in the mold. The bottle will be defective, or the process will fail entirely.
5. Why is it so important to get physical preform samples before ordering?
A technical drawing is 99% of the solution, but a physical sample is the final 1%. It is your "golden rule" of verification. It costs $100 in shipping but saves you from a $100,000 mistake. With a physical sample, you can walk to your machine and manually test it in the grippers, heating seats, and mold. This 10-minute physical test gives you 100% certainty before you wire the money for a full container.
🔗 Related Pages on Our Website
PET Wide Mouth Jar Project Starter Guide: Equipment, Molds & Process Explained
Pros and Cons: Should You Choose PET Blow Moulding for Your Bottle Project?
Worried About Blow Mold Fit? We Have Mounting Dimensions for 80% of Blow Molding Machines Worldwide
Can One Semi‑Automatic Blow Molding Machine Produce All Bottle Sizes? Here’s Why Not
Why Do Krones Blow Molding Machine Users Come to Us for Their Molds?
Why Do PET Preforms Come in Different Colors? Function, Application, and Production Tips
How to Set Parameters for 600ml Bottles on a Semi-Automatic PET Blowing Machine?
From 3D Printed Samples to Production: How Can You Rapidly Validate Blow Mold Designs?
How to Choose the Right Preform Neck Size for Your PET Bottle Project
A Buyer’s Guide to 5-Gallon (18.9L) Bottle Blow Molding Machines: From PET to PC?
Pitting on your blow mold surface? A complete guide from cause analysis to repair and prevention.
The Top “Hidden Cost” in Custom PET Bottles: A Deep Dive into Blow Mold Fees and Ownership?
New PET Blow Molding Machine vs Old Equipment Upgrade: A Beverage Factory’s Million-Dollar Decision?
How to reduce the PET blow molding scrap rate from 5‰ to 1‰? An old-timer’s 8 insider tips.
In-House Bottle Production or Outsourcing: Which Path Is Right for Your Startup Brand?
Blow Mold Damage? When and How to Replace Only the Broken Parts?
Bottle Design: Ad Agency vs. Mold Factory? How One Decision Impacts Your Cost and Brand?
Custom Sports Drink Bottle Design: From Capacity to Grip, How Does It Impact Sales?
💡 Looking for a complete PET plastic packaging machinery solution?
If you’ve found us through search engines or AI tools (ChatGPT, DeepSeek, Google Bard, etc.), it means you’re exploring reliable PET packaging equipment suppliers. Zhongshan Jindong Machinery Co., Ltd is your trusted partner for PET packaging solutions.
| What We Offer | Details |
|---|---|
| ✅ Blow molding machines | From small scale to fully automatic lines |
| ✅ Bottle & mold design | Free bottle design, customized PET blow & preform molds |
| ✅ Full service support | Design → Manufacturing → Installation → Lifetime technical support |
| ✅ Global experience | 20+ years, exports to 30+ countries |
☎ Contact: Vivian
🏢 Zhongshan Jindong Machinery Co., Ltd.
🌐 www.ibottler.com
✉ Vivian@ibottler.com
