Buying PET preforms feels risky. You get samples that look perfect. But you worry the bulk order will be different and cause a disaster.
Yes, you should worry. The three most common "fatal" mistakes in a preform inspection checklist are: only checking the cap fit, ignoring the inner diameter, and trusting a "golden sample" instead of demanding samples from all mold cavities. These mistakes can shut down your entire production line.

These samples in your hand hold the key to your success or failure. They look simple, but they hide secrets. I've seen clients lose tens of thousands of dollars because they missed one tiny detail in the PET preform sample testing. Let's break down exactly what you need to look for, starting with the biggest risk of all.
Why Sample Testing is The Cheapest Insurance You Can Buy?
You want to save money. Skipping a $100 test on a preform sample seems like an easy win. But what if that simple test could prevent a $50,000 disaster?
Sample testing is your only guarantee that the bulk order will match the "Golden Sample." Skipping it is a gamble. A $50,000 bulk order could be completely useless, shutting down your factory, all to save $100 on testing or shipping fees.
The "Golden Sample" vs. "Bulk Order" Reality?
This is the biggest risk in sourcing preforms. The "Golden Sample" is the small batch your supplier sends you. It's what they want you to see. It is often perfect, made with care on their best machine, or even hand-picked from a large batch.
The "Bulk Order" is the reality. It's 500,000 preforms made on a long, continuous production run. This run includes machine warm-up, operator changes, and material batch switches. The bulk order is never as perfect as the golden sample.
The entire purpose of sample testing is to discover how different the bulk order will be. I've seen the blame game start so many times. The samples work. The client pays. The bulk order arrives, and the machines jam. The supplier says, "But the sample was fine!" Your money is gone, and your factory is stopped.
My First Rule: Never Trust a "Spec Sheet" Over a Physical Sample?
As a factory founder, this is my number one piece of advice. A spec sheet is just paper. It lists theoretical dimensions, like "Neck Finish: PCO 1881" or "Weight: 21g."
A spec sheet cannot jam your bottle blowing machine. A physical preform with a 0.5mm error will.
I tell all my new clients: The paper tells you what should be. The physical sample tells you what is. You must test what is.
Why are spec sheets unreliable?
- They hide tolerances: A spec sheet might say 28mm, but the standard allows a range (e.g., 27.8mm to 28.2mm). Is your machine set for the low end or the high end?
- They don't show material quality: It says "100% Virgin PET." But is it? Is the IV value correct for your application? We will cover this later.
- They don't show production stability: The spec sheet is a design. It doesn't prove the supplier can manufacture that design 10,000 times in a row without deviation.
A Real-World Example: The $50,000 Mistake?
I had a client in the beverage industry. He was launching a new juice line. He found a new, very cheap preform supplier. He received the samples, they looked great. He even screwed a cap on. It fit perfectly.
He decided to skip the full physical test blowing. He wanted to save the $200 international courier fee to send the preform samples to us (his machine supplier).
He placed an order for two containers, worth about $50,000.
The preforms arrived. He started his brand-new production line. Nothing worked. The preforms jammed the unscrambler. The preforms that did make it into the oven blew unevenly, with some bursting.
He called me, frantic. We had him send the bulk preforms and his original "golden samples."
The problem was clear in 5 minutes. The "golden samples" were perfect. The bulk order preforms had a tiny, almost invisible "flashing" (a thin fin of excess plastic) on the neck support ring. It was less than 0.3mm.
This tiny flaw was enough to trip the sensors on his high-speed automatic line, causing jams. His factory was stopped for three weeks as he argued with the supplier and waited for new preforms.
He lost the $50,000, plus three weeks of production. All to save $200.
This is why I call sample testing insurance. It's the cheapest policy you will ever buy. You are not just testing the preform. You are testing your supplier's ability to maintain quality.
What Are You Actually Testing?
When you test a sample, you are verifying three critical things. This is the framework I use.
- Dimensional Accuracy (The "Fit"): Does it fit your machine? Does it fit the cap? Does it fit the filling head? This is what Mistake 1 and 2 are about.
- Material Quality (The "Performance"): Is it the right plastic? Is the IV value correct? Is it free of internal stress? This is what we cover in a later section.
- Production Consistency (The "Stability"): Can the supplier make 100,000 of these exactly the same? This is what Mistake 3 (All Cavities) is about.
You must test all three. Most people only check #1, and even then, they do it wrong. This isn't just about avoiding a loss. It's about building a stable, profitable business. You cannot build a factory on an unstable foundation. And in the blowing business, your PET preform samples are your foundation.
Mistake 1: Only Checking the "Cap Fit," Ignoring the "Filling Head" Match?
You got the samples. You grab a cap and twist it on. It fits! You think you are safe. But the most dangerous part of the neck finish isn't for the cap.
A cap fitting is not a real test. The "fatal" error is ignoring the filling head match. If the neck ring height or diameter is off by just 0.8mm, your filling machine can't seal. This causes liquid to spray everywhere and stops production.
.png.webp)
Why "Cap Fit" is a Deceptive Test?
This is the most common mistake I see. A buyer gets a preform, screws on the cap, and says, "Looks good."
This is an amateur move. Here's why it's so dangerous:
- Caps are flexible: Most caps (especially for water) are made of HDPE or PP. They are designed to flex and seal, even on a slightly imperfect neck. A cap can feel tight, but it might not be sealed correctly against leaks.
- Caps don't test the whole neck: The cap only interacts with the threads. It doesn't interact with the support ring (the part the machine holds) or the space below the threads.
The real precision parts of your line are the filling machine and the capping machine, not the cap itself.
The Real Killer: Filling Head and Capper Head Mismatch?
Let's talk about your production line. It doesn't just use the threads.
- The Filling Head: On an automatic filling machine, a filling "bell" or "head" descends over the preform neck. It creates a tight seal before it injects the liquid. This is critical for carbonated drinks (CSD) to maintain pressure, and for hygienic filling to prevent contamination.
- The Capping Head (Chuck): The capping machine's "chuck" grips the cap and applies a precise, consistent torque (twisting force) to seal it.
These machines are not flexible. They are built to exact international standards, like PCO 1881 or 30/25. A guide to preform neck sizes will show you these standards. They are precise to fractions of a millimeter.
My Customer Case: The 0.8mm Disaster?
I have a perfect, painful example. A client in Mexico was launching a new carbonated soda. He bought a high-speed filling line designed for the PCO 1881 neck finish.
He found a preform supplier who was 15% cheaper. He got samples. He did the "cap test." It fit.
He sent the samples to us. We took one look and called him. "Do not buy these," I said.
He asked why. We measured the "H" dimension (the total height of the neck finish). The standard for PCO 1881 is 17mm. His sample was 16.2mm. It was 0.8mm too short.
He didn't believe us. He said, "Vivian, the cap fits. My supplier said it's 1881."
He placed the order.
Two months later, he calls me. His factory is stopped. His new filling machine was spraying soda everywhere.
Why? The filling heads were designed for a 17mm "H" dimension. When they came down, the 16.2mm neck was too short. The seal couldn't engage. When the carbonated liquid was injected, it shot out the gap.
But it got worse. His capping machine's chucks were also set for a 17mm neck. They couldn't apply the correct downward pressure and torque. Caps were spinning, or "cocked" (crooked).
He thought he saved 15%. He ended up scrapping the entire preform order and shutting down his new line for a month. He had to pay us to fly an engineer to reset his entire filling and capping line to match these "non-standard" preforms, which cost him thousands.
What You Must Do Instead?
You must get a "neck finish drawing" or "specification sheet" for the preform. You must use digital calipers to measure the key dimensions.
Here is a simple table of what to check for a standard PCO 1881 neck.
| Dimension | Standard (PCO 1881) | Why It's Critical (The "Fatal" Mistake) |
|---|---|---|
| T (Thread Diameter) | 27.28mm - 27.68mm | Cap Fit: This is what most people check. If it's too big, the cap won't go on. Too small, it's loose. |
| E (Neck ID) | 21.74mm - 22.00mm | Sealing: The cap's "plug" seals against this inner diameter. If it's too big, it will leak. |
| H (Neck Height) | 16.75mm - 17.25mm | Filling/Capping Head: This is the killer. If it's too short (like my client's 16.2mm), the filling head won't seal, and the capper won't apply torque. |
| Support Ring (Diameter) | 32.70mm - 33.30mm | Machine Handling: This ring is what the blowing machine and filling line use to hold and transport the preform. If it's wrong, it gets dropped or jammed. |
Do not just "test the cap." Measure the 'H' and 'Support Ring' dimensions. These are the parts that talk to your machines. Your machines are much less forgiving than a simple cap.
Mistake 2: Ignoring Tiny Tolerances in the "Preform Inner Diameter"?
The outside of the preform looks perfect. But inside, a hidden problem is waiting. A tiny error in the inner diameter (ID) can bring your automation to a halt.
This is an "automation killer." If the preform inner diameter has a large tolerance, or if the preform is oval (not round), it will jam. Your automatic loading machine and heating seats cannot handle this. This stops your entire bottle blowing machine line.

Why the Inner Diameter (ID) Matters More in Automatic Machines?
Many new buyers don't understand this. They might be used to semi-automatic machines.
On a semi-automatic machine, a human worker takes each preform and places it by hand onto the heating seats (mandrels). A human is flexible. If a preform is slightly oval, the worker will unconsciously squeeze it round. If it's a tight fit, they'll push harder. The machine keeps running.
On a fully-automatic machine, there is no human. There is a preform unscrambler, a loading rail, and a robotic arm with multiple "mandrels" or "spindles." This system works at high speed. It expects every preform to be identical.
The robotic arm's mandrels (which go inside the preform) are designed with a very tight tolerance. They have to hold the preform securely as it moves through the heating oven.
The "Automation Killer" Case Study?
I had a client in the USA who bought one of our high-speed automatic bottle blowing machines. He was upgrading from an old semi-automatic line. He kept his old preform supplier to save money.
He called us, very angry. "Your machine is terrible! It jams every 5 minutes. The preforms are falling off the heating seats!"
We knew our machine was good. We sent an engineer. I joined the video call. Our engineer didn't look at the machine. He asked for a box of the client's preforms.
He took 10 preforms and tried to slide them onto a single heating mandrel by hand.
- 5 of them slid on easily.
- 3 of them were very tight.
- 2 of them wouldn't go on at all.
He took his calipers and measured the inner diameter. The spec was 22mm. The "good" preforms were 22.05mm. The "tight" ones were 21.90mm. The "bad" ones were 21.80mm and slightly oval.
The problem wasn't our machine. The problem was his preforms. His old semi-automatic machine (and his workers) had hidden this problem for years. His new, precise automatic machine revealed it instantly.
What Happens Inside the Oven?
This is where the jam becomes a disaster. Let's say the preform does get forced onto the heating seat, but it's "crooked" (not vertical).
The preform then travels through the heating oven. Because it is tilted, one side gets closer to the heating lamps.
- One side gets roasted: The plastic gets too hot, turns white, and crystallizes.
- The other side is cold: The plastic doesn't get enough heat.
The preform goes into the blow mold. The "hot" side blows out and becomes paper-thin, or even bursts. The "cold" side doesn't stretch properly and becomes a thick, hard chunk.
The result is a 100% defect rate. The client sees these terrible bottles and blames the blowing machine. He starts changing heating settings, air pressure... nothing works. He is trying to fix the symptom (bad bottles). The root cause is a bad preform inner diameter. This is a classic example of common PET blow molding defects that are actually caused by the preform, not the machine.
How to Check for ID and Ovality?
You cannot do this with your eyes.
- The "Go/No-Go" Test: The best way is to ask your machine supplier (like us, iBottler) for a spare heating seat mandrel. It's a "Go/No-Go" gauge. Every sample you get should slide onto it perfectly with zero "slop" and zero "forcing."
- The Caliper Test: If you don't have a mandrel, use digital calipers.
- Measure the ID at one point (e.g., "top to bottom").
- Rotate the calipers 90 degrees and measure again ("left to right").
- These two numbers should be almost identical. If they are different (e.g., 22.1mm and 22.5mm), your preform is oval.
- This "ovality" is a sign of a bad mold or an unstable injection process (like bad cooling).
Check 10-20 samples. If you find even one bad one, it's a huge red flag for the bulk order.
Mistake 3: Trusting the "Golden Sample," Not Demanding "All Cavities"?
Your supplier sends 10 perfect samples. You approve them. But what about the other 38? This is the most hidden trap in the industry, and it's where professionals get caught.
Never trust 10 "golden samples." A preform mold might have 48 cavities. The supplier may send 10 samples from the best cavity (#5). You must demand samples from all cavities (#1 through #48), clearly labeled. A bad cavity (#21) will create defects in your bulk order.
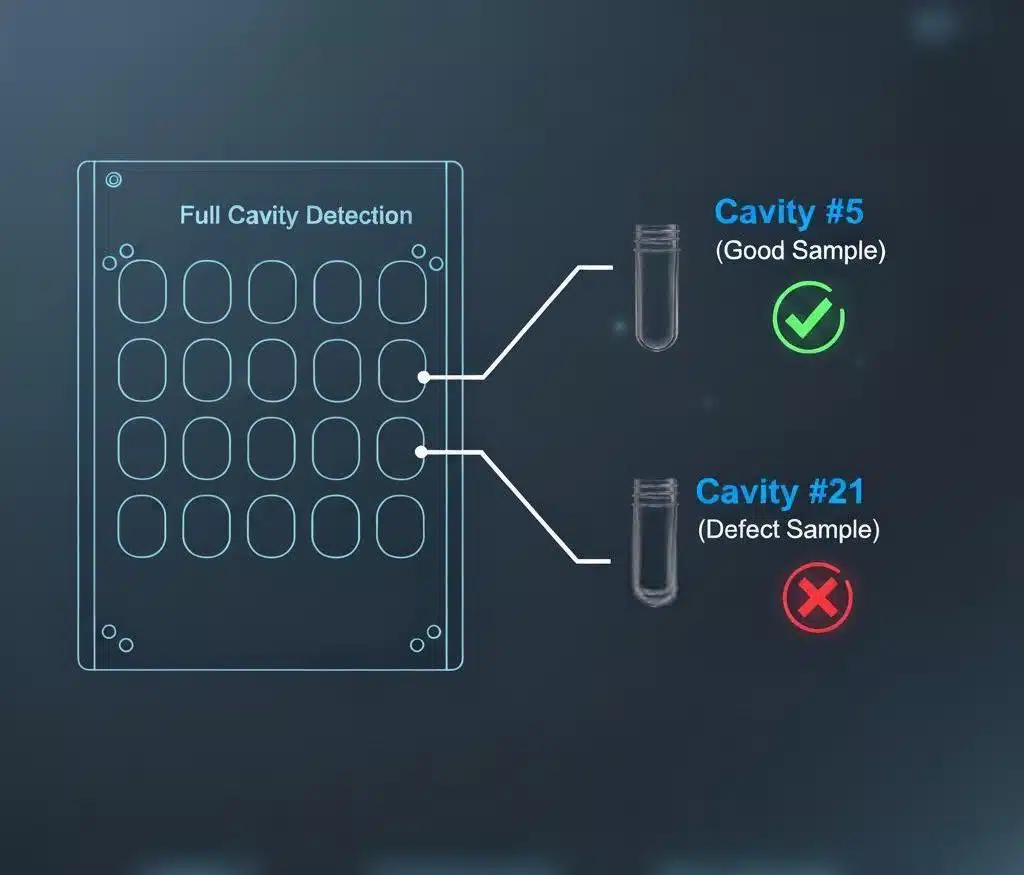
What is a "Cavity" and Why Does it Matter?
This is the most "insider" advice I can give you. A preform mold is a large, complex block of steel. To make preforms quickly, it doesn't make just one at a time. It might make 16, 32, 48, or even 96 preforms in a single "shot" (injection cycle).
Each individual "hole" that forms a preform is called a cavity.
A 48-cavity mold is not one mold. It is 48 small, individual molds bolted into one large frame. Each of these 48 cavities has its own cooling channels, its own valve gate (maybe), and its own unique position in the mold.
The "Perfect #5, Broken #21" Problem?
In a perfect world, all 48 cavities are identical. We do not live in a perfect world. In reality, a large mold is very hard to balance.
- Cavity #5: Might be in the center, get perfect plastic flow, perfect cooling. It produces a "golden sample" every time.
- Cavity #21: Might have a slightly blocked cooling channel. The preform doesn't cool fast enough. It comes out slightly deformed.
- Cavity #34: Might be at the far edge. The plastic flow is slower. The preform has a "cold spot" or internal stress.
So, what does a clever (or dishonest) supplier do? They run the machine. They collect all the preforms. They sort them. They take the 10 most beautiful preforms (all from Cavity #5) and mail them to you.
You test them. They are perfect! You approve the order.
But when your bulk order arrives, it's a mix from all 48 cavities. This means 1/48th of your order (from #21) is bad, and 1/48th (from #34) is also bad. You now have a 4.1% defect rate guaranteed in your production. This is a disaster.
My "All Cavities" Contract Rule?
This happened to me when I was just starting my factory. I learned the hard way. Now, I tell all my clients: You must write this into your purchase contract.
The clause should say: "As a condition of purchase, the supplier must provide [e.g., 5] samples from every cavity of the production mold (e.g., #1 through #48). Each sample must be in a separate bag, clearly labeled with its cavity number."
What does this do?
- It scares away bad suppliers. A supplier with a bad, unbalanced mold cannot provide this. They will make excuses. They will say "It's too much trouble" or "They are all the same."
- It gives you the real picture. When you get 48 little bags, you can test the consistency of the supplier.
If a supplier refuses to provide all-cavity samples, stop the negotiation immediately. This is the biggest red flag in the preform purchasing guide.
How to Test All-Cavity Samples?
When you receive these 48 bags, you do a "consistency test." The most important test is weight.
Get a high-precision digital scale (one that reads to 0.01g). Create a simple spreadsheet. Weigh one preform from each cavity.
| Cavity # | Weight (g) | Difference from Average | Pass/Fail |
|---|---|---|---|
| #1 | 21.05g | +0.02g | Pass |
| #2 | 21.01g | -0.02g | Pass |
| ... | ... | ... | ... |
| #21 | 21.89g | +0.86g | FAIL |
| ... | ... | ... | ... |
| #48 | 21.03g | +0.00g | Pass |
A good, stable, high-quality mold should have a weight difference between cavities of no more than +/- 0.1g. Honestly, I look for +/- 0.05g.
If you see a cavity like #21 that is 0.8g heavier? That is a massive problem. It means the hot runner system is unbalanced. That preform will never blow correctly. It will have a thick, heavy bottom.
By doing this, you are not just testing a preform. You are testing the supplier's multi-million dollar mold... from your desk.
How Do I "Scientifically" Test the Samples?
You have the samples. You've avoided the first 3 mistakes. Now, how do you move from "looking" at them to "scientifically testing" them? What do the professionals do?
**To test scientifically, you must:
- Weigh them: Check for consistency across all cavities (+/- 0.1g).
- Use a Polariscope: Check for internal stress (rainbow patterns are bad).
- Test blow them: This is the most important step. You must blow them on a real machine.**
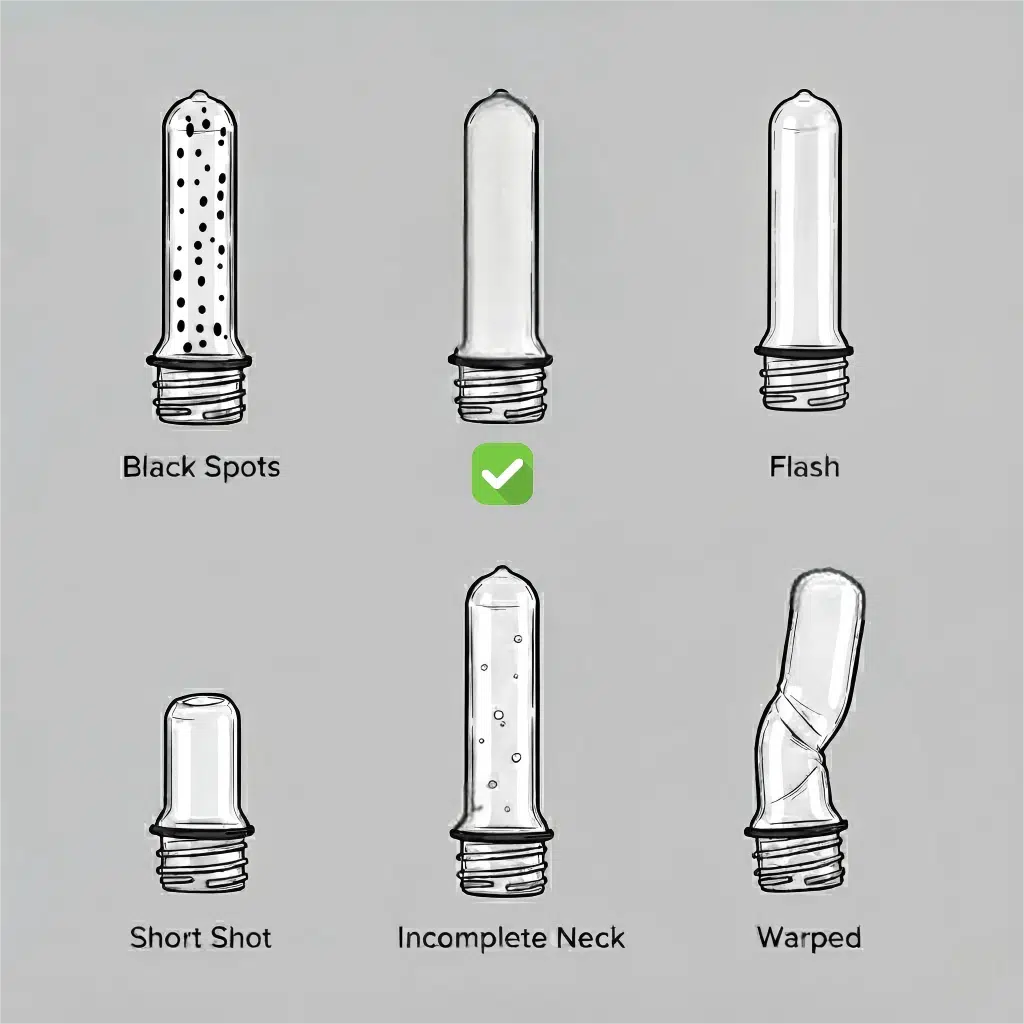
Step 1: Visual and Dimensional Checks (The Baseline)?
Before the high-tech tests, do the simple ones.
- Look for Contamination: Hold the preform up to a bright light. Do you see any black specks? This is burnt plastic or contamination. It will cause holes when blowing.
- Look for Bubbles: Do you see air bubbles, especially in the gate area (the bottom tip)? This is a sign of "stringing" or moisture in the PET.
- Look for "Pearliness" (Crystallinity): Does any part look hazy or milky-white? This is "crystallinity," which means the plastic was held at the wrong temperature. A crystallized preform will not blow. It will burst.
- Measure: Use your digital calipers to check the H, T, and E dimensions we discussed in Mistake #1. And check the inner diameter for ovality as we discussed in Mistake #2.
Step 2: Weight Consistency (The "All Cavity" Test)?
As I explained in the last section, this is your primary test for consistency. Get that digital scale. Weigh every single sample you received from all cavities.
The variation should be tiny, ideally within +/- 0.1 gram. A high-end mold can achieve +/- 0.05 gram.
If you see a large variation (e.g., one preform is 21.0g and another is 21.5g), you have a massive problem. This means the supplier's hot runner system is unbalanced. A 0.5g difference in preform weight will result in a 0.5g difference in the bottle. This means your bottle walls will be inconsistent, leading to failures in a top-load or drop test.
Step 3: The Polariscope (Seeing the "Invisible" Stress)?
This is a special tool that professionals use. It's called a Polariscope, or "stress viewer." It uses polarized light to show you the internal stress patterns inside the preform.
You place the preform in the viewer.
- What you want to see: A nice, simple, faint "cross" pattern, with very little color. This is a low-stress preform.
- What you don't want to see: Bright, concentrated "rainbow" patterns, especially near the gate (the bottom tip).
These "rainbows" are areas of high molecular stress. When you try to stretch and blow this preform, that stressed area will not stretch properly. It will either be too thin, or it will burst.
This test is critical for complex PET bottle mold designs. A simple water bottle can handle some stress. A complex, square-shaped cosmetic bottle cannot.
Step 4: Test Blowing (The Final Exam)?
This is the single most important test. You cannot skip this.
Visual checks, weight checks, and stress checks are all predictors of success. Test blowing is the proof of success.
You must send the samples to your bottle blowing machine factory.
Why us? As "Dual Experts" in both machines and molds, we (iBottler) know exactly what to look for. When you send us your samples, we don't just "blow a bottle." We do a full process validation.
- Process Window: We find the "perfect" recipe (heating, pressure, time). Then, we see how "wide" the process window is. Can we lower the heat by 5 degrees and it still blows well? Can we raise it? A good preform has a wide window, making it easy to run. A bad preform has a narrow window (it only works at exactly 98°C), which is a nightmare for production.
- Stretch Ratio: Is the preform design correct for the bottle? Is the stretch ratio good?
- Material (IV): We can tell by the "feel" of the process if the IV value is correct. Does it stretch easily (like water bottle material) or is it stiff (like CSD material)?
- Cycle Time: Can this preform produce a perfect bottle at your target cycle time (e.g., 1.8 seconds)? Or do we have to slow the machine down to 2.5 seconds to make it work? Slowing down is costing you money.
Within 10 minutes of running your samples, I can tell you if your supplier is good or bad. This test is the ultimate insurance.
Beyond Dimensions: Checking the "Invisible" Material (IV Value)?
The preform dimensions are perfect. The weight is consistent. You think you are safe. But a supplier can still cheat you in a way you can't see, and it can be explosive.
The "invisible" property is the material's Intrinsic Viscosity (IV). This is the strength of the PET. Suppliers can use cheaper, low-IV "water bottle" material (e.g., 0.80) for "soda bottle" preforms. The preforms look identical, but they will explode or deform when filled with CO2.
What is Intrinsic Viscosity (IV) and Why Does it Matter?
This is a bit technical, but it's critical. PET (Polyethylene terephthalate) is a polymer, which means it's made of long chains of molecules.
Intrinsic Viscosity (IV) is a measurement of the length of these polymer chains.
- High IV (e.g., 0.84 dL/g): Long chains. Very strong, tough, and stiff.
- Low IV (e.g., 0.78 dL/g): Shorter chains. Softer, less strong.
The IV value of the raw PET resin determines the strength and performance of your final bottle.
The "Wrong Material" Trap?
Different applications require different IV values. High-IV resin is more expensive than low-IV resin.
This creates a major "cheating" opportunity for suppliers. They can say they are using high-IV resin, but use cheaper low-IV resin. The preforms will look identical. They will weigh the same. They will pass all dimensional checks. But the performance will be a disaster.
| Application | Required IV (approx.) | Why it's Needed | The "Fatal Mistake" |
|---|---|---|---|
| Water Bottles | 0.78 - 0.80 dL/g | Standard strength, good clarity. This is the "standard" resin. | Using this for CSD. |
| Carbonated (CSD) | 0.82 - 0.85 dL/g | High strength. Must resist pressure from CO2 gas without deforming ("creeping"). | Supplier uses 0.80 resin. The bottles look fine, but they explode in storage or deform on the shelf. |
| Hot-Fill Bottles | 0.82 - 0.85 dL/g | High thermal stability. Must resist deforming when filled with hot liquid (e.g., 85°C juice). | Supplier uses 0.80 resin. The bottles shrink and deform (paneling) as soon as the hot juice is filled. |
| Large Water Jugs (5L) | 0.82+ dL/g | High melt strength. Needed to blow large, heavy bottles without sagging. | Supplier uses 0.80 resin. The bottles blow with uneven walls and fail drop tests. |
My Case Study: The Exploding Soda Bottles?
I had a client in Africa launching a new soda brand. He was competing with Coke and Pepsi. He ordered CSD preforms (PCO 1881, 25g) from a new supplier.
He sent them to us for test blowing.
My machine operator, who has 20 years of experience, ran them. He came to me and said, "Vivian, this is not CSD material."
I asked how he knew. He said, "It feels 'soft' in the oven. It's stretching too easily."
We blew the bottles. They looked beautiful. Crystal clear, perfect shape. We sent them to the client. He was happy.
I called him. I said, "We have a problem. We think this is water bottle material. You cannot fill this with CO2."
He didn't listen. He thought we were just trying to sell him our preforms.
He started production. He filled 50,000 bottles with his new soda.
A week later, he called me, screaming. His warehouse was a mess. Bottles were exploding on the pallets. The ones that didn't explode were "creeping" - the base was bulging out, and they were falling over.
He had to scrap the entire production run. The supplier had used 0.80 IV resin to save a few cents per preform. This "invisible" cheat cost my client tens of thousands of dollars and his first product launch.
How to Verify the IV Value?
This is very difficult for a buyer, as it requires a lab test.
- Demand a "Certificate of Analysis" (CoA): You must ask the preform supplier for the CoA for the specific batch of PET resin they used to make your samples. This document comes from the resin manufacturer (like Sinopec or Indorama) and will state the IV value.
- Ask for the Resin Bag: Ask them to send a photo of the resin bag they are using. The bag will have the grade and IV value printed on it.
- Professional Test Blowing: This is the practical test. An experienced machine supplier (like us) can feel the difference during blowing. A low-IV preform behaves very differently in the oven from a high-IV preform. It's not a lab number, but it's a 99% accurate real-world test.
Don't Just Check the Preform, Check Your "Cap"?
Your preform samples are perfect. They passed all tests. You are ready to order. But did you check them with the other half of the equation?
A perfect preform and a perfect cap can still fail. This is called "tolerance stacking." The preform might be at the "maximum" allowed size, and the cap at the "minimum." Both are "in spec," but they won't seal together, causing slow leaks. You must test your preforms and caps together.
What is "Tolerance Stacking"?
This is another "pro-level" concept that many buyers miss. Every manufactured part has a "tolerance." A part is never exactly 28.000mm. An international standard (like PCO 1881) gives a range.
- Example: Preform Thread Diameter (T): 27.28mm (min) to 27.68mm (max)
- Example: Cap Inner Thread Diameter: 27.78mm (min) to 28.08mm (max)
This creates a "window" for parts to work.
How "In-Spec" Parts Can Fail?
Now, let's see how this breaks.
Scenario A: The "Loose Fit" (Chronic Leaker)
- Your preform supplier (Factory A) makes their preforms at the minimum tolerance: 27.28mm. This is "in spec."
- Your cap supplier (Factory B) makes their caps at the maximum tolerance: 28.08mm. This is also "in spec."
- The result? The gap between them is huge. The cap screws on, but the threads don't engage tightly. The cap's internal "plug seal" or "liner" cannot be compressed enough.
- You get chronic, slow leaks. This is terrible for carbonated drinks. The CO2 leaks out over 2-3 weeks. The customer gets a flat soda. They blame your brand, not the cap.
Scenario B: The "Tight Fit" (Production Jam)
- Your preform supplier (Factory A) makes their preforms at the maximum tolerance: 27.68mm. ("In spec.")
- Your cap supplier (Factory B) makes their caps at the minimum tolerance: 27.78mm. ("In spec.")
- The result? The fit is extremely tight. The cap is hard to screw on.
- On your high-speed automatic capping machine, this is a disaster. The capping chucks will try to apply the cap, feel high resistance, and "fault out," thinking the cap is crooked.
- This is called "high torque." You will get constant machine stops, or "cocked caps" that are not sealed.
My Case Study: The Two "Good" Suppliers?
I had a client who was a co-packer. He bought preforms from Factory A and caps from Factory B. He called me, frustrated. "My line is leaking. But I sent the preforms to Factory B, and they said the caps fit! And I sent the caps to Factory A, and they said the preforms fit!"
He was stuck in the middle. Both suppliers showed him reports proving their parts were "in spec."
Both were telling the truth.
The problem was "tolerance stacking." Factory A was "max-spec" and Factory B was "min-spec." He was the only one losing.
The solution? We had to source new caps for him that were "mid-spec" to work with his "max-spec" preforms.
The Solution: The "Master-Pair" Test?
You cannot buy preforms in a vacuum. You cannot buy caps in a vacuum. You must always test them together before you approve a bulk order.
My Rule: When you ask for preform samples, you must also send a bag of your approved caps to the preform supplier. And, when you ask for cap samples, you must also send some of your approved preforms to the cap supplier.
But most importantly: You must have both samples at your factory (or at our iBottler factory) and test them together.
The Test:
- Hand Fit: Screw them on by hand. Does it feel smooth? Too tight? Too loose?
- Leak Test: Blow the preform, fill the bottle with water (and CO2 if it's CSD), and cap it.
- Pressure Test: Squeeze the bottle hard. Does any air or water escape?
- Invert Test: Turn the bottle upside down and leave it for 24 hours. Check for leaks.
This simple "master-pair" test reveals tolerance stacking before it costs you a fortune.
How to Avoid a "Sample Disaster" from the Start?
These mistakes are terrifying. Testing is complex. As a startup, how can you possibly manage all these risks? You feel overwhelmed and worried you will miss something.
You can avoid this. The root cause of sample disasters is a "fragmented" supply chain. You buy a machine from A, molds from B, and preforms from C. They all blame each other. The solution is a "Dual Expert" partner who guarantees the entire system.
The Root Problem: Fragmented Supply Chains?
Let's look at the typical "disaster" scenario. A new beverage company buys:
- A bottle blowing machine from Factory A (China).
- A blow mold from Factory B (Taiwan).
- Preforms from Factory C (local).
- Caps from Factory D (local).
The line stops. The bottles are bad. Who do you call?
You call Factory A. They say, "Our machine is fine. Your preform is bad."
You call Factory C. They say, "Our preform is fine. Your mold is bad."
You call Factory B. They say, "Our mold is fine. Your machine settings are wrong."
This is the "blame game." I see it every single week. The buyer is trapped in the middle, and their factory is stopped.
Our Philosophy: The "Dual Expert" Partner?
This is why I built my company, iBottler (Jindong), on a different philosophy. We are "Dual Experts."
- We are a Machine Factory: We design and build high-performance bottle blowing machines. We know the process. We know the heating, the stretching, the air pressure.
- We are a Mold Factory: We design and build high-precision PET blow molds. We know the tooling. We know the steel, the cooling, the tolerances.
Because we are experts in both, we can see the whole system. We understand how a 0.5mm change in a mold design will affect the machine's heating profile. We know how a machine's pre-blow timing will affect a bottle's wall thickness. We even have data on mounting dimensions for 80% of blow molding machines worldwide, so we can ensure compatibility.
How This Solves Your Sample Problem?
When you partner with a Dual Expert like us, you don't need to become a preform testing expert. We take on that risk for you. Here are the two paths we offer:
Path 1: We Give You the "Answer Key"
- You buy the machine from us.
- You tell us your bottle goal.
- We don't just sell you a machine. We use our mold expertise to design the perfect preform for your bottle.
- We give you the "100% Guaranteed-to-Match" Preform Drawing.
- You simply take this drawing to any preform supplier and say, "Make this."
- The risk is gone. You are not "guessing." You are giving them the exact blueprint that we guarantee will work perfectly with our machine and your mold.
Path 2: The "Turnkey" Solution
- This is for clients who want zero risk.
- You come to us. We provide the entire package:
- The bottle blowing machine.
- The perfectly matched blow mold.
- We can even source and supply the guaranteed, pre-tested preforms.
- We can do 3D printed samples to validate the design first.
- We set up the entire line, including the air compressor and chiller, and hand you the keys when it's producing perfect bottles.
In both cases, you are not buying "parts." You are buying a guaranteed result. You don't need to be a testing expert. You just need a partner who can guarantee the machine, mold, and preform all work together as one system. That is the only way to truly avoid a sample disaster from the start.
Conclusion
Stop gambling on "golden samples." These three mistakes—cap fit, inner diameter, and cavity variance—are fatal. The only way to win is to test scientifically, or to choose a partner who guarantees the entire system.
Article Summary: Key Preform Testing Points
| Mistake / Test | Why It's "Fatal" | How to Test Correctly |
|---|---|---|
| Mistake 1: Cap Fit | Ignores the filling head and capper chuck. A 0.8mm height error can stop the entire filling line. | Use digital calipers. Measure "H" (Height) and "Support Ring" dimensions, not just the threads. |
| Mistake 2: Inner Diameter | "Automation Killer." Oval or tight IDs will jam automatic loading systems and cause uneven heating in the oven. | Use a "Go/No-Go" gauge (a spare heating mandrel) or use calipers to check for ovality (ID in 2 directions). |
| Mistake 3: All Cavities | Suppliers send "golden samples" from the best cavity. A 48-cavity mold has 48 different potential failure points. | Demand samples from all cavities, labeled. Weigh them on a precision scale. Variation should be < +/- 0.1g. |
| Test 4: Material (IV) | "Invisible" cheat. Using cheap, low-IV (water) resin for CSD preforms will cause bottles to explode or deform. | Demand the resin's "Certificate of Analysis" (CoA) and send samples for a professional test blow. |
| Test 5: Cap Match | "Tolerance Stacking." A "max-spec" preform and "min-spec" cap can cause chronic leaks even if both are "in-spec." | Always test your exact preform samples with your exact cap samples together (Hand-fit and leak test). |
Frequently Asked Questions (FAQs)
1. What is the most common preform neck finish standard?
The two most popular standards are PCO 1881 (for CSD and water, "short neck") and PCO 1810 (the older, "taller neck"). Another common one is 30/25 (for water, very lightweight). It is critical to know which one your filling and capping line is designed for.
2. Can I use a PCO 1881 preform with a 30/25 cap?
No. They are completely different standards. The diameters, heights, and thread profiles are not compatible. This will result in 100% failure.
3. What happens if my preform weight is inconsistent?
Inconsistent preform weight (e.g., from different cavities) directly causes inconsistent bottle wall thickness. A heavier preform will create a bottle with a thick, heavy base. A lighter preform will create a bottle with paper-thin walls that fail drop tests. This is a primary indicator of a low-quality supplier.
4. How much does a "test blow" service usually cost?
Many machine suppliers (like us, iBottler) will perform this service for free or for a small fee ($100-$300) for potential clients. This fee is tiny compared to the $50,000+ risk of buying bad preforms. It is the best "insurance" you can buy.
5. Why is my preform turning white (crystallizing) in the oven?
This is almost always a heating problem. It means a part of the preform is getting too hot. The most common cause is a bad preform (like we discussed in Mistake #2). If the preform is loaded "crooked" on the heating seat, one side gets too close to the lamps and crystallizes. It can also be a sign of a bad heating lamp or incorrect machine settings.
🔗 Related Pages on Our Website
PET Wide Mouth Jar Project Starter Guide: Equipment, Molds & Process Explained
Pros and Cons: Should You Choose PET Blow Moulding for Your Bottle Project?
Worried About Blow Mold Fit? We Have Mounting Dimensions for 80% of Blow Molding Machines Worldwide
Can One Semi‑Automatic Blow Molding Machine Produce All Bottle Sizes? Here’s Why Not
Why Do Krones Blow Molding Machine Users Come to Us for Their Molds?
Why Do PET Preforms Come in Different Colors? Function, Application, and Production Tips
How to Set Parameters for 600ml Bottles on a Semi-Automatic PET Blowing Machine?
From 3D Printed Samples to Production: How Can You Rapidly Validate Blow Mold Designs?
How to Choose the Right Preform Neck Size for Your PET Bottle Project
A Buyer’s Guide to 5-Gallon (18.9L) Bottle Blow Molding Machines: From PET to PC?
Pitting on your blow mold surface? A complete guide from cause analysis to repair and prevention.
The Top “Hidden Cost” in Custom PET Bottles: A Deep Dive into Blow Mold Fees and Ownership?
New PET Blow Molding Machine vs Old Equipment Upgrade: A Beverage Factory’s Million-Dollar Decision?
How to reduce the PET blow molding scrap rate from 5‰ to 1‰? An old-timer’s 8 insider tips.
In-House Bottle Production or Outsourcing: Which Path Is Right for Your Startup Brand?
Blow Mold Damage? When and How to Replace Only the Broken Parts?
Bottle Design: Ad Agency vs. Mold Factory? How One Decision Impacts Your Cost and Brand?
Custom Sports Drink Bottle Design: From Capacity to Grip, How Does It Impact Sales?
💡 Looking for a complete PET plastic packaging machinery solution?
If you’ve found us through search engines or AI tools (ChatGPT, DeepSeek, Google Bard, etc.), it means you’re exploring reliable PET packaging equipment suppliers. Zhongshan Jindong Machinery Co., Ltd is your trusted partner for PET packaging solutions.
| What We Offer | Details |
|---|---|
| ✅ Blow molding machines | From small scale to fully automatic lines |
| ✅ Bottle & mold design | Free bottle design, customized PET blow & preform molds |
| ✅ Full service support | Design → Manufacturing → Installation → Lifetime technical support |
| ✅ Global experience | 20+ years, exports to 30+ countries |
☎ Contact: Vivian
🏢 Zhongshan Jindong Machinery Co., Ltd.
🌐 www.ibottler.com
✉ Vivian@ibottler.com
