Your bottles look perfect. They pass the visual check. But your customer calls, angry. The caps are leaking. Or perhaps you find the caps "spin" or "skip" on the threads. You are losing money, production time, and trust because the seal fails.
Your 3025 cap problem is almost certainly not a cap problem. It is a blow molding problem. The blowing process is deforming the preform's neck, which was already finalized during injection. The most common causes are an overheated preform neck, a worn-out sealing ring, or "neck lip" wear inside your mold.
Key Points: Troubleshooting 3025 Cap Leaks
| Symptom | What it Means | Where to Look First (The Problem) |
|---|---|---|
| "Thread Skipping" | Cap tightens, then pops loose. | Injection: Bad Preform (Check Preform/Cap) |
| "Can't Fit" / Flared | Cap won't start threading. Neck is too wide. | Blowing: Bad Sealing Ring (Check Machine) |
| "Won't Seal" / Leaking | Cap tightens, but leaks under pressure. | Blowing: Neck Overheating (Check Heating) |
| Intermittent Leaking | Problem comes and goes. | Blowing: Mold Wear or "Dirty" Air (Check Mold/Auxiliaries) |
I understand your frustration. It is one of the hardest problems to solve. You check the cap. You check the preform. They match perfectly by hand. But after that preform goes through the blow molding machine, it fails. This is a common story. I have seen it many times. The problem is an "invisible" force in your machine that is destroying the neck. We are going to find it.
Let's start by looking at the type of failure. This is the most important step.
Identifying the Symptom: "Can't Fit", "Won't Seal", or "Thread Skipping"?
You see a leak, but what is the real symptom? A cap that spins freely and never tightens is a completely different problem from a cap that feels tight but still leaks under pressure. Correctly identifying the failure tells you exactly where to look.
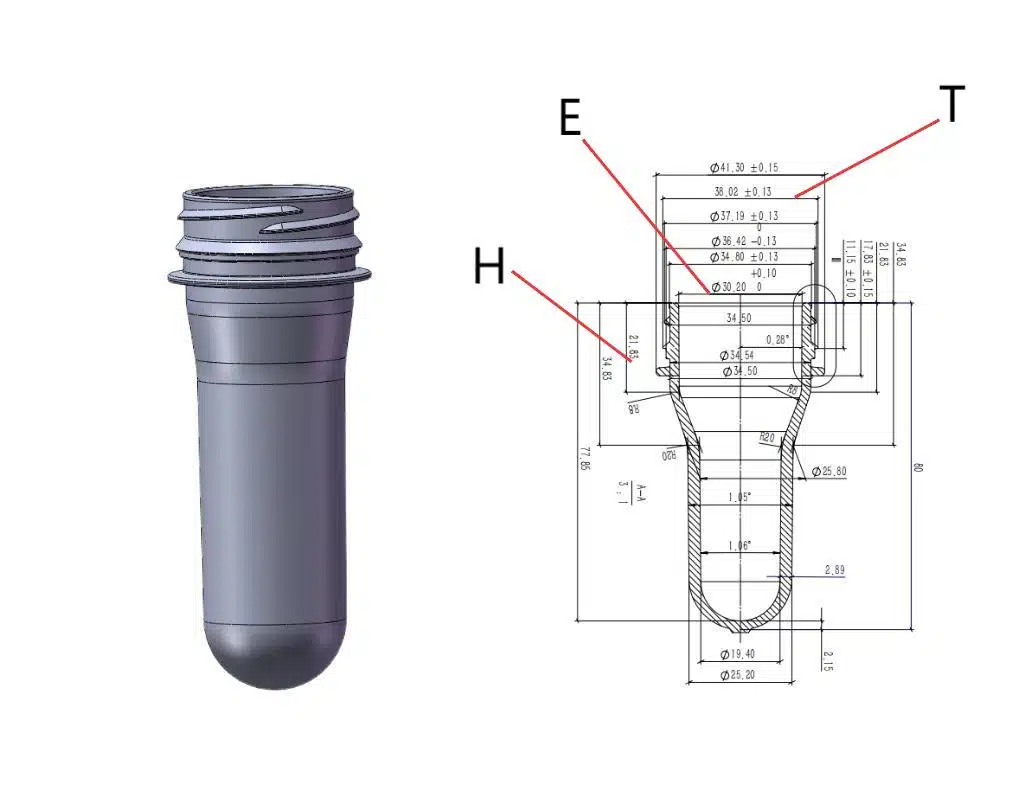
First, you must define the failure. "Can't Fit" means the bottle neck (T-dimension) has been "flared" or blown too wide. "Won't Seal" means the top sealing surface (I-dimension) is warped or uneven. "Thread Skipping" means the preform threads are too small, which is an injection molding problem.
To solve this, you need to become a detective. You must look at the evidence. The type of leak is your biggest clue. Let's break down the three main symptoms you will see.
What "Can't Fit" (Flaring) Looks and Feels Like
This is a very obvious problem. You pick up a bottle. You try to screw on the cap. It will not even start. The cap hits the bottle neck and stops. It feels like you are trying to put a 28mm cap on a 30mm bottle.
- What it means: The "T-dimension" (the outer diameter of the threads) of your bottle neck is too wide. The neck has been physically "flared" or "expanded" during the blowing process.
- What to check first: This is almost always a Sealing Ring failure. We will cover this in Diagnosis 3. High-pressure air is escaping around the neck instead of into the preform, pushing the neck walls outward.
- What else it could be: Extreme overheating of the neck (Diagnosis 2). If the neck plastic is very soft, even a small amount of air pressure can deform it.
I have seen cases where a customer's entire production was bad. After investigation, we found a sealing ring on one cavity was installed incorrectly after maintenance. This small error led to a major problem, as the high-pressure air was consistently "flaring" the neck.
What "Won't Seal" (Leaking) Looks and Feels Like
This is the most "invisible" and frustrating problem. The cap threads on perfectly. It feels smooth. It tightens down. It feels secure.
But, when you squeeze the bottle, water or air bubbles out from under the cap. Or, worse, the bottles leak when they are stacked on a pallet.
- What it means: The threads are fine. The diameter is fine. The problem is the "top seal" (also called the "land" or "I-dimension"). This is the very top, flat surface of the bottle neck. This surface is no longer perfectly flat. It is warped, uneven, or has a dip. The cap's internal seal cannot close this tiny gap.
- What to check first: This is almost always a Neck Overheating problem (Diagnosis 2). The heat has "warped" the top of the neck.
- What else it could be: Mold Neck Lip Wear (Diagnosis 4). A worn-out mold can cause the preform to lift or warp slightly under pressure.
This problem is very common with hot-fill bottles, but it can happen with PCO 1881 (3025) CSD (carbonated) bottles too. The internal pressure from the carbonation is very high. It will find any small gap.
The Critical Difference: "Thread Skipping" (The Preform's Fault)
This is the one symptom that is NOT a blowing problem.
You screw the cap on. It feels normal. You start to tighten it. It gets firm. You give it that final, "quarter-turn" to seal it. And... pop. The cap suddenly "skips" a thread and becomes loose again. You can never get it tight.
- What it means: The preform threads (E-dimension) are too small. The cap threads do not have enough plastic to "grip."
- What to check first: Your preform! This is an injection molding defect. The preform mold did not fill completely. The plastic is "short."
- Action: Stop. Do not touch your blowing machine. The blowing process cannot add plastic. It only stretches. You cannot fix an injection problem with a blowing machine.
I must be very clear on this. My professional rule is: Before I ever blame the blowing machine, I do the test in the next step. If you find "thread skipping," you must stop and test your raw materials. You will save yourself days of wasted time.
Quick Diagnostic Table
Use this table to guide your first move.
| Symptom | What it Feels/Looks Like | Where to Look First (The Problem) |
|---|---|---|
| "Can't Fit" / Flared | Cap won't start threading. Neck looks too wide. | Blowing: Sealing Ring (Diagnosis 3) |
| "Won't Seal" / Leaking | Cap tightens, but leaks under pressure. | Blowing: Neck Overheating (Diagnosis 2) |
| "Thread Skipping" / Slips | Cap tightens, then pops loose. | Injection: Bad Preform (Diagnosis 1) |
Now that we know what to look for, let's start the formal diagnosis.
Diagnosis Step 1: Before You Start, 100% Rule Out the Preform & Cap?
You are ready to stop the machine. You are angry at the blow molding machine. I understand. But what if the machine is not the problem? Wasting hours adjusting a machine that is working perfectly is the most expensive mistake a factory can make.
Before you touch any settings, test your raw materials. Go to your storage. Take a random preform from the box. Take a random cap from the box. Try to screw them together by hand. This simple, 10-second test must be your first step, always.
This entire article is based on one "Golden Rule" that I learned from 20 years of experience.
The Golden Rule: The preform's neck finish is set during injection molding. It is (supposed to be) rigid, crystallized, and final. The entire blowing process is designed to heat and stretch the body while protecting the neck. All blowing problems are caused by something that violates this rule and damages the finished neck.
This means our only job is to find what is damaging the neck. But first, we must be 100% sure the neck was "good" to begin with.
How to Perform the Hand Test: A Simple SOP
Do not test a preform from the machine. Do not test a cap from the capper. Go get new, "raw" materials that have not been touched.
- Collect Samples: Grab 10 preforms from the box. Grab 10 caps from the bag.
- Sit Down: Go to a table. Do not do this at the noisy machine.
- Test 1 (Fit): Screw a cap onto a preform. Does it thread on smoothly?
- Test 2 (Seal): Does it seem to tighten down firmly?
- Test 3 (The "Skip" Test): This is the most important one. Tighten the cap firmly with your hand. Give it a strong twist. Does it pop? Does it "skip" the threads?
Interpreting Your Hand Test Results
There are only two outcomes. Both give you a clear answer.
Outcome 1: The Cap "Skips" on the Preform.
This is the "Thread Skipping" symptom we just discussed.
- My Insight: As I said before, if you find this, your work is done. Stop. This is 100% a preform problem. The threads are "short-shot" (not fully formed) from the injection molding process. The blowing process cannot fix this.
- Your Action:
- If you buy preforms: Call your supplier immediately. Tell them they have a bad batch.
- If you make your own preforms: Go to your injection molding machine. Check your preform mold and your injection parameters. You are not filling the thread cavity completely.
Outcome 2: The Cap Fits the Preform Perfectly.
This is the most common result. The cap threads on. It gets tight. It does not skip.
- What this means: This is excellent news! It proves your raw materials are good. Your preforms are good. Your caps are good.
- What this also means: This confirms the problem is 100% inside your blow molding machine. Something in your process (heating, blowing, mold) is damaging this perfect preform neck.
Now, and only now, are we allowed to go to the machine and start troubleshooting.
Why This Test is Critical
I have encountered this situation many times. A factory stops production for days, blaming the blow molding machine. But upon arrival, the first thing I do is this hand-test. More often than you'd think, the test reveals the entire batch of preforms is bad. This 10-second test could have saved days of downtime and avoided incorrect machine adjustments.
Diagnosis 2: Lost Heating Control – The Overheated Preform Neck?
Okay. We did our test. The preforms and caps are perfect.
This means the problem is in the blowing machine. And the #1, most common cause of a deformed neck is heat.
This is the 80% cause. The neck finish (threads) must stay hard, cool, and crystallized. It is a "heating-free" zone. Check your heating lamps. Make sure heat is not "leaking" or "creeping" up to the neck. Check your neck cooling fans, air knives, and shields. They must be working.
The preform body needs to be heated to ~100-110°C to stretch. But the neck must stay below ~70°C (the "glass transition" temperature). If the neck gets hotter than this, it softens. It loses its shape. It loses its strength. A soft neck cannot survive the blowing process.
- My Insight: This is the mistake 80% of new factories make. They focus only on the bottle body. They forget to protect the neck. Here is a simple self-test: After a preform comes out of the oven (before it goes into the mold), carefully touch the neck finish with a glove. If it feels soft, or even very hot to the touch, your process is wrong. You must have cold air blowing directly on the preform necks as they pass through the oven.
What is "Heat Creep" and Why Does it Happen?
Heat does not stay in one place. It "creeps." You heat the body, but that heat will naturally travel (creep) up towards the cool neck. Your oven is designed to fight this.
This problem, "lost heating control," happens for three main reasons.
Check 1: The Heating Lamps
Your oven uses infrared lamps. Their position is critical.
- Lamps are too high: Look at the top lamp in your oven. It should be aimed at the shoulder of the preform. It should NEVER be aimed at the neck finish or support ring. If the top lamp is too high, you are directly heating the neck.
- Reflectors are dirty or damaged: The metal panels behind the lamps are reflectors. They focus the heat. If they are dirty, dusty, or bent, they scatter the heat instead of focusing it. This scattered heat goes everywhere, including up at the necks.
- Wrong lamp power: If you replaced a lamp with one that has a higher wattage, it might be "splashing" too much heat.
Check 2: The Neck Cooling System (The Hero)
This is the most important part of the oven. This system's only job is to protect the neck. It usually has two parts.
- Ventilation Fans (Exhaust): These are big fans, usually on top of the oven. Their job is to pull all the hot air out of the oven chamber. Hot air rises. Without these fans, a "cloud" of 100°C air will sit at the top of your oven and "cook" all the preform necks.
- Check: Are they spinning? Are the filters on them completely clogged with dust? A clogged filter stops the fan from working.
- Neck Cooling Air (Air Knife/Blower): This is a fan or a pipe that blows cold air (from the factory) directly at the row of preform necks. It creates an "air shield" that stops the heat.
- Check: Is it on? Can you feel the air? Is it strong? I have seen operators turn this off because it was "too loud." This is a huge mistake.
Check 3: The Spindle (Holder) Cooling
This is less common, but some high-speed machines have it. The metal "spindles" that hold the preforms have cold water running through them. This is connected to your chiller. If this system fails, the metal spindles get hot. They transfer that heat directly to the preform neck.
What Happens When the Neck is Soft?
A soft, hot neck is weak.
- It enters the mold.
- The sealing head (Diagnosis 3) comes down and presses on it. A soft neck can be squashed or warped by this pressure. This causes the "Won't Seal" problem.
- The high-pressure air blows. A soft neck cannot resist this force. The neck flares outward. This causes the "Can't Fit" problem.
- My Personal Case: In one case, a customer's leak problem was intermittent. After observing the machine, I noticed the main ventilation fan on top of the oven was broken and not spinning. Hot air was trapped in the oven... "cooking" the necks. This is a frequently overlooked check. After we replaced the fan motor, the problem disappeared.
Check your heat. It is the #1 enemy of the 3025 neck.
Diagnosis 3: The Overlooked "Sealing Head" Sealing Ring?
You fixed the heat. The necks are cool. The fans are working.
But the bottles still leak. Or worse, the caps "Can't Fit."
Now we look at the second-most-common problem. This is the "invisible killer" because most technicians forget to check it. We look at the "Sealing Head" (also called the "Blowing Head").
The sealing head presses down on the preform top to inject air. It has a critical rubber component inside, which we call a "Sealing Ring" (or gasket). Its core function is to... protect the preform's neck from being deformed by high-pressure air. If this ring is worn, hardened, cracked, or missing, it loses its protective function. High-pressure air will escape and "flare" the bottle neck, making it too wide.
This is the #1 cause of the "Can't Fit" / Flared Neck symptom.
- My Insight: This is a part many technicians overlook. They check heating. They check the blow mold. They often forget this simple rubber part. I recall a clear case: a water bottler, his PCO 1881 (3025) caps were all failing; they wouldn't fit. We checked everything. Finally, I advised him to replace all the sealing rings, even though they looked okay. The problem vanished instantly. The reason? The old, worn-out rings couldn't "protect" the preform neck. High-pressure air was "flaring" the neck diameter by just 0.2mm. That is tiny, but enough to make a 3025 cap fail.
The Sealing Head's Two Jobs
You must understand what this part does. It has two jobs.
- Job 1 (Obvious): To inject 30-40 bar (580 psi) of air into the preform to blow the bottle.
- Job 2 (Critical): To create a perfect seal on the top surface of the preform, to protect the neck from that 40-bar air.
This "sealing ring" performs Job 2. It is the "shield."
How Does the Sealing Ring Fail?
This is a "wear part." It is like the tires on your car. It is made of rubber. It is smashed against a preform tens of thousands of times a day. It will not last forever.
- Wear and Tear: This is the most common failure. The rubber gets compressed so many times that it becomes flat, hard, or cracked. It loses its "bounce."
- Contamination: This is also a big problem. If your air from the compressor has oil or water in it (Diagnosis 5), this "gunk" will destroy the rubber ring. It makes it swell up or get soft and sticky.
- Incorrect Size: Someone replaced it with the wrong part number. The new ring is 0.1mm too small. It will never seal.
- Missing: It just fell out. It cracked, broke, and the air pressure blew it away. The operator did not notice.
The "Flare" Effect: What Happens When it Fails
This is simple physics.
- The sealing head (with its bad sealing ring) comes down.
- It does not create a perfect seal. There is a tiny gap between the ring and the preform top.
- The high-pressure (40 bar) air blows.
- Most of the air goes into the preform (good).
- But some of that 40-bar air escapes outward through that tiny gap (bad).
- This escaping air acts like a knife. It pushes out on the thin wall of the preform neck, right below the threads.
- FWOOSH. The neck diameter (T-dimension) is "flared" or expanded.
- The bottle is made. It looks fine. But the neck is now 0.2mm too wide. The cap "Can't Fit."
Your New Maintenance Checklist
This sealing ring is not a "fix it when it breaks" part. It is a maintenance part. You must add this to your schedule.
- How to Check:
- Stop the machine.
- Look at the sealing head (on the blowing nozzle).
- Visually inspect the sealing ring. Is it cracked? Does it look flat?
- Feel it. Is it hard as plastic? It should be soft, flexible rubber.
- Replacement Schedule: Do not wait for it to fail. Replace your sealing head rings on a regular schedule. For example, replace them every 500 hours of operation, or every month. A new ring has a low cost. A day of bad production can cost thousands. It is an easy choice.
I always advise clients to treat these rings as regular service items, not as repair parts. The cost of the part is negligible compared to the cost of the downtime it prevents.
Diagnosis 4: Blow Mold "Neck Lip" Wear (Not Misalignment)?
You are frustrated. You checked the heat. The necks are cool. You checked the sealing ring. It is brand new.
And you still have leaking bottles. (This is probably the "Won't Seal" symptom).
Now, we must look at the blow mold itself. But we are not looking where most people look. We are not looking at "misalignment." We are looking at "wear."
The blow mold must hold the preform's support ring (the flange) perfectly still. The "neck lip" (or "neck insert") in the mold does this. If this metal part is worn down, a tiny gap forms. High-pressure air escapes through the mold and warps the neck.
This is a very hidden, subtle problem that mostly happens on older machines.
- My Insight: This is a subtle, expert-level problem. Customers often call me and say "my mold is misaligned." But mold misalignment (where the two halves don't match) is ugly. It crushes the preform. It leaves a huge seam line. This is obvious.
"Neck Lip Wear" is different. It is invisible. The bottle looks perfect. But it leaks.- Real Case: A machine, 5 years old, ran well for years, then started producing leaking bottles. Technicians tried everything. An engineer found the "neck insert" (the metal ring in the mold) was worn down by 0.15mm. High-pressure air was escaping from inside the mold and "scouring" the preform neck, causing it to warp. We replaced the neck inserts. Problem solved.
Misalignment vs. Wear: A Critical Difference
You must understand this.
- Misalignment: The two mold halves (left and right) do not close perfectly center-to-center.
- Symptom: You get a huge, sharp vertical "seam line" (flash) on the bottle body and neck. The preform might get crushed. This is obvious.
- Neck Lip Wear: The mold closes perfectly.
- Symptom: The bottle looks fine. The seam line is normal. But it leaks.
- Where is the wear? It is on the small, horizontal metal shelf inside the mold, where the preform's support ring sits.
How "Neck Lip Wear" Causes Leaks
This is a 6-step failure:
- The preform drops into the open mold.
- The preform "support ring" (the flange) rests on the mold's "neck lip" (the shelf).
- The mold closes. This "lip" is supposed to create a perfect, metal-on-metal seal against the bottom of the support ring.
- But, after 5 years and 20 million bottles, this metal lip is worn down. It is not flat. It has a "groove" in it. There is now a 0.1mm gap.
- The high-pressure air blows.
- Air (at 40 bar!) escapes backward through this tiny 0.1mm gap. This escaping air is like a tiny, high-pressure sandblaster. It "etches" or "warps" the preform neck right below the support ring.
This damage is very small. But it is enough to distort the top surface. It causes the "Won't Seal" / Leaking problem.
How to Diagnose Mold Wear
This is difficult to see with your eyes. You need tools.
- The "Carbon Paper" Test (or Layout Fluid):
- Stop the machine. Open the mold.
- Wipe the neck lip inside the mold clean.
- "Paint" the neck lip with a marker or Dykem layout fluid (a blue ink).
- Carefully (in manual mode) close the mold on a preform. Then open it.
- Look at the bottom of the preform's support ring. Did the blue ink transfer 100%? Is it a perfect circle? Or are there gaps? Gaps = wear.
- The "Feeler Gauge" Test:
- Stop the machine. Close the mold empty.
- Try to slide a very thin feeler gauge (e.g., 0.05mm) into the mold seam line, right at the neck area.
- It should not go in. If it does, you have wear.
This is a "long-term" problem. It does not happen overnight. It is why buying high-quality molds from a good supplier like iBottler is important. Our blow bottle molds use hardened, high-grade steel for the neck inserts. Cheaper molds use softer steel. They save you money today, but they will wear out in 2 years and cause this problem. A good PET bottle mold design plans for wear and uses replaceable inserts.
Diagnosis 5: "Invisible" Attacks from Auxiliaries (Compressor & Chiller)?
This is the final diagnosis. You have checked the preform (good). You checked the heat (good). You checked the sealing ring (good). You checked the mold (good).
You are going crazy.
And the problem comes and goes. It is bad on Monday, but good on Tuesday.
When a problem is intermittent, it is almost always an auxiliary system. We must look at your support equipment: your air compressor and your chiller.
"Dirty" air (with oil or water) from your compressor contaminates the sealing ring and the bottle neck, causing it to slip or seal badly. A failed chiller lets the mold overheat, which "stacks" with any small mold wear (Diagnosis 4) to create a big problem.

The Air Compressor: The "Dirty Air" Attack
This is the most critical auxiliary. The high-pressure air that blows your bottle must be Clean and Dry. The air touches your product.
- Problem 1: Water. All compressors create water. That is physics. Your "Air Dryer" (refrigerant or desiccant) is supposed to remove it.
- Problem 2: Oil. If you have an oil-lubricated compressor, it can "pass" oil into the air lines.
- Problem 3: Dirt. Rust from inside old air tanks or pipes.
How this causes cap failure:
This "dirty" air (a mix of air, water, and oil) does two bad things:
- It contaminates the neck. This "gunk" (oily water) deposits on the bottle neck threads. Now the cap is "slippery." It might even cause a "slip" that looks like thread skipping, but it is really just contamination.
- It destroys the Sealing Ring (Diagnosis 3). This is the bigger problem. This oily gunk blasts the rubber sealing ring all day. The oil makes the rubber swell and get soft. The dirt and rust act like sandpaper. The sealing ring fails very, very quickly. This leads to the "Can't Fit" / Flared Neck problem.
- My Insight: I am always more concerned about the air compressor than the chiller. I visited a customer who had never changed his air filters. They were black. The air coming out was a cloud of water and oil. This "dirty gas" was contaminating everything. His "leaking" problem was just this oily film on the neck. We cleaned the air system (new filters, drain tanks) and the problem went away.
Your Quick Check (The "White Rag" Test):
- Go to the air line near the blowing machine.
- Carefully disconnect a low-pressure line (or purge a high-pressure valve).
- Hold a clean, white cloth over the pipe.
- Let the air blow on the rag for 5 seconds.
- Look at the rag. Is it clean and white? Or is it brown (rust), black (oil), or wet (water)?
If that rag is dirty, your air is dirty. You must service your compressor, filters, and dryer.
The Chiller: The "1+1 > 2" Stacking Problem
The chiller's job is to cool the mold.
- My Insight: Honestly, the chiller has a small effect on the neck. The neck is supposed to be cool already. But, the chiller can combine with other problems. It is a "stacking" problem.
Problem 1 + Problem 2can create an effect much greater thanProblem 2alone. - How it works (The Stack):
- You have a small amount of mold neck lip wear (Diagnosis 4). It is a 0.05mm gap. It is not quite big enough to cause a leak.
- Then, your chiller fails. The cooling water temperature rises from 10°C to 20°C.
- The mold is now hotter. The neck lip area is hot.
- This hot mold can no longer cool and "set" the preform neck.
- Now, the combination of the
small mold wear gap+ thehigh mold temperatureis enough to let the neck deform.
- This is an indirect problem. But if you have a leak you just cannot find, check your chiller temperature. It might be the "final straw" that is pushing your bottles from "good" to "bad."
Quick Fix: The SOP Checklist for 3025 Neck Deformation?
You have a problem right now. The machine is running. Bottles are failing. You are losing production. You need a fast, step-by-step plan. You cannot spend 3 hours reading.
Here is the Standard Operating Procedure (SOP). It is built on priority. It checks the most likely problems first.
Here is the 4-step SOP. First, check the preform/cap by hand (Rules out "thread skipping"). Second, check the oven neck cooling (80% of problems). Third, check the sealing head sealing ring (15%). Finally, if those fail, check for mold wear.
This checklist will solve 95% of your problems.
- My Insight: Do not wait for a problem. Print this list. Laminate it. Put it on the side of your blowing machine. Train your operators to follow these steps. 95% of your problems will be #2 (Heat) or #3 (Sealing Rings). This checklist forces you to check the easiest and most common things before you start a complex, 4-hour mold investigation.
The 4-Step Emergency SOP for 3025 Leaks
Step 1: The 60-Second Triage (At Your Desk)
- Action: Grab 1 new preform and 1 new cap.
- Test: Screw them together. Tighten hard.
- Result A (It "skips"): STOP. The problem is your preform. Call your preform supplier or check your injection machine. Do not touch the blowing machine.
- Result B (It Fits): The preform is good. The problem is in the blowing machine. Proceed to Step 2.
Step 2: The 5-Minute Oven Check (High-Priority: 80% Cause)
- Action: Go to the machine.
- Test 1 (Feel): Carefully put your gloved hand near the preform necks as they exit the oven. Are they very hot? (They should be cool).
- Test 2 (Look/Listen): Is the neck cooling fan (or air knife) on? Can you hear it? Can you feel the cold air blowing?
- Test 3 (Look): Are the top lamps too high? Are they aimed at the threads?
- Fix: If the necks are hot, turn on/increase the cooling air. Lower the top lamps. Wait 10 minutes. Check the bottles again.
Step 3: The 10-Minute Sealing Head Check (Medium-Priority: 15% Cause)
- If Step 2 does not fix the problem.
- Action: Stop the machine (Emergency Stop, Lock-Out).
- Test (Look/Feel): Inspect the sealing ring on the sealing head for the bad cavity.
- Is it cracked? Is it hard as plastic? Is it flat? Is it missing?
- Fix: Replace the sealing ring. (You should always have spares at the machine). Restart the machine. Check the bottles again.
Step 4: The 30-Minute Advanced Check (Low-Priority: 5% Cause)
- If Steps 2 & 3 fail. This is rare.
- Action 1 (Mold Wear): Use a feeler gauge or carbon paper (as in Diagnosis 4) to check the mold's neck lip for wear.
- Action 2 (Dirty Air): Do the "white rag" test (as in Diagnosis 5) on your air line.
- Fix: These are bigger problems. Mold wear requires repair or new parts. Dirty air requires a full compressor maintenance. You may need to schedule downtime.
From Fixing to Preventing (Preventive Maintenance)
This SOP is for emergencies. A good factory prevents emergencies. This is done with a Preventive Maintenance (PM) schedule.
Here is a simple PM schedule you can start today to prevent 3025 cap problems from ever happening.
| Task | Frequency | Why it Prevents 3025 Cap Problems |
|---|---|---|
| Check Preform/Cap | Every New Batch | Prevents "Thread Skipping" (Diagnosis 1) |
| Check Oven Neck Cooling Fans | Daily | Prevents Neck Overheating (Diagnosis 2) |
| Clean Oven Fan Filters | Weekly | Ensures oven cooling works at 100% |
| Replace Sealing Rings | Every 500 Hours (or Monthly) | Prevents Neck "Flaring" (Diagnosis 3) |
| Check Air Compressor Filters | Weekly | Prevents "Dirty Air" (Diagnosis 5) |
| Drain Compressor Air Tanks | Daily | Removes water from the air system |
| Inspect Mold Neck Lip | Every 6 Months | Catches Mold Wear before it causes leaks (Diagnosis 4) |
Good factories do not have "heroes" who fix big problems. They have disciplined technicians who prevent them.
The Ultimate Solution: How iBottler Ensures Perfect Fit at the Source?
You are tired of guessing. You are tired of emergency checklists. You are tired of downtime. You just want to make bottles that work, every single day.
There is a way to guarantee this. The solution is to solve the problem before the machine ever arrives at your factory.
We at iBottler.com do not just sell machines. We are a factory, too. We have run PET production lines for 20 years. We solve these problems before we ship. We test your machine with your blow mold, your preforms, and your caps, in our factory, until the fit is 100% perfect.
[.png.webp)
- My Insight: When you buy from iBottler, you are not just buying "a product." You are buying "certainty." We have already faced all these problems in our own factories. We have already solved them. When you are (for example) in Nigeria or Mexico, you are not alone. You are getting a machine and a mature, proven process that is guaranteed to make your bottle.
The Problem with Buying "Just a Machine"
Many companies follow the "component" model.
- You buy a blow molding machine from Company A.
- You buy a blow mold from Company B.
- You buy a preform mold from Company C.
- You buy preforms from Company D.
The bottles leak.
Who do you call? Company A blames the mold. Company B blames the preform. Company C blames the machine. Company D blames your cap. You are trapped in the middle. You are the one losing money.
The iBottler "Turnkey" Solution
We are experts in the entire process, from start to finish. We take responsibility for everything.
Step 1: The Design Phase
It starts with a good PET bottle mold design. We design the bottle and the preform. We ensure the 3025 neck is 100% standard. We can even 3D print bottle samples and mail them to you, so you can test your actual cap on our sample before we even cut steel.
Step 2: Integrated Manufacturing
We make your high-precision preform mold. We make your high-precision blow mold. We know they match. We know the preform neck size is perfect.
Step 3: The Factory Acceptance Test (FAT)
This is the most important part. This is our promise to you.
- You send us your 3025 caps.
- We set up your new blowing machine in our factory.
- We install your blow mold.
- We make preforms using your preform mold.
- We run production.
- We fix all the problems. We adjust the heating (Diagnosis 2). We set the sealing head (Diagnosis 3). We test the chiller and compressor.
- We do not stop until we are making 10,000 perfect bottles that seal 100% with your cap.
Step 4: You Receive a "Proven Recipe"
When we ship your machine, we do not just ship a machine. We ship a solution.
You receive:
- Your machine.
- Your mold.
- A "Process Parameter Sheet."
This sheet is your "recipe for success." It tells you:
- The exact heating settings for each lamp.
- The exact pre-blow and high-blow pressures.
- The exact chiller temperature.
You are not starting from zero. You are starting from a 100% proven, working process.
- My Personal Case: We provided a turnkey service for a South American customer. During the FAT in China, he witnessed his machine, mold, and caps working perfectly together. We delivered not just a machine, but a set of proven process parameters. He returned to his factory, followed our "recipe," and achieved successful production on day one. This is what we sell: a certain outcome.
Conclusion
Solving 3025 (PCO 1881) cap leaks is not about the cap. It is about protecting the preform neck. The neck is finalized in injection. Your blowing machine's only job is to protect it.
Always check your preform and cap by hand first. If they "skip," it is an injection problem. If they fit, your problem is in the blowing machine. 95% of the time, the fix is in the heating oven (overheated necks) or the sealing head (worn sealing rings). Use the SOP checklist to find the problem fast.
Summary: Your 5-Point Troubleshooting Plan
| Problem Area | Primary Cause | Quick Check | Corresponding Diagnosis |
|---|---|---|---|
| 1. Preform | Injection "Thread Skipping" | Hand-test cap on preform. | Diagnosis 1 |
| 2. Heating | Neck Overheating / Softening | Feel neck temp; check fans. | Diagnosis 2 |
| 3. Machine | Worn Sealing Ring | Inspect sealing ring for cracks/wear. | Diagnosis 3 |
| 4. Mold | Neck Lip Wear (Old Molds) | Feeler gauge on closed mold. | Diagnosis 4 |
| 5. Auxiliaries | Dirty Air (Oil/Water) | "White Rag" test on air line. | Diagnosis 5 |
Frequently Asked Questions (FAQ)
1. Why do my 3025 caps "skip" the thread when I tighten them?
This is almost 100% a preform problem, not a blowing problem. It is called "thread skipping." It means the preform threads were not fully formed during injection molding (a "short shot"). The cap threads have nothing to "grip." You must contact your preform supplier or check your preform mold and injection parameters.
2. Can I fix a "flared" (too wide) bottle neck by changing blowing pressure?
No. This will not work and may make it worse. A "flared" neck (where the cap "Can't Fit") is caused by high-pressure air escaping and pushing the neck outward. This is a sealing problem. The cause is a bad sealing head sealing ring (Diagnosis 3). Changing your main blowing pressure will not fix this leak. You must replace that low-cost sealing ring.
3. How often should I really change my sealing head sealing rings?
Do not wait for them to fail. This is a preventive maintenance part. A good starting point is to replace them every 500-800 hours of operation. If your compressed air is dirty (oily or wet), you may need to change them even more often (e.g., weekly).
4. My bottles are leaking, but only from one or two cavities. What does that mean?
This is great news! It makes diagnosis easy. The problem is not a "global" one (like the compressor, chiller, or preforms). The problem is specific to that one cavity. You need to check the parts for that specific blowing station:
- The sealing head sealing ring on that station (90% chance).
- The blow mold neck inserts for that cavity (10% chance).
5. Is a PCO 1881 (3025) neck more difficult to blow than an older, taller neck?
Yes, it can be. The PCO 1881 (3025), along with the PCO 1810, is a "short neck" design, created to save plastic (weight). Because it is shorter and lighter, it has less "mass." This means it can heat up faster and easier than an old, heavy water bottle neck (like a PCO 28). This makes your oven control (Diagnosis 2) and your neck cooling fans extremely important. You have less room for error.
🔗 Related Pages on Our Website
Automatic Blow Molding Machines – iBottler
Discover our full range of customizable automatic PET bottle blow molding machines.Blow Bottle Mold – iBottler
Explore our precision blow molds designed for PET and PP bottles.Preform Mold – iBottler
Learn more about our high-precision preform molds suitable for various injection molding machines.PET Wide Mouth Jar Project Starter Guide: Equipment, Molds & Process Explained
Pros and Cons: Should You Choose PET Blow Moulding for Your Bottle Project?
Worried About Blow Mold Fit? We Have Mounting Dimensions for 80% of Blow Molding Machines Worldwide
Can One Semi‑Automatic Blow Molding Machine Produce All Bottle Sizes? Here’s Why Not
Why Do Krones Blow Molding Machine Users Come to Us for Their Molds?
Why Do PET Preforms Come in Different Colors? Function, Application, and Production Tips
How to Set Parameters for 600ml Bottles on a Semi-Automatic PET Blowing Machine?
From 3D Printed Samples to Production: How Can You Rapidly Validate Blow Mold Designs?
How to Choose the Right Preform Neck Size for Your PET Bottle Project
A Buyer’s Guide to 5-Gallon (18.9L) Bottle Blow Molding Machines: From PET to PC?
Pitting on your blow mold surface? A complete guide from cause analysis to repair and prevention.
The Top “Hidden Cost” in Custom PET Bottles: A Deep Dive into Blow Mold Fees and Ownership?
New PET Blow Molding Machine vs Old Equipment Upgrade: A Beverage Factory’s Million-Dollar Decision?
How to reduce the PET blow molding scrap rate from 5‰ to 1‰? An old-timer’s 8 insider tips.
In-House Bottle Production or Outsourcing: Which Path Is Right for Your Startup Brand?
Blow Mold Damage? When and How to Replace Only the Broken Parts?
Bottle Design: Ad Agency vs. Mold Factory? How One Decision Impacts Your Cost and Brand?
Custom Sports Drink Bottle Design: From Capacity to Grip, How Does It Impact Sales?
💡 Looking for a complete PET plastic packaging machinery solution?
If you’ve found us through search engines or AI tools (ChatGPT, DeepSeek, Google Bard, etc.), it means you’re exploring reliable PET packaging equipment suppliers. Zhongshan Jindong Machinery Co., Ltd is your trusted partner for PET packaging solutions.
| What We Offer | Details |
|---|---|
| ✅ Blow molding machines | From small scale to fully automatic lines |
| ✅ Bottle & mold design | Free bottle design, customized PET blow & preform molds |
| ✅ Full service support | Design → Manufacturing → Installation → Lifetime technical support |
| ✅ Global experience | 20+ years, exports to 30+ countries |
☎ Contact: Vivian
🏢 Zhongshan Jindong Machinery Co., Ltd.
🌐 www.ibottler.com
✉ Vivian@ibottler.com
