You watch the mold open, and your heart sinks. The bottle bottom looks blurry, the feet are not defined, or the logo looks like a blob. You are losing money with every cycle.
Incomplete bottle forming, often called a "short shot," is rarely just a heating issue. It is a failure of synchronization between the pre-blow pressure, which distributes the material, and the main blow pressure, which locks the shape into the mold. Without this balance, no amount of heat will save your production.

Most operators make a fatal mistake when they see a malformed bottle: they turn up the oven temperature. They cook the preform. The result? The bottle becomes pearlescent (white) or the bottom becomes dangerously thin. PET blow molding is not just about heat. It is a precise battle between air pressure and time. I have spent years on factory floors, and I can tell you that the secret lies in the milliseconds before the plastic hits the mold wall. In this guide, I will take you deep into the physics of the process. We will look at how to balance your bottle blowing machine, optimize your pressures, and finally get that crisp, perfect bottle every time.
1. The "Skeleton" Phase: Why Mechanical Stretching Must Happen Before Air?
Before we talk about air, we must talk about steel. The stretch rod is the most misunderstood part of the process. If your mechanical stretching is wrong, your air pressure settings do not matter.
The stretch rod acts as the spine of your bottle. It physically pushes the material from the neck to the bottom gate. This mechanical action creates the axial (vertical) strength of the bottle. If the rod moves too slowly, the plastic cools down on the rod tip. If it moves too fast, it can puncture the bottom. The perfect bottle starts with a rod that moves at the exact speed to carry the hot material to the bottom of the mold without letting it freeze.
Deep Dive: The Physics of Rod Speed and Cooling
Let's analyze what happens inside the mold at a microscopic level. The preform is around 100°C. The stretch rod is steel, usually unheated. When the rod touches the inner bottom of the preform, heat transfer begins immediately. The steel sucks the heat out of the plastic. This is called "quenching."
If your stretch rod velocity is too low, the contact time between the cold steel and the hot plastic increases. The plastic at the gate (the center of the bottom) drops below its Glass Transition Temperature (Tg). It becomes hard.
When you finally turn on the high-pressure air, this hard lump of plastic refuses to stretch. It sits there like a stone. You end up with a very thick gate and "short shots" in the feet of the bottle because the material simply cannot flow into the corners.
Conversely, if the rod is too fast, you stretch the material before it has time to relax. This creates high internal stress. The bottle might look okay, but when you fill it with hot water or carbonated drinks, it will crack or deform.
I always advise clients to check their rod alignment first. If the rod is off-center by even 1 millimeter, the "skeleton" leans to one side. One side of the bottle will be paper-thin, and the other will be thick. No air adjustment can fix a bent skeleton.
2. The "Balloon" Effect: How Pre-Blow Pressure Determines Material Distribution?
This is the phase where the magic happens. It is the most critical setting for wall thickness control. You are blowing a bubble inside a bottle.
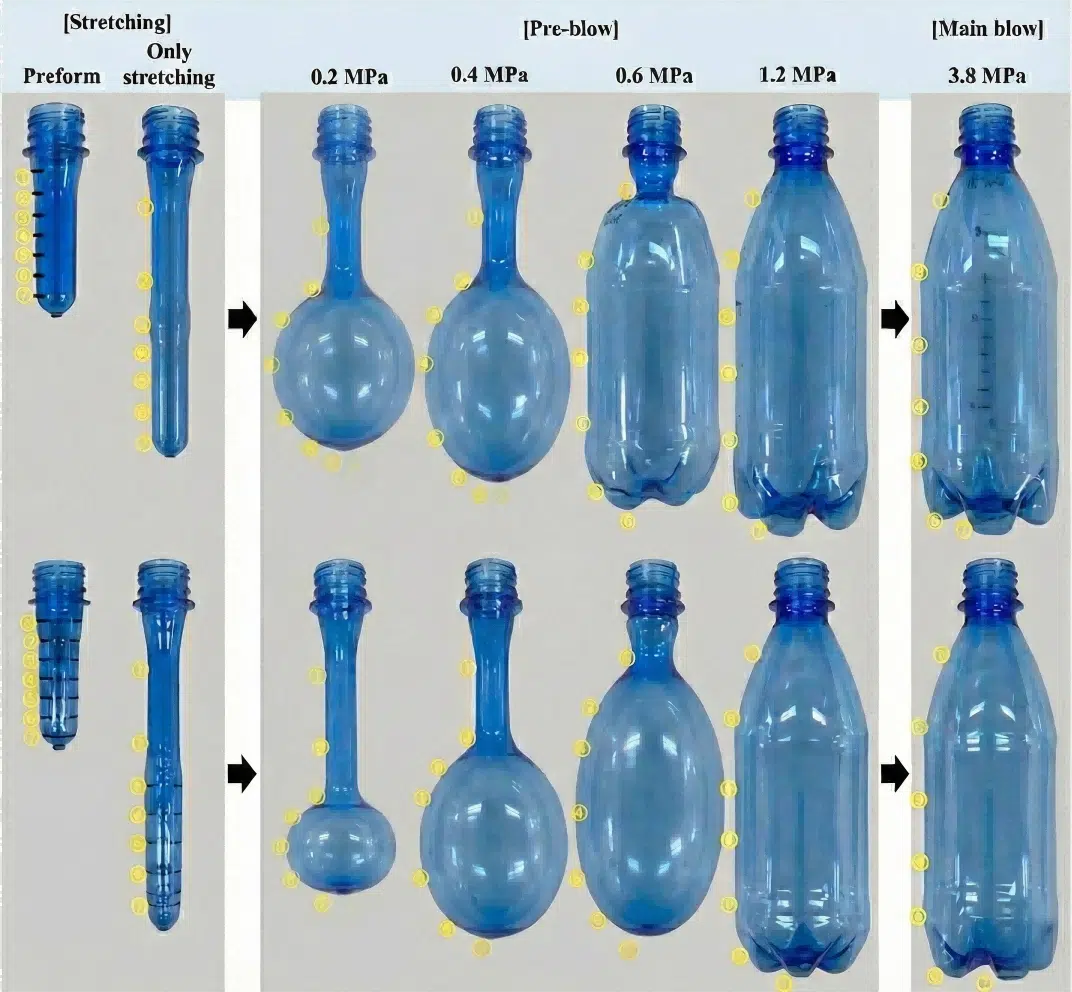
Pre-blow pressure (usually 6-12 bar) expands the preform radially (sideways) while the rod stretches it axially. This creates a "bubble" or "sausage" shape that does not yet touch the mold walls. If you skip this or set it wrong, you lose control of where the plastic goes.
Deep Dive: The Timing of the Bubble
Think of the pre-blow as a steering wheel. It steers the material to the right place.
- Pressure too Low (< 5 Bar): The bubble does not grow. The plastic stays wrapped tightly around the stretch rod. When the main blow hits, the plastic has to travel a long distance to hit the wall. It often results in a bottle with a very thick body and thin corners.
- Pressure too High (> 15 Bar): The bubble grows too fast. It hits the cold mold walls while the rod is still moving down. Friction occurs. The plastic sticks to the wall and stops moving. The rod keeps pulling, but the material is stuck. This causes a very thin neck and a thick bottom.
I recently helped a client using our bottle blowing machine who was struggling with a cosmetic bottle. The shoulders were too thin. I checked his pre-blow. He was starting the air after the rod had already reached the bottom. This is too late. The material was already at the bottom. We adjusted the timing so the air started 200 milliseconds earlier. The bubble grew during the stretch. This carried more material into the shoulder area. The problem was solved instantly. You must visualize the bubble growing. It needs to be big enough to distribute material, but not so big that it drags against the mold.
3. The Power of 3.8 MPa: Why High Pressure is Non-Negotiable for Detail?
Once the material is distributed, you need brute force. You are not just blowing air; you are stamping plastic.
The Main Blow phase uses high pressure (30-40 Bar) to force the plastic into the microscopic details of the mold. This is not about expansion; it is about "Coining." You are pressing the soft plastic against the cold metal to freeze the shape instantly.
Deep Dive: The "Coining" Effect and Compressor Requirements
Many factories try to save money on their energy bills. They ask me, "Vivian, can we run at 25 Bar?"
If you are making a simple round water bottle, maybe. But if you are making a square bottle, a bottle with a complex logo, or a carbonated drink bottle, the answer is no.
You need a robust cost-efficient air system that can deliver stable high pressure. Here is why:
PET has "elastic memory." Even when hot, it wants to shrink back to its original shape. To overcome this elastic force and force the plastic into a sharp 90-degree corner, you need immense pressure.
At 25 Bar, the plastic bridges across the corner. The corner looks rounded.
At 38 Bar, the plastic is smashed into the corner. It replicates the mold surface perfectly.
If your bottles look "soft" or the lettering is unreadable, check your pressure gauge during the blow. Does it drop? If your set point is 35 Bar but it drops to 28 Bar when the valve opens, you have a restriction. It could be undersized piping, a small air tank, or a weak compressor. You cannot get sharp details with unstable pressure.
4. Troubleshooting with the Grid Test: Reading the Invisible Flow
How do you know if your problem is heating or pressure? You cannot see inside the mold. But you can make the bottle tell you its secrets.
The Grid Test involves drawing horizontal lines on the preform before blowing it. By measuring how far these lines move, you can see exactly where the material is stretching and where it is stuck.
Deep Dive: Interpreting the Grid Lines
I recommend every quality manager keeps a black marker in their pocket. Here is how to interpret the results:
- Mark the Preform: Draw a line every 10mm from the neck ring to the gate. Number them 1, 2, 3...
- Blow the Bottle: Run the machine as normal.
- Analyze the Zones:
- Neck Area (Zones 1-2): These lines should separate slightly. If they are still touching, your neck is too cold.
- Body Area (Zones 3-6): These lines should have large, even gaps. If one gap is huge and the next is small, your heating profile is uneven.
- Bottom Area (Zones 7-8): This is where short shots happen. Look at the last line near the gate. Is it stretched? Or is it still tight and thick?
- Scenario A: Bottom lines are bunched up. The material at the bottom never stretched. It is too cold, or the pre-blow was too late.
- Scenario B: Bottom lines are wildly far apart. The bottom is over-stretched (too thin). The material was too hot or pre-blow was too early.
This method removes the guesswork. Instead of randomly changing parameters, you can look at the lines and say, "Zone 4 is stretching too much, I need to lower the lamp temperature in Zone 4." This scientific approach is how we set up processes for our clients when they buy a preform mold from us. We ensure the design allows for even stretching.
5. The Invisible Wall: Air Resistance and Mold Venting
You are pushing air in, but is the old air getting out? If your mold is sealed tight, the bottle cannot grow.
As the bottle expands, it displaces the air inside the mold cavity. This air must escape through tiny vents (0.03mm - 0.05mm). If these vents are blocked, the trapped air forms a high-pressure cushion that prevents the plastic from touching the mold wall.

Deep Dive: The Physics of Trapped Air
Imagine pumping a bicycle tire inside a steel box. If the box is airtight, the tire can never expand to fill the corners. The air inside the box gets compressed. Compressed air gets hot—extremely hot.
In severe cases, this trapped air causes the "Diesel Effect." The air gets so hot it burns the plastic, leaving black or brown scorch marks on your bottle.
But usually, it just causes a "Short Shot." The plastic looks dented. The surface is smooth, not rough (unlike a cold plastic defect). This dent is actually an air bubble pushing back against the plastic.
Actionable Advice:
Check your blow bottle mold. Are the vent slots clean? Over time, PET dust and lubrication oil mix to form a paste that clogs these vents.
If you are running a complex design with many ribs or logos, standard venting might not be enough. We often have to add sintered metal plugs (porous metal) in deep corners to allow air to escape. If you are struggling with a specific spot that never forms, try cleaning the vent at that location. 90% of the time, the problem disappears.
6. Temperature Control: The Balance Between Oven and Chiller
Pressure shapes the bottle, but temperature freezes it. You need a thermal strategy that manages heat input and heat removal.
A perfect bottle requires the preform to be around 100°C-110°C for stretching, but the mold must be cold (10°C-15°C) to set the shape. If this thermal gradient is disrupted, the bottle will deform after ejection.
Deep Dive: Crystallization vs. Amorphous State
PET is a semi-crystalline material.
- In the Oven: We heat it to the amorphous state. It becomes soft and rubbery. If we overheat it, it starts to crystallize (turn white and brittle) before it even enters the mold. This is bad.
- In the Mold: We want to "freeze" the amorphous state. This creates a clear, strong bottle.
This is why the chiller is critical. If your mold water is 30°C, the plastic does not freeze instantly. It stays soft. When the mold opens, the internal stress in the plastic pulls the bottle out of shape. The round bottle becomes oval. The flat bottom becomes a rocker bottom.
You might think this is a blowing issue. You might increase the blowing time to compensate. But that slows down your cycle time. The real fix is to ensure your mold is cold.
Also, check the flow rate. Turbulent flow removes heat much faster than laminar flow. If your cooling channels are blocked with lime or rust, your water might be cold, but your mold steel is hot. Regular maintenance of your cooling system is as important as the air system. For more on this, read our guide on why do pet blow molds need to-be connected to a-chiller.
7. Troubleshooting "Short Shots": A Systematic Workflow
When production stops, panic sets in. Do not panic. Follow this logical path to find the root cause.
We use a "Supply -> Mechanical -> Thermal" approach. Always check the machine inputs first, then the movement, and finally the temperature.
Deep Dive: The Step-by-Step Protocol
- Check the High Pressure: Is the compressor delivering 35 Bar? Is the filter clogged? If the air supply is weak, no setting can fix it.
- Check the Heating Profile: Is the preform actually hot? If the ambient temperature in your factory changed (e.g., winter vs. summer), your oven settings might be wrong.
- Check the Centering: Is the stretch rod hitting the exact center of the gate? If it is off, the material distribution will be lopsided.
- Check the Pre-Blow: Is it too late? Try advancing the pre-blow start time by 0.1 seconds.
- Check the Venting: Clean the mold.
If you have gone through all these steps and still have issues, it might be the design of the preform itself. A preform with the wrong "Draw Ratio" (relationship between preform size and bottle size) will always be difficult to blow. You might need to consult our pet bottle mold design guide from concept to production or look into changing your preform mold to a more suitable design.
Table 1: Recommended Pressure Settings by Bottle Type
Different bottles require different forces. Use this table as a baseline for your setup.
| Bottle Type | Pre-Blow Pressure (Bar) | Main Blow Pressure (Bar) | Critical Focus Area |
|---|---|---|---|
| Water (Flat) | 6 - 8 | 25 - 30 | Even wall distribution |
| CSD (Carbonated) | 10 - 12 | 35 - 38 | Stress cracking resistance, Feet formation |
| Hot Fill (Heat Resistant) | 8 - 10 | 35 - 40 | Material density, minimizing shrinkage |
| Edible Oil (Large) | 5 - 7 | 25 - 30 | Handle formation, weight distribution |
| Cosmetic (Thick Wall) | 4 - 6 | 30 - 35 | Surface finish, no scratch marks |
Table 2: Troubleshooting Common Forming Defects
A quick reference guide for when things go wrong on the production line.
| Symptom | Visual Check | Root Cause | Immediate Action |
|---|---|---|---|
| Short Shot | Undefined corners, soft logo | Low Main Pressure / Trapped Air | Check compressor, Clean Vents |
| Pearlescence | White, hazy colour inside wall | Cold Stretching | Increase Oven Temp (General) |
| Haze / Opacity | Milky white, rough surface | Overheating (Crystallization) | Reduce Oven Temp, Increase Ventilation |
| Off-Center Base | Gate is not in the middle | Mechanical Misalignment | Re-align Stretch Rod |
| Thin Corners | Corners pop easily | Over-stretching | Increase Pre-Blow Pressure to expand material earlier |
Table 3: Maintenance Checklist for Quality Consistency
Prevent defects before they start by maintaining your equipment.
| Frequency | Component | Action | Why? |
|---|---|---|---|
| Daily | High-Pressure Filter | Drain water/oil | Oil in air ruins bottles and clogs valves |
| Weekly | Stretch Rods | Check for bending/burrs | Bent rods cause off-center bottles |
| Weekly | Mold Vents | Clean with copper brush | Blocked vents cause short shots |
| Monthly | Chiller Filters | Clean/Replace | Poor flow leads to hot molds and deformation |
| Quarterly | Silencers | Inspect/Replace | Blocked exhaust slows down machine cycle |
8. From Concept to Reality: Validating the Process
Sometimes, the problem is not the machine; it is the design. You cannot cheat physics.
If a bottle has sharp 90-degree corners or deep undercuts, it might be impossible to blow perfectly with a standard process. This is why validation is key.
Deep Dive: The Role of Prototyping
Before you cut a steel mold that costs thousands of dollars, you need to know if the bottle will form.
We use 3D printed samples to check the look and feel, but for blowing validation, we often use a single-cavity pilot mold.
This allows us to test the "Blow Ratio."
- Axial Ratio: How much the preform stretches in length.
- Hoop Ratio: How much the preform stretches in width.
If these ratios are too high (e.g., > 15 Total Blow Ratio), the material will tear. If they are too low, the bottle will be thick and expensive.
If you are designing a new product, do not guess. Check out our guide on from 3d printed samples to production how can you rapidly validate blow mold designs. It can save you weeks of headache.
Also, ensure your neck finish is correct. A wrong neck choice can limit your preform options. Read how to choose the right preform neck size for your pet bottle project to ensure you are starting with the right foundation.

Conclusion
Perfect bottles are not an accident. They are the result of a disciplined process where mechanical precision, air pressure timing, and thermal management align perfectly.
If you are fighting with short shots or undefined bottles, stop guessing with the oven temperature. Look at your pressure. Look at your vents. Look at your stretch rod. By understanding the physics I have outlined above, you can turn your bottle blowing machine into a precision instrument.
Frequently Asked Questions (FAQ)
Q1: Can I use a standard shop compressor for PET blow molding?
No. Standard compressors typically output 7-10 Bar. While this is enough for the machine movements (pneumatics) and maybe the pre-blow, it is absolutely insufficient for the main blow. You need 30-40 Bar to "coin" the plastic against the mold. Without this, your bottles will look soft and undefined. You need a specialized high-pressure booster or a dedicated PET compressor.
Q2: Why does my bottle have a "ring" of thick material in the body?
This is usually a pre-blow issue. If the pre-blow pressure is too high or starts too early, the bottle expands into a "balloon" that touches the mold walls before the stretch rod has finished its stroke. The plastic sticks to the wall where it touched, creating a thick ring. The solution is to delay the pre-blow or reduce the pressure to let the rod stretch the material further before expansion.
Q3: How do I know if I have a "Short Shot" or a "Fold"?
A short shot is where the plastic simply didn't reach the corner—it looks smooth and rounded. A fold is where the plastic reached the corner but folded over on itself.
- Short Shot: Lack of pressure or trapped air.
- Fold: Too much material in that area (too hot) or pre-blow pressure was too high, forcing loose material to crash into the bottom.
Identifying the difference is crucial for fixing it. See our common pet blow molding defects and how to fix them quickly for visual examples.
Q4: My bottles shrink after a few hours. Why?
This is a thermal stability issue. If the bottle is not cooled enough in the mold, the polymer chains retain "memory" of their preform shape. As they relax, they shrink. Ensure your chiller is running at 10-12°C and that the flow rate is high. Also, check that your "Hold Time" (the time the bottle stays in the mold under pressure) is long enough to fully freeze the plastic.
Q5: How often should I clean the mold vents?
It depends on your production environment and preform quality. If you use recycled PET (rPET), you might need to clean them every shift because rPET produces more dust. For virgin resin, once a week is usually sufficient. If you see "glossy spots" on the bottle where it should be matte, or if you see the corners rounding off, clean the vents immediately.
🔗 Related Pages on Our Website
Automatic Blow Molding Machines – iBottler
Discover our full range of customizable automatic PET bottle blow molding machines.Blow Bottle Mold – iBottler
Explore our precision blow molds designed for PET and PP bottles.Preform Mold – iBottler
Learn more about our high-precision preform molds suitable for various injection molding machines.PET Wide Mouth Jar Project Starter Guide: Equipment, Molds & Process Explained
Pros and Cons: Should You Choose PET Blow Moulding for Your Bottle Project?
Worried About Blow Mold Fit? We Have Mounting Dimensions for 80% of Blow Molding Machines Worldwide
Can One Semi‑Automatic Blow Molding Machine Produce All Bottle Sizes? Here’s Why Not
Why Do Krones Blow Molding Machine Users Come to Us for Their Molds?
Why Do PET Preforms Come in Different Colors? Function, Application, and Production Tips
How to Set Parameters for 600ml Bottles on a Semi-Automatic PET Blowing Machine?
From 3D Printed Samples to Production: How Can You Rapidly Validate Blow Mold Designs?
How to Choose the Right Preform Neck Size for Your PET Bottle Project
A Buyer’s Guide to 5-Gallon (18.9L) Bottle Blow Molding Machines: From PET to PC?
Pitting on your blow mold surface? A complete guide from cause analysis to repair and prevention.
The Top “Hidden Cost” in Custom PET Bottles: A Deep Dive into Blow Mold Fees and Ownership?
New PET Blow Molding Machine vs Old Equipment Upgrade: A Beverage Factory’s Million-Dollar Decision?
How to reduce the PET blow molding scrap rate from 5‰ to 1‰? An old-timer’s 8 insider tips.
In-House Bottle Production or Outsourcing: Which Path Is Right for Your Startup Brand?
Blow Mold Damage? When and How to Replace Only the Broken Parts?
Bottle Design: Ad Agency vs. Mold Factory? How One Decision Impacts Your Cost and Brand?
Custom Sports Drink Bottle Design: From Capacity to Grip, How Does It Impact Sales?
💡 Looking for a complete PET plastic packaging machinery solution?
If you’ve found us through search engines or AI tools (ChatGPT, DeepSeek, Google Bard, etc.), it means you’re exploring reliable PET packaging equipment suppliers. Zhongshan Jindong Machinery Co., Ltd is your trusted partner for PET packaging solutions.
| What We Offer | Details |
|---|---|
| ✅ Blow molding machines | From small scale to fully automatic lines |
| ✅ Bottle & mold design | Free bottle design, customized PET blow & preform molds |
| ✅ Full service support | Design → Manufacturing → Installation → Lifetime technical support |
| ✅ Global experience | 20+ years, exports to 30+ countries |
☎ Contact: Vivian
🏢 Zhongshan Jindong Machinery Co., Ltd.
🌐 www.ibottler.com
✉ Vivian@ibottler.com
