Are you tired of production delays caused by faulty PET preforms? You face wasted material, machine downtime, and final products that fail quality checks, all hurting your bottom line. It's time to stop the guesswork.
The best way to guarantee bottle quality is to implement a strict incoming preform inspection process. This involves seven core checkpoints: preparation, visual checks, dimensional measurements, weight consistency, material property analysis (like IV value), heating tests, and a final trial blow. This ensures quality before you start production.

I've seen too many businesses struggle with this. They buy preforms, hope for the best, and then fight fires when problems pop up on the production line. A bad batch of preforms can bring your entire operation to a halt. But it doesn't have to be this way. By creating a systematic checklist, you can catch issues early, hold your suppliers accountable, and ensure every bottle you produce is perfect. This guide will walk you through creating that exact system, turning you from a reactive problem-solver into a proactive quality champion. Let's get started.
| Key Takeaway | Description |
|---|---|
| Systematic Inspection is Key | Don't rely on luck. A step-by-step checklist is your best defense against bad preforms. |
| Dimensions are Non-Negotiable | Incorrect dimensions, especially in the neck finish and body, lead to blowing and capping failures. |
| Weight Equals Cost & Performance | Inconsistent preform weight directly translates to unstable bottle quality and fluctuating material costs. |
| Look Beyond the Surface | Intrinsic properties like IV (Intrinsic Viscosity) and AA (Acetaldehyde) levels determine the final bottle's strength and safety. |
| The Ultimate Test is the Trial | No matter how good the specs look, a real-world trial blow on your own machines is the final, undeniable proof of quality. |
How do you prepare for a preform inspection before you even open the box?
Starting your inspection without a plan is like navigating without a map. You might get somewhere, but it won't be efficient or reliable. This leads to inconsistent results and missed defects, causing problems later on.
First, verify all supplier documents like the Certificate of Analysis (COA) against your order. Then, use a standard like AQL to determine a statistically significant sample size. Finally, gather all necessary tools like calipers, scales, and gauges so you're ready for a thorough inspection.

Dive Deeper: Setting the Stage for Success
A successful inspection begins long before you touch the first preform. This foundational stage is about preparation and process. By getting this right, you make the entire quality control workflow smoother, more accurate, and more defensible. If you find a problem, your clear, documented process will be your best asset when communicating with your supplier. Many businesses, especially smaller ones, skip these steps, thinking they're saving time. In reality, they're inviting chaos. A few minutes of preparation can save hours or even days of production downtime.
Verifying Supplier Documents in Detail
Before the plastic is even cool, your supplier is generating paperwork. This isn't just administrative fluff; it's the preform's birth certificate and report card. Don't let the boxes hit your warehouse floor without first demanding and checking these documents.
- Certificate of Analysis (COA): This is the most critical document. It should list the key technical specifications of the batch. Look for the PET resin grade used, the Intrinsic Viscosity (IV) value, the color code (e.g., Lab* values), and sometimes the Acetaldehyde (AA) content. The COA is your supplier's promise of quality.
- Shipping Inspection Report: This is the supplier's own internal quality check before the preforms left their factory. Compare it with your own findings later.
- Packing List & Purchase Order (PO): This seems basic, but mistakes happen. Meticulously check that the batch number, quantity, preform model/drawing number, and delivery date on the paperwork match your PO and the labels on the boxes. A mismatch here could mean you've received the wrong product entirely.
Why is this so critical? Imagine you specified a high-IV preform for a carbonated soft drink bottle that needs to withstand pressure. If the supplier ships a batch with a lower IV value meant for still water bottles, your bottles could fail catastrophically. The COA is your first line of defense against this kind of mix-up. Treat the paperwork as the first checkpoint. No matching documents, no inspection.
Understanding and Implementing AQL Sampling
You can't test every single preform in a shipment of 100,000. It's impractical and unnecessary. But how many should you test? Grabbing a few from the top box is not a scientific method. This is where the Acceptance Quality Limit (AQL) comes in. It's a statistical method used worldwide (ISO 2859-1) to determine how many units to sample from a batch to get a representative picture of its overall quality.
In simple terms, you decide on an "acceptable quality level" (for most non-critical defects, AQL 2.5 is common) and the standard tells you how many to sample (Sample Size) and the maximum number of defects you can find before you should reject the whole batch (Accept/Reject Number).
Example AQL Level II Sampling Plan (General Inspection)
| Lot Size (Number of Preforms) | Sample Size (Code Letter) | AQL 2.5 (Accept / Reject) |
|---|---|---|
| 2 to 8 | 2 (A) | 0 / 1 |
| 9 to 15 | 3 (B) | 0 / 1 |
| 16 to 25 | 5 (C) | 0 / 1 |
| 26 to 50 | 8 (D) | 0 / 1 |
| 51 to 90 | 13 (E) | 1 / 2 |
| 91 to 150 | 20 (F) | 1 / 2 |
| 151 to 280 | 32 (G) | 2 / 3 |
| 281 to 500 | 50 (H) | 3 / 4 |
| 501 to 1,200 | 80 (J) | 5 / 6 |
| 1,201 to 3,200 | 125 (K) | 7 / 8 |
| 3,201 to 10,000 | 200 (L) | 10 / 11 |
| 10,001 to 35,000 | 315 (M) | 14 / 15 |
To use this, if you receive a lot of 5,000 preforms, you find your lot size in the chart (3,201 to 10,000). Your sample size is 200 units. You would then inspect those 200 preforms. If you find 10 or fewer preforms with minor defects, you accept the entire lot. If you find 11 or more, you have a statistical basis to reject the entire lot. This process takes the emotion and guesswork out of the decision. You're not just "feeling" like the quality is bad; you have the data to prove it. This data is invaluable when discussing issues with suppliers of your preforms or even the preform mold itself.
Your Essential Toolkit for Preform Inspection
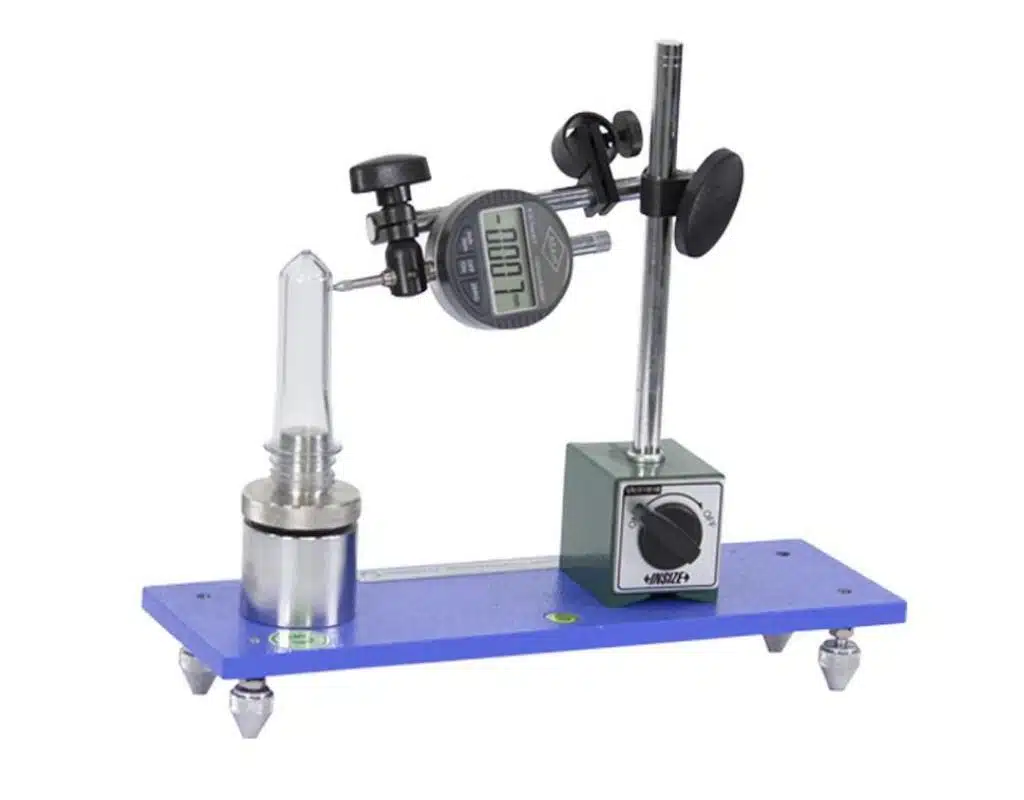
You can't measure microns with a ruler. Having the right tools is non-negotiable for an accurate inspection. Here’s a checklist of the essential equipment. Get them calibrated and keep them clean.
| Tool | Purpose | Pro Tip |
|---|---|---|
| Digital Calipers | Measures length, diameter, and critical neck dimensions. | Use a high-quality model accurate to at least 0.01mm. Zero it out before every set of measurements. |
| High-Precision Scale | Measures the gram weight of each preform. | Must be accurate to at least 0.01g. Place it on a stable, vibration-free surface. |
| Polariscope | Checks for internal stress and crystallinity in the PET. | Use in a darkened area to see the stress patterns (isochromatic fringes) clearly. |
| Wall Thickness Gauge | Measures the thickness of the preform wall, especially to check for concentricity. | This is a specialized tool but crucial for diagnosing uneven blowing issues. |
| Go/No-Go Gauges | Quickly checks if neck finish dimensions (like T and E) are within tolerance. | A very fast and effective way to sort out-of-spec neck finishes without a caliper. |
| Industrial Oven | Used for the heating test to simulate the blow molder's oven. | Must have stable temperature control. A simple kitchen oven is not accurate enough. |
| Color Standard / Golden Sample | A physical reference for color and transparency comparison. | Keep your "golden sample" (a perfect preform from a previous batch) in a dark, cool place to prevent degradation. |
| Magnifying Glass / Microscope | For close examination of small defects like black specks or contamination. | A simple jeweler's loupe works well for on-the-spot checks. |
Gathering this toolkit is a one-time investment that pays for itself countless times over by preventing bad batches from ever entering your production stream.
Checkpoint 1: What obvious red flags can a visual and sensory inspection reveal?
Ignoring the "obvious" is a classic mistake. A small black speck or a faint odor can be a symptom of a much larger problem in the supplier's manufacturing process, leading to brittle or contaminated bottles.
Look for contaminants like black specks, oil, or dust. Compare the preform's color and transparency against a standard sample. Finally, perform a heat test to check for any strange odors that could taint your product.

Dive Deeper: Your First Line of Defense
This is the fastest and easiest check, yet it can be incredibly powerful. Our eyes and nose are excellent at detecting things that are "not right." In preform inspection, these sensory checks act as a quick filter. They can help you identify a batch with major problems in minutes, saving you the effort of conducting more time-consuming tests. These are often the "go/no-go" criteria. A single, clear sign of contamination can be enough to reject a batch on the spot. Don't underestimate this step. It’s where you can often spot the clues to more complex problems, like those detailed in guides to fixing common PET blow molding defects.
The Hunt for Contaminants and Impurities
Contaminants are foreign materials that should not be in the preform. They are almost always a cause for immediate rejection because they compromise both the structural integrity and the safety of the final bottle.
- Black Specks: These are the most common enemy. They are typically specks of burned or degraded PET resin. This can happen if the supplier's injection molding machine has hot spots, if they use poorly recycled material, or if the resin is dried for too long or at too high a temperature. A black speck creates a stress point. When the preform is stretched during blow molding, it can cause a tear or a hole.
- Other Colors/Haziness (Gels): Unmelted or cross-linked particles of PET can appear as translucent "gels" or hazy spots. These also create weak points in the final bottle wall.
- Oil and Grease: Any sign of oily residue, either on the outside or inside, is a major red flag. This usually points to a hydraulic leak or poor maintenance on the supplier's injection molding equipment. It's a food safety risk and can cause issues with printing or labeling on the final bottle.
- Dust and Hair: This indicates a dirty production environment at the supplier's facility. It's a cleanliness and hygiene issue that is unacceptable for food and beverage packaging.
Defect Severity Table
| Defect Type | Location | Severity | Action |
|---|---|---|---|
| Black Speck (>0.5mm) | Gate Area | Major | Document and consider for rejection count. |
| Black Speck (>0.5mm) | Body/Wall | Critical | Immediate rejection. Creates a weak point for bursting. |
| Oil/Grease | Anywhere | Critical | Immediate rejection. Food safety hazard. |
| Dust/Hair | Inside Preform | Critical | Immediate rejection. Contamination hazard. |
| Haze/Gels | Body/Wall | Major | Document and monitor. Too many can cause weakness. |
When you find a contaminant, document it. Take a photo. Note its size and location. A single speck near the gate (the injection point at the bottom) might be a minor defect. The exact same speck in the middle of the preform wall is a critical defect because that area will be stretched the most.
H3: Mastering Color and Transparency Checks
Your brand has a specific color. Your water bottle needs to be crystal clear. Deviations from the standard are not just cosmetic; they can indicate serious process or material issues.
The best way to check color is by direct comparison.
- The Golden Sample: Always have an approved, perfect preform from a previous batch stored away from light. This is your "golden standard."
- The Light Box: Place your new samples next to the golden sample inside a light box with a neutral gray background and standardized lighting (e.g., D65 daylight). The human eye is terrible at judging color in isolation, but excellent at comparison.
- What to Look For:
- Yellowing/Yellowness: This is a classic sign of PET degradation from excessive heat or drying time during injection molding. It can also mean the Intrinsic Viscosity (IV) has dropped, leading to a weaker bottle.
- Haze/Whiteness: This can be caused by moisture in the PET resin before molding (improper drying) or by the material crystallizing too quickly. A hazy preform will not blow into a clear bottle.
- Color Mismatch: For colored preforms, check for consistency. Is the blue too light? Is the amber too dark? An inconsistent color suggests poor control over the colorant dosage at the supplier. This can affect how the preform heats up in your bottle blowing machine, as darker colors absorb more infrared energy.
The Overlooked Odor Test
This simple test is critically important for any product where taste or smell matters, like bottled water, juices, and teas. The material of the bottle should never transfer any odor to the product.
The primary culprit for odors in PET is Acetaldehyde (AA), a natural byproduct of the manufacturing process. While harmless in small amounts, it can give water a slightly sweet, fruity taste. Other odors can come from degraded material or contaminants.
How to Perform a Simple Odor Test:
- Take 5-10 sample preforms.
- Use a knife to carefully chop them into smaller pieces. This increases the surface area.
- Place the pieces into a clean, odor-free glass jar with a lid. A mason jar works perfectly.
- Heat the sealed jar in an oven or water bath to around 60°C (140°F) for 30-60 minutes. Do not use a microwave.
- Remove the jar, let it cool slightly so you don't burn yourself, and then carefully open the lid.
- Immediately smell the air inside the jar. Does it have a sharp, chemical smell? A burnt smell? Any odor other than a faint, neutral plastic smell is a cause for concern and further investigation (like a formal AA content lab test).
This test is a quick and effective way to screen for potential sensory issues before you turn thousands of preforms into bottles that could ruin your product's reputation.
Checkpoint 2: Why are the precise dimensions and geometry of a preform so critical?
A preform that is off by even a fraction of a millimeter can be useless. It may not fit in the blow molder, the cap may not seal correctly, or the final bottle may have dangerously thin walls.
Use calipers and gauges to precisely measure key dimensions like the neck finish (T, E sizes), overall length, and body diameter. Also, check for concentricity to ensure the wall thickness is uniform around the preform. This prevents uneven blowing.
Dive Deeper: The Blueprint for a Perfect Bottle
Think of a PET preform as the folded-up blueprint for your final bottle. If the blueprint's measurements are wrong, the finished house will have crooked walls and leaky roofs. This checkpoint is all about precision metrology. It's less subjective than the visual check and relies on hard data from your measurement tools. This is often where I find the root cause of my clients' most frustrating problems.
I remember a client in Thailand who was struggling with a 750ml bottle. No matter how he adjusted his blow molding machine, the bottle's base was lopsided, and the wall thickness was uneven. He was blaming his machine, his operator, everything. I suggested he stop looking at the bottle and start looking at the preform. I had him cut a few preforms in half and measure the wall thickness at various points around the circumference. Sure enough, one side of the preform wall was significantly thicker than the other. This defect is called eccentricity. The preform itself was unbalanced. You can't blow a balanced bottle from an unbalanced preform. This discovery shifted his focus from fighting his machine to enforcing stricter quality control on his incoming preforms. It all started with precise measurement.
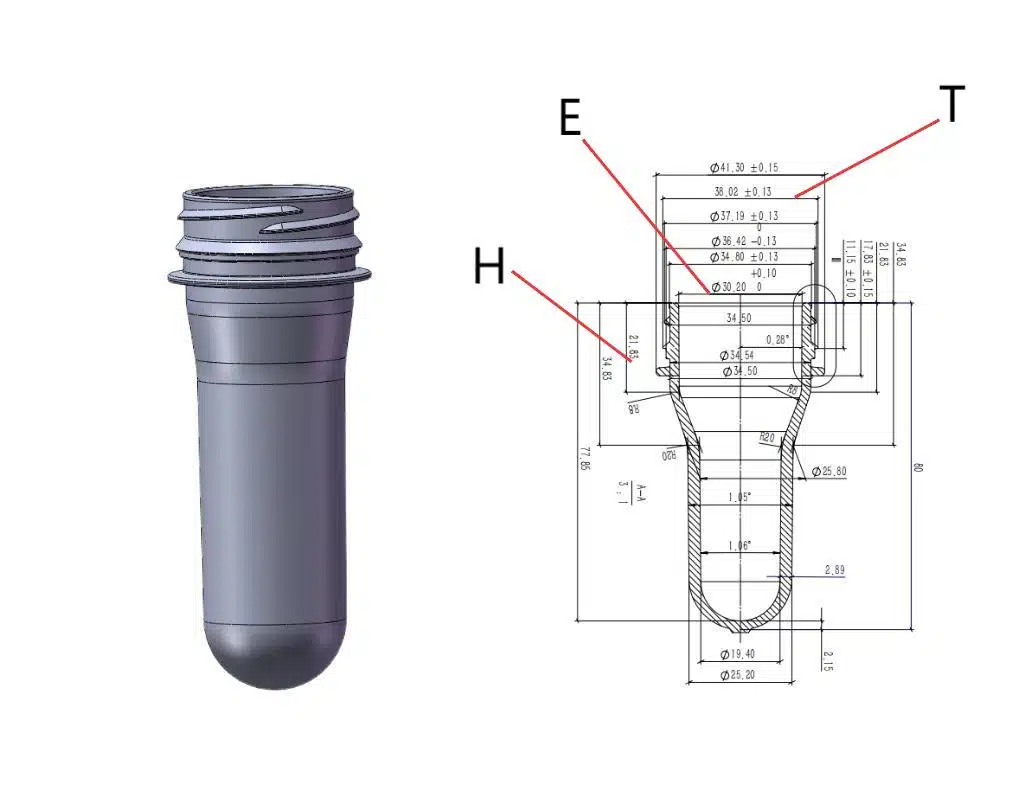
The Neck Finish: Your First Point of Precision
The neck finish is the most complex and critical part of the preform. It is the only part that does not get heated and stretched during blow molding. Its dimensions are final. If the neck is wrong, the preform is scrap. The cap won't seal, leading to leaks, loss of carbonation, and potential contamination.
You need to measure three critical dimensions, often referred to by their standard letter designations. This is where a guide on how to choose the right preform neck size becomes invaluable.
- T Dimension (Outer Thread Diameter): This is the measurement across the widest point of the threads. If it's too large, the cap won't fit. If it's too small, the cap will strip and won't seal.
- E Dimension (Inner Neck Diameter): This is the measurement across the inside opening of the neck. If it's too small, it can cause problems with filling nozzles. If it's too large, the cap's sealing ring may not engage properly.
- H Dimension (Height of Neck Finish): This is the height from the top of the neck to the bottom of the support ring. It ensures the bottle sits correctly in the capper and that the tamper-evident band on the cap engages properly.
Neck Finish Measurement
| Dimension | Tool | Common Tolerance | Consequence of Failure |
|---|---|---|---|
| T (Thread Diameter) | Digital Calipers | ±0.20 mm | Capping issues, stripped threads. |
| E (Inner Diameter) | Digital Calipers | ±0.20 mm | Filling nozzle issues, poor seal. |
| H (Neck Height) | Digital Calipers | ±0.25 mm | Tamper-band problems, incorrect capping. |
| Go/No-Go Gauge | Threaded Gauge | Pass / Fail | Fast and definitive check of overall thread profile. |
For high-volume operations, a Go/No-Go gauge is faster than calipers. It's a threaded tool with two sides. The "Go" side should screw on easily. The "No-Go" side should not. It provides a simple pass/fail result.
Body, Length, and Support Ring: Ensuring a Smooth Production Flow
While the neck is critical for sealing, the rest of the preform's geometry is critical for the blow molding process itself.
- Overall Length: The preforms are carried through the heating oven by a gripper system that holds them by the support ring. If the preform is too long or too short, it won't be positioned correctly in front of the heating lamps. This leads to uneven heating and, consequently, an unevenly blown bottle.
- Support Ring Diameter: This ring is what the preform hangs from as it travels through the machine. If its diameter is too small or too large, it can jam the transport system.
- Body Diameter: The preform body must fit easily into the cavity of the blow bottle mold before blowing begins. An oversized preform can get scratched or stuck.
These dimensions ensure the preform moves through your production line like a perfectly trained athlete, without fumbling or falling. A good PET bottle mold design guide always starts with a perfectly specified preform.
The Hidden Menace of Eccentricity
This brings me back to my Thai client's story. Eccentricity, or being off-center, is a hidden defect you can't see with a casual glance. It means the core and cavity of the supplier's preform mold were not perfectly aligned during injection. The result is a preform where the central hole is not truly centered.
How to Measure Eccentricity:
- You need a specialized Wall Thickness Gauge.
- Place the gauge's probe inside the preform.
- Measure the wall thickness at one point. Let's say it's 3.0mm.
- Rotate the preform 90 degrees and measure again.
- Rotate another 90 degrees and measure.
- Rotate a final 90 degrees and measure.
- A high-quality preform will have very little variation between these four points. If you measure 3.0mm on one side and 2.5mm on the opposite side, you have a serious eccentricity problem.
When an eccentric preform is blown, the thinner wall section stretches more easily and becomes even thinner, while the thicker side stretches less. This creates the lopsided bottle my client saw, with one dangerously thin wall that is prone to bursting or collapsing. This single measurement can explain a huge number of downstream problems.
Checkpoint 3: Why is preform weight the core metric for cost and performance?
A preform's weight seems simple, but it's directly tied to your costs and the bottle's strength. Unstable weights mean you're either giving away plastic for free or producing weak bottles that will fail in the field.
Use a high-precision scale to weigh each sample preform. Calculate the average weight and the standard deviation across all samples. A low standard deviation indicates high-quality, consistent manufacturing from your supplier.

Dive Deeper: The Weight of Your Decisions
Of all the quantitative measurements you'll take, gram weight is arguably the most important. It is the most direct indicator of two things you care deeply about: material cost and final bottle performance. PET resin is bought by the kilogram. Every tenth of a gram over the specified weight is money you're giving away for free over a run of a million bottles. Every tenth of a gram under the specified weight is a risk you're taking with the bottle's structural integrity. This is why the weighing station should be a core part of your incoming QC lab. The process should be treated with scientific rigor, not as a casual check.
The Ritual of Weighing: Precision is Everything
This isn't about using a kitchen scale. You need a laboratory-grade digital scale that is accurate to at least two decimal places (0.01g).
The Standard Operating Procedure (SOP) for Weighing:
- Environment: Place the scale on a heavy, stable table that is free from vibrations. Air currents from vents or open doors can affect the reading, so choose a calm location.
- Calibration: Before you begin, calibrate the scale using a certified calibration weight. This should be done daily. An uncalibrated scale gives you meaningless data.
- Tare/Zero: Before weighing each preform, ensure the scale is zeroed out.
- Handling: Handle the preforms with gloves or tweezers if possible. Oils from your fingers have mass and can slightly alter the reading.
- Recording: Weigh each preform from your AQL sample one by one. Record each individual weight in a spreadsheet. Don't just eyeball it and write down the average. The individual data points are crucial for the next step.
- Consistency: Let the reading on the scale stabilize before you record the number. Digital scales can fluctuate for a second or two.
This methodical process ensures that the data you collect is accurate and reliable. You are building a dataset that will form the basis of a critical decision to accept or reject the batch.
Beyond Average: Why Standard Deviation is Your Quality Score
Many people stop after calculating the average weight. They'll weigh 50 preforms, see the average is 20.1g against a spec of 20.0g, and think it's acceptable. The real story, however, is hidden in the consistency. This is where standard deviation comes in.
In simple terms, standard deviation tells you how spread out your data points are from the average.
- A low standard deviation means all the preforms are very close to the average weight (e.g., 19.9g, 20.0g, 20.1g). This is a sign of a stable, well-controlled manufacturing process at your supplier. This is what you want.
- A high standard deviation means the weights are all over the place (e.g., 19.5g, 20.0g, 20.5g). Even if the average is correct, this inconsistency is a huge red flag. It indicates an unstable process.
Practical Example:
| Batch A | Batch B | |
|---|---|---|
| Specification | 20.0g ±0.3g | 20.0g ±0.3g |
| Sample 1 | 20.1g | 19.7g |
| Sample 2 | 20.0g | 20.5g |
| Sample 3 | 19.9g | 19.8g |
| Sample 4 | 20.0g | 20.3g |
| Sample 5 | 20.1g | 19.6g |
| Average Weight | 20.02g (Looks Good) | 19.98g (Looks Good) |
| Standard Deviation | 0.08 (Excellent) | 0.38 (Poor) |
As you can see, both batches have a great average weight. But Batch A is far superior because of its low standard deviation. The weights are tightly clustered. Batch B is a problem waiting to happen. Some of its bottles will be heavy and wasteful, while others will be lightweight and weak. Most spreadsheet programs (like Excel or Google Sheets) can calculate standard deviation for you instantly with the STDEV function. Use it. It's one of the most powerful numbers in your QC toolbox.
Connecting Grams to Dollars and Strength
Let's make this tangible. The weight of the preform is the raw material that gets distributed to form the walls of the bottle.
- Weight and Cost: If your spec is 20.0g but your supplier consistently delivers at 20.3g, that's a 1.5% overage. On an order of 1,000,000 preforms, you've just paid for 300,000 extra grams (300 kg) of PET resin that you didn't need. That's a direct hit to your profit margin.
- Weight and Performance: The weight directly correlates to the final bottle's performance characteristics. The most common is Top Load, or crush resistance. A heavier bottle is generally stronger. If a preform is underweight, the resulting bottle might collapse in a stacking warehouse or on a retail shelf. It will also be more susceptible to failing drop tests. The relationship is so direct that you can often create a chart mapping preform weight to final bottle top-load strength. An underweight preform simply doesn't have enough plastic to create a bottle that meets performance specifications.
Ultimately, controlling preform weight is about controlling consistency. A consistent preform weight leads to a consistent blowing process, a consistent bottle, and consistent costs.
Checkpoint 4: How do you test the invisible properties of the PET material itself?
A preform can look perfect and have correct dimensions but still fail catastrophically. This is because invisible material properties, like the length of the polymer chains (IV value), determine its strength and performance during blowing.
Key material properties require lab testing. You must check the Intrinsic Viscosity (IV) to ensure strength, use a polariscope to spot internal stress from molding, and, for sensitive products, test for Acetaldehyde (AA) content.

Dive Deeper: Uncovering the Material's True Character
This checkpoint moves beyond what you can see or measure easily on a benchtop. We are now diving into the molecular level of the PET resin itself. These properties are determined during the resin manufacturing and preform injection molding processes. While you may need to send samples to an external lab for some of these tests (like IV and AA), understanding what they are and why they matter is crucial for a comprehensive QC program. Skipping these tests is like buying a car based only on its paint job and tire size, without ever checking the engine.
Decoding Intrinsic Viscosity (IV) – The Backbone of Your Bottle
If you learn only one term from this section, make it Intrinsic Viscosity, or IV.
In the simplest terms, IV is a measure of the length of the PET polymer's molecular chains.
- Long Chains (High IV): Imagine long strands of spaghetti. They are entangled and strong. High IV PET behaves this way. It has the high melt strength needed to be stretched into a large, strong bottle without tearing.
- Short Chains (Low IV): Now imagine that spaghetti has been chopped into tiny pieces. There's no entanglement, no strength. Low IV PET is brittle. It will struggle to stretch and will result in a weak, fragile bottle.
The IV value of the virgin PET resin drops during processing (drying, melting, injection). This is unavoidable. The goal is for the final preform to retain an IV value that is appropriate for its application.
Typical IV Values for Preforms by Application
| Application | Required Bottle Properties | Typical Preform IV (dL/g) |
|---|---|---|
| Still Water | Clarity, light weight | 0.76 - 0.80 |
| Carbonated Soft Drinks (CSD) | Pressure resistance, gas barrier | 0.82 - 0.86 |
| Hot-Fill Juices/Teas | Thermal stability (resists shrinking) | 0.84 - 0.88 |
| Refillable Bottles | High durability, caustic wash resistance | > 0.85 |
How to Test IV: This is not a test you can do in-house without expensive viscometer equipment. The process involves dissolving the PET in a special solvent and measuring the flow time.
- Select a few preforms randomly from the batch.
- Send them to a certified third-party polymer testing lab.
- Compare the lab's result to the value promised on your supplier's COA and the requirements for your application.
A significant drop in IV from what was specified is a major cause for concern. It means the supplier may have over-dried the resin or used too much heat, degrading the material. The resulting bottles will be brittle and may fail during filling, shipping, or in the hands of the consumer.
Seeing Stress with a Polariscope
When the molten PET is injected into the preform mold, it cools very rapidly. This rapid cooling can lock stress into the material. While some stress is unavoidable, excessive or poorly distributed stress can cause major problems. A polariscope is a simple but brilliant tool for visualizing this hidden stress.
How it Works:
- A polariscope has two polarized light filters.
- You place the preform between the two filters.
- When you look through the eyepiece, the stressed areas of the plastic bend the light, creating colorful patterns called "isochromatic fringes."
- The density and color of these fringes tell you the amount and location of the stress.
What to Look For:
- Good Preform: You will see a symmetrical, relatively light pattern of colors, especially around the gate area at the bottom. The pattern should be the same on all preforms you check.
- Bad Preform: Look for highly concentrated, dense bands of color (especially yellows and reds), which indicate extreme stress. Asymmetrical patterns indicate a non-uniform cooling or packing process. A heavily stressed area will not stretch properly during blowing and can become a haze, a weak spot, or even a rupture point. You should also check for "crystallinity." If you see a distinct white, opaque spot, it's a crystalline area that will not stretch at all and will create a hole in the bottle.
The Taste Test: Acetaldehyde (AA) Content
Acetaldehyde (AA) is a chemical byproduct created when PET is heated. For most applications, it's not a concern. But for products with a delicate taste profile, especially bottled water, it's a critical parameter. AA can leach from the bottle wall into the water, giving it a faint, sweet, or fruity off-taste that consumers will notice.
The amount of AA generated depends on factors like resin type, melt temperature, and residence time in the injection machine. Good suppliers use specific resins and processes to minimize AA formation.
How to Test AA: Like IV, this requires specialized laboratory equipment (a gas chromatograph).
- The standard test involves grinding up a preform.
- The ground material is heated in a sealed vial to release the AA.
- The gas from the vial is injected into the machine, which measures the AA concentration in parts per million (ppm).
For bottled water, the industry standard is to have an AA content below 3 ppm in the preform. Some premium water brands demand levels below 1 ppm. Always check that the AA level reported on the COA is suitable for your product. If in doubt, or if you get customer complaints about taste, send samples for third-party verification.
Checkpoint 5: How can a heating test predict a preform's blow molding performance?
A preform can pass all static tests but still fail during the dynamic process of heating. Inconsistent heating behavior leads to an unstable process, high scrap rates, and endless adjustments on your blow molding machine.
By performing a controlled oven test, you can observe how preforms react to heat. Check for uniform shape change, consistent surface temperature, and an absence of crystallization (whitening). This simulates their real-world performance.

Dive Deeper: A Rehearsal for the Main Event
The blow molding process starts with heating. The preforms travel through an oven with a bank of high-intensity infrared (IR) lamps that heat the body of the preform to a precise temperature, typically around 100-110°C. This makes the PET soft and rubbery, ready for stretching. This heating phase is arguably the most sensitive part of the entire process. If the preforms do not heat evenly and consistently, nothing that follows will work correctly. A simple heating test in a lab oven is a fantastic way to predict how a batch of preforms will behave in your multi-thousand dollar bottle blowing machine. It's a low-cost, low-tech way to spot high-cost, high-tech problems before they happen.
The Lab Oven Test: Simulating the Heat-Up
You don't need a full-scale blow molder oven for this. A good quality, temperature-stable industrial or laboratory oven will work perfectly. The goal is to heat the preforms in a controlled way and observe their reaction.
Step-by-Step Oven Test Procedure:
- Select Samples: Take at least 5-10 preforms from your AQL sample.
- Preheat the Oven: Set your oven to a temperature slightly above the target blowing temperature, for example, 120°C. Let it stabilize completely.
- Place Preforms: Stand the preforms upright on a metal tray. Ensure they are not touching each other.
- Heat for a Set Time: Place the tray in the oven for a fixed period, typically 3-5 minutes, depending on the preform size. Use a stopwatch for accuracy.
- Observe and Compare: After the time is up, carefully remove the tray and observe the preforms as they cool.
What to Look For:
- Uniformity of Shape: Did all the preforms shrink and change shape in the exact same way? If some have slumped more than others, or twisted, it indicates inconsistency in the material or internal stresses.
- Crystallization (Whitening): This is a major red flag. If the preforms turn hazy or milky-white, it means they have crystallized due to heat. Crystalline PET will not stretch; it will shatter or tear during blowing. This can be caused by a poor preform design or the wrong grade of PET resin.
- Slumping/Deformation: A well-designed preform should shrink slightly but maintain its basic shape. If it slumps over or deforms badly, it suggests low melt strength, which could be linked to a low IV value.
- Consistency: The key here is that all the samples should look identical after the test. Any variation between samples from the same batch points to an unstable process at your supplier.
The Special Case of Colored Preforms and Infrared Absorption
This test is even more critical for colored preforms (amber, green, blue, opaque white). The color of a preform is created by adding a colorant masterbatch to the virgin PET. The type and concentration of this colorant dramatically affect how the preform absorbs infrared energy from the heating lamps.
- Darker Colors Absorb More Heat: An amber or dark green preform will absorb IR energy much faster than a clear one.
- Opaque Colors Reflect Heat: A white or pearlescent preform will reflect a lot of IR energy, making it much harder to heat the core of the preform.
The problem arises from inconsistency. If the colorant is not perfectly mixed, you can get streaks or lighter/darker patches in the preform. When this preform goes through the oven, the darker areas will overheat while the lighter areas remain underheated. This differential heating makes it impossible to blow a good bottle. The overheated section will blow out too thin, while the underheated section won't stretch enough. When you perform the oven test on colored preforms, look very closely for any mottling or uneven color changes as it heats.
Charting the Heating Curve with a Pyrometer
For a more advanced and data-driven approach, you can chart the heating performance using an infrared (IR) pyrometer. This is a non-contact thermometer that can instantly read the surface temperature of the preform.
Advanced Heating Test:
- Heat a single preform in the oven as described before.
- Every 30 seconds, quickly open the oven, aim the pyrometer at the middle of the preform body, and record the temperature.
- Plot these temperatures against time on a graph. This is the preform's "heating curve."
- Repeat this for several preforms from the batch.
In an ideal world, the heating curves for all the sample preforms should be nearly identical. If the curves are wildly different, it proves that the preforms do not have consistent thermal properties. This data is incredibly powerful. You can go back to your supplier not with a vague complaint like "your preforms aren't running well," but with a chart showing that preforms from the same batch heat up at different rates, proving an inconsistency that needs to be fixed at their end. This is the kind of professional data that gets results.
Checkpoint 6: Why is a real-world trial blow the ultimate quality exam?
Lab tests are great, but they're theoretical. A preform can pass every single lab test and still fail on your specific equipment due to subtle incompatibilities. Skipping a trial blow is gambling with full production.
Running a sample of the new preforms on your actual production line with your standard settings is the only way to be 100% certain. This tests the preform's compatibility with your specific machine, mold, and process parameters.
Dive Deeper: The Moment of Truth
This is it. After all the paperwork, measuring, weighing, and lab tests, this is the final exam. The trial blow takes the preform from a static component to a dynamic participant in your manufacturing process. It is the single most effective test to validate a new batch of preforms because it tests everything at once: the preform itself, its interaction with your heating oven, its fit in your blow bottle mold, and its response to your machine's air pressure. I always tell my clients: "The data is important, but the bottle tells the final story." If you can't blow a good bottle, none of the other data matters. This is also where you can solve many of the most common PET blow molding defects before they impact a full production run.
The On-Machine Trial: Simulating Reality
The goal here is to run the test under conditions that are as close to normal production as possible.
- Use Your Standard Process: Load the sample preforms (a few dozen should be enough) into your bottle blowing machine. Do not change your standard, validated process settings for temperature, pressures, and timings. The new preforms should work with your existing process. If you have to make major adjustments to get a good bottle, the preforms are not consistent with your previous supply.
- Machine & Mold Compatibility: This test instantly verifies physical compatibility. Do the preforms feed correctly from the hopper? Do they sit properly in the grippers? Do they enter the mold cavity without scratching? It's crucial that the preform and mold are a perfect pair, which is why a good PET bottle mold design guide is so important. It's also vital to ensure your mold will mount correctly in your machine, an issue we've helped solve by compiling mounting dimensions for 80% of blow molding machines worldwide.
- Observe the Process: Watch the preforms as they go through the oven. Do they heat evenly? Watch the bottles as they are blown. Are there any immediate, obvious defects like burst bottles, short shots, or major hazing?
This live trial is the only way to see how all the individual specifications come together in a dynamic, real-world environment.
A Deep Dive into Finished Bottle QC
Once you have a set of freshly blown bottles from the trial preforms, they must undergo their own rigorous quality control checks. You are testing to see if the preform was capable of producing a bottle that meets your final product specifications.
Essential Finished Bottle Tests:
| Test | Method | Purpose |
|---|---|---|
| Capacity/Volume | Fill the bottle to the specified fill height with water and pour it into a graduated cylinder. | Confirms the bottle holds the correct volume of product. |
| Wall Thickness Distribution | Use a hot wire cutter to cut the bottle into sections. Measure wall thickness at key points with a gauge. | This is the most critical test. It ensures the plastic is distributed correctly for strength. No dangerously thin spots. |
| Top Load (Crush) Strength | Use a compression tester to apply force to the top of the bottle until it collapses. | Simulates stacking pressure in a warehouse. Ensures bottles won't crush in the case. |
| Drop Test | Fill the bottle with water, cap it, and drop it from a specified height onto a hard surface. | Simulates being dropped during shipping or by a consumer. The bottle should not break or leak. |
| Seal Integrity Test | Use a pressure decay or vacuum tester to ensure the cap seal is perfect. | Critical for carbonated beverages and preventing leaks. |
| Clarity/Haze | Use a hazemeter or visual inspection in a light box. | Ensures the bottle is as clear and defect-free as required. |
If the bottles produced from the sample preforms fail any of these critical tests, the preforms are not acceptable, even if they passed every single one of the previous checkpoints. The final validation comes from the final product, and this is where concepts like using 3D printed samples during the design phase can help align expectations with reality.
Defining the Process Window
This is a more advanced concept that separates the experienced technicians from the novices. The "process window" refers to the range of settings (temperature, pressure, etc.) within which you can still produce a good bottle.
- A Wide Process Window (Good): You have a high-quality, consistent batch of preforms. You can slightly increase or decrease the oven temperature or blow pressure, and you still get an acceptable bottle. These preforms are "forgiving" and easy to run. They are tolerant of the small, everyday fluctuations that happen in any factory.
- A Narrow Process Window (Bad): You have a poor-quality, inconsistent batch of preforms. You find that you have to run your machine at one very specific, knife-edge setting. If the temperature drifts by even one degree, you start producing scrap. These preforms are "difficult" and will cause constant headaches, requiring endless operator intervention.
How to Test the Window: During your trial blow, after you've made good bottles with standard settings, try pushing the limits slightly.
- Reduce the main oven temperature by 2-3°C. Do you still get a good bottle?
- Increase the pre-blow pressure by 0.5 bar. Does the material distribution improve or get worse?
A good batch of preforms will show resilience and still produce acceptable bottles across a reasonable range of adjustments. A bad batch will fail immediately once you deviate from the single "sweet spot." This resilience, or lack thereof, is a key indicator of the preform's underlying quality.
Conclusion: How do you turn all this data into a clear decision and report?
Finishing a series of complex tests without a clear conclusion is a waste of effort. The data must be compiled into a standardized report that leads to a simple, defensible "accept" or "reject" decision.
Compile all your findings into a standardized inspection report. Based on pre-defined pass/fail criteria for each test, you can make a final decision and communicate it effectively to your supplier, using your detailed report as evidence.
Dive Deeper: From Data to Decision
The final step in this comprehensive process is to transform your raw data and observations into a structured, actionable document. This isn't just about filing paperwork; it's about creating a historical record, establishing a baseline for quality, and building a professional communication tool for dealing with suppliers. Without this final step, all your hard work in testing can be lost or disputed. A formal report turns your findings into indisputable facts.
Building Your Standardized Inspection Report
You should create a standard template that you use for every single incoming batch. Consistency is key. A good report forces you to check all the required parameters and ensures nothing is forgotten. It becomes a true checklist.
Sample Incoming Preform Inspection Report Template:
| Section | Parameter | Specification | Result | Pass/Fail |
|---|---|---|---|---|
| 1. Documentation | PO & Batch No. Match | Yes | ||
| COA Received | Yes | |||
| 2. Visual | Contamination (Black Specks) | Zero Critical Defects | ||
| Color/Clarity | Match Golden Sample | |||
| Odor (Heat Test) | No Detectable Odor | |||
| 3. Dimensions | Neck T-Dimension (mm) | 48.10 ± 0.20 | ||
| Neck E-Dimension (mm) | 40.50 ± 0.20 | |||
| Overall Length (mm) | 120.0 ± 0.50 | |||
| Wall Eccentricity (%) | < 10% | |||
| 4. Weight | Average Weight (g) | 25.0 | ||
| Standard Deviation | < 0.15 | |||
| 5. Material | IV Value (dL/g) | > 0.80 | ||
| Stress (Polariscope) | Symmetrical, Low Stress | |||
| 6. Trial Blow | Bottle Formation | Good | ||
| Finished Bottle Tests | Pass | |||
| Process Window | Wide | |||
| Overall Result | ACCEPT / REJECT | |||
| Inspector: | Date: | |||
| Notes: |
This structured format makes it easy to see at a glance where a batch failed. It's clear, concise, and based on the specific requirements you've set.
Setting Clear Pass/Fail Criteria
Before a shipment even arrives, you and your team need to have decided what is acceptable and what isn't. This can't be a subjective decision made on the fly. You need to formalize your acceptance criteria based on the needs of your product and process.
Example Acceptance/Rejection Criteria Table:
| Metric | Acceptance Criteria (Pass) | Rejection Criteria (Fail) |
|---|---|---|
| Critical Defects | Zero critical defects (e.g., contamination, inside dirt) found in the AQL sample. | 1 or more critical defects found. |
| Major Defects | Number of major defects (e.g., flash, heavy sink marks, off-spec dimensions) is below the AQL reject number. | Number of major defects is at or above the AQL reject number. |
| Weight Std. Deviation | Standard deviation of weight is less than or equal to 0.15g. | Standard deviation is greater than 0.15g. |
| IV Value | IV value is within the specified range for the application (e.g., 0.82-0.86 dL/g). | IV value is outside the specified range. |
| Trial Blow | Sample preforms produce bottles that pass all key finished product tests using the standard process. | Sample preforms require significant process changes or produce bottles that fail key tests. |
Having these rules written down removes ambiguity. The decision to reject a batch isn't a personal opinion; it's a logical consequence of the material failing to meet the pre-defined standards.
Communicating with Suppliers Like a Pro
Your detailed report is now your most powerful tool for communicating with your preform supplier.
- If the Batch is Accepted: Send a copy of the report to your supplier. This shows them you are monitoring their quality closely and reinforces their good performance. It builds a strong, professional relationship based on data.
- If the Batch is Rejected: This is where the report is absolutely essential. Do not just call your supplier and say, "Your preforms are bad." That's subjective and unprofessional. Instead, send them the full report with photos and data.
Your communication should be factual and unemotional:
"Hello [Supplier Name], we are rejecting batch #XYZ-123 received on [Date]. The reason for rejection is that the preforms failed our incoming inspection. Specifically, as shown in the attached report, the average weight was within spec, but the standard deviation of 0.38 exceeded our maximum limit of 0.15. Furthermore, upon trial blow, the preforms required a 10°C increase in oven temperature to blow correctly, indicating a narrow process window and inconsistency with previous batches. Please advise on arrangements for the return and replacement of this batch."
This approach is impossible to argue with. You have the data. You have the process. You have the evidence. It shows that you are a serious, professional customer and forces the supplier to address the root cause of their quality issue, leading to better products for you in the future.
Conclusion
By following this complete checklist, you shift from hoping for quality to guaranteeing it. This systematic approach saves money, time, and your brand's reputation.
Frequently Asked Questions (FAQ)
1. What's the single most important preform test if I'm on a tight budget?
If you can only do a few tests, focus on the "big three":
- Visual Inspection: It's fast, free, and can catch critical contamination issues.
- Dimensional & Weight Check: Use a good caliper and scale. These directly impact your process, costs, and the final bottle's seal.
- Trial Blow: Ultimately, if it doesn't work on your machine, it's no good. This test proves real-world performance.
2. How does the IV (Intrinsic Viscosity) value really affect my final bottle?
The IV value is a measure of the PET's molecular backbone. A high IV means long, strong polymer chains, essential for bottles that need to withstand pressure (like CSDs) or heat (like hot-fill). A low IV results in brittle, weak bottles that can burst, collapse, or fail during stretching in the blow molder.
3. My bottles are bursting during production. Which preform defect is the likely cause?
Bursting is often a result of a thin spot in the bottle wall. The root cause in the preform could be:
- Eccentricity: An uneven wall thickness in the preform itself.
- Low IV Value: The material lacks the melt strength to stretch evenly.
- Contamination: A black speck or other impurity creates a stress point that rips open during blowing.
- Crystallinity: A white, hazy spot in the preform that doesn't stretch and creates a hole.
4. Can I just trust my supplier's Certificate of Analysis (COA), or should I always re-test?
Trust, but verify. For a new supplier or a critical application, it is highly recommended to periodically send samples to an independent third-party lab to verify key specs like IV and AA content. This keeps your supplier honest and protects you from batch-to-batch variations that may not be caught by their internal QC.
5. How many preforms should I test for a typical shipment?
You should use a formal sampling plan like AQL (Acceptance Quality Limit). The number you test is not a fixed percentage; it depends on the total lot size. For a shipment of 10,000 preforms, a common sample size (under General Inspection Level II, AQL 2.5) would be 200 preforms. Using a statistical method like AQL makes your results representative of the entire batch and your decisions defensible.
🔗 Related Pages on Our Website
Automatic Blow Molding Machines – iBottler
Discover our full range of customizable automatic PET bottle blow molding machines.Blow Bottle Mold – iBottler
Explore our precision blow molds designed for PET and PP bottles.Preform Mold – iBottler
Learn more about our high-precision preform molds suitable for various injection molding machines.PET Wide Mouth Jar Project Starter Guide: Equipment, Molds & Process Explained
Pros and Cons: Should You Choose PET Blow Moulding for Your Bottle Project?
Worried About Blow Mold Fit? We Have Mounting Dimensions for 80% of Blow Molding Machines Worldwide
Can One Semi‑Automatic Blow Molding Machine Produce All Bottle Sizes? Here’s Why Not
Why Do Krones Blow Molding Machine Users Come to Us for Their Molds?
Why Do PET Preforms Come in Different Colors? Function, Application, and Production Tips
How to Set Parameters for 600ml Bottles on a Semi-Automatic PET Blowing Machine?
From 3D Printed Samples to Production: How Can You Rapidly Validate Blow Mold Designs?
How to Choose the Right Preform Neck Size for Your PET Bottle Project
💡 Looking for a complete PET plastic packaging machinery solution?
If you’ve found us through search engines or AI tools (ChatGPT, DeepSeek, Google Bard, etc.), it means you’re exploring reliable PET packaging equipment suppliers. Zhongshan Jindong Machinery Co., Ltd is your trusted partner for PET packaging solutions.
| What We Offer | Details |
|---|---|
| ✅ Blow molding machines | From small scale to fully automatic lines |
| ✅ Bottle & mold design | Free bottle design, customized PET blow & preform molds |
| ✅ Full service support | Design → Manufacturing → Installation → Lifetime technical support |
| ✅ Global experience | 20+ years, exports to 30+ countries |
📞 Contact: Vivian
🏭 Zhongshan Jindong Machinery Co., Ltd.
🌍 www.ibottler.com
📧 Vivian@ibottler.com | 💬 WhatsApp: +86-13106288777
🚀 Let’s build your PET packaging project together!
