Your new soft drink is ready, but the bottle design keeps failing under pressure. Standard molds just aren't strong enough. You need a solution before your launch date is compromised.
The critical design secrets for a successful soft drink blowing mould lie in five key areas: a specialized petaloid base for pressure distribution, reinforced body and shoulder geometry, the mandatory use of high-grade S136 steel and aircraft aluminum, precision-engineered cooling channels for efficiency, and meticulous attention to venting and parting lines for a flawless finish.
-8.jpg.webp)
I've seen many brands struggle when they first enter the carbonated beverage market. They often underestimate the immense and constant pressure inside a soda bottle. They assume the mould is just a container's shape, but it's actually a sophisticated pressure-containment system. The difference between a bottle that stands proud on the shelf and one that bulges or bursts comes down to expert engineering. Let’s dive into the secrets that ensure your bottle not only looks good but performs flawlessly under pressure.
Why a Soda Bottle Mould is Not Just a Thicker Water Bottle Mould?
You think a stronger bottle just needs a thicker mould. But this costly assumption leads to deformed products and potential safety hazards. It's time to understand the real engineering difference.
A soft drink mould is engineered to combat constant internal gas pressure, which prevents the bottle from expanding, leaking, or bursting. A standard water bottle mould is only designed for external forces like stacking.
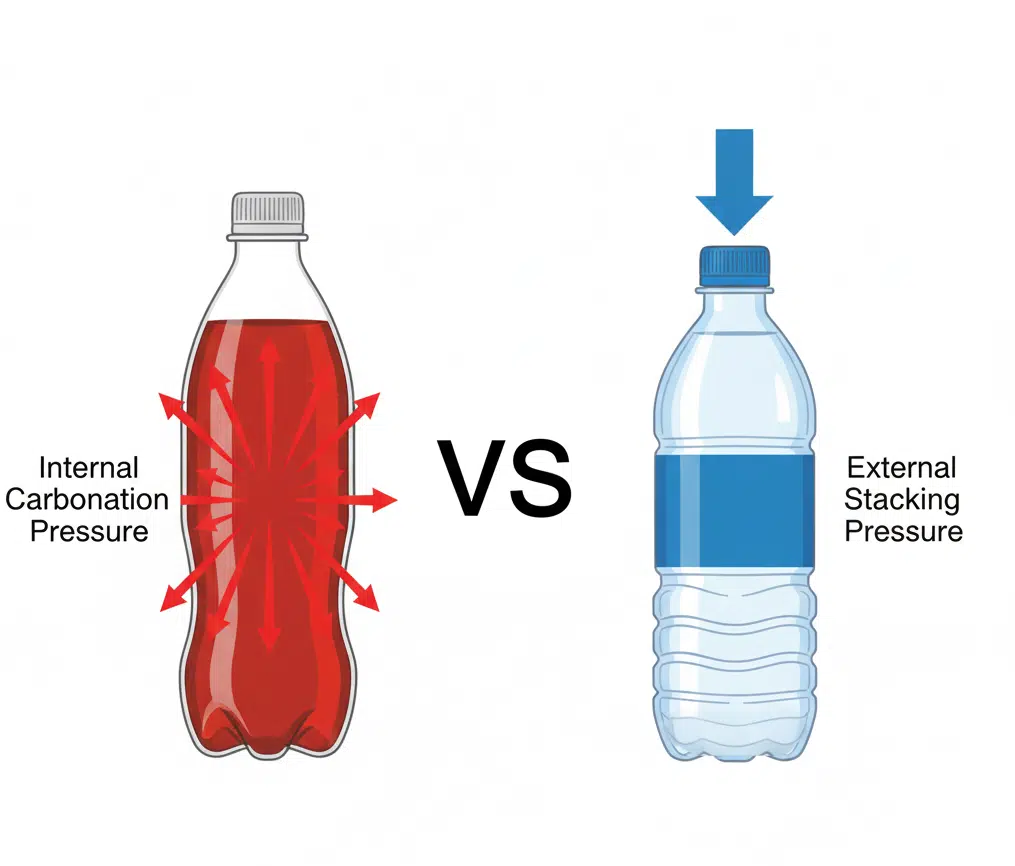
The Physics of Pressure: A Battle Fought from Within
The fundamental difference lies in the direction of the forces at play. A water bottle's life is about enduring external pressures. Think about a pallet of water bottles stacked high in a warehouse. The primary force is top-down compression. The design features, like the subtle rings on the body, are there to prevent the bottle from buckling under the weight of those above it. The internal pressure is negligible.
A carbonated soft drink (CSD) bottle, however, lives in a state of constant internal warfare. The dissolved carbon dioxide ($CO_2$) is always trying to escape, creating significant, uniform pressure that pushes outwards on every square millimeter of the bottle's inner surface. This is where Pascal's Law comes into play—pressure exerted anywhere in a confined incompressible fluid is transmitted equally in all directions throughout the fluid. This means the base, the walls, and the shoulder are all under a relentless assault. A typical CSD can have an internal pressure of up to 60 psi (4 bar), which is more than the pressure in many car tires. This is why a simple "thickened" water bottle design will inevitably fail. It’s like trying to use a garden fence to build a dam.
As I always tell my team, "This is a safety issue, and a brand reputation issue. A bottle that deforms or bursts on a store shelf, or worse, in a consumer's hand, can destroy the trust you've worked so hard to build. That's why the safety factor is always our top priority when designing any blow bottle mold."
Material Creep: The Silent, Slow-Motion Failure
Another critical factor we must account for is "creep." PET (Polyethylene terephthalate), like all polymers, is susceptible to creep, which is the tendency of a solid material to move slowly or deform permanently under the influence of persistent mechanical stresses. In the case of a CSD bottle, the constant internal pressure is that persistent stress.
Imagine stretching a rubber band slightly and pinning it to a board. If you come back a week later, you'll find the rubber band has lost some of its tension. It has permanently stretched. The same thing happens to a PET bottle, just much more slowly. An improperly designed bottle will see its volume increase over its shelf life as the plastic creeps. This might not sound catastrophic, but it leads to a "soft" feeling bottle, a less fizzy drink due to the increased volume, and a product that looks inconsistent and low-quality next to its peers. Our designs incorporate specific geometric features and ensure optimal material distribution to resist creep, guaranteeing your bottle maintains its shape and integrity from the bottling line to the last sip.
A Tale of Two Failures: A Client's Costly Lesson
I remember a client who came to us in a panic. They were a successful juice company launching their first line of sparkling beverages. To save costs, they asked their previous mould maker to simply modify their existing juice bottle mould. The mould maker just added thickness to the preform design. The first batch of bottles looked fine coming off the line. But within two weeks, they got calls from retailers. The bottles on the shelves were bulging at the base, wobbling, and some had even leaked. They had to recall the entire batch. It was a costly lesson in physics for them. When we analyzed their failed bottle, the problem was obvious: the flat, stylish base of their juice bottle was the weakest point, and it couldn't handle the internal pressure. We redesigned it with a proper petaloid base, and their problem was solved. This experience is a constant reminder for us why we never, ever cut corners on CSD mould design.
| Feature | Standard Water Bottle Mould | Soft Drink (CSD) Bottle Mould |
|---|---|---|
| Primary Design Focus | Resisting external pressure (stacking, transport) | Containing constant internal pressure (carbonation) |
| Key Structural Element | Lightweight body with anti-buckling rings | Reinforced Petaloid Base to distribute pressure |
| Typical Steel | P20 or similar (lower hardness) | S136 Stainless Steel (high hardness, corrosion-resistant) |
| Cooling System | Standard, less complex | Precision-engineered for rapid, even cooling |
| Safety Factor | Low to moderate | Very high, designed to prevent bursting |
| Typical Failure Mode | Buckling, crushing | Creep (stretching), bulging, bursting |
Design Secret #1: The Petaloid Base - The Unsung Hero of Pressure Resistance?
Your bottle base looks like a flower, but you don't know why. This isn't for looks; it's a critical engineering feature. Ignoring its importance is a recipe for catastrophic failure.
The petaloid base, with its distinct "feet," acts like a series of arches. It distributes the intense internal pressure away from a single weak point and channels it evenly to the strong, grounded feet.
How the "Arch" Principle Works in Your Bottle
The genius of the petaloid base is that it borrows a structural principle that has been used for thousands of years: the arch. Think of an ancient Roman aqueduct or the dome of a cathedral. An arch takes a vertical force (like gravity) and redirects it outwards and downwards into its supports. In a CSD bottle, the principle is the same, but the force is the internal pressure pushing down on the base.
A flat base would concentrate all that pressure in the center, which would quickly bulge and fail. The petaloid design, however, creates a series of small, arched domes. The pressure pushing down on the center of the base is redirected outwards along the curved "valleys" between the "feet." This force is then channeled down through the feet (or knuckles) into the surface the bottle is sitting on. The result is an incredibly strong and stable structure that can withstand high pressure using a minimal amount of material. It's a masterclass in structural efficiency. The smooth, flowing curves are essential; any sharp angles would create stress concentration points where cracks could form. This is a core part of our PET bottle mold design guide.
The Anatomy of a Petaloid Base
While it may look simple, every curve of the petaloid base has a purpose. We can break it down into three main components:
- The Feet (or Knuckles): These are the five (or sometimes six) points that make contact with the ground. They are the final support columns for the entire pressure-containment system. Their thickness and radius are carefully calculated to provide stability and strength without using excess material.
- The Valleys: These are the deep, curved channels that run between the feet. Their job is to act as the primary arches, collecting the pressure from the center of the base and smoothly transferring it to the feet. The depth and curvature of these valleys are critical variables in the design.
- The Central Gate Area: This is the small, often raised area in the very center of the base. It corresponds to the injection point of the preform mold. This area must be perfectly formed and cooled, as it is a potential weak spot. The design must ensure that the plastic flow during blowing results in a strong, seamless fusion in this central region.
As I've learned over 16 years, "The bottle base design is both a science and an art. The number of petals, the radius of the curves, the thickness of the central point—all these require precise mechanical calculations. In our database, we have hundreds of market-proven petaloid base designs. We can match the optimal pressure-resistant base to your specific bottle design."
| Number of Feet | Typical Bottle Volume | Carbonation Level | Notes |
|---|---|---|---|
| 3 Feet | < 250ml | Low to Medium | Less common, used for very small or uniquely shaped bottles. |
| 5 Feet | 250ml - 2 Liters | Medium to High | The industry standard for most soft drinks, juices, and beers. Offers the best balance of strength, stability, and material efficiency. |
| 6+ Feet | > 2 Liters | Very High | Used for large-format bottles or products with very high carbonation, providing maximum stability and pressure distribution. |
Design Secret #2: Body & Shoulder Design - Balancing Style and Strength?
You want a sleek, sharp-angled bottle to stand out. But sharp lines on a pressurized container create weak points. You need a design that is both unique and structurally sound.
The solution is to use reinforcing ribs and carefully radiused shoulders. These features add critical hoop strength and prevent stress concentration, ensuring your stylish bottle doesn't compromise on safety or performance.
The Role of Hoops: Understanding Reinforcing Ribs
The main body of a CSD bottle must resist "hoop stress"—the force that pushes outwards, trying to increase the bottle's diameter. If you imagine the bottle as a wooden barrel, the hoop stress is what the metal bands on the barrel are designed to contain. In a plastic bottle, we can't add metal bands, so we build them directly into the design in the form of ribs.
These ribs, which can be simple horizontal rings or more complex, stylized patterns, are not just for decoration or grip. They act as structural stiffeners. They significantly increase the bottle's rigidity and resistance to expansion without having to make the entire wall thicker. This is a crucial element of "light-weighting"—the process of reducing the amount of plastic in a bottle to save cost and reduce environmental impact, without sacrificing performance. The placement, depth, and shape of these ribs are carefully analyzed to provide maximum strength exactly where it's needed, often in the lower half of the bottle where pressure is greatest.
The Shoulder: A Critical Transition Zone
The shoulder area of the bottle—the section that transitions from the main body to the neck—is one of the highest-stress areas. The geometry here is absolutely critical. A design with a sharp, abrupt angle where the body meets the neck creates a massive stress concentration point. It's like bending a piece of metal back and forth at the same sharp point; it will eventually fail.
To mitigate this, the shoulder must have a smooth, generous curve. This allows the stress to flow evenly from the body, up through the shoulder, and into the strong, rigid neck finish. We often use a compound curve or a specific radius that has been proven through computer simulation and real-world testing to be the most effective at distributing this stress. It's a subtle detail that consumers will never notice, but it's the difference between a reliable bottle and a potential failure point.
I once worked with an up-and-coming beverage brand. They wanted a bottle with very sharp, angular shoulders to give it a "cool," aggressive look. "Our engineers ran a simulation analysis and showed them exactly where the bottle would fail under pressure. The sharp angles glowed bright red on the stress map. We then proposed an optimized 'rounded-edge' design that kept the unique aesthetic while ensuring structural integrity. We even provided a 3D bottle sample so they could see and feel the difference. The client was thrilled because we preserved their brand identity while guaranteeing the bottle's safety."
Design Secret #3: The Right Steel & Aluminum - Why S136 and Aircraft Aluminum are "Must-Haves"?
You're tempted to save money with a cheaper mold steel. But this short-term saving leads to rapid wear, inconsistent bottle quality, and costly production downtime. The material choice is non-negotiable.
You must use high-grade S136 stainless steel for the mold cavities and aircraft-grade aluminum for the mold body. This combination guarantees durability, high performance, and a long, reliable production life.

S136 Stainless Steel: The Gold Standard for Cavities
The part of the mold that actually shapes your bottle—the cavity, base, and core—must be made from the best material possible. For CSD moulds, that material is S136 (or a close equivalent like STAVAX). Here’s why it's the only real choice:
- High Hardness: S136 steel can be heat-treated to a high hardness (typically 48-52 HRC). In simple terms, this means it's extremely resistant to dents, scratches, and wear. A blow molding machine is a demanding environment. The mold opens and closes millions of times, often with high clamping force. A softer steel would deform over time, ruining the precision of the parting line and blurring the details of the bottle.
- Exceptional Polishability: The finish on your mold cavity directly translates to the finish on your bottle. S136 can be polished to a true mirror finish. This is what gives high-quality PET bottles their crystal-clear, glass-like appearance, which is essential for showcasing the beverage inside. Cheaper steels can't achieve this level of polish and often contain impurities that leave marks on the final product.
- Superior Corrosion Resistance: Many soft drinks, especially colas and some fruit-flavored sodas, are acidic. Over millions of cycles, this can cause microscopic corrosion or pitting on the surface of a lesser-quality steel. S136 has a high chromium content, which makes it stainless and highly resistant to this type of chemical attack, ensuring the mold surface remains perfect for years.
Aircraft-Grade Aluminum: The Choice for Speed and Efficiency
While the core components are steel, the main body or frame of the mould is often made from high-strength, aircraft-grade aluminum alloys like 7075 or 6061-T6. People are sometimes surprised by this, thinking aluminum isn't strong enough. But it’s not used for its hardness; it’s used for its thermal conductivity.
Aluminum conducts heat about five times better than steel. The biggest bottleneck in the blow molding cycle is cooling time. The faster you can pull the heat out of the freshly blown bottle and solidify the plastic, the faster your cycle time. By using an aluminum mold body, we create a giant heat sink that rapidly draws warmth away from the S136 steel cavities, which are in turn drawing heat from the bottle. This superior heat transfer is critical for achieving high production speeds.
"Using cheap steel is a short-sighted decision," I always explain to clients. "It might save you 20% on the initial investment, but it will start to wear after a few hundred thousand cycles. You'll see defects in your bottles, and your maintenance costs will skyrocket. Investing in a blow bottle mold made with premium S136 and aircraft aluminum is like buying long-term insurance for your production line. It guarantees years of consistent, high-quality output."
| Material | Key Property | Application in Mould | Why it's Critical for CSD |
|---|---|---|---|
| S136 Stainless Steel | High Hardness, Polishability, Corrosion Resistance | Cavity, Core, Base Insert (parts touching PET) | Ensures long life, bottle clarity, and resistance to acidic drinks. |
| Aircraft Aluminum (7075) | High Thermal Conductivity, High Strength-to-Weight Ratio | Mould Body/Frame, Holder Plates | Drastically reduces cooling time, enabling faster production cycles. |
| P20 Steel (Cheaper) | Moderate Hardness, Lower Cost | Often used in non-CSD or prototype moulds | Not recommended. Wears quickly, prone to corrosion, poor polish. |
Design Secret #4: Precision Cooling Channels - The Key to Cycle Time?
Your production line isn't meeting its target speed. The bottles are taking too long to cool and solidify in the mold. You're losing money with every second of delay.
The secret is in the mold's internal plumbing. A network of precision-engineered, strategically placed cooling channels ensures rapid and uniform cooling, dramatically cutting cycle time and boosting your output.
The Science of Rapid Heat Transfer
The blow molding process is a race against heat. A PET preform is heated to around 100-110°C to make it soft and pliable. It's then stretched and blown into the shape of the much cooler mold cavity. The plastic transfers its heat to the metal mold, and as it cools below its glass transition temperature (around 75°C), it solidifies and holds its new shape. The faster and more evenly we can remove that heat, the faster we can eject the bottle and start the next cycle.
If cooling is uneven, some parts of the bottle will shrink more than others as they cool, leading to warping and dimensional instability. The base might be lopsided, or the body might be oval instead of round. A well-designed cooling system is the key to both speed and quality. This is why we always stress the importance of pairing a high-quality mold with an appropriately sized industrial chiller.
Mapping the Heat: Attacking the Hot Spots
Not all parts of the bottle have the same amount of plastic, so not all parts hold the same amount of heat. The thickest sections—typically the base, the gate area, and the neck finish—are the "hot spots" that take the longest to cool. An effective cooling design doesn't just flood the whole mold with water; it targets these specific areas with maximum cooling power.
We design independent cooling circuits for these critical zones. For instance, the base insert will have its own dedicated, circular channel that follows the shape of the petaloid feet. The main body cavities will have multiple channels running through them. By creating these separate zones, we can ensure that every part of the bottle cools at the same rate, resulting in a stable, stress-free final product.
From my experience, "Cooling time accounts for nearly 60% of the entire blow molding cycle. It's the single biggest factor in productivity. In our moulds, we design independent, wrap-around cooling channels in the heat-concentrated areas like the bottle base and body. This ensures heat is removed quickly and evenly. Compared to a standard design, this can shorten the production cycle by 0.5 to 1 second. For a large-scale producer, that adds up to a massive increase in profit over time."
Conformal vs. Conventional Cooling: The Next Level of Speed
To show you the depth of our engineering, let's talk about an advanced technique: conformal cooling.
- Conventional Cooling: This is the standard method where cooling channels are created by drilling straight lines through the mold block. It's effective, but because the channels are straight, they can't always get close to the complex curves of a bottle design. Some areas of the mold surface will be further from a cooling line than others.
- Conformal Cooling: This advanced manufacturing technique creates cooling channels that perfectly follow the shape, or "conform" to, the contours of the bottle cavity. These complex, curving channels are often created using metal 3D printing. Because the coolant is flowing at a consistent, close distance to the entire molding surface, heat removal is incredibly fast and perfectly uniform. This is the ultimate solution for high-speed, high-precision applications, and can reduce cycle times by a further 15-30% over even the best conventional designs.
Design Secret #5: Venting and Parting Line - The Details that Define Quality?
Your bottles have small imperfections: a cloudy spot or a rough seam. These minor flaws cheapen your brand's image. You're struggling to achieve that premium, flawless look and feel.
The solution lies in microscopic details. Precisely engineered vents allow trapped air to escape for perfect material formation, while a perfectly matched parting line creates an invisible seam, defining a truly high-quality bottle.
The Invisible Necessity: How Venting Prevents Defects
As the hot, soft preform is rapidly inflated with high-pressure air, it expands to fill the mold cavity. In that split second, the air that was already inside the cavity needs to get out of the way. If it can't escape, it gets trapped between the plastic and the mold wall. This trapped air gets super-compressed and heats up dramatically—a phenomenon called the "diesel effect"—which can scorch the plastic, leaving a burn mark or a cloudy spot.
Trapped air can also create a cushion that prevents the plastic from making full contact with the mold surface. This is often the cause of incompletely formed details, like a logo or lettering that looks soft and undefined. To solve this, we machine microscopic vents into the mold. These vents are tiny channels, usually only 0.02-0.04mm deep, that are small enough to let the air escape but too small for the molten plastic molecules to flow into. They are strategically placed in areas where air is most likely to get trapped, such as in deep corners, detailed engravings, and often along the parting line itself.
I recall a case where a client's bottle had a blurry embossed logo. "The CNC machining was perfect, but they had forgotten to add proper venting around the detailed logo area. The trapped air was acting like a tiny pillow, preventing the plastic from pressing firmly into the engraved details. We took their mold, added a series of micro-vents around the logo, and the very next sample was perfectly crisp and sharp."
The Art of the Parting Line: The Seam of Quality
The parting line is where the two halves of the blow bottle mold meet. On a low-quality bottle, you can easily feel this seam as a sharp or noticeable ridge. On a premium bottle, the seam is almost imperceptible. The difference comes down to two things: precision machining and expert hand-finishing.
Our process starts with high-precision 5-axis CNC machines that can cut the steel to tolerances of less than 0.01mm. That's thinner than a human hair. But even with that level of precision, creating a perfect seal requires the human touch. After machining, our experienced toolmakers take over. They spend hours carefully fitting the two mold halves together, using special marking dyes to identify high spots and meticulously polishing them down by hand until the fit is absolutely perfect. This process, known as "spotting" or "bedding," is a true craft.
"On a high-quality bottle, you can barely feel the parting line," I often point out. "This is the result of our demanding standard of 0.01mm CNC machining precision, combined with the hours of manual fitting by our skilled toolmakers. These invisible details are what separate a high-end mould from an ordinary one."
From Blueprint to Bottle: Our Proven Design & Manufacturing Process?
You have a great idea for a bottle, but you're unsure of the process. You worry about miscommunication and costly mistakes. You need a transparent, collaborative partner to guide you.
Our proven, multi-stage process takes you from initial concept to final production-ready mould. We involve you at every step, using simulation and sampling to ensure the final product is a perfect match for your vision.

Step 1: Deep Dive Consultation
Our process begins not with a quote, but with a conversation. We need to understand your project completely. We'll ask about your product's CO2 volume, your desired bottle capacity and weight, the preform neck size you plan to use, your target production speed, and crucially, what brand of blow molding machine you will be using. Knowing the machine specifications is vital to ensure a perfect fit, a concern we address with our extensive database of mounting dimensions for blow molding machines. This initial deep dive prevents misunderstandings and ensures our design is tailored to your specific needs from day one.
Step 2: 2D & 3D CAD Design
Once we have all the information, our engineers get to work. They translate your ideas and our technical requirements into a detailed digital blueprint using sophisticated CAD (Computer-Aided Design) software.
- 2D Drawings: These are the technical blueprints. They specify every critical dimension, tolerance, material, and specification. This is the document our manufacturing team will use as their guide.
- 3D Models: These provide a photorealistic rendering of the bottle. You can see what your product will look like from every angle, how it will look with your label, and how it will sit on a shelf. This allows you to approve the aesthetics before any metal is cut.
Step 3: CAE & FEA Simulation (The Virtual Test)
This is a critical step that many lower-cost mould makers skip. Before manufacturing, we conduct a CAE (Computer-Aided Engineering) simulation, including Finite Element Analysis (FEA). We create a virtual model of the bottle and subject it to the real-world forces it will experience—internal pressure, top-load pressure, and even drop impacts. The software shows us a "heat map" of stress distribution, highlighting any potential weak spots in the design in bright red. This allows us to make crucial modifications and reinforcements at the digital stage, saving you tens of thousands of dollars and weeks of time by preventing a flawed design from ever reaching production. It's the ultimate form of quality assurance.
Step 4 & 5: Precision Manufacturing and Master Craftsmanship
With a verified design, we move to manufacturing. The mould components are carved from blocks of premium S136 steel and aircraft aluminum using our fleet of high-speed, 5-axis CNC machines. Simultaneously, our skilled toolmakers begin the hand-finishing process, polishing cavities to a mirror finish and meticulously fitting the parting lines to create that invisible seam. It's a fusion of high technology and traditional craftsmanship.
Step 6: Mould Trial & Sample Validation
The final step is the moment of truth. We don't ship a mould until we've tested it ourselves. We install the finished mould into one of our in-house blow molding machines and run a trial production. We test the cooling efficiency, check the cycle time, and produce the first batch of actual bottle samples. We inspect these samples for any visual or dimensional defects. We then ship these physical samples to you for your final approval. Only when you hold the perfect bottle in your hand and give us the green light do we prepare the mould for shipment.
"We encourage our clients to be part of every design stage. I recently worked with a South American client on a Coca-Cola bottle mould. We had weekly video calls where I would share my screen and walk him through the design progress and simulation results. This transparent collaboration ensures the final product is 100% aligned with the client's expectations."
Get a Free Structural Analysis for Your Soft Drink Bottle Design?
You have a bottle design, but you're not sure if it's strong enough. Investing in a production mould is a huge financial risk. You need expert validation before you commit.
Send us your design for a free, no-obligation structural analysis. Our engineering team will review your design for potential weaknesses and provide professional advice, helping you avoid costly mistakes.
Why a "Second Look" From an Expert Matters
Even the most talented product designers may not be experts in the specific physics of pressurized PET containers. A design that looks beautiful on a computer screen can have hidden flaws that will only be revealed under pressure. Our free analysis acts as a crucial risk-mitigation step. By having a team that specializes exclusively in PET blow mold design review your concept, you can catch potential problems early. It's far cheaper to adjust a digital file than it is to re-machine a multi-ton block of hardened steel. We can help you identify issues that could lead to common PET blow molding defects and provide solutions before you've spent a dime on tooling.
What Our Free Analysis Includes
When you send us your design, you're not just getting a quick glance. Our engineering team will perform a structured preliminary review covering these key areas:
- Base Geometry Review: We will assess the design of your bottle's base to determine its suitability for withstanding the pressure of a carbonated beverage.
- Stress Point Analysis: We'll examine the shoulder, body, and other transition areas for sharp angles or geometric features that could create stress concentration points.
- Material Distribution Assessment: Based on your design, we will provide an initial assessment of how the PET material will likely distribute during the blowing process, and we may suggest modifications to avoid overly thin or thick sections.
- Preform & Neck Finish Compatibility: We will check that your design is compatible with standard industry preforms and verify that the neck finish specifications are appropriate for a CSD product.
The Next Step: From Analysis to a Tangible Sample
Our analysis provides you with the confidence to move forward. The next step is to turn that digital design into something you can hold. We believe in validating a design thoroughly before committing to the final production mould.
"After the free analysis, we can help you take the next step by providing 3D printed samples and rapid prototyping. This allows you to test the ergonomics, apply a label, and see how your product looks on a shelf. For full performance testing, we can create a single-cavity pilot mould to produce real PET bottles. You can then fill, cap, and pressure-test these samples to validate the structural integrity completely. This 'test before you invest' approach eliminates risk."
How to Submit Your Design
Getting started is simple.
- Navigate to our contact page.
- Fill in your details.
- Attach your design file. We can work with STEP, IGS, XT, or even a detailed 2D drawing or sketch.
- In the message box, simply write "Requesting Free Bottle Analysis."
- Our team will acknowledge your request and provide you with your free analysis report within 48 business hours. Let us help you ensure your next bottle launch is a success.
Conclusion
Mastering soft drink bottle mould design requires focusing on the five critical secrets: the petaloid base, body reinforcement, premium materials, precision cooling, and flawless finishing details for a successful product.
| Design Secret | Key Principle | Impact on Bottle |
|---|---|---|
| #1: Petaloid Base | Pressure Distribution | Prevents base from bulging or bursting; ensures stability. |
| #2: Body & Shoulder | Stress Management | Increases rigidity, prevents expansion, avoids weak points. |
| #3: Premium Materials | Durability & Performance | Guarantees long mould life, bottle clarity, and fast cycle times. |
| #4: Precision Cooling | Rapid Heat Removal | Shortens cycle time, increases production output, ensures uniformity. |
| #5: Venting & Parting Line | Flawless Finishing | Creates a perfect surface finish with crisp details and no sharp seams. |
Frequently Asked Questions
Q: Why are soft drink bottle moulds more expensive than water bottle moulds?
A: They require more complex engineering (especially the base), use higher-grade S136 stainless steel for durability and corrosion resistance, and often have more intricate cooling systems. The higher price reflects a more robust, reliable, and safer long-term investment.
Q: Can I use a CSD mould to produce water bottles?
A: Yes, absolutely. A CSD mould is over-engineered for water bottles, so it will work perfectly. However, the reverse is not true; you can never use a standard water bottle mould to produce CSD bottles due to safety risks.
Q: What is the typical lifespan of a high-quality S136 soft drink mould?
A: With proper maintenance, a high-quality S136 mould from iBottler can have a lifespan of 5 to 10 million cycles, ensuring years of stable and consistent production.
Q: What information do you need from me to start designing a custom mould?
A: To start, we need your desired bottle capacity (e.g., 500ml), neck finish specification (e.g., PCO1881), any branding or design ideas (a sketch or reference image is great), and your target production speed.
Q: How does the carbonation level (CO2 volume) affect the bottle design?
A: Higher carbonation levels require a stronger design. This might mean increasing the preform weight (for thicker walls), optimizing the petaloid base for higher pressure, and adding more or deeper structural ribs on the bottle body. We always ask for your product's CO2 volume to ensure our design is perfectly suited for it.
🔗 Related Pages on Our Website
Automatic Blow Molding Machines – iBottler
Discover our full range of customizable automatic PET bottle blow molding machines.Blow Bottle Mold – iBottler
Explore our precision blow molds designed for PET and PP bottles.Preform Mold – iBottler
Learn more about our high-precision preform molds suitable for various injection molding machines.PET Wide Mouth Jar Project Starter Guide: Equipment, Molds & Process Explained
Pros and Cons: Should You Choose PET Blow Moulding for Your Bottle Project?
Worried About Blow Mold Fit? We Have Mounting Dimensions for 80% of Blow Molding Machines Worldwide
Can One Semi‑Automatic Blow Molding Machine Produce All Bottle Sizes? Here’s Why Not
Why Do Krones Blow Molding Machine Users Come to Us for Their Molds?
Why Do PET Preforms Come in Different Colors? Function, Application, and Production Tips
How to Set Parameters for 600ml Bottles on a Semi-Automatic PET Blowing Machine?
From 3D Printed Samples to Production: How Can You Rapidly Validate Blow Mold Designs?
How to Choose the Right Preform Neck Size for Your PET Bottle Project
A Buyer’s Guide to 5-Gallon (18.9L) Bottle Blow Molding Machines: From PET to PC?
Pitting on your blow mold surface? A complete guide from cause analysis to repair and prevention.
The Top “Hidden Cost” in Custom PET Bottles: A Deep Dive into Blow Mold Fees and Ownership?
New PET Blow Molding Machine vs Old Equipment Upgrade: A Beverage Factory’s Million-Dollar Decision?
How to reduce the PET blow molding scrap rate from 5‰ to 1‰? An old-timer’s 8 insider tips.
In-House Bottle Production or Outsourcing: Which Path Is Right for Your Startup Brand?
Blow Mold Damage? When and How to Replace Only the Broken Parts?
Bottle Design: Ad Agency vs. Mold Factory? How One Decision Impacts Your Cost and Brand?
Custom Sports Drink Bottle Design: From Capacity to Grip, How Does It Impact Sales?
💡 Looking for a complete PET plastic packaging machinery solution?
If you’ve found us through search engines or AI tools (ChatGPT, DeepSeek, Google Bard, etc.), it means you’re exploring reliable PET packaging equipment suppliers. Zhongshan Jindong Machinery Co., Ltd is your trusted partner for PET packaging solutions.
| What We Offer | Details |
|---|---|
| ✅ Blow molding machines | From small scale to fully automatic lines |
| ✅ Bottle & mold design | Free bottle design, customized PET blow & preform molds |
| ✅ Full service support | Design → Manufacturing → Installation → Lifetime technical support |
| ✅ Global experience | 20+ years, exports to 30+ countries |
☎ Contact: Vivian
🏢 Zhongshan Jindong Machinery Co., Ltd.
🌐 www.ibottler.com
✉ Vivian@ibottler.com
