A sudden production halt because of a damaged blow mold is a nightmare. You see profits stopping and costs rising. The idea of replacing the entire expensive mold set seems like the only, painful solution.
Yes, you can often replace only the broken parts of a blow mold. This is possible if your mold has a modular design with standardized, separable components like the base insert, neck ring, or guide pins. The key is to ensure the replacement part perfectly matches the original's critical dimensions and interfaces.
A damaged mold doesn't always mean a complete write-off. In my years of experience, I've seen countless situations where a targeted repair saved the day, getting production back online faster and for a fraction of the cost of a full replacement. This guide will walk you through exactly how to identify the problem, determine if a partial replacement is viable, and what steps to take for a successful repair. We'll dive deep into the specific components that fail most often and how to handle them. Let's get your line moving again.
What are the most common parts that break in a blow mold?
Your blow mold stops working, and the line goes silent. Every minute of downtime costs money. You suspect a part is broken, but which one? The entire mold is a complex, expensive piece of equipment.
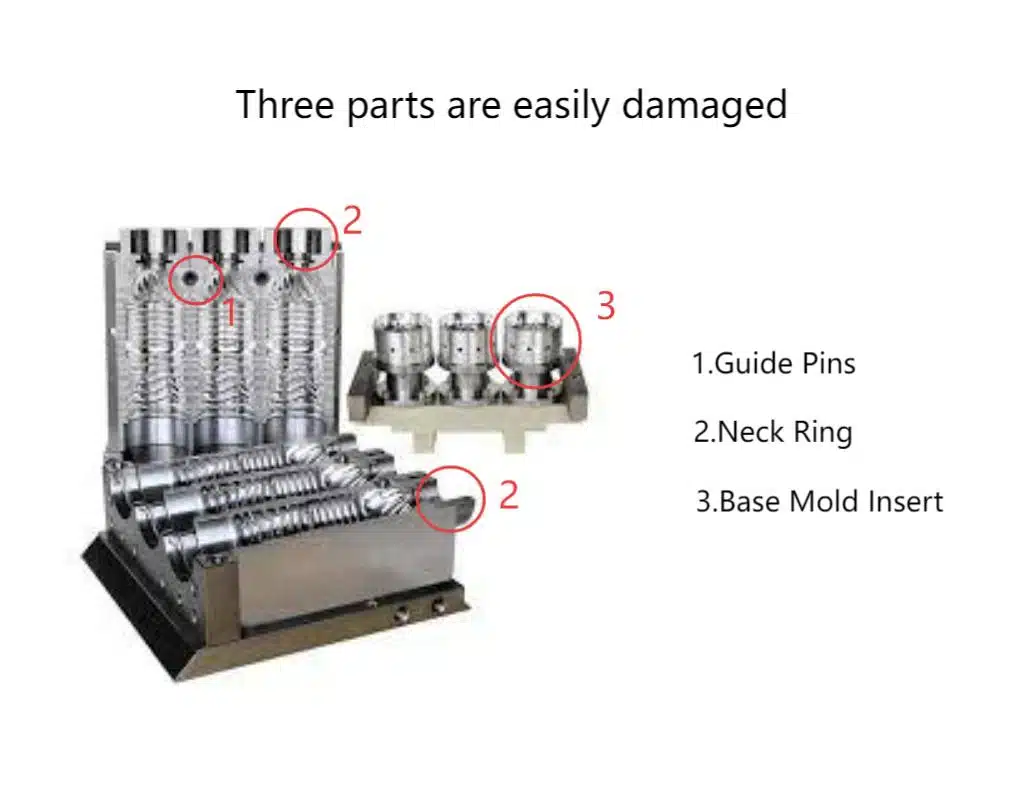
The most common failure points are high-wear components. These include the base mold insert, the neck ring (or mold lip), and the guide pins and bushings. These parts endure constant thermal stress, high pressure, and mechanical friction during every single cycle.
Understanding these common points of failure is the first step in rapid troubleshooting and effective maintenance. When a problem arises, knowing where to look first can save you hours of diagnostic time. Instead of treating the mold as a single black box, think of it as a system of individual components, each with its own lifespan and failure modes. In my experience, over 80% of unscheduled mold-related downtime comes from one of these three areas. Let's break down each one so you can spot the signs early and take action before a small issue becomes a catastrophic failure. This knowledge not only helps in repair but also in building a preventative maintenance schedule that keeps your production running smoothly.
The Blow Mold Base Insert: The Foundation Under Fire
The base insert, or "push-up," is one of the hardest-working parts of the entire mold. It forms the bottom of the bottle and bears the full force of the stretch rod and high-pressure air. It's also subjected to intense and rapid temperature changes, as it's directly involved in cooling the thickest part of the PET preform. This combination of thermal and mechanical stress is a recipe for eventual failure.
One of the most common failure modes is simple wear and tear. Over millions of cycles, the sharp details of the base design can become rounded, leading to inconsistencies in the final product. I once worked with a client producing bottled water whose bottles were failing drop tests. The cause wasn't the bottle design or the preform; it was a base insert that had worn down by just half a millimeter. This slight change altered the standing surface, making the bottles unstable.
Another major issue is corrosion and blockage in the cooling channels. The water flowing through these channels, especially if not properly treated, can leave mineral deposits over time. This is why connecting your mold to a high-quality industrial chiller is so critical for mold longevity. Blocked channels lead to inefficient cooling, creating "hot spots" on the bottle base. This can cause deformation, haziness, or a pearlescent appearance in the PET. In severe cases, the base can warp from the uneven temperatures, leading to bottles that can't stand upright—a clear sign that immediate action is needed. Warping can also break the seal between the base insert and the main mold body, causing air leaks and inconsistent blowing pressure.
Signs of a Failing Base Insert:
- Visual Defects: Visible warping, sinking, or "rocker bottom" on the bottle base.
- Inconsistent Weight: If the base is not forming correctly, it can affect material distribution throughout the bottle.
- Cooling Issues: Increased cycle times or visible hot spots (haziness/pearl essence) on the base.
- Visible Damage: During maintenance checks, look for pitting, corrosion, or rounded edges on the insert itself.
The Neck Ring (Mold Lip): The Critical Interface
The neck ring, sometimes called the neck insert or lip cavity, is responsible for forming the threads and finish of the bottle neck. This is arguably the most critical part of the bottle from a functional standpoint. It has to seal perfectly with the cap, and its dimensions are held to very tight tolerances. Unfortunately, it's also subject to a great deal of abuse.
Every cycle, a hot preform is loaded, and the neck ring clamps down. This repeated impact and thermal shock can lead to wear, chipping, or dimensional deformation. I remember a case with a major soda brand. They were experiencing slow, random leaks from a small percentage of their bottles in warehouses. It was a logistical nightmare. We traced the issue back to a tiny chip on the sealing surface of a single neck ring in one of their blow bottle molds. This tiny imperfection, almost invisible to the naked eye, was enough to compromise the seal on some bottles. It's a perfect example of how a small part can cause a massive problem. If your product is failing due to issues around the cap area, the neck ring should be your first suspect.
The constant clamping and unclamping action also wears down the mating surfaces. This can lead to flash—a thin, unwanted sliver of plastic—squeezing out at the parting line of the neck. Flash is not only ugly but can also interfere with capping machines and create a sharp edge that is a potential safety hazard. When you're dealing with neck finishes, precision is everything. A guide like the one on how to choose the right preform neck size can help you understand these critical dimensions, and it's these same dimensions that must be perfectly maintained in the neck ring.
Signs of a Failing Neck Ring:
- Neck Flash: Plastic squeezing out at the parting line below the support ring.
- Leaking Bottles: The most serious sign, indicating a compromised sealing surface.
- Incorrect Thread Formation: Threads look misshapen, or caps don't screw on smoothly.
- Visible Damage: Chips, dings, or a rolled edge on the critical sealing surfaces.
Guide Pins and Bushings: The Unsung Heroes of Alignment
While the base insert and neck ring form the bottle, the guide pins and bushings ensure the two halves of the mold come together perfectly, every single time. These components guarantee the precise alignment needed to produce a symmetrical bottle without a noticeable seam. Their failure is often due to one simple thing: improper lubrication.
Without a layer of high-temperature grease, you have metal-on-metal friction under high clamping pressure. This will quickly lead to galling and seizure. The guide pins will wear down, and the bushings will become enlarged. This "slop" in the alignment means the mold halves may not close in the exact same position for each cycle. The result is often a mismatched parting line, where one side of the bottle is slightly offset from the other. You can feel this as a distinct ridge or step along the seam of the bottle.
I once visited a plant where the operator was complaining about scuff marks on the side of their oval-shaped shampoo bottles. The mold was slamming shut with a loud bang. The problem was obvious: the guide bushings were completely worn out from a lack of lubrication. The mold halves were literally grinding against each other on closure. This not only created the bottle defect but was also actively destroying the more expensive mold bodies. We replaced the pins and bushings and implemented a strict lubrication schedule, and the problem vanished. It’s a cheap, simple fix that prevents very expensive damage.
Signs of Failing Guide Components:
- Mismatched Parting Line: A visible or tactile "step" on the bottle's seam.
- Scuffing/Dragging Marks: Marks on the bottle body parallel to the direction of mold closure.
- Audible Noises: Grinding, squealing, or banging sounds as the mold closes.
- Difficult Mold Operation: The mold may seem to "stick" or hesitate during opening or closing.
| Component | Common Failure Mode | Symptom in Bottle | Primary Cause |
|---|---|---|---|
| Base Mold Insert | Warping, Wear, Corrosion | Rocker bottom, inconsistent weight, hazy base | Thermal stress, blocked cooling, high cycles |
| Neck Ring | Chipping, Dimensional Wear | Leaking cap, flash on neck, bad threads | Preform impact, high clamping force |
| Guide Pins/Bushings | Galling, Wear | Mismatched parting line, scuff marks | Lack of lubrication, contamination |
Can I really replace just the broken parts of my blow mold?
Your production line is down due to a single damaged mold part. You're facing a long lead time and a huge bill for a full mold replacement. You wonder if there's a more efficient, cost-effective way.
Yes, you can absolutely replace only the broken component, provided the mold was built with a modular design. A modular mold is constructed with interchangeable parts, like a set of Legos, allowing for targeted and rapid repairs without replacing the entire assembly.

The ability to perform a partial replacement is one of the most significant advantages of a well-designed mold. It transforms a potentially catastrophic failure into a manageable maintenance task. The key lies in the initial design philosophy. Molds designed for serviceability will feature separate inserts for high-wear areas, standardized interfaces, and precise locating features. This foresight during the design phase pays for itself the first time a part fails. Let's explore the critical factors that determine whether a partial replacement is feasible for your specific mold.
The Power of Modular Design in Blow Molds
The concept of modularity is central to modern, efficient manufacturing, and it applies perfectly to blow bottle molds. A non-modular, or "monoblock," mold is essentially carved from a single, large piece of aluminum or steel. If a critical surface like the neck finish or the base push-up gets damaged, your repair options are limited to difficult and often imperfect methods like welding and re-machining. In many cases, the entire mold half has to be scrapped.
A modular mold, on the other hand, is an assembly of precision components. The main mold bodies, which are the largest and most expensive parts, are designed to be universal carriers. Specialized, high-wear parts like the neck rings, body cavities, and base inserts are created as separate, replaceable pieces that bolt into these carriers.
I had a client in the juice industry who frequently launched new products with minor variations in bottle shape and volume. Instead of buying a completely new mold set for each product, we developed a modular system for them. They had one universal mold base and several sets of interchangeable cavity and base inserts. When they wanted to switch from a 500ml bottle to a 450ml version, they didn't need a whole new mold. They just swapped the inserts. This approach not only made new product introduction cheaper but also made maintenance a breeze. When a base insert eventually wore out, they simply ordered a new one from us, using the part number from the drawing we provided. Downtime was reduced from weeks to just a couple of hours. This is the true power of planning for maintenance from day one.
The Importance of Locating Features and Standard Interfaces
Simply having separate parts isn't enough. For a replacement to work, the new part must fit into the exact same position as the old one with micron-level precision. This is achieved through carefully designed locating features. These are the unsung heroes that ensure interchangeability.
Common locating features include:
- Dowel Pins: Hardened steel pins that fit into precisely reamed holes in both the main mold body and the insert. They provide highly accurate location in the X and Y axes.
- Locating Rings/Bosses: A circular feature on one part that fits snugly into a corresponding bore on another. This is often used to center base inserts or neck rings.
- Keyed Interfaces: A slot and key system, similar to a shaft and keyway, that prevents a part from rotating out of position.
When you remove a damaged part, you should see這些 features. If the part simply sits in a pocket with no positive locating elements, it's a sign of a lower-quality mold, and successful replacement will be much more difficult. Standardized interfaces also play a huge role. This means using common screw sizes (e.g., M6, M8) and patterns, as well as standard O-ring groove dimensions. When a designer uses standard components, finding replacements is far easier than if they used custom, non-standard fasteners or seals.
Assessing the Impact on Overall Quality and Performance
Before you order a replacement part, you must consider how it will interact with the rest of the mold assembly. It's not just about a mechanical fit; it's about a functional fit.
- Sealing Integrity: Where the new part meets the old, is there a critical seal? For example, the interface between a base insert and the mold body must be perfectly flat to prevent high-pressure air from leaking. Any leak will result in under-blown bottles and potential defects. Many common PET blow molding defects can be traced back to pressure loss from a poor seal.
- Thermal Transfer: The replacement part must not impede the flow of coolant. Cooling channels must align perfectly between the insert and the main mold body. A new base insert with misaligned water channels will create a thermal bottleneck, increasing cycle time and potentially causing defects like haziness in the base.
- Dimensional Accuracy: The replacement part must be a perfect twin of the original in all critical dimensions. This is especially true for bottle-forming surfaces. A replacement neck ring must match the original's thread profile, sealing diameter, and height to the thousandth of a millimeter to ensure compatibility with your preforms and caps.
| Factor | Modular Design (Good) | Monoblock Design (Bad) | Why It Matters for Repair |
|---|---|---|---|
| Construction | Assembly of separate components | Machined from a single block | Allows for targeted replacement of only the failed part. |
| Repair Cost | Low (cost of the insert) | High (cost of the entire mold block) | Dramatically reduces maintenance expenses. |
| Downtime | Short (hours) | Long (weeks or months) | Gets the production line back up and running quickly. |
| Flexibility | High (can swap inserts for different designs) | Low (fixed design) | Enables easier product line extensions and changes. |
| Key Features | Dowel pins, standard bolts, O-rings | Custom-machined surfaces | Ensures the new part fits perfectly and functions correctly. |
What key parameters must I check when replacing the blow mold base insert?
You've determined your damaged base insert can be replaced. Now you have the new part in hand. But just because it looks right doesn't mean it is. Bolting it in without checking could lead to disaster.
Before installation, you must verify all critical dimensions and features. The most important parameters to check are the center locating features, the mounting hole pattern, the alignment and integrity of the cooling channels, and the flatness of the sealing surfaces.

This verification step is non-negotiable. It's the quality gate that stands between a quick, successful repair and a frustrating, costly failure. A small deviation in one of these parameters can cause a cascade of problems, from leaky seals and defective bottles to catastrophic damage to the main mold body. I always tell my clients to "trust, but verify." Even if the part comes from a reputable supplier, a quick check with a set of calipers can save you a world of trouble. Let’s go through each parameter step-by-step.
Critical Dimension 1: The Center Locating Features
The absolute first thing to check is the feature that centers the base insert within the mold cavity. This is most often a central locating bore or a pattern of dowel pins. This feature dictates the concentricity of the bottle—meaning, whether the bottle is perfectly centered relative to its base.
Why it's critical: If the base insert is off-center by even a fraction of a millimeter, the stretch rod will not hit the center. This will cause the PET material to distribute unevenly during blowing. The result is a bottle with one thick wall and one dangerously thin wall. This thin wall is a major failure point, prone to bursting under pressure or failing during transport.
How to check:
- Direct Comparison: Place the old insert and the new insert side-by-side on a flat surface plate. Use a height gauge and calipers to compare the diameter and position of the locating bore or pins.
- Fit Test: If possible, gently test-fit the new insert into the mold body without any bolts. It should slide into place smoothly, with no binding and minimal play. If you have to force it, something is wrong.
- CMM Verification: For absolute certainty, especially for high-cavitation molds, a Coordinate Measuring Machine (CMM) is the gold standard. It can map the part's geometry with micron-level accuracy and compare it directly to the design file.
I once had a client who was in a rush and installed a new base insert without this check. They started production and immediately saw a 30% failure rate due to thin walls. They blamed the preforms, the bottle blowing machine, everything except the new part. When we finally took the mold apart, we measured the new insert. The central locating bore was off-center by 0.15mm. It was a tiny error, but it cost them a full day of production and thousands of defective bottles.
Critical Dimension 2: The Mounting Hole Pattern
This might seem obvious, but it's a common stumbling block. The pattern of threaded holes for the bolts that hold the insert in place must be a perfect match. This includes the number of holes, their diameter, their position relative to the center (the Bolt Circle Diameter or BCD), and their spacing.
Why it's critical: If the holes don't line up, you simply cannot install the part. Attempting to force bolts in at an angle will strip the threads in the much more expensive mold body, creating a far bigger problem. Even if you can get the bolts started, a mismatched pattern can put uneven stress on the insert, potentially causing it to warp under heat and pressure.
How to check:
- Paper Template: A simple and effective method. Place a piece of paper over the old insert and create a rubbing of the hole pattern. You can even punch out the holes. Then, lay this template over the new insert to see if everything lines up.
- Calipers: Measure the center-to-center distance between adjacent holes and across the diameter of the pattern. Compare these measurements between the old and new parts.
- Overlay: Place the new insert directly on top of the old one. Use pins or drill bits shank-down in the holes to check for alignment through both parts.
Critical Function 1: Cooling Channel Alignment and Integrity
Proper cooling is the key to fast cycle times and stable, high-quality bottles. The base insert contains critical cooling channels that must seamlessly connect with the channels in the main mold body.
Why it's critical: Any misalignment will restrict or completely block the flow of coolant. This creates a hot spot, leading to a soft, deformed, or hazy bottle base. Furthermore, the connection points are sealed with O-rings. If the mating surfaces are not perfectly aligned, these O-rings can be pinched or extruded, causing a water leak inside your mold. A water leak can cause rust, short out electrical components, and create cosmetic defects on the bottle surface if water gets into the cavity. This is another reason why a properly sized and maintained chiller system is so vital to the entire process.
How to check:
- Visual Inspection: Before installation, look through the cooling ports on the insert and ensure you can see a clear path.
- Flow Test: After installing the O-rings but before final bolting, connect a low-pressure air line to the cooling inlet of the mold. You should feel a strong, steady stream of air coming out of the outlet. If the flow is weak or non-existent, there is a blockage or misalignment.
- O-Ring Grooves: Inspect the O-ring grooves on the new part. They should be clean, free of burrs, and have the correct depth and width for the specified O-ring.
Critical Function 2: Sealing Surfaces
The surface where the base insert meets the main mold body is a critical sealing face. This surface contains the high-pressure blowing air within the mold cavity.
Why it's critical: Any imperfection on this surface—a scratch, a dent, or a lack of flatness—can create a microscopic path for air to escape. This pressure loss will result in an under-blown bottle, which may be weak, misshapen, or have an incomplete base. It's a defect that can be hard to diagnose, as it mimics other problems like low blowing pressure from your air compressor system.
How to check:
- Visual and Tactile Inspection: Look at the surface under a bright light. It should be perfectly smooth and uniform. Run your fingernail across it; you should not be able to feel any scratches or steps.
- Flatness Check: For best results, use a surface plate and a height indicator to check for flatness. A simpler method is to use a known straight edge and feeler gauges to check for any gaps between the straight edge and the sealing surface.
- Bluing Paste: Apply a thin layer of machinist's bluing paste to the sealing surface of the mold body. Gently press the new insert into place, then remove it. The paste should transfer evenly to the insert, indicating a good, flat contact area. If there are bare spots, that area is not making contact and will likely leak.
| Parameter to Check | Tool for Verification | Potential Problem if Ignored |
|---|---|---|
| Center Locating Features | Calipers, Height Gauge, CMM | Uneven bottle wall thickness, lopsided bottles |
| Mounting Hole Pattern | Calipers, Paper Template | Cannot install part, stripped threads, warped insert |
| Cooling Channel Alignment | Visual Check, Low-Pressure Air | Hot spots, bottle defects, longer cycle times, water leaks |
| Sealing Surface Flatness | Straight Edge, Bluing Paste | High-pressure air leaks, under-blown bottles |
How do I overcome the challenges of replacing a damaged neck ring?
A damaged neck ring is a critical failure. It affects capping, sealing, and product safety. You know it needs to be replaced, but this is one of the most precise parts of the mold. The tolerances are tight, and a small error can cause big problems.
The main challenges are the extremely high precision required, ensuring a perfect match with the preform neck finish, and potential compatibility issues with the blowing machine's gripper mechanism. The solution lies in precision manufacturing, careful verification, and potential on-site adjustments.

Replacing a neck ring is not like replacing a simple bolt. It's a piece of high-precision tooling that directly forms the most functional part of your bottle. Unlike the bottle body, which can have some minor aesthetic variation, the neck finish has zero tolerance for error. It must conform to industry standards to work with caps from any supplier. I've seen more production headaches caused by improper neck ring replacement than almost any other component. Overcoming these challenges requires a deep understanding of the part's function and a meticulous approach to sourcing and installation.
The Challenge of High-Precision Manufacturing
The surfaces inside the neck ring that form the threads and the sealing surface are machined to tolerances measured in microns (thousandths of a millimeter). This is not something that can be achieved in a general machine shop. It requires specialized CNC grinding and polishing equipment.
Why it's a challenge:
- Complex Geometry: Bottle threads are not simple grooves. They have a specific profile (e.g., rounded, trapezoidal) that must be perfectly replicated. The sealing surface beneath the support ring must be perfectly flat and have a specific diameter to ensure a hermetic seal with the cap liner.
- Material Hardness: To withstand the constant impact and wear, neck rings are typically made from hardened tool steel (like S136 or Stavax), which is difficult to machine. After machining, they are often heat-treated to achieve a high surface hardness, which can slightly distort the part if not done correctly.
- Surface Finish: The internal surfaces must have a mirror-like polish (Ra < 0.2 μm). Any machining marks or roughness can be transferred to the bottle, affecting its appearance and, more importantly, its sealing capability.
The Solution: You must source your replacement neck ring from a specialist mold maker who has experience with PET tooling. Ask potential suppliers about their machining capabilities, specifically if they use high-precision CNC grinders. They should also have robust quality control processes, using tools like optical comparators and CMMs to verify the finished part against the drawing. Do not try to save money by going to a general-purpose shop for this component. The small amount you save will be lost a hundred times over in defective products. A great starting point is to understand the variety of neck finishes available; our guide on choosing the right preform neck size gives a good overview of the precision involved.
The Challenge of Matching the Preform and Bottle Design
The new neck ring must be a perfect match for the specific preform you are using. A "28mm PCO 1881" neck finish has a different thread profile and height than a "30/25" neck finish. Using the wrong neck ring will result in a bottle that cannot be capped or that will not seal.
Why it's a challenge:
- Standardization Nuances: While there are industry standards, slight variations exist between preform manufacturers. The perfect neck ring is designed not just for the standard, but for the specific preform you have sourced for your product.
- Design Evolution: Neck finish standards have evolved over time for light-weighting and performance. An older mold might use a PCO 1810 neck, while a newer product uses a PCO 1881. They look similar but are not interchangeable.
- Information Gap: You might not have the original detailed drawing for your preform mold or the blow mold itself. Without this data, ordering the correct replacement is a guessing game.
The Solution:
- Identify Your Preform: The absolute first step is to get the technical drawing for the preform you are using. This document contains all the critical dimensions for the neck finish. This is the master document that the neck ring must be designed to match.
- Reverse Engineer: If you don't have the preform drawing, you need to have the neck area of a sample preform and a successfully produced bottle measured by a professional. This can be done with an optical comparator or a 3D scanner.
- Provide Complete Information: When you order the replacement part, provide your supplier with the preform drawing. Don't just say "I need a 28mm neck ring." Specify the exact standard, like "28mm PCO 1881 Short Neck." The more information you provide, the higher the chance of success. The entire process, from idea to final product, is covered in our PET bottle mold design guide, which highlights the importance of this initial data gathering.
The Challenge of Machine Interface and Gripper Compatibility
The neck ring doesn't just form the bottle neck; its exterior geometry interacts with the bottle blowing machine. The machine's grippers hold the mold, and the alignment of the neck ring relative to the machine's centerline is critical.
Why it's a challenge:
- Machine-Specific Designs: While the internal, bottle-forming geometry of a neck ring is standardized to the preform, the external, machine-interfacing geometry is not. A neck ring for a Sidel machine may have a different outer diameter or clamping feature than one for a Krones or Sipa machine.
- Alignment Issues: If the new neck ring is not perfectly concentric with the mold's locating features, it can cause the entire mold to be misaligned in the machine, leading to issues with preform loading and bottle ejection.
- Wear on Mating Parts: Sometimes, the issue isn't the new neck ring but wear on the machine's own clamping or locating parts. Installing a perfect new neck ring into a worn-out machine gripper won't solve the underlying problem.
The Solution:
- Check Machine Compatibility: This is a crucial conversation to have with your parts supplier. You need to tell them the exact make and model of your blowing machine. A good supplier will have a database of machine specifications. At iBottler, we've compiled a massive library of mounting dimensions, which is why we can confidently say we have the data for 80% of blow molding machines worldwide. This data is essential for ensuring the replacement part will fit not just your mold, but your machine too.
- On-Site Fitting and Adjustment: In some cases, minor adjustments may be needed. This might involve shimming the part to achieve perfect height alignment or making small modifications to non-critical surfaces. It's best to have a skilled technician perform this fitting.
- Inspect the Machine: Before blaming a new part, inspect the machine's grippers, clamps, and alignment features for wear. Sometimes, the mold is fine, and the machine itself needs maintenance.
What about smaller parts like guide pins and stop blocks?
You've focused on the big, obvious parts like inserts and neck rings. But your mold is still acting up. The parting line doesn't match, or you hear a "clunk" when the mold closes. You might be overlooking the small, inexpensive parts that have a major impact.
Don't underestimate the importance of minor components like guide pins, bushings, and stop blocks. While small, they are absolutely critical for the precision and longevity of your mold. Their failure can lead to serious bottle defects and even catastrophic damage to the main mold bodies.

These components are the skeleton of your mold, providing the alignment and structural stability it needs to function correctly under immense pressure and speed. I've often found that clients are so focused on the bottle-forming "cavity" parts that they neglect basic mechanical maintenance. But a wobbly foundation can never support a perfect structure. Let's look at why these small parts are so vital and what you should do to maintain or replace them.
The Critical Role of Guide Pins and Bushings in Mold Alignment
Guide pins and bushings are the primary alignment system for your mold. Typically, one mold half will have hardened, precision-ground pins, and the other half will have corresponding bronze or graphite-impregnated bushings. As the mold closes, the pins engage the bushings before the two cavity halves touch, ensuring they are perfectly aligned.
Why they are critical:
- Parting Line Mismatch: If the pins are worn or the bushings are oval-shaped from wear, there will be "slop" or play in the system. The mold halves can shift slightly relative to each other during clamping. This directly results in a mismatched parting line on the bottle, which is a major quality defect. You can feel it as a sharp step on the seam of the bottle.
- Preventing Cavity Damage: The guide pins ensure that the two detailed and expensive cavity halves never crash into each other. They take the initial alignment stress. If the guides are worn, the cavity edges can impact each other, causing nicks, dings, and irreversible damage that is extremely costly to repair. The pins and bushings are sacrificial parts designed to wear out and be replaced, protecting the far more valuable cavities.
- Smooth Operation: Well-lubricated, properly fitting guide components allow the mold to open and close smoothly at high speeds. Worn or seized guides will cause jerky motion, which can strain the blowing machine's clamping mechanism.
Maintenance and Replacement:
- Lubrication is Everything: This is the single most important maintenance task. A thin film of the correct high-temperature grease must be present at all times. This should be on a daily or shift-based checklist. Lack of lubrication is the #1 cause of premature failure.
- Regular Inspection: During any mold change or cleaning, wipe down the pins and visually inspect them for scoring or galling (a sign of metal-to-metal contact). Check the bushings for any visible ovality or excessive clearance.
- When to Replace: You should replace them as a set (pins and bushings together). Replace them if you can physically wiggle the mold halves when they are closed, if you see any visual signs of galling, or if you are already seeing the effects in the form of parting line mismatch. They are inexpensive parts, and proactive replacement is cheap insurance.
The Function of Stop Blocks and Wear Plates
Stop blocks, sometimes called stop pads or kiss plates, are hardened steel blocks located on the outside of the mold. Their purpose is to provide a positive stop for the mold when it is fully closed, ensuring the cavity is sealed without the two cavity halves actually touching. Wear plates serve a similar function, providing a durable, replaceable surface for parts that slide against each other.
Why they are critical:
- Controlling "Squeeze": The stop blocks are precision-ground to set the exact amount of clamping force, or "squeeze," on the parting line surfaces. This ensures the mold is tightly sealed to contain the blowing pressure but prevents the delicate parting line edges from being crushed or hobbed by excessive force.
- Preventing Bottom-Out: They ensure the mold closes to the same point every single time, which contributes to consistent bottle volume and quality.
- Absorbing Force: Like guide pins, they are sacrificial. They absorb the immense force of the machine's clamp, protecting the softer aluminum mold bodies from being damaged over millions of cycles.
Maintenance and Replacement:
- Check for Coining: After millions of cycles, the stop blocks can "coin," meaning the metal has become compressed and a slight indentation has formed. This will cause the mold to over-close, which can damage the parting line. You can check for this with a straight edge and feeler gauges.
- Torque Checks: Stop blocks are bolted on. These bolts should be checked for proper torque periodically, as the vibration of the machine can cause them to loosen. A loose stop block is completely ineffective and dangerous.
- Replace, Don't Shim (Usually): If the stop blocks are worn, the correct solution is to replace them. While in an emergency, you might be tempted to "shim" them with thin pieces of metal to regain the correct height, this is a temporary fix at best. Shims can fall out or compress unevenly, leading to inconsistent performance.
The Case for Using Replaceable Components by Design
The best approach is to ensure that your molds are designed with replaceable wear components from the start.
Design Recommendations:
- Standardized Parts: Use standard, off-the-shelf guide pins, bushings, and wear plates whenever possible. This makes sourcing replacements quick and easy.
- Easy Access: Design the mold so that these components can be accessed and replaced without having to completely disassemble the entire mold. For example, some designs allow guide bushings to be replaced from the back of the mold half.
- Material Selection: Use the appropriate materials. Hardened steel (like H13 or D2) for stop blocks and pins, and a dissimilar, self-lubricating material like oil-impregnated bronze or graphite-plugged bushings to prevent galling.
By paying attention to these small, often-ignored parts, you can significantly extend the life of your expensive blow bottle molds, improve bottle quality, and prevent unexpected, costly downtime.
How can I get the correct technical drawings for replacement parts?
Your mold is down. You've identified the broken part, a replaceable insert. You're ready to order a new one, but the supplier asks for a technical drawing or a part number. You search your files, but you have nothing. Production is stopped, and you're stuck.
Getting the correct technical drawings is the most critical step for a successful repair. The best-case scenario is obtaining the original drawings from the mold manufacturer. If that's not possible, you'll need to use reverse engineering techniques like 3D scanning or manual measurement.
A technical drawing is the universal language of manufacturing. It communicates every critical dimension, tolerance, material specification, and surface finish required to make a part that fits and functions perfectly. Without this document, you are essentially flying blind. Ordering a part "by description" is a huge gamble that rarely pays off. Let's look at the best ways to secure the information you need to get the right part made the first time.
The Gold Standard: Original Manufacturer Drawings
The moment you purchase a new blow mold, you should insist on receiving a complete set of technical drawings as part of the documentation package. This is the single most valuable asset you can have for future maintenance and repair.
What to ask for:
- Assembly Drawing: A top-level drawing showing how all the components fit together. This will include a Bill of Materials (BOM) with part numbers for every single component, from the main cavity blocks down to the last O-ring and bolt.
- Component Drawings: Detailed, individual drawings for each replaceable wear part, such as the neck ring, body cavities, and base insert. These drawings should contain all necessary dimensional and tolerance information.
- Digital Files: In addition to PDF copies, ask for the original 2D (DWG, DXF) and 3D (STEP, IGES) CAD files. These digital files can be sent directly to a parts supplier for quoting and manufacturing, eliminating any chance of manual data entry errors.
My Experience: I always make this a non-negotiable part of any mold purchase contract for my clients. A manufacturer who is hesitant to provide drawings might be trying to lock you into their ecosystem for expensive replacement parts. A transparent and reliable partner will understand that providing drawings is part of delivering a complete, serviceable product. We once had a client who bought a mold from another supplier without drawings. Two years later, a base insert cracked. The original supplier had gone out of business. They were completely stuck. We had to start from scratch with reverse engineering, which added cost and a week of downtime that could have been avoided.
When Drawings are Missing: The Art of Reverse Engineering
If you can't get the original drawings, you're not out of luck. You'll have to create them through a process called reverse engineering. This involves precisely measuring the existing part (either the broken one or a good one from another cavity) to create a new drawing.
Method 1: 3D Scanning
This is the modern, high-tech approach and is ideal for parts with complex curved surfaces, like a bottle cavity.
- How it works: A 3D scanner uses lasers or structured light to capture millions of data points on the surface of the part, creating a highly accurate digital "point cloud." This point cloud is then converted into a 3D CAD model.
- Pros: Extremely accurate (often to within 0.025mm), fast, and captures complex organic shapes perfectly. It's the best way to duplicate a part exactly. This is the same technology we use in our 3D printed sample validation process, allowing us to move from a physical object to a digital design with incredible fidelity.
- Cons: Requires specialized equipment and software, so you'll likely need to hire a service provider.
Method 2: Manual Measurement (Metrology)
This is the traditional approach, using precision measuring tools. It works well for more prismatic parts with flat surfaces and simple holes, like a base insert or stop block.
- How it works: A skilled technician uses tools like digital calipers, micrometers, height gauges, and a CMM (Coordinate Measuring Machine) to measure every feature of the part. They then use this data to create a 2D or 3D drawing from scratch.
- Pros: Can be done with relatively common metrology tools (though a CMM is a specialized piece of equipment).
- Cons: Can be very time-consuming for complex parts. It's highly dependent on the skill of the technician, and there's a higher risk of human error compared to 3D scanning. For critical features like thread profiles, specialized tools like an optical comparator are needed.
The Importance of Record Keeping
Once you have the drawings, whether from the original manufacturer or through reverse engineering, you need to manage them properly.
Best Practices:
- Centralized Digital Library: Store all your CAD files and PDFs on a secure, backed-up server. Name the files with a clear, consistent convention (e.g.,
PartNumber_Description_MoldID.pdf). - Version Control: If a part is ever modified or updated, ensure the drawing is updated and given a new revision number. Using an old drawing is a common and costly mistake.
- Maintain a Maintenance Log: Keep a logbook for each mold. When you replace a part, record the date, the part number from the drawing, and the supplier you used. This creates an invaluable service history that can help diagnose future problems and makes re-ordering parts a simple task.
Having the right drawing is the difference between a quick, precise repair and a long, frustrating ordeal. It's the foundation of effective mold maintenance and troubleshooting.
| Method | Pros | Cons | Best For |
|---|---|---|---|
| Original Manufacturer | Most accurate, includes all specs, "free" with mold purchase | Manufacturer may be unwilling or out of business | All new mold purchases |
| 3D Scanning | Very high accuracy, fast, captures complex shapes | Requires specialized service provider | Bottle cavities, complex inserts, neck rings |
| Manual Measurement | Can use in-house tools (calipers, etc.) | Time-consuming, risk of human error, difficult for curves | Simple, prismatic parts like base inserts, stop blocks |
How can I design new molds to make future repairs easier?
You're buying a new blow mold, a significant investment. You're focused on the launch date and the bottle it produces. But you're not thinking about what will happen two years and five million cycles from now when something inevitably wears out.
To prepare for future maintenance, you must prioritize modularity in your initial mold design. This means designing with replaceable inserts for all high-wear areas, using standardized components wherever possible, and ensuring easy access for repairs.

Thinking about maintenance during the design phase is one of the smartest investments you can make. It's a classic "pay me now or pay me a lot more later" scenario. A mold that is cheap to build but difficult to repair will cost you far more in the long run through extended downtime and expensive service calls. When I work with clients on a new PET bottle mold design, I always push them to think like a maintenance manager, not just a product designer.
Design Philosophy 1: Embrace Full Modularity
The core principle is to break the mold down into logical, replaceable units. Instead of a large, monolithic block of metal, think of it as a master frame that holds a set of smaller, purpose-built inserts.
- Separate High-Wear Areas: Any surface that experiences high friction, impact, or thermal stress should be a separate, replaceable insert. This is non-negotiable for:
- Neck Rings: They take impact from the preform.
- Base Inserts: They take impact from the stretch rod and high thermal loads.
- Cavity Halves: The main body of the bottle can even be an insert within a larger mold frame or "shoe." This is common in high-cavitation molds, allowing you to replace a single damaged cavity without scrapping the entire 16-cavity block.
- Benefits of this Approach:
- Reduced Repair Cost: You replace a small, inexpensive insert instead of a massive, expensive mold body.
- Reduced Downtime: Swapping an insert takes a fraction of the time it takes to get a large block repaired or replaced.
- Increased Flexibility: You can change the bottle design by simply creating new inserts for the same mold frame. Want to add a logo or change the shape? New inserts are much cheaper than a whole new mold.
Design Philosophy 2: Standardize Everything
The enemy of quick repair is a custom, one-off component. Your goal should be to use standardized, readily available parts whenever you are not dealing with the unique geometry of the bottle itself.
- Fasteners: Use standard metric (or imperial, if that's your plant's standard) socket head cap screws. Avoid exotic or proprietary screw heads. This means any technician can work on the mold with a standard set of Allen keys.
- O-Rings and Seals: Design cooling channels and pneumatic connections to use standard-size O-rings that you can buy from any industrial supplier. Having to custom-order a special-sized O-ring can shut you down for days.
- Guide Components: Use standard-catalogue guide pins and bushings. Companies like DME or Hasco have been making these for decades, and you can get replacements overnight. There is no reason to design custom guide pins.
- The "Why" of Standardization: Standardization turns a desperate search for a custom part into a simple trip to the stock room or an online order. It commoditizes the non-essential parts of your mold, saving you time and money. It also simplifies your inventory management for spare parts.
Design Philosophy 3: Design for Access
A replaceable part is useless if you can't get to it easily. A good designer thinks about the technician who will have to work on the mold in the future.
- Access from the Back: Where possible, design inserts to be unbolted and removed from the back or side of the mold. This can sometimes allow for a part to be replaced without even removing the mold from the bottle blowing machine, which is a massive time-saver.
- Clearance for Tools: Ensure there is enough space around bolt heads for a wrench or socket. I've seen molds where you need a special, custom-ground wrench to reach a bolt, which is a terrible design practice.
- Lifting and Handling: For large molds, incorporate dedicated tapped holes for lifting eyes. This makes handling the mold safer and easier, preventing accidental damage during mold changes or maintenance.
- Clear Labeling: This is a simple but incredibly helpful detail. Engrave part numbers directly onto the non-critical surfaces of each insert. When a technician removes a part, they can immediately see the number they need to order, eliminating guesswork.
By insisting on these three design principles—Modularity, Standardization, and Access—you are essentially building a maintenance plan directly into your mold's DNA. It ensures that when a failure occurs, it's a minor service event, not a major production crisis. It's a key part of a holistic approach to blow mold troubleshooting and lifecycle management.
How do I choose a reliable partner for mold repair or parts?
Your mold is broken, and you need a replacement part—fast. You search online and find dozens of companies claiming they can help. Some are cheap, some are expensive. Some are local, some are overseas. How do you choose the right one to get you back online without creating new problems?
Choosing a reliable partner is critical. You should prioritize suppliers with proven experience in your specific mold type, who support custom single-part orders, possess strong in-house inspection capabilities, and can offer rapid prototyping or verification services to guarantee fit.
Your relationship with your mold repair partner is just as important as the quality of the mold itself. A good partner is more than just a machine shop; they are a consultant who can help you diagnose problems, suggest improvements, and get you the right part quickly. A bad partner can take your money and deliver a part that doesn't fit, sending you back to square one with even more downtime. I've built my business on being that reliable partner, and I know what separates the experts from the amateurs.
Priority 1: Proven Experience and Structural Familiarity
Not all molds are created equal. A shop that specializes in simple injection molds may not understand the unique challenges of a PET blow mold, such as cooling channel design, high-polish requirements, and the specifics of neck finish geometry.
- Look for Specialization: Does the supplier's website and case studies feature PET mold parts? Do they talk about neck rings, preforms, and stretch-blow molding? If their portfolio is full of automotive parts or consumer electronics casings, they may not be the right fit.
- Ask About Machine Compatibility: A key indicator of experience is their familiarity with different blowing machine brands. Ask them, "Have you made parts for a Sidel Series 2? Or a Krones Contiform 3?" An experienced supplier will know that the machine interface is just as important as the bottle geometry. This is why we've invested so much in building our database of mounting dimensions for major blow molding machines. It shows a deep understanding of the entire ecosystem, not just a single part.
- Prefer the Original Manufacturer (If Possible): Your first call should always be to the company that made the mold. They have the original drawings and know the mold intimately. However, if they are slow, expensive, or out of business, you'll need a qualified third-party specialist.
Priority 2: Technical and Production Capabilities
You need a partner with the right tools for the job. This goes beyond just having a CNC machine.
- Support for Single-Part Orders: Many large manufacturers are only interested in high-volume production runs. You need a partner who is willing and able to manufacture a single, custom replacement part efficiently. Their business model should be geared towards service and repair, not just mass production.
- In-House Quality Control and Inspection: This is non-negotiable. Ask them about their QC department. What tools do they have? Do they have a CMM? An optical comparator? A surface roughness tester? They must be able to verify that the part they made matches the drawing before they ship it to you. Ask for a detailed inspection report to be included with the part.
- Material Expertise: Do they understand the specific grades of aluminum (like Aleris Hokotol) and steel (like S136 or Stavax) used in blow molding? Can they provide material certificates to prove they used the correct alloy? Using the wrong material can lead to rapid wear, corrosion, or catastrophic failure.
Priority 3: Service, Speed, and Verification
In a downtime situation, speed is critical. But speed without accuracy is useless. A good partner balances both.
- Rapid Prototyping and Verification: The best suppliers can offer services to reduce risk. For a complex or expensive part, you can ask them to first produce a 3D-printed model. This allows you to physically test the fit of the part in your mold before committing to expensive metal machining. This is a core part of our process, where we go from 3D printed samples to production to ensure a perfect fit every time.
- Clear Communication and Quoting: A reliable partner will provide a clear, detailed quote that specifies the material, process, lead time, and what's included (like an inspection report). They should be responsive to your questions and proactive in their communication.
- Repair vs. Replace Consultation: A true partner will sometimes advise you not to replace a part. They might look at photos of the damage and suggest a more cost-effective repair, like micro-welding or re-polishing. This shows they are interested in solving your problem, not just selling you a part.
| Capability | What to Look For | Why It's Important |
|---|---|---|
| Experience | Specialization in PET blow molds, familiarity with your machine brand. | Ensures they understand the unique requirements of your process. |
| Technical Ability | In-house CMM, optical comparators, material certification. | Guarantees the part is made to the correct specifications and tolerances. |
| Service Model | Willingness to make single custom parts, offers repair consultation. | You need a partner geared for service, not just mass production. |
| Speed & Verification | Offers rapid prototyping (3D printing), provides detailed inspection reports. | Minimizes risk and ensures the part will fit before it arrives. |
Conclusion
A damaged blow mold does not have to mean a full replacement. By understanding which parts fail and adopting a modular approach, you can perform targeted, efficient, and cost-effective repairs.
Frequently Asked Questions (FAQ)
1. Is it cheaper to repair a small part or just buy a new mold?
For almost any individual component failure (like a base insert, neck ring, or guide pin), it is vastly cheaper to repair or replace that single part. A complete new mold can cost tens of thousands of dollars, while a replacement insert might only be a few hundred or a few thousand. The key is having a mold with a modular design that allows for such replacements.
2. How long does it take to get a custom replacement part made?
The lead time can vary significantly based on the part's complexity and the supplier's backlog. A simple stop block might be made in a few days. A complex, high-precision neck ring could take 2-4 weeks. This is why having drawings ready and a relationship with a reliable supplier is crucial to minimize downtime. Services like 3D printed verification can add time initially but prevent longer delays from a poorly fitting part.
3. My mold is very old, and the original manufacturer is gone. Am I out of luck?
No, you are not out of luck. This is a very common situation. A good mold repair specialist can reverse-engineer your existing components. Using tools like 3D scanners and CMMs, they can create a perfect digital duplicate of your part and manufacture a new one from that data. It's essential to document this new part with a technical drawing for the future.
4. What is the single biggest mistake people make when replacing mold parts?
The biggest mistake is skipping the verification step. They receive the new part and immediately install it without measuring it or comparing it to the original. This is a huge gamble. A small error in a critical dimension can lead to bottle defects, air or water leaks, or even damage to the main mold body. Always "trust, but verify" with a set of calipers and a visual inspection at a minimum.
5. How can I build a "first aid kit" of spare parts for my molds?
A great way to prevent downtime is to stock critical spares. For each mold family, you should have at least one of everything that is designed to be a replaceable wear item. This includes:
- A full set of O-rings and seals.
- One spare base insert.
- One spare neck ring.
- A set of guide pins and bushings.
- A set of stop blocks.
Having these on a shelf turns a multi-week downtime event into a repair that takes just a few hours.
🔗 Related Pages on Our Website
Automatic Blow Molding Machines – iBottler
Discover our full range of customizable automatic PET bottle blow molding machines.Blow Bottle Mold – iBottler
Explore our precision blow molds designed for PET and PP bottles.Preform Mold – iBottler
Learn more about our high-precision preform molds suitable for various injection molding machines.PET Wide Mouth Jar Project Starter Guide: Equipment, Molds & Process Explained
Pros and Cons: Should You Choose PET Blow Moulding for Your Bottle Project?
Worried About Blow Mold Fit? We Have Mounting Dimensions for 80% of Blow Molding Machines Worldwide
Can One Semi‑Automatic Blow Molding Machine Produce All Bottle Sizes? Here’s Why Not
Why Do Krones Blow Molding Machine Users Come to Us for Their Molds?
Why Do PET Preforms Come in Different Colors? Function, Application, and Production Tips
How to Set Parameters for 600ml Bottles on a Semi-Automatic PET Blowing Machine?
From 3D Printed Samples to Production: How Can You Rapidly Validate Blow Mold Designs?
How to Choose the Right Preform Neck Size for Your PET Bottle Project
