Choosing a partner for your bottle design feels overwhelming. Make the wrong call, and you could face soaring costs and a brand image that never gets off the ground. This guide clarifies the path forward.
Your choice depends entirely on your priorities. An ad agency excels at creating a visually stunning bottle that tells a brand story, but they can miss critical production details. A mold factory guarantees a functional, efficient design that will run smoothly on the production line, saving you money and headaches.

This single decision is one of the most important you'll make. It’s not just about a drawing; it’s about a choice that will ripple through your entire project, affecting your budget, your timeline, and the final quality of the product that represents your brand on the shelf. I’ve been in the PET mold business for over 16 years, and I’ve seen this choice make or break new ventures. Let's walk through what you need to know so you can make the right decision for your business, based on real-world experience, not just theory.
How do design philosophies differ between an agency and a factory?
You've got a brilliant idea for a new bottle. But are you sure the final product will look great and be easy to make? The designer's core philosophy is what ultimately determines the answer to that question.
An ad agency focuses on grabbing the customer's eye. They use market research and visual language to build a brand story. A mold factory, on the other hand, prioritizes the physics of production. We focus on wall thickness, material flow, and cycle times to ensure your bottle can be made without constant problems.

Over my 16 years in this industry, I've learned that the gap between a beautiful idea and a manufacturable product is where projects succeed or fail. The two worlds—creative branding and industrial engineering—speak different languages. Understanding both is the key to success.
The Ad Agency's World: Aesthetics and Brand Story
When you hire an advertising or design agency, you are paying for their expertise in marketing and consumer psychology. Their primary goal is to create a bottle that will stand out on a crowded retail shelf. They think about questions like:
- Who is the target customer? What shapes, colors, and textures will appeal to them?
- What is the brand's story? Should the bottle look rugged and strong, or elegant and refined?
- How will it look next to competitors? The design needs to be different enough to be memorable.
An agency will develop mood boards, research market trends, and present you with several concepts. They use sophisticated 3D rendering software to create photorealistic images of the bottle. These images are powerful and help you visualize the final product. They might design a bottle with sharp, crisp lines to convey a sense of modern precision, or one with gentle, organic curves to suggest natural ingredients. This is a vital part of building a premium brand, and for my high-end clients, this investment is non-negotiable. They are not just selling a beverage; they are selling an experience, and the bottle is the first point of contact with the customer. The agency's work is to make that first impression unforgettable.
The Mold Factory's Reality: Physics and Practicality
When my team of designers gets a project, our thought process starts from a completely different place. We have a combined 40+ years of experience not just in design, but in the actual manufacturing of molds and troubleshooting production lines. We think about the physical journey of a tiny PET preform becoming a full-sized bottle in about three seconds.
Our questions are about physics and efficiency:
- What is the preform-to-bottle stretch ratio? If we stretch the plastic too much, the walls will be dangerously thin.
- How will the molten plastic flow into all the details? An intricate pattern might look great, but the plastic might not fill it properly, leading to defects.
- Where do we place the cooling channels in the mold? Proper cooling is essential for a stable bottle and a fast cycle time. Poor cooling leads to warped bottles.
- What is the necessary draft angle? Every bottle needs a slight taper so it can be ejected from the mold cleanly. Too little, and you get scuff marks or stuck bottles.
We live in the world of millimeters, pressure bars, and cooling temperatures. A beautiful, sharp-cornered design from an agency immediately raises a red flag for us. We know that sharp internal corners are incredibly difficult to form correctly and create weak spots that can burst under pressure or when dropped. We see the drawing, and our minds immediately translate it into a map of potential failures. I highly recommend anyone starting this journey to read a comprehensive PET bottle mold design guide to understand these foundational principles.
Where the Two Worlds Collide
The ideal project finds a balance between these two worlds. The collision point is where the creative vision meets the laws of physics. I remember a client in the premium juice market who came to us with a design from a top agency in Europe. It was for a square-shaped bottle, meant to look like a block of ice. The renderings were breathtaking.
However, my lead designer took one look and pointed out the problem. To get those perfectly sharp, 90-degree corners, the plastic would have to stretch dramatically, resulting in paper-thin walls at the corners. The bottle would have no top-load strength (it would collapse when stacked) and would likely fail during carbonation.
The client was disappointed. They had already paid the agency a hefty fee. Instead of saying "it's impossible," we saw it as a challenge. Our job was to preserve the intent of the design while making it manufacturable. We spent a week making tiny adjustments. We changed the corner radius from a theoretical 0mm to a practical 2mm—imperceptible to the average consumer, but it made all the difference in material flow. We added microscopic ribs inside to add structural integrity. We presented our modified 3D model, and the client was thrilled. It looked 99% the same as their "perfect" design, but this one could actually be produced. This is the value an experienced mold maker brings: we are the bridge between the dream and the reality.
What are the real cost differences in bottle design?
You're worried about your budget, and rightly so. The cost of design can be a significant part of your startup expenses. Choosing the wrong design partner can lead to you paying twice for the same job.
Ad agencies charge a separate, often substantial, fee for their creative services. Mold factories, like mine, usually include the structural design work as part of the overall mold development package. This means if you pay an agency first, you might have to pay your mold maker again to re-engineer the design for production.
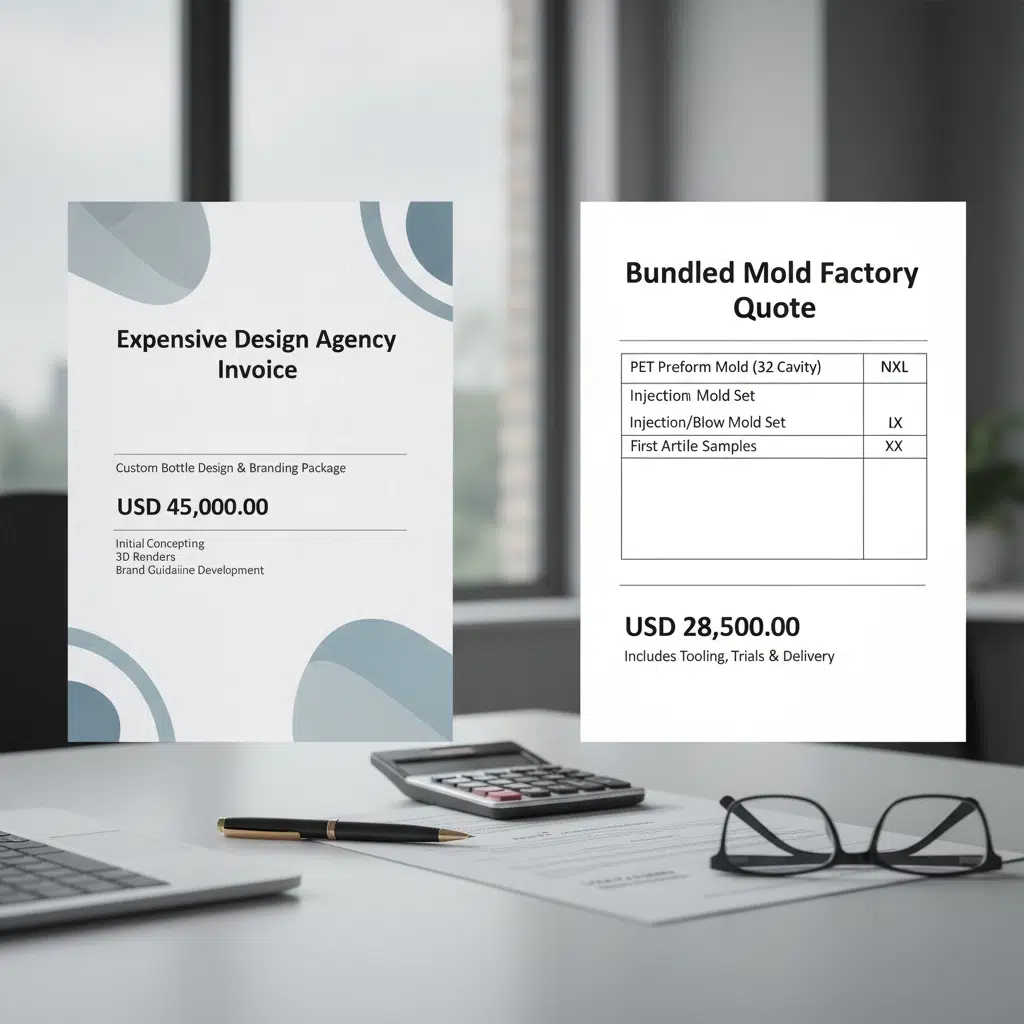
Let’s break down the numbers and the hidden costs. The initial quote is never the full story, and I want to help you see the complete financial picture based on the projects I’ve seen over the years.
Breaking Down the Ad Agency Invoice
When a high-end client decides to work with a design agency, they are making a strategic investment in their brand. The cost reflects the extensive work involved. An agency's invoice isn't just a single line item for "design." It's typically broken down into phases:
- Phase 1: Research & Discovery: This can cost anywhere from $5,000 to $15,000. It includes market analysis, competitor review, and defining the target consumer profile.
- Phase 2: Concept Development: This is where the creative work happens. An agency might develop 3-5 initial concepts, complete with storyboards and mockups. This phase could range from $10,000 to $30,000+.
- Phase 3: Refinement & Revisions: You'll choose a concept, and the agency will refine it based on your feedback. There are usually a set number of revision rounds included. Additional rounds cost extra.
- Phase 4: Final 3D Renders & Technical Packet: They provide you with beautiful, high-resolution images for your marketing and a basic technical drawing.
All in, a bottle design from a reputable agency can easily cost between $20,000 and $50,000, or even more for world-renowned firms. You are paying for their brand expertise and the creation of intellectual property. For a major corporation launching a global product, this is a necessary expense.
Understanding the Mold Factory's "Free" Design
Now, let's look at the mold factory model. When a client comes to me, especially a startup or a small business, they are often relieved to hear that we don't charge a separate, large fee for design. Our design service is a value-added part of the mold-making process. The cost is factored into the total price of the blow bottle mold, which might range from $5,000 to $25,000 depending on complexity and cavitation.
This approach is fundamentally different. Our goal is to get you to a manufacturable design as efficiently as possible. I had a client from Vietnam who is starting a new line of soda water. The market is very competitive, and he wanted a unique bottle but had a limited budget. He came to me with three bottles from his competitors. He said, "I like the stripes on this first bottle, the strong base on the second one, and the shoulder shape of the third one. Can you combine them into something new for me?"
My design team got to work. We took the elements he liked and blended them into a new, cohesive design. We made sure the stripes were not too deep to cause molding issues, that the base was stable for the filling line, and that the shoulder provided good top-load strength. We sent him the 3D drawing within three days. He loved it. We created a brand new bottle for him, and the design service was effectively free—it was part of our commitment to being his manufacturing partner. He launched his new soda brand with a custom bottle without ever paying a separate design firm.
The Hidden Cost: Redesign and Optimization
Here is the most important part to understand: the hidden cost. Let's say you spend $25,000 on an agency design. You bring the beautiful drawings to a mold factory. The factory's engineers review it and find three critical flaws that make it unmanufacturable.
Now what? The factory has to spend time—sometimes days—with their experienced engineers and designers to fix the agency's work. They have to adjust angles, thicken walls, and change curves. This is skilled work that takes time and resources. They will have to charge you for this "feasibility optimization" or "design for manufacturing" service. This could be an additional fee of $2,000 to $8,000.
Suddenly, you have paid twice for one design. You paid the agency for the creative concept, and now you are paying the factory to make it actually work. This is the most common point of friction I see, and it causes a lot of frustration for clients. They feel like they're being charged again, but from my perspective, we are performing a crucial engineering service that was missing from the initial process.
| Feature | Ad Agency | Mold Factory |
|---|---|---|
| Initial Design Fee | $20,000 - $50,000+ (Standalone) | Often included in mold price |
| Focus of Design | Brand Story, Aesthetics, Market Appeal | Manufacturability, Efficiency, Cost |
| Feasibility Analysis | Not included; purely visual | Core part of the design process |
| Revision Process | Based on visual feedback | Based on technical/functional feedback |
| Hidden Cost Risk | High risk of needing a paid "redesign for manufacturing" phase | Low risk; design is created to be manufacturable from the start |
| Best For | High-budget, brand-focused companies | Startups, budget-conscious companies, efficiency-focused projects |
Can your beautiful bottle design actually be blown?
You’ve signed off on a stunning design. The 3D renderings look perfect. But you send them to the factory, and you get a call: "We can't make this." Your project grinds to a halt.
Mold factories possess a deep, hands-on knowledge of "blowability"—the complex science of how a PET preform heats and stretches into a final bottle shape. We can predict manufacturing failures from a 2D drawing. Agencies, lacking this production floor experience, often create designs that are beautiful but physically impossible to produce.
This isn't about pointing fingers; it's about understanding different areas of expertise. An artist can paint a beautiful picture of a car, but an automotive engineer is the one who makes sure the engine runs. In the world of bottles, my team and I are the engineers.
What Is "Blowability"? The Art and Science
Blowability is a term we use in the industry to describe the entire process of transforming a small, thick-walled test tube-shaped object called a preform into a thin-walled, full-sized bottle. It’s a delicate dance of heat, time, and pressure.
Imagine you're trying to blow a bubble from bubble gum into a star shape. It's nearly impossible. The gum will stretch unevenly and pop at the sharp corners. Blow molding PET is similar, but far more scientific.
The process involves:
- Heating the Preform: The preform is heated to a precise temperature, around 100°C (212°F). The heat has to be perfectly even, but sometimes we apply more heat to certain sections that need to stretch more.
- Stretching and Blowing: The heated preform is placed inside the mold. A long, thin stretch rod shoots down and stretches the preform vertically. Almost simultaneously, high-pressure air is blasted in, forcing the plastic outwards to take the shape of the mold cavity.
This all happens in a matter of seconds. "Blowability" is our ability to control this violent, rapid process to produce a perfect bottle every single time, millions of times over. This requires a deep understanding of how the PET material behaves under these conditions.
The Science of Stretch Ratios
The single most important factor in blowability is the stretch ratio. This is a mathematical calculation of how much the preform has to stretch to become the final bottle. There are two types:
- Axial Ratio: How much the preform stretches in length (vertically).
- Radial Ratio: How much the preform stretches in width (horizontally).
Every bottle design has a unique set of stretch ratios. A tall, skinny bottle has a high axial ratio. A short, wide jar has a high radial ratio. The ideal PET bottle has balanced ratios. If one ratio is extremely high compared to the other, it puts immense stress on the material. This often leads to problems like inconsistent wall thickness, weak spots, or the bottle simply not forming completely.
This is why choosing the right preform is so critical. A preform designed for a 500ml water bottle cannot be used to make a 1-liter wide-mouth jar. The preform's weight, length, and wall thickness are all engineered for a specific range of stretch ratios. For anyone serious about their project, understanding the basics of how to choose the right preform neck size and its implications on the overall design is a crucial first step. Our designers can look at a bottle concept and instantly know which preform will give it the best chance of success. An agency designer simply does not have this foundational knowledge.
Common Design Flaws That Kill Blowability
Over the years, I've seen countless "unblowable" designs. They almost always share one of a few common flaws:
- Sharp Internal Corners: As mentioned before, plastic doesn't like to flow into sharp 90-degree angles under pressure. This is the #1 design flaw we see.
- Drastic Changes in Diameter: A design that goes from very narrow to very wide in a short space is a nightmare. It requires the plastic to stretch at dramatically different rates, causing thin spots in the wide areas.
- Excessively Deep Ribs or Embossing: A deeply embossed logo or a decorative rib might look great, but if it's too deep, the plastic won't be able to push into that detail without becoming too thin.
- No Draft Angle: A perfectly vertical wall (zero draft) will create friction when the bottle is trying to eject from the mold, causing scuffs and slowing down production.
When we see these issues in a design from an agency, we have to become educators. We explain why it won't work, often using diagrams and simulations. Our goal is to fix the design while preserving the designer's original intent. This often involves solving issues that would later show up as common PET blow molding defects, saving the client months of troubleshooting down the line.
How quickly can you get design changes made?
Your project is racing against the clock. Every day of delay means a later launch date. In this environment, endless back-and-forth on design revisions is a disaster. You need a fast, efficient revision process.
A mold factory can revise and validate designs much faster than an agency. We have the engineers, the software, and the prototyping tools all under one roof. An ad agency's revision process is inherently slower because they are the creative hub, not the manufacturing hub. They must rely on external feedback, which creates long, frustrating communication chains.
Time is money in manufacturing. A week saved in the design phase is a week's worth of product you can sell. Let’s look at the two processes side-by-side.
The Factory's Integrated Workflow
When a client asks us for a design change, the process is lean and fast. I've built my team and systems specifically to eliminate delays.
Here’s what our typical revision cycle looks like:
- Client Feedback: The client emails us with a requested change. For example, "Can we make the grip section a little wider and add a small rib for strength?"
- Designer's Desk (1-2 Hours): The request goes directly to one of my designers. He opens the 3D CAD file and makes the adjustment. Because he understands the manufacturing implications, he makes the change in a way that he knows is still blowable.
- Engineering Review (1 Hour): The modified design is passed to a senior engineer. He runs a quick simulation to check wall thickness distribution and confirms the change doesn't create any new problems.
- Updated Drawing to Client (30 Mins): We export a new 3D PDF or drawing and email it back to the client.
The entire process, from receiving the feedback to delivering a revised, technically-sound drawing, can take as little as half a day. There are no middlemen. The person changing the design is the same person who understands how the mold will be built. This tight feedback loop is incredibly powerful.
The Agency's Disconnected Chain of Communication
Now, consider the same scenario with an ad agency. The process becomes much more complex and drawn out.
- Client Feedback: The client emails their account manager at the agency with the same request.
- Internal Agency Communication (1 Day): The account manager has to schedule a meeting or write a brief for the creative designer who originally worked on the project.
- Designer's Work (1-2 Days): The agency designer, who is likely juggling multiple projects, makes the change in their 3D software. Their focus is purely on aesthetics. They make the grip wider, but they might not add the rib correctly or might change a curve in a way that negatively impacts blowability.
- Agency Sends to Client (1 Day): The agency sends the updated visual rendering to the client for approval. It looks good on screen.
- Client Sends to Factory (1 Day): The client forwards the new design to me for a feasibility check.
- Factory Review & Feedback (1 Day): My team analyzes the new design and finds a problem. We write up a technical explanation and send it back to the client.
- Client Sends Feedback to Agency (1 Day): The client forwards our technical feedback to the agency's account manager.
In this scenario, a full week has passed, and we are back at square one. The communication chain is long and fragmented. Nuance gets lost in emails. The designer at the agency doesn't have the direct, instant feedback from the manufacturing engineer. This cycle of revisions can repeat two or three times, adding weeks to the project timeline.
The Power of Rapid Prototyping
The ultimate speed advantage is our ability to create physical parts. A 3D render is just a picture, but a physical prototype is something you can hold in your hand. This is where we completely outpace an agency. We offer 3D bottle prototyping as a core part of our process.
Within 24 hours of finalizing a design, we can have a 1:1 scale 3D printed model of the bottle ready. We can ship this to the client anywhere in the world. Now, they can feel the ergonomics of the grip, check if it fits in a car's cup holder, and see how their label will apply to the real curves. This physical check reveals things a screen never can. Finding a problem at this stage costs a few hundred dollars. Finding it after the steel mold is cut costs tens of thousands and months of delays. An agency can only show you pictures; we give you reality.
Does your high-impact brand design have to be a manufacturing nightmare?
You want a bottle that stops customers in their tracks. It has to be unique, memorable, and a physical representation of your brand's quality. But your manufacturing partner is warning you about production instability and high costs. Do you have to choose between a powerful brand and a profitable product?
No, but you must find a smart balance. Highly differentiated and complex designs often come at the cost of manufacturing efficiency, leading to higher scrap rates and production headaches. The real art, which comes from experience, is in finding that sweet spot where a bottle is unique enough to build a brand but simple enough to be produced reliably.
I have seen clients chase a "perfect" design that was so complex it could never be profitable. I have also seen clients be so conservative that their bottle was invisible on the shelf. The path to success is in the middle.
The Allure of Radical Design
Why do brands chase unique bottle shapes? It's simple: differentiation. In a sea of generic round and square bottles, a unique silhouette is a powerful marketing tool. Think of the iconic Coca-Cola "contour" bottle, the square Fiji water bottle, or the elegant curves of a high-end perfume bottle. These shapes are instantly recognizable. They communicate a message before the customer even reads the label.
A radical design can:
- Justify a Premium Price: A custom, heavy-feeling bottle makes the product inside seem more valuable.
- Tell a Story: A bottle shaped like a bamboo stalk for a natural tea brand, for example, tells an instant story.
- Improve Functionality: A unique grip or a novel cap can be a real point of difference for the consumer.
I completely understand and respect this goal. When a client comes to me with a bold vision, my first instinct is not to say "no," but to ask, "how can we make this work?" The creative drive for uniqueness is valid and important.
The Manufacturing Trade-offs
Every design decision has a consequence on the production line. This is the hard reality that is often missing from purely creative discussions.
- Complex Shapes & Scrap Rate: The more intricate the bottle shape—with deep grooves, sharp angles, and asymmetrical features—the higher the probability of production defects. A "scrap rate" is the percentage of bottles that have to be thrown away because of flaws. A typical line runs at a scrap rate of less than 1%. A complex bottle might run at 5% or even 10%. That's a huge increase in material cost and a massive decrease in profitability.
- Instability on the Filling Line: A beautiful, but top-heavy or oddly-shaped bottle can be a nightmare for the rest of the production process. If it constantly falls over on the conveyor belt between the bottle blowing machine and the filler, you have constant downtime and lost efficiency.
- Cooling Challenges: PET plastic needs to cool evenly in the mold to be stable. A design with both very thick and very thin sections will cool unevenly. The thick sections hold heat longer, and as they cool, they can shrink and warp the entire bottle. This requires a longer cooling time in the mold, which slows down your entire production cycle. You produce fewer bottles per hour, which increases the cost of each bottle. It's why connecting molds to a powerful chiller is absolutely necessary.
Finding "Manufacturable Uniqueness"
This is the skill that defines an expert mold-making partner. Our job is to be a creative problem-solver, not just a machine shop. We take a client's radical vision and find ways to translate it into a physical object that respects the laws of thermodynamics and fluid dynamics.
Here are some techniques we use:
- Softening Radii: We take a sharp, 90-degree angle from a drawing and turn it into a 2mm or 3mm radius. It still looks sharp to the naked eye, but it allows the plastic to flow smoothly.
- Optimizing Embossing: A client wants their logo deeply embossed. We might suggest making the logo slightly smaller but with a wider stroke. This achieves the premium feel without creating a weak spot in the bottle wall.
- Adding Structural Features: We can add very thin, almost invisible ribs on the inside of a flat panel to give it strength without changing the external look.
I once worked with a startup launching a high-end cocktail mixer. Their agency designed a bottle inspired by a classic crystal whiskey decanter, with many sharp, diamond-like facets. The renderings were incredible. But when we analyzed it, we saw two major problems. The internal sharp corners would cause the stretch rod to potentially deflect or damage the preform, and the external facets would create dozens of weak points.
Our solution was to redesign the facets with a slightly rounded profile, what we call a "soft facet." It caught the light in almost the same way, preserving the "crystal" look. We also adjusted the base to be slightly heavier, improving stability. The client got the premium, unique bottle they wanted, and we were able to guarantee a production process with a scrap rate under 2%. That is the balance we strive for.
What critical design details does an agency usually miss?
Your new bottle looks fantastic in the marketing photos. But then the first production run starts, and disaster strikes. The caps don't seal properly, causing leaks. The bottles wobble on the conveyor belt. Small, technical details that were overlooked in the initial design phase are now causing huge, expensive problems.
A mold factory lives and breathes these critical structural details. We optimize the parts of the bottle that an agency designer, focused on the overall look, often misses. This includes the thread on the neck, the shape of the base, the thickness of a handle, and the precise angles needed to get the bottle out of the mold.
Getting these details right from the start is the difference between a smooth product launch and a cascade of expensive fixes. After 16 years, I can tell you that these "boring" details are where the profit is made or lost.
The Neck Finish: More Than Just a Place for the Cap
The top of the bottle, called the "neck finish," is arguably the most critical component. It has to do a lot of jobs perfectly. An agency might just draw a generic cap on top, but we have to engineer it to precise, global standards.
- Thread Standards: There are many different standards for threads, like PCO 1881 (for carbonated beverages), PCO 1810, or 38mm for wider mouths. The choice depends on the product (soda needs a stronger seal), the cap you plan to use, and the capping machine on your filling line. Choosing the wrong one means your caps will either leak or won't screw on at all.
- Tamper-Evident Band: The small ring at the base of the threads that breaks when you first open the bottle is a critical safety and quality feature. The geometry of this area has to be perfect for it to function correctly.
- "Land" Area: The very top flat surface of the neck finish is called the land. This is the surface that seals against the inside of the cap. It has to be perfectly flat and smooth to prevent leaks.
When a client is unsure, we guide them through our detailed preform neck size guide to ensure the choice they make is compatible with their entire production ecosystem. This is a conversation an agency is simply not equipped to have.
The Base: The Unsung Hero of Stability
The bottom of the bottle might be the last thing a consumer looks at, but for production, it's one of the first things we perfect. A poorly designed base can cause a bottle to be unstable ("rocker bottom") or even burst under pressure.
There are several base designs, each for a specific purpose:
- Petaloid Base: You see this on almost all carbonated soda bottles. The five "feet" provide stability and resist the internal pressure from the carbonation.
- Champagne Base: This features a deep "push-up" or "punt" in the center. It's also used for pressure resistance and gives the bottle a premium look and feel.
- Flat Base: Used for non-pressurized products like water or juice. Even a "flat" base has a carefully designed, slightly indented profile to ensure it sits flat and doesn't rock.
We have to design the base to be thick enough to be strong but not so thick that it wastes plastic or requires too much cooling time. A "rocker bottom" is one of the most frustrating common PET blow molding defects, and it's almost always caused by an improperly designed base or a poor cooling setup.
The Technical Stuff: Parting Lines and Draft Angles
These are two concepts that are completely invisible to the end consumer but are absolutely critical for manufacturing.
- Parting Line: A blow bottle mold is made of two halves that clamp together. The seam where these two halves meet is called the parting line. We have to strategically decide where this line will be on the bottle. The goal is to hide it as much as possible, perhaps along an existing edge or curve in the design, so it's not a visible, ugly seam running down the side. An agency designer would never even think about this.
- Draft Angle: This is a slight taper, usually just 0.5 to 2 degrees, on any vertical wall of the bottle. Think of a stack of plastic cups; they have a taper so they don't get stuck together. A bottle needs the same thing so it can be cleanly ejected from the mold after it's blown. A design with perfectly vertical "zero-draft" walls is a recipe for disaster. The bottle will scrape against the mold as it's removed, causing scuff marks and slowing down the production cycle.
My designers are trained to incorporate these technical requirements into the design from the very beginning, ensuring the creative vision is never compromised by a late-stage technical fix.
| Structural Detail | Ad Agency Focus | Mold Factory Focus | Potential Problem if Ignored |
|---|---|---|---|
| Neck Finish | Looks good with the cap | Thread standard, seal integrity, tamper-evidence | Leaking caps, failed quality control |
| Base Design | Aesthetically pleasing shape | Stability on conveyors, pressure resistance | Wobbly bottles ("rockers"), bottles bursting |
| Wall Thickness | Not considered | Uniformity for strength, minimal material use | Weak spots, collapsing bottles, high material cost |
| Draft Angle | Not considered | 0.5 - 2 degree taper for easy mold release | Scuffed bottles, slow production cycles |
| Parting Line | Not considered | Strategic placement to hide the mold seam | Visible, unattractive line on the final product |
How can you be sure the design will work before spending thousands on a mold?
You're at the final stage. You've approved a design, and the next step is to write a big check for the production mold. It's a nerve-wracking moment. What if the real bottle doesn't feel right? What if the logo looks stretched and distorted? What if it fails a basic drop test?
A mold factory can eliminate this uncertainty by creating physical samples for you to test and approve before you ever commit to the expensive final tooling. Using methods like 3D printing and single-cavity pilot molds, we provide real-world validation. An agency can only provide pictures; we provide proof.
This validation step is the most effective insurance policy you can have against a costly design mistake. It’s a core part of our process and philosophy of moving from 3D printed samples to production with confidence.
Beyond the Render: The Need for a Physical Prototype
A photorealistic 3D render on a high-resolution monitor is a powerful sales tool, but it can also be very deceiving. It cannot communicate crucial information that you can only get from a physical object:
- Ergonomics & Feel: How does the bottle actually feel in a customer's hand? Is the grip comfortable? Is it easy to open?
- Weight & Balance: Does the bottle feel substantial and high-quality, or flimsy and cheap? Is it balanced or does it feel like it wants to tip over?
- Real-World Scale: Does it fit in the spaces it needs to, like a refrigerator door, a car cup holder, or the packaging you've already designed?
- Label Application: How will your label wrap around the real curves of the bottle? A flat graphic on a screen doesn't show the distortion that can happen on a complex surface.
I had a client who was convinced their design was perfect based on the renders. We insisted on sending them a 3D-printed prototype. The moment he held it, he realized the grip section was too small for an average adult's hand. It was a simple, two-hour fix in the CAD model. Had we not made that prototype, they would have spent over $15,000 on a production mold for a bottle that was uncomfortable to use.
Our Prototyping Process: A Phased Approach
We use a multi-step process to validate a design, moving from low-cost and fast to higher-fidelity as we gain confidence.
Step 1: The 3D Printed Sample
This is the fastest and most affordable way to get a physical model. Using our industrial 3D printers, we can produce a full-scale model of the bottle, usually within a day. This model is made from a hard resin, not PET, so it can't be used for performance testing. Its purpose is purely for form and ergonomic validation. You can hold it, feel it, test it with your labels, and show it to focus groups. It's the first and most important reality check.
Step 2: The Single-Cavity Pilot Mold
Once the 3D printed sample is approved, some clients want an even higher level of confidence before commissioning a 6- or 8-cavity production mold. In these cases, we can create a single-cavity pilot mold. This is a real mold, usually made from aluminum instead of the more durable P20 steel, designed to produce a few hundred or a few thousand real, blow-molded PET bottles. It's more expensive than a 3D print but a fraction of the cost of the final production mold.
What We Learn from a Blown Sample
Getting that first bottle from a pilot mold is an exciting day. It's the moment the design truly comes to life. Now, we can perform a whole new set of tests that were previously impossible:
- Wall Thickness Analysis: We cut the bottle into sections and use a special gauge to measure the wall thickness at dozens of points. This tells us if the material is distributing evenly or if there are dangerous thin spots.
- Logo & Pattern Deformation: We can see exactly how an embossed logo or a textured pattern stretches during the blowing process. We can make small adjustments to the mold to counteract any unwanted distortion.
- Performance Testing: We can now perform top-load tests (to simulate stacking), drop tests, and pressure tests (for carbonated products).
- Clarity and Color: We can see how the final PET material looks, whether it has the desired clarity, and how the color concentrate is dispersing.
This pilot mold phase is the ultimate validation. It confirms that the bottle not only looks good but also performs to the required technical specifications. An ad agency's involvement ends with a beautiful image file. Our job isn't done until we've delivered a bottle that is proven to work in the real world. This process also ensures that the final mold will work perfectly with your specific bottle blowing machine and that you won't have to worry about mold fit.
So, who is the right design partner for your project?
You now understand the different philosophies, costs, and capabilities. But the final decision still rests on your shoulders. How do you weigh your project's specific needs for branding, budget, and technical feasibility to make the right choice?
The answer lies in your primary goal. For large-scale, high-budget launches where creating a powerful brand is the top priority, a collaboration between an agency and a factory is best. For startups and businesses where budget and speed to market are critical, working directly with an experienced mold factory is the most efficient and logical path.
Let's explore the common scenarios I see every day to help you place your own project into the right category.
Scenario 1: The Major Brand Launch
Imagine you are a director at a large beverage company. You have a multi-million dollar budget to launch a new product that needs to compete with established giants. In this case, branding is everything.
The Strategy: A dual-track approach.
- Hire the Ad Agency First: You need their expertise in market research, consumer trends, and brand storytelling. They will lead the creative process and develop the core concept and visual identity of the bottle. This is their strength.
- Bring in the Mold Factory as a Technical Consultant EARLY: Do not wait until the design is "final." As soon as the agency has 2-3 promising concepts, you should bring in a mold factory partner (like us) to do a "pre-feasibility" analysis. We can review the concepts and provide immediate feedback on potential manufacturing challenges.
This collaborative approach prevents the agency from going too far down a path that is a manufacturing dead-end. It allows the creative team to innovate while being guided by the realities of production. It costs more upfront to have both parties involved, but it prevents hugely expensive delays and redesigns later. It's the professional, low-risk approach for a high-stakes project.
Scenario 2: The Startup or Small Business
Now, imagine you are an entrepreneur. You've perfected a recipe for craft soda in your kitchen. You have a limited pool of funding from friends and family. Your primary goal is to get a safe, reliable, and attractive product to market as quickly and affordably as possible.
The Strategy: Go directly to an experienced mold factory.
In this scenario, spending $30,000 on an agency design before you've even bought your first batch of ingredients is not a wise use of capital. Your priority is manufacturability and cost-effectiveness.
This is where a factory like mine becomes a true partner. You can leverage our in-house design services. Just like my Vietnamese client with the soda water, you can come to us with your ideas, inspiration from other bottles, and a clear goal. Our designers, who are also manufacturing experts, will work with you to create a bottle that is:
- Unique: We can create a proprietary shape that is all yours.
- Affordable: The design service is part of the mold package, eliminating a massive upfront cost.
- Guaranteed to Work: The design is created from day one with production efficiency in mind. There is zero risk of a "looks good, won't blow" scenario.
This path prioritizes your cash flow and reduces your time to market, which are the two most critical factors for any startup's survival. You can also rely on us to help plan your full production line, from the air compressor system to the final machine setup.
The Hybrid Model: The Best of Both Worlds
Over the past decade, a third option has emerged. Many experienced mold factories, including my own, have invested heavily in our design capabilities. We recognized the gap in the market and hired designers with a strong sense of aesthetics, not just engineering.
This hybrid model offers a one-stop-shop solution. We can have the brand-focused conversations that you might have with an agency, but temper them immediately with 16 years of manufacturing reality. We can talk about the emotional appeal of a certain curve and, in the same meeting, explain how that curve will affect the cooling time of the mold.
This integrated approach is often the most efficient for mid-sized companies that want a custom, branded look but don't have the budget of a global corporation. It streamlines communication, reduces cost, and dramatically shortens the timeline from concept to production.
| Decision Factor | Primarily Choose Ad Agency | Primarily Choose Mold Factory | Consider a Hybrid Approach |
|---|---|---|---|
| Budget | Large ($50k+ for design & tooling) | Small to Medium (<$30k for design & tooling) | Medium to Large |
| Brand Focus | Highest priority; creating an iconic brand | Important, but secondary to cost and function | High; want a custom look with efficiency |
| Speed to Market | Slower; multi-stage process | Fastest; integrated process | Fast and efficient |
| Technical Complexity | High risk; agency lacks expertise | Low risk; expertise is in-house | Low risk; integrated expertise |
Conclusion
Ultimately, choosing between an ad agency and a mold factory is a strategic decision based on your unique balance of budget, brand ambition, and production realities. The key to a successful launch lies in respecting both creative vision and manufacturing science.
Frequently Asked Questions (FAQ)
1. Can a mold factory really help me design a unique, branded bottle?
Absolutely. An experienced mold factory with a dedicated design team can be a powerful creative partner. We don't just offer stock shapes. We can work with your ideas and inspiration to create a completely new, proprietary design. The main advantage is that our creativity is grounded in manufacturing reality, ensuring the final design is not only unique but also efficient and affordable to produce.
2. How much does a bottle design from an ad agency typically cost compared to a factory's service?
An ad agency can charge anywhere from $15,000 to over $50,000 for a comprehensive bottle design process, as it is a standalone creative service. At a mold factory like ours, the structural and feasibility design service is typically included as a value-added part of the mold manufacturing package. This saves you a significant upfront cash investment.
3. What is the single biggest risk of using only an ad agency for my bottle design?
The biggest risk is that you will pay for a beautiful design that cannot be manufactured efficiently or, in some cases, at all. This leads to the "hidden cost" of paying a second time for a mold factory to re-engineer the design for manufacturability, causing major project delays and budget overruns.
4. I already have a finished design from an agency. Can you still make the mold for me?
Yes, of course. This is a very common situation. Our first step will be to conduct a thorough "Design for Manufacturing" (DFM) analysis. We will review every aspect of your design, from stretch ratios to draft angles. If we find any potential issues, we will provide you with a clear report and suggest the minimum necessary adjustments to ensure a successful, efficient production run.
5. If I have the same bottle design but want it in two different sizes (e.g., 500ml and 1L), do I need two different molds?
Yes, you will need two separate blow bottle molds. A 500ml bottle and a 1L bottle have very different volumes and dimensions, which means they require different preforms and have completely different stretch ratios. While the visual design language can be scaled and applied to both sizes to create a cohesive product family, the physical tooling is unique to each volume.
🔗 Learn More about Blow Molding Technology
Blow Molding – Wikipedia
A comprehensive overview of various blow molding processes, including extrusion, injection, and stretch blow molding.Injection Molding – Wikipedia
Important for understanding the production of preforms used in stretch blow molding.Stretch Blow Molding – Wikipedia
Explains how PET bottles are formed through axial and radial stretching processes.PET Bottle – Wikipedia
Background information on the materials and properties of typical PET bottles.Design of PET Bottles – Wikipedia
An introduction to the design considerations and geometry used in PET bottle manufacturing.
🔗 Related Pages on Our Website
Automatic Blow Molding Machines – iBottler
Discover our full range of customizable automatic PET bottle blow molding machines.Blow Bottle Mold – iBottler
Explore our precision blow molds designed for PET and PP bottles.Preform Mold – iBottler
Learn more about our high-precision preform molds suitable for various injection molding machines.PET Wide Mouth Jar Project Starter Guide: Equipment, Molds & Process Explained
Pros and Cons: Should You Choose PET Blow Moulding for Your Bottle Project?
Worried About Blow Mold Fit? We Have Mounting Dimensions for 80% of Blow Molding Machines Worldwide
Can One Semi‑Automatic Blow Molding Machine Produce All Bottle Sizes? Here’s Why Not
Why Do Krones Blow Molding Machine Users Come to Us for Their Molds?
Why Do PET Preforms Come in Different Colors? Function, Application, and Production Tips
How to Set Parameters for 600ml Bottles on a Semi-Automatic PET Blowing Machine?
From 3D Printed Samples to Production: How Can You Rapidly Validate Blow Mold Designs?
How to Choose the Right Preform Neck Size for Your PET Bottle Project
