Have you ever filled a PET bottle with a hot liquid, only to watch it shrink and collapse? This frustrating problem not only wastes product and packaging but can also damage your brand's reputation.
The key to successful hot-fill packaging lies in a professional and systematic design approach. You must have a bottle with specific structures like vacuum panels, select the correct heat-resistant PET material, and utilize a precise blow molding process. These three elements working in concert are what prevent severe deformation after filling and cooling.
It's a painful lesson: not all PET bottles are created equal. A bottle that's perfect for ambient-temperature water will fail spectacularly when faced with juices, teas, or functional drinks that require high-temperature sterilization. While the physics behind this failure is simple, overcoming it requires a deep understanding of material science, structural mechanics, and molding processes. Now, let's dive deep into each core argument of successful hot-fill bottle design to ensure you start on the right path and avoid those costly detours.
Why Are Regular PET Bottles Doomed to Fail in Hot-Fill Applications?
Do you assume that all PET bottles are more or less the same and can be used interchangeably? This misconception is the root cause of hot-fill failures and tremendous waste.
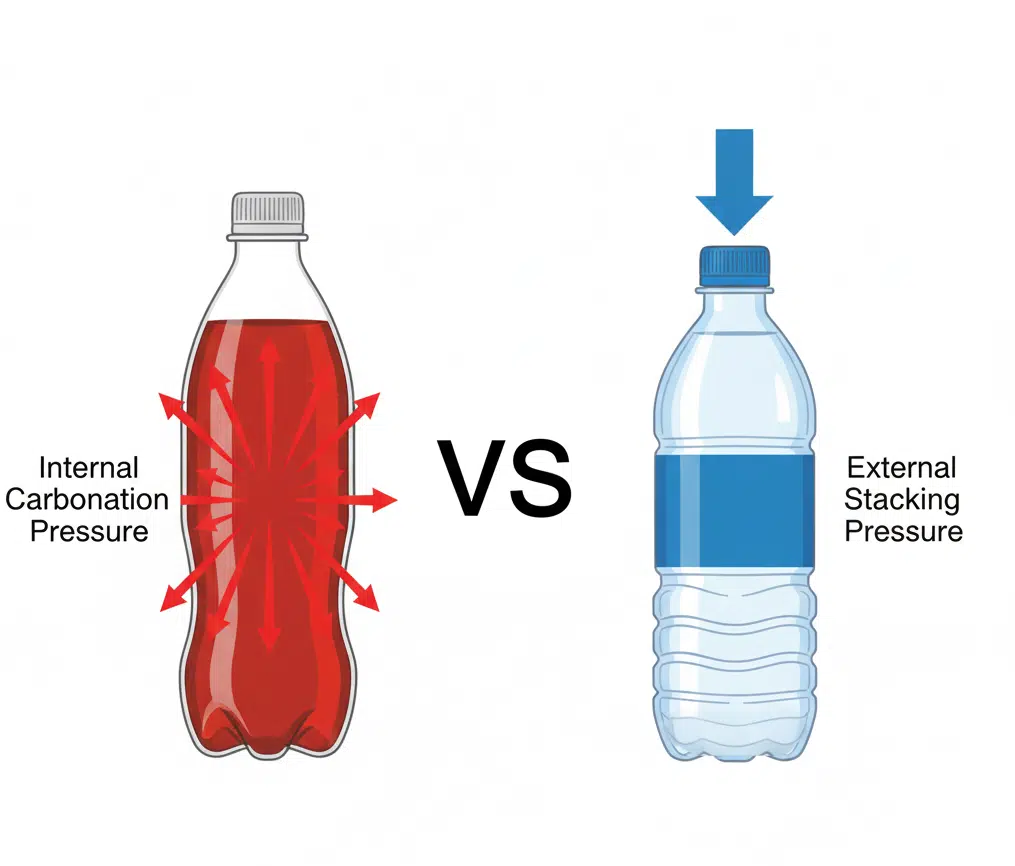
The failure of a standard PET bottle is predetermined by its physical properties. Its low glass transition temperature ($$T_g$$) and a structure incapable of resisting a cooling vacuum mean that when it encounters liquid hotter than 70°C, it will inevitably suffer severe shrinkage, collapse, and distortion.
To fully grasp this issue, we must explore two core scientific concepts: Glass Transition Temperature ($$T_g$$) and vacuum pressure.
First, the "amorphous" polymer used in standard PET bottles has a $$T_g$$ of approximately 70-75°C. The glass transition temperature is the point at which a polymer transitions from a hard, glassy state to a soft, rubbery state. When you pour liquid at 85-92°C into the bottle, the wall temperature quickly exceeds its $$T_g$$. The PET molecular chains begin to move frantically, and the material's properties change from that of a rigid plastic to something akin to soft rubber, losing its original shape and dimensional stability, which leads to thermal shrinkage.
Second, and more destructive, is the vacuum pressure. During filling, the air and the product inside the bottle are in a hot, expanded state. Once capped, the cooling process begins, causing the liquid and gas inside to contract sharply, creating a powerful internal vacuum. A massive pressure differential is created between the standard atmospheric pressure outside (approx. 101.3 kPa) and this internal vacuum. A standard bottle, lacking any special structural reinforcement, cannot withstand this immense inward-acting pressure. It is literally crushed by the atmosphere, resulting in body paneling (what we call "collapse"), base deformation, and a wrinkled label area. This is why a professional blow bottle mold is essential for creating a structure that can resist this pressure.
| Property Comparison | Standard PET (Amorphous) | Heat-Set PET (Crystallized) |
|---|---|---|
| Molecular Structure | Polymer chains are randomly arranged, disordered | Polymer chains form ordered, micro-crystalline regions through heat treatment |
| Glass Transition Temp ($$T_g$$) | ~70-75°C | ~80-85°C (Inherently higher) |
| Thermal Stability | Low; softens rapidly above $$T_g$$ | High; crystalline zones act as a skeleton, maintaining structure at high temps |
| Vacuum Resistance | Extremely low; no structural support | Extremely high; relies on specialized structural design |
| Application | Ambient water, cold-fill beverages | Hot-filled juices, teas, sports drinks |
What Structural Designs Are Absolutely Core to Resisting Hot-Fill Pressure?
Are you struggling to design a bottle that can both resist deformation and attract consumers on the shelf? This requires finding the perfect balance between engineering science and commercial aesthetics.
The solution lies in the precise design and integration of three core structural elements: vacuum panels to manage the negative pressure, reinforcing ribs to enhance body stiffness, and a specialized base to ensure final stability and pressure resistance. None of these can be omitted.
I've had too many clients whose initial design drafts only pursued smooth curves and minimalist beauty, but this is a non-starter for hot-fill. Functionality must be the primary driver of the design.
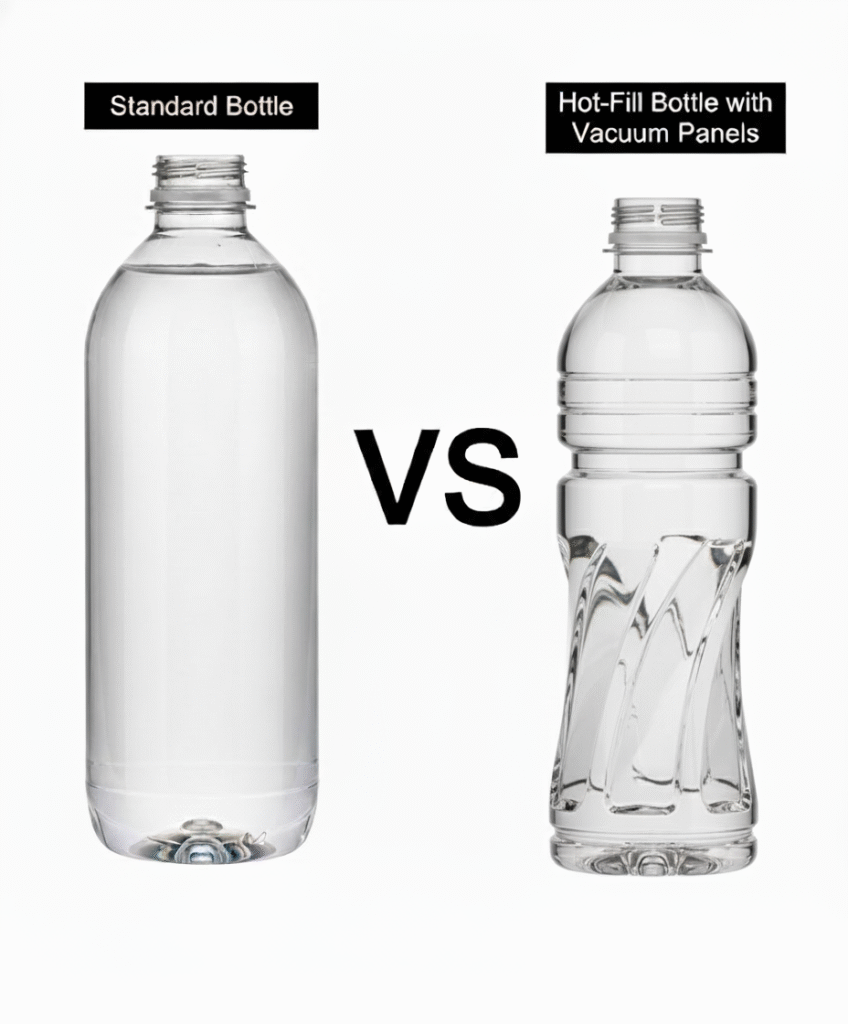
1. Vacuum Panels
This is the soul of hot-fill design. It's not a simple indentation but a precisely calculated area designed for "active collapse." When a vacuum forms inside the bottle, these specially designed panels flex inward in a controlled, predetermined way. This absorbs most of the negative pressure, protecting other parts of the bottle (like the label area) and keeping them flat and attractive. Common panel designs include U-shaped, V-shaped, and dot indentations. Square or rectangular bottle bodies can integrate these panels more naturally. The key is that the panel's area, depth, and shape must be precisely matched to the bottle's volume and filling temperature.
2. Reinforcing Ribs
If vacuum panels are the "flexible" solution, then ribs are the "rigid" support. These are typically small grooves that run horizontally or vertically around the bottle, acting like the "I-beams" in a building. They significantly increase the bottle wall's structural integrity and resistance to pressure, preventing bulging or deformation during stacking and transport. The geometry of the ribs—their height, width, and spacing—is determined through mechanical analysis to provide the maximum stiffness with minimal material increase.
3. Base Support Structure
The base is one of the key areas chịu the force of internal pressure and vacuum suction. A flat base will bulge outward under heat and pressure, creating an unstable "rocker bottom," which is unacceptable on a retail shelf. Therefore, hot-fill bottles must use a specialized base design, the most common being the "Petaloid Base." This design uses multiple arched feet to distribute pressure evenly, greatly enhancing the base's pressure resistance and standing stability. A well-designed base ensures the bottle can stand perfectly stable even after experiencing huge temperature and pressure changes.
How Can Neck and Thread Design Ensure a Fail-Proof High-Temperature Seal?
Have you experienced the nightmare of product spoiling due to a leaky cap, or worse, finding that caps have "popped off" in the warehouse due to thermal expansion and contraction? This is the direct result of a failure in sealing stability design.
To achieve an absolutely reliable high-temperature seal, the answer lies in a crystallized neck finish and an optimized thread design. The crystallization process ensures the neck does not deform under heat, while robust threads provide a durable, reliable locking force. The combination of both is what guarantees seal integrity.

The neck and cap interface is the final—and most critical—line of defense for your packaging.
First, let's talk about neck crystallization. During the preform mold design and blow molding process, we subject the neck portion to a special "post-heating" treatment and then allow it to cool under controlled conditions. This process encourages the PET molecular chains in the neck area to re-align into a highly ordered, semi-crystalline structure, which appears translucent or opaque white. Unlike the transparent, "amorphous" structure of the bottle body, the crystalline region has much higher thermal stability. When scorching hot liquid flows past it, the crystallized neck maintains its precise geometric shape and dimensions, refusing to shrink or soften. This provides a solid, non-deforming platform for the cap to seal against.
Second is the thread design. The threads on a hot-fill bottle need much stronger engagement. We consider several points:
- Thread Type: The appropriate thread standard is chosen for the application. For example, a 38mm thread is often used for juice bottles because it offers a larger sealing surface area.
- Thread Engagement: The number of thread turns and their depth must be sufficient to resist the torque changes that occur during cooling, preventing the cap from "stripping" or loosening.
- Cap Compatibility: The choice of liner inside the cap is also critical. An induction-sealed liner with an aluminum foil layer is often used. Through electromagnetic induction heating, this liner fuses with the crystallized neck finish, creating a perfect, hermetic seal. This is the ultimate guarantee against microbial contamination and for ensuring product shelf life.
A neck that has not been crystallized will deform under heat. The threads will distort, and even if the cap is screwed on tightly at the time of filling, it will become loose upon cooling due to dimensional changes, leading to seal failure.
Why is Selecting the Right PET Resin & Preform a Cornerstone of Project Success?
Have you ever selected the wrong material at the start of a project, only to find your bottles can't withstand the pressure, forcing you to pay for expensive mold modifications or scrap the entire toolset?
To avoid disaster from the outset, you must be clear on two points: first, you must use a specific grade of resin known as "heat-set" or "hot-fill grade" PET, for which Intrinsic Viscosity (IV) is the key metric. Second, the design of the preform from which the bottle is blown (its weight and wall thickness distribution) is just as critical as the resin choice itself.
The success or failure of a project is often decided in the earliest material selection phase.
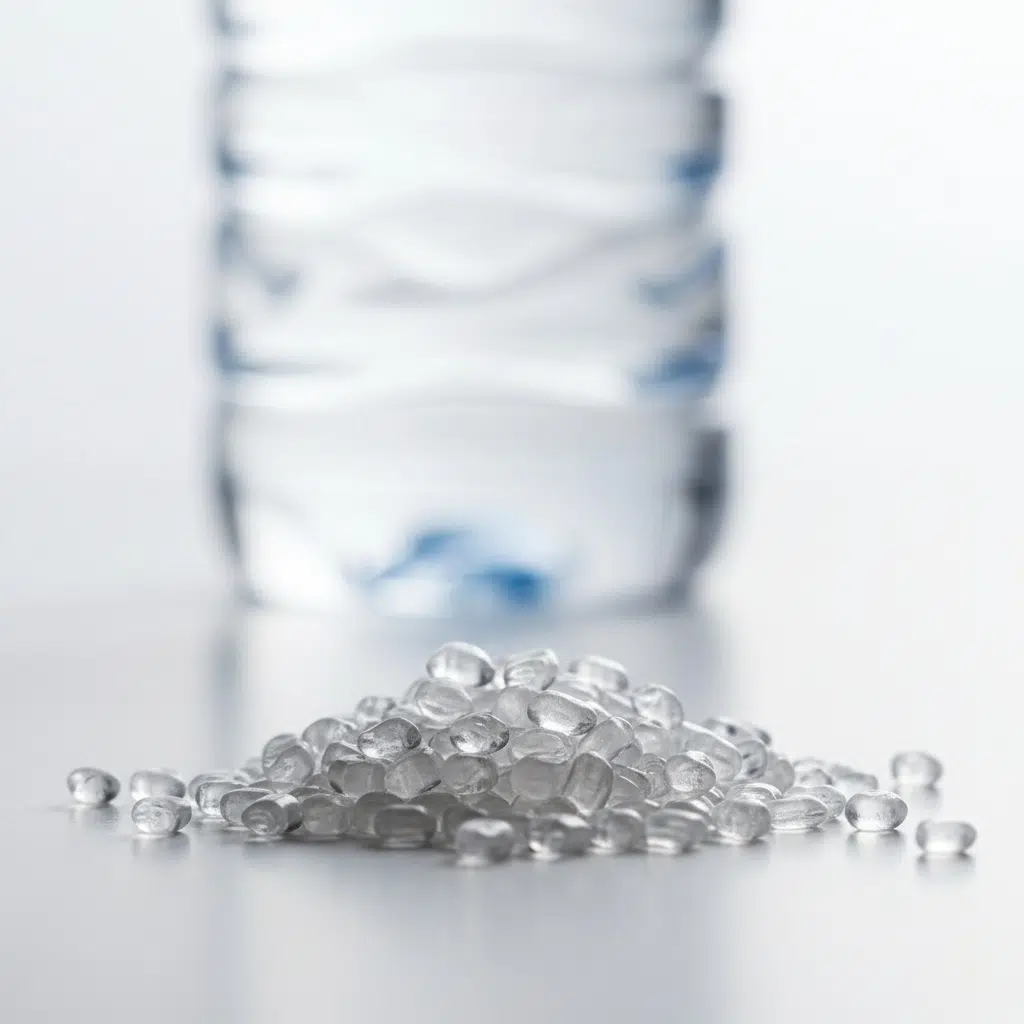
1. Selecting Heat-Set PET Resin:
This is not an option; it is a requirement. Unlike the standard PET resin used for water bottles (which typically has an Intrinsic Viscosity (IV) of around 0.76 dL/g), hot-fill applications demand a resin with a higher IV, usually between 0.80 dL/g and 0.84 dL/g.
- What is Intrinsic Viscosity (IV)? IV is a measure of the length of the PET polymer's molecular chains. A higher IV value indicates longer chains, which results in stronger intermolecular forces and entanglement. This translates directly to greater mechanical strength and higher thermal stability. Longer chains mean the material is better able to resist deformation and shrinkage at high temperatures. Using a low-IV material for hot-fill is like trying to build a load-bearing wall out of cardboard.
2. Designing the Preform Parameters:
Even with the right resin, a poorly designed preform will still lead to failure. The preform is the "DNA" of the bottle; its design dictates the final bottle's performance. A high-quality preform mold is the prerequisite for achieving a precision preform design.
- Preform Weight: This directly determines the total amount of material in the bottle and its approximate average wall thickness. Insufficient weight leads to walls that are too thin to resist the vacuum pressure.
- Wall Thickness Distribution: This is the core of preform design. The thickness of different areas of the preform (e.g., base, body, neck) must be carefully engineered to ensure that after blowing and stretching, the material is distributed correctly to all parts of the final bottle. For example, the base of the preform is often made thicker to provide enough material and strength for the bottle's base. If the preform is poorly designed, the blown bottle will likely have fatally thin weak spots.
The wrong raw material or preform design is like laying the wrong foundation for a skyscraper. No matter how beautiful the superstructure, it is ultimately destined to collapse.
How Should Blow Molding Parameters Be Precisely Calibrated for Hot-Fill Bottles?
With the design and material all perfectly in place, why are the bottles coming off the line still failing? The answer most likely lies in the final "execution"—the blow molding process.
To successfully form a durable, heat-resistant bottle, a specialized, precise set of process parameters must be employed. This includes a unique heating profile in the oven, a stretch ratio optimized for heat-setting, and strictly controlled mold temperatures and cooling times. Every step is designed to maximize the material's performance.

The magic happens inside the bottle blowing machine. Transforming a heat-set preform into a qualified heat-resistant bottle is a precision science that requires experience and data; it's far more than just "blowing air." It involves four critical control points:
Heating Profile: Before entering the blow bottle mold, the preform rotates through an oven composed of multiple banks of heating lamps. For hot-fill bottles, we need to create a very precise temperature gradient. By independently controlling the power of different lamp zones, we can make certain parts of the preform (areas that need more stretching) hotter than others. The goal is to bring the preform to the optimal stretching temperature without overheating and degrading the material.
Stretching and Blowing: Once inside the mold, a stretch rod enters from the neck, stretching the heated preform axially (vertically). Almost simultaneously, high-pressure air is injected, blowing the preform radially (horizontally). This "biaxial orientation" process aligns the PET molecular chains in two directions, which gives the bottle its strength and clarity. For hot-fill bottles, the stretch ratio (the ratio of the bottle's dimensions to the preform's dimensions) is specially optimized to create the best crystal structure and stress distribution.
Heat-Setting: This is the most unique step in the hot-fill process. Unlike blowing water bottles where the mold is cooled with chilled water, when blowing hot-fill bottles, we circulate hot oil to heat the mold, keeping it at an elevated temperature (e.g., 120-140°C). When the bottle wall touches the hot mold, it induces the formation of more tiny crystals. This "heat-setting" process dramatically improves the bottle's dimensional stability and heat resistance, locking in the beneficial structure created by biaxial orientation.
Cooling: After heat-setting, the bottle needs to be sufficiently cooled to solidify its final shape. Inadequate cooling will cause "post-blow shrinkage" after the bottle exits the mold.
My Mexican client's initial failure was largely because their supplier had not mastered this complex process. As a result, even though they used heat-set material, the bottles produced still could not survive on a 92°C filling line.
How Can You Scientifically Validate Bottle Performance Before Investing in Expensive Molds?
Are you losing sleep worrying that the multi-cavity production mold you're about to invest a fortune in might not meet requirements? This fear of the unknown can be completely eliminated by a scientific process.
The only reliable way to eliminate this risk is to adopt a three-step systematic validation process: first, conduct computer simulations using 3D modeling and Finite Element Analysis (FEA); second, create a low-cost, single-cavity pilot mold to produce real physical samples; and finally, subject those samples to rigorous physical hot-fill testing that mimics your real production line.
Investing directly in a production mold that can cost hundreds of thousands of dollars without thorough testing is a massive gamble. I never let my clients take that risk. The core of our success in turning around the project for my Mexican client was this rigorous validation process.
Step 1: Computer Simulation (FEA)
After the 3D design is complete, we use professional Finite Element Analysis (FEA) software to simulate the bottle's performance in the real world. We can apply virtual "loads," such as:
- Vacuum Load Analysis: Simulates the vacuum created after cooling to predict which parts of the bottle will deform, by how much, and whether the vacuum panels are working effectively.
- Top-Load Analysis: Simulates the vertical pressure from stacking in a warehouse or from the capping process to ensure it won't be crushed.
- Stress Analysis: Identifies stress concentration points in the bottle's structure, which are potential failure points, allowing us to optimize them in the design phase.
Step 2: Pilot Mold & Sampling
Digital simulation is still virtual. The most critical step is to manufacture a low-cost, single-cavity pilot blow bottle mold. While it has fewer cavities, its internal cavity dimensions, structure, and surface finish are identical to the final production mold. We can use it to blow a few dozen to a few hundred sample bottles that are identical to the final product.
Step 3: Physical Performance Testing
With sample bottles in hand, we conduct a series of rigorous lab tests, and the client can also conduct tests on their own filling line. A standard hot-fill testing protocol is shown below:
| Test Item | Test Method & Standard | Purpose |
|---|---|---|
| Dimension & Volume Test | Measure bottle height, diameter, and overflow capacity before and after filling. | To assess if thermal shrinkage and volume loss are within acceptable limits (typically <1.5%). |
| Hot-Fill Cycle Test | Fill sample bottles with 92°C water, cap immediately, hold horizontally for 30 seconds, then cool to room temp via a spray tunnel. | To simulate the real production process and comprehensively evaluate the bottle's overall performance. |
| Vacuum Deformation Eval | Check cooled bottles for irregular collapse, label panel flatness, and whether vacuum panels contracted as designed. | To validate the effectiveness of the structural design. |
| Base Stability Test | Place cooled bottles on a flat surface to check for "rocker bottom." | To ensure the bottle's standing stability on the shelf. |
| Top-Load & Side-Load Test | Use specialized equipment to apply vertical and lateral pressure until the bottle fails. | To evaluate stacking strength and resistance to pressure during transport. |
Through these three steps, we fully confirm the success of the design before spending a fortune on the production mold, reducing the risk to zero.
What Are the Six Fatal Hot-Fill Bottle Design Mistakes You Must Avoid?
Do you think that as long as you add some ribs and grooves, a bottle is ready for hot-fill? The reality is far from it. Many seemingly minor design oversights can lead to the failure of the entire project.
Avoiding the industry's six most common design mistakes is a prerequisite for success. These errors include: having no vacuum absorption design at all, a weak base structure, overly sharp shoulder angles, improper label panel design, using a standard non-crystallized neck finish, and neglecting uniform material distribution.
Over the years, I have seen countless projects get into trouble by repeating these fundamental mistakes. They often stem from a common root cause: designers prioritizing aesthetics over the laws of engineering physics. Below is a deep dive into these six fatal flaws:
Mistake 1: Believing in a Smooth, Round, or Streamlined Body
Consequence: This design lacks any controllable structure to absorb the cooling vacuum. The immense negative pressure will randomly attack the weakest points of the bottle, causing unpredictable and extremely ugly collapse and distortion.
Correct Approach: You must proactively design vacuum absorption panels. Square or rectangular bodies with flat surfaces are ideal because they can naturally incorporate U-shaped or V-shaped panels. The core design philosophy is "to guide rather than block," actively directing the pressure to release in designated areas.
Mistake 2: Using a Flat or Unreinforced Base
Consequence: A flat base will bulge outward like a balloon under heat and pressure, creating an unstable "rocker bottom." Such products will wobble on conveyor belts and be impossible to stand straight on shelves—a quality control nightmare.
Correct Approach: A mechanically optimized base design, such as a "Petaloid" or "Champagne" base, is mandatory. These designs use multiple arched structures to distribute pressure evenly and provide stable support feet.
Mistake 3: Designing a Shoulder That Is Too High or Has Sharp Angles
Consequence: Sharp transition angles are hotspots for stress concentration. Under the dual action of heat and vacuum, a sharp shoulder becomes a structural weak point, highly prone to collapse or distortion, destroying the bottle's overall profile.
Correct Approach: The shoulder design should use smooth, rounded curves for transitions whenever possible. If a high shoulder is required by the design, it must be paired with circumferential ribs to provide additional structural support.
Mistake 4: Mixing the Label Area with the Pressure-Bearing Area
Consequence: If the label area itself is a panel that bears the vacuum load, it will inevitably contract inward, causing the label on top of it to wrinkle, bubble, or even peel off, severely impacting the product's shelf appeal.
Correct Approach: The label panel must be designed as an independent, protected "island." Through a recessed design or surrounding ribs, it is structurally isolated from the main vacuum panels, ensuring that no matter how other parts of the bottle deform, the label area remains perfectly flat.
Mistake 5: Using a Standard, Non-Crystallized Neck Finish
Consequence: This is an extremely common and dangerous mistake. A standard neck will soften and deform at high temperatures, causing the thread dimensions to change and the cap seal to fail. The minor consequence is leakage of air or liquid, leading to product spoilage; the major consequence is the cap coming off entirely during transport.
Correct Approach: The design drawings must explicitly specify "Neck to be crystallized." This is an absolute requirement to ensure seal integrity, product shelf life, and safety.
Mistake 6: Neglecting Uniform Material Distribution from Preform Design
Consequence: Even with the best heat-set material and a perfect blow bottle mold, if the preform design is irrational, the resulting bottle can still have fatal weak spots. These areas with insufficient wall thickness will be the first to fail under the test of hot-filling.
Correct Approach: Bottle design and preform design must be done in parallel. By simulating the blowing process with professional software, the preform's wall thickness distribution can be optimized to ensure that every point on the final bottle has enough material to resist pressure.
How Do We Provide a One-Stop Service for Your Hot-Fill Project, From Design to Mold?
Faced with so many technical details and potential pitfalls, are you feeling overwhelmed and unsure where to start? Trying to assemble your own "dream team" of designers, material suppliers, and mold makers often devolves into a nightmare of miscommunication and finger-pointing.
What we offer is not a single product, but an end-to-end, risk-free, integrated solution. Our service covers everything from initial concepting, structural design, and performance simulation to pilot mold validation, and finally, the delivery and process support for your high-quality production blow bottle mold.

We transform a complex, high-risk hot-fill project into a clear, controllable process with a guaranteed outcome. When you work with us, you will go through the following seven steps:
Step 1: In-Depth Requirement Consultation. We first take the time to understand all your needs: your product characteristics (e.g., does it contain pulp?), target filling temperature, production line speed, brand positioning, and cost budget.
Step 2: Concept & Structural Design. Our engineering team merges your aesthetic vision with the rigid engineering demands of hot-fill, creating a 3D bottle model that is both beautiful and functional, with core structures like vacuum panels and ribs integrated from the start.
Step 3: Finite Element Analysis (FEA) Simulation. We import the 3D model into professional simulation software to model its performance under extreme hot-fill conditions, including vacuum and top-load pressures. By analyzing stress maps and deformation results, we can iteratively optimize the design and eliminate potential flaws before any physical object is made.
Step 4: Pilot Mold Manufacturing. Once the design is digitally validated, we manufacture a low-cost, single-cavity pilot blow bottle mold for you. This is the critical step of turning the design into reality and was the core of our success in turning around the project for our Mexican client.
Step 5: Sample Production & Client Validation. Using this pilot mold on a professional bottle blowing machine, we produce a batch of sample bottles identical to the final product and ship them to you. You can conduct the most realistic tests on your own filling line.
Step 6: Multi-Cavity Production Mold Manufacturing. Only after you are 100% satisfied with the sample bottle performance and provide written approval do we begin manufacturing the final high-quality, high-efficiency multi-cavity production mold. We use premium mold steel (like S136) and employ precision CNC machining and heat treatment processes to ensure the mold's durability and stability. We also provide recommendations for a matching preform mold.
Step 7: After-Sales & Process Support. The delivery of the mold is not the end of our service. Our technicians can provide on-site support to help you set up the optimal blowing process parameters on your equipment to ensure a smooth project launch.
Through this process, we reduce your investment risk to zero, ensuring you receive not just a set of molds, but a guaranteed successful hot-fill packaging solution.
Conclusion
Successfully designing a hot-fill PET bottle is a rigorous systems engineering task. It demands a deep understanding and precise control over structure, materials, and molding processes, as any oversight can lead to costly failures.
Frequently Asked Questions (FAQs)
1. What is the maximum temperature a hot-fill PET bottle can withstand?
A professionally designed and manufactured hot-fill PET bottle can typically and safely withstand filling temperatures up to 92°C (198°F). Its performance limit is a function of three combined factors: the Intrinsic Viscosity (IV) of the heat-set PET resin, the bottle's structural design (especially the efficiency of the vacuum panels and the strength of the base), and how well the heat-setting process was executed during blow molding.
2. Can I use a completely round bottle design for hot-fill products?
It is highly discouraged, to the point of being forbidden. A completely smooth, round bottle has no structure to manage the immense vacuum pressure created during cooling. This will inevitably lead to random, uncontrolled collapse. The vast majority of successful hot-fill designs are square or rectangular with flat panels, as these shapes naturally accommodate functional vacuum absorption panels.
3. How much does a custom hot-fill bottle mold cost?
The cost of a mold varies dramatically based on several core factors: the number of cavities (e.g., a 2-cavity mold vs. a 16-cavity mold will have vastly different prices), the complexity of the bottle design, the grade of mold steel used (e.g., Swedish S136 stainless steel is much more expensive than standard steel), and the manufacturer's level of craftsmanship. A single-cavity pilot mold for validation is relatively low-cost, whereas a multi-cavity mold for mass production is a major investment. The only way to get an accurate price is to request a quote based on your specific bottle design and requirements.
4. What is the essential difference between 'Hot-Fill', 'Warm-Fill', and 'Aseptic-Fill'?
This is a question of sterilization method and cost:
- Hot-Fill: Temperature is between 82-92°C. It uses the high temperature of the product itself to sterilize the inside of the bottle. It places the highest demands on the bottle's heat resistance and structure.
- Warm-Fill: Temperature is between 60-75°C. The requirements for the bottle are between those of hot-fill and ambient-fill, sometimes requiring some heat-resistant design features.
- Aseptic-Fill: The product and the bottle are sterilized separately and then filled in a commercially sterile environment. This method has no heat-resistance requirements for the bottle (any shape, including round, can be used), but the investment in the filling equipment and sterile environment is the most expensive of the three.
5. How long does it typically take to develop a custom hot-fill bottle, from design to final production mold?
The entire timeline typically spans from 8 to 16 weeks, depending on the project's complexity and communication efficiency. A typical project timeline breakdown is as follows:
- Design & Simulation: 2-3 days
- Pilot Mold Manufacturing: 2-3 days
- Sampling, Shipping & Client Testing: 1-2 weeks
- Production Mold Manufacturing: 3-4weeks
Although adding the "pilot mold" stage extends the upfront timeline, it actually saves a significant amount of time and money for the overall project by 100% mitigating the risk of failure in the final, expensive production mold.
🔗 Learn More about Hot Fill Bottle Design and Related Technologies
Hot Filling – Wikipedia
Explains the hot fill process, used to fill products like juices and teas at high temperatures to ensure sterility.Polyethylene Terephthalate – Wikipedia
Details the properties of PET material, including heat resistance and crystallization — key factors in hot fill bottle design.Thermal Expansion – Wikipedia
Covers how materials expand under heat, which is critical for understanding the deformation risks in hot fill bottle shapes.Bottle Design – Wikipedia
Provides insight into structural elements like panel design, neck finish, and vacuum panels, which are essential for hot fill containers.
🔗 Related Pages on Our Website
Automatic Blow Molding Machines – iBottler
Discover our full range of customizable automatic PET bottle blow molding machines.Blow Bottle Mold – iBottler
Explore our precision blow molds designed for PET and PP bottles.Preform Mold – iBottler
Learn more about our high-precision preform molds suitable for various injection molding machines.
