Struggling with inconsistent bottle quality and worried about operator safety? An untrained operator on a semi-automatic blower is a risk to your production timeline and, more importantly, to themselves.
The most effective training for a semi-automatic blow molding machine operator combines foundational knowledge of PET material with strict safety protocols, a step-by-step operational workflow, hands-on practice for quality control, and basic troubleshooting skills. This comprehensive approach builds confidence, ensures safety, and boosts production efficiency.
I've seen firsthand how a well-trained operator can transform a production line. A client in South Africa was completely new to the industry. He told me, "I know nothing about these machines. How can I possibly learn?" His concern was real, but I assured him that the semi-automatic machine is the perfect starting point. I explained that we provide not just the machine, but a complete learning package—detailed diagrams showing how to connect everything from the high-pressure air compressor to the blower, step-by-step video tutorials, and my personal availability for video calls. He went from anxious to confident in just a few weeks. This guide is built on that same principle: breaking down complex processes into simple, manageable steps to empower your team from day one. Let's build that same confidence in your operators.
Why Must Every Operator Understand the Basic Principles of PET and Blow Molding First?
You wouldn't ask someone to cook without knowing what heat does to food. Similarly, asking an operator to run a machine without understanding the material is setting them up for failure.
Operators must first learn PET material basics and blow molding principles because this knowledge transforms them from button-pushers into proactive problem-solvers. Understanding why a preform stretches and forms allows them to anticipate issues, improve quality, and operate the machine more safely and effectively.

Before an operator even touches the machine, I believe they need a solid 30 minutes in a classroom setting. It’s an investment that pays off almost immediately. Giving them this foundational knowledge removes the "magic" from the process and replaces it with science and understanding. They start to connect their actions—like adjusting heat or loading a preform—to the final product in their hands. This mental model is crucial for consistency and quality. It’s the difference between an operator who just follows steps and one who truly owns their station. This foundational knowledge is the first and most critical step in building a skilled, efficient, and safe team.
What Exactly is PET and Why Do We Use It?
I always start my training by holding up a PET preform. It’s hard, clear, and looks like a small test tube. I ask the new operator, "What do you think this is made of?" It's important to connect them with the material itself.
PET stands for Polyethylene Terephthalate. That's a mouthful, so we just call it PET. I explain that it’s a type of plastic, a polymer, that has some really special properties perfect for making bottles.
- It's Strong but Lightweight: This is why a thin-walled bottle can hold a carbonated drink without bursting.
- It's Clear: It looks like glass but doesn't shatter, which is great for showing off the product inside.
- It's Safe: It's approved globally for contact with food and drinks.
- It's Recyclable: It has the number "1" in the recycling symbol.
I then explain a key concept: PET is hygroscopic. This means it loves to absorb water from the air. If preforms have too much moisture, they will create weak, cloudy bottles during the blowing process. This is why we stress the importance of proper storage. This simple fact helps them understand why we have specific rules for handling preforms, connecting their actions directly to product quality. I find that a solid PET bottle mold design guide can also help engineers and operators alike understand how material behavior influences the final shape.
The Magic of Heating: How a Preform Becomes Malleable
The next step is explaining the heating process. I tell them, "Think of the preform like a piece of glass. When it's cold, it's rigid. When you heat it up, it becomes soft and you can shape it."
The heater, or oven, on the bottle blowing machine is designed to do this perfectly. It uses special lamps to heat the preform to just the right temperature, which is called the "glass transition temperature." At this temperature, the PET isn't melted; it's just soft and rubbery, like taffy. This is the ideal state for stretching.
We also discuss how the heat isn't uniform. The lamps are often arranged in zones. This allows us to control the heat distribution along the preform's body. I explain that getting this heating profile right is crucial. For example, if the bottom of the bottle is too thin, it might be because the bottom of the preform wasn't heated enough. This simple "if-then" logic empowers them to start thinking like a technician.
The Power of Air: The Two Stages of Blowing
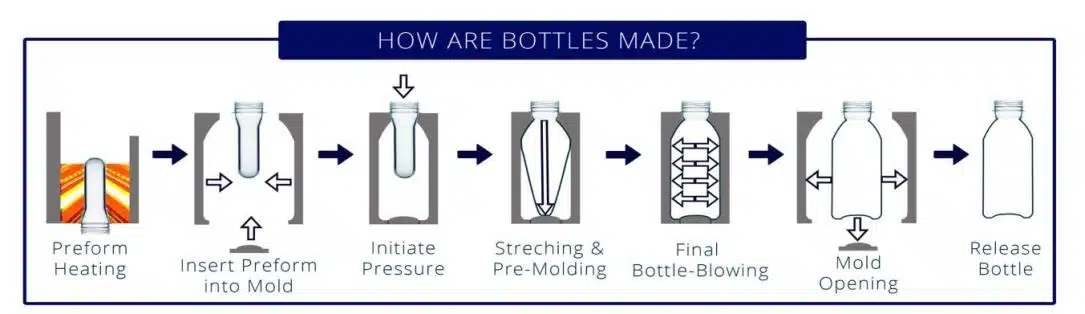
Once the preform is perfectly heated, it goes into the mold. This is where the magic of air pressure comes in. I break it down into two simple stages:
The Pre-Blow: A small puff of low-pressure air is sent into the preform. This does two things. First, it pushes the preform out to touch the mold walls. Second, and more importantly, a stretch rod simultaneously pushes down from the top, stretching the preform vertically. This biaxial stretching (stretching in two directions) is what gives the PET bottle its strength and clarity.
The Main-Blow: Immediately after the pre-blow, a blast of high-pressure air is injected. This forces the soft plastic to take the exact shape of the blow bottle mold. This happens in a fraction of a second.
After the main blow, the bottle is held against the cold mold walls for a moment. The mold is cooled by a chiller, and this rapid cooling "freezes" the PET molecules in their stretched-out state, locking in the bottle's shape and strength.
Anatomy of a Semi-Automatic Blower
To bring it all together, we do a walk-around of the machine. I point to each main part and explain its function in simple terms. We don't need to get into the complex electronics, just the parts they will interact with every day.
| Component Name | Simple Function | Why It's Important for the Operator |
|---|---|---|
| Preform Heater (Oven) | Warms up the preforms until they are soft and rubbery. | The operator loads preforms here. They must understand it is a high-temperature area. |
| Preform Holder/Mandrel | Spindles that carry the preforms through the heater. | The operator must place preforms correctly on these to ensure even heating. |
| Molding Station | Holds the mold and the clamping mechanism that closes it. | The operator places the heated preform here and must keep hands clear during operation. |
| Control Panel | The "brain" of the machine with buttons and screens. | The operator uses this to start/stop cycles and see machine status. |
| Two-Hand Start Buttons | Two buttons that must be pressed simultaneously to start blowing. | This is a critical safety feature to ensure the operator's hands are out of the way. |
| Safety Guards/Doors | Clear physical barriers around the moving parts. | These must always be closed during operation. The machine will not run if they are open. |
By the end of this first session, the operator doesn't just see a machine. They see a logical process: load a preform, heat it, move it, blow it. They understand the material and the forces at play. This foundation is what we build everything else upon.
What are the Absolutely Critical Safety Protocols Your Operators Must Follow?
You have a new machine and an eager operator. But excitement can lead to accidents if safety isn't the absolute top priority. One moment of carelessness can have severe consequences.
Operators must internalize critical safety protocols, including the location and use of emergency stops, awareness of high-heat zones, respect for high-pressure air systems, and the non-negotiable use of all safety guards. These rules are the foundation of a safe and productive work environment.

Before anyone operates a machine I've supplied, I make them promise me one thing: safety first, speed second. I tell them, "The machine can be repaired. You cannot." This isn't just a phrase; it's the core philosophy of our training. We don't just show them the safety features; we explain in detail why they exist and what happens if they are ignored. True safety isn't about a list of rules; it's about creating a culture of awareness and respect for the machine's power. It’s about ensuring every operator goes home in the same condition they arrived.
The Big Red Button: Your First and Best Friend
The very first safety device I introduce is the Emergency Stop button. It’s big, red, and placed in an easy-to-reach location for a reason. I make the operator press it. They need to feel the satisfying click and see the machine immediately power down.
I explain the protocol clearly:
- When to Use It: You press this button if you see anything dangerous. This could be a part of the machine moving erratically, another person in danger, a strange noise like grinding metal, or smoke. It's also for any personal emergency, like if a glove gets caught. I tell them, "If you even think something might be wrong, press the button. There is no penalty for being too cautious."
- What It Does: The E-stop cuts all power to the motors and actuators instantly. It's a hard stop designed to prevent injury or further damage to the machine.
- How to Reset: After the situation is resolved by a supervisor or technician, the button is typically twisted or pulled to be reset. The machine will not restart on its own. It requires a deliberate series of actions.
We practice this. I'll create a safe, simulated scenario and have them react by hitting the E-stop. The physical memory of this action is just as important as the theoretical knowledge.
Respect the Heat: Avoiding Burns from the Oven and Mold
The heater oven can reach temperatures well over 100°C (212°F), and the mold, while cooled, can still be hot to the touch. Burns are a significant and easily preventable risk.
Our training focuses on three layers of protection:
- Personal Protective Equipment (PPE): This is non-negotiable. Heat-resistant gloves must be worn at all times when handling preforms or working near the oven and mold. Safety glasses are also mandatory to protect from any potential debris.
- Awareness and Safe Zones: We physically mark "no-touch" zones on and around the machine with high-visibility tape. We train operators to always be aware of where the hot components are, even when focused on their task. I teach them to develop a "bubble of awareness" around the heater and mold station.
- Procedure: The workflow itself is a safety feature. The process of moving the preform from the heater to the mold is designed to be quick and efficient, minimizing the time their hands are near hot surfaces. We never allow operators to rest their hands on the machine.
High-Pressure Air: A Hidden Danger
Operators can see the heat, but they can't see the danger of high-pressure air. The main blow cycle uses air compressed to as much as 40 bar (580 psi). This is not the same as the air from a shop hose.
I explain the two primary risks:
- Injection Injury: A leak from a high-pressure fitting can create a jet of air powerful enough to pierce the skin and force air into the bloodstream, which can be fatal. I stress that they must never, ever use their hand to check for leaks. Leaks are identified by sound (a loud hiss) or by using a soapy water solution.
- Noise: The release of this high-pressure air during each cycle is loud. Proper hearing protection is mandatory in the machine area to prevent long-term hearing damage.
I make sure operators know the location of the main air shut-off valve. If they hear a major leak, their first action after hitting the E-stop is to shut off the air supply. This is a key part of our blow molding safety procedures. It's a skill that gives them control in a potentially chaotic situation. Just like my client in South Africa needed a diagram to connect his air compressor system, new operators need a mental diagram of the safety shut-offs.
A Daily Safety Checklist: Start Every Shift Right
To reinforce these protocols, we implement a mandatory pre-shift checklist. This is a simple but powerful tool that forces a moment of deliberate safety focus before production begins. The operator must physically check and sign off on each item.
| Check Item | Condition | Operator Action |
|---|---|---|
| Emergency Stop Buttons | Are they unobstructed and appear functional? | Visually inspect all E-stops. |
| Safety Guards/Doors | Are they in place, closed, and undamaged? | Physically check that all guards are secure. |
| Work Area | Is the floor clear of spills, tools, or debris? | Tidy the area around the machine. |
| Personal Protective Equipment | Are your safety glasses, gloves, and hearing protection on? | Confirm PPE is being worn correctly. |
| Air Hoses & Fittings | Do you hear any audible air leaks? | Listen for hissing sounds around the machine. |
| Machine Alarms | Are there any active alarms on the control panel? | Check the panel before starting the machine. |
This machine operator checklist is not just paperwork. It's a ritual. It builds a habit of safety that becomes second nature. It shifts the responsibility for safety onto the operator, empowering them and making them a key part of the factory's safety culture.
What is the Exact Step-by-Step Guide for Operating the Machine?
Theory and safety are vital, but confidence comes from doing. An operator needs a clear, repeatable workflow to follow, turning a complex machine into a series of simple, manageable actions.
A clear, step-by-step guide is essential. It involves a pre-flight check and power-on, manually loading preforms into the heater, transferring heated preforms to the mold, activating the two-hand blowing cycle, and finally ejecting and inspecting the finished bottle. This rhythm builds muscle memory.
I always teach the operational workflow as a dance. It has a rhythm and a sequence. When you first learn, the steps feel clumsy and slow. But with practice, it becomes a smooth, efficient motion. I tell operators not to worry about speed at first. The goal is to get the sequence right, every single time. Accuracy first, then efficiency. This approach reduces errors, prevents accidents, and ultimately leads to a faster, more consistent production rate than rushing and making mistakes. Let's break down the steps of this dance.
Step 1: The Pre-Flight Check and Power-On Sequence
Before we even turn the machine on, we perform the daily safety checklist we just discussed. Once that's done, we follow a specific power-on sequence. This isn't just flipping a switch; it prevents electrical surges and ensures the machine initializes correctly.
- Turn on the Main Power: This is usually a large isolator switch on the side of the machine or on a nearby wall panel.
- Activate Control Power: On the control panel, there will be a key or button to turn on the machine's control circuits. You'll see the screen light up.
- Turn on the Heaters: There is a separate switch or button for the oven. I tell them to turn this on early, as the lamps need a few minutes to reach a stable operating temperature.
- Charge the Air System: Ensure the main air valve is open, allowing compressed air to flow to the machine.
- Check the Chiller: Verify that the mold cooling system is on and running. Proper cooling is crucial, and linking the mold to a reliable chiller is a step that cannot be skipped.
This deliberate sequence becomes a habit. It ensures nothing is missed and the machine is fully ready for production.
Step 2: Manually Loading Preforms
This is the first hands-on step in the production cycle. The operator takes PET preforms from a bin and places them onto the mandrels or holders that will carry them through the oven.
It sounds simple, but technique matters.
- Consistent Loading: The operator must fill every empty mandrel as it comes around. Skipping one disrupts the heating flow and can lead to inconsistencies.
- Proper Seating: The preform must be pushed all the way down onto the mandrel so that the neck finish is protected from the heat. I explain that if the neck gets soft, it won't be able to hold the cap correctly. Learning details like how to choose the right preform neck size is important for the whole team, but for the operator, protecting that neck is their direct responsibility.
- No Contamination: Operators should handle preforms with clean gloves to avoid transferring oils or dirt, which can cause blemishes on the final bottle.
Step 3: Transferring Heated Preforms to the Mold
After a preform has traveled through the oven, it emerges at the other end, perfectly heated and ready for blowing. This is the most rhythm-dependent manual step.
The operator must:
- Quickly and Safely Remove the Preform: Using their gloved hands, they take the hot, rubbery preform off the mandrel.
- Immediately Place it in the Mold: The open mold is waiting. They place the preform, neck-down, into the mold cavity. It must be seated correctly.
- Move Hands Away: As soon as the preform is in place, their hands move directly to the two start buttons.
This entire transfer must happen in a few seconds. If it takes too long, the preform will cool down, resulting in a poor-quality bottle. This is where practice builds speed and confidence.
Step 4: Activating the Two-Hand Blowing Cycle
This is a critical safety and operational step. Nearly every semi-automatic bottle blowing machine I've ever worked with has a two-hand control system.
To start the cycle, the operator must press two separate buttons at the same time and hold them.
- Why Two Buttons? This design ensures the operator's hands are occupied and safely outside the mold area when the high-pressure clamping mechanism closes. It is physically impossible to have a hand in the mold and start the machine.
- The Machine Takes Over: Once the buttons are pressed, the automatic part of the cycle begins. The mold clamps shut, the stretch rod descends, the pre-blow and main-blow occur, and the cooling time elapses. The operator can release the buttons once the mold is closed.
Step 5: Ejecting and Inspecting the Finished Bottle
After the cooling time is complete, the mold automatically opens. The operator then reaches in, removes the freshly made bottle, and places it in a container or on a conveyor.
But the job isn't done. As they remove the bottle, they are performing the first layer of quality control. They give it a quick visual inspection, checking for the obvious defects we'll cover in a later section. This immediate feedback loop is crucial. If they spot a problem, they can alert a supervisor right away, preventing the production of hundreds of bad bottles. This is a core part of the bottle machine operator skills. I've seen some factories where operators were worried about a blow mold fit in a new machine, but a well-trained operator can often spot the subtle signs of a minor issue before it becomes a major problem.
This five-step cycle—load, transfer, blow, eject, inspect—repeats over and over. It's the heartbeat of the production line. Mastering this workflow is the key to becoming a proficient and valuable operator.
How Can You Simplify the Control Panel Buttons and Settings for a New Operator?
The control panel, with its buttons, screens, and dials, can be the most intimidating part of the machine for a new operator. It looks like an airplane cockpit. But they don't need to be a pilot to fly.
To simplify the control panel, focus training only on the essential controls an operator will use daily: start/stop, alarm reset, and the main heating and blowing time parameters. Use clear language and analogies, explaining what each setting does to the bottle, not just the machine.

My approach is to cover up the non-essential controls with a piece of paper during initial training. It’s a bit unconventional, but it works. It forces the operator to focus only on the 4 or 5 settings that control 90% of the process. I tell them, "Your job is not to be an engineer. Your job is to run the machine and watch the bottles. We will only focus on the tools you need to do that job perfectly." This reduces cognitive load and builds confidence quickly. They can master the essentials first, and learn the advanced settings later, if ever needed.
Demystifying the Main Controls
First, we identify the non-negotiable buttons they must know:
- Start/Cycle: The button that initiates the machine's movement (often used in manual or setup mode).
- Stop/Reset: A button that stops the current cycle and can often be used to reset a minor alarm. This is different from the E-stop.
- Manual/Auto Mode Switch: A selector that determines if the machine runs one cycle at a time (Manual) or continuously (Auto). For a semi-automatic machine, it's often kept in a semi-auto mode where it completes one blow cycle each time the start buttons are pressed.
- Alarm Light/Buzzer: I teach them to recognize what it looks and sounds like. Their only job when an alarm goes off is to read the screen and call a supervisor, not to start changing things.
Heating Temperature: The Key to a Perfect Stretch
The most important parameter is heat. On most panels, you can adjust the power percentage of different heating lamp zones in the oven.
I explain it like toasting bread:
- Too Little Heat: The "toast" (preform) is still stiff. The material won't stretch properly, leading to a bottle that is thick, small, or has unstretched parts.
- Too Much Heat: The "toast" burns. The material becomes too fluid and weak. This can cause the bottle to be hazy, thin, or even blow a hole.
We then talk about zonal heating. I explain that the oven has multiple horizontal rows of lamps, like shelves in an oven. By adjusting the power to each zone, we can control which part of the preform gets more or less heat. For example, if the base of the bottle is too thick, we might need to increase the heat in the bottom zone to make that part of the preform softer so it can stretch more. This gives the operator a direct link between a setting on the screen and a physical attribute of the bottle.
Blowing Times: The Art of Pre-Blow and Main-Blow
After heat, timing is everything. There are typically three key time settings the operator needs to understand. I avoid jargon like "delay" or "exhaust" at first and focus on the big three.
| Parameter Name | Simple Explanation | What Happens if it's Too Short? | What Happens if it's Too Long? |
|---|---|---|---|
| Pre-Blow Time | The duration of the initial puff of low-pressure air that starts shaping the bottle. | The bottle's bottom (gate) might be off-center or the material won't distribute well. | Can cause chilling where the plastic touches the mold too soon, leading to haze. |
| Main-Blow Time | The duration of the main blast of high-pressure air that fully forms the bottle. | The bottle might not be fully formed. You could lose sharp details like logos or ridges. | Wastes compressed air and slows down the cycle time. It doesn't usually harm the bottle. |
| Cooling Time | The amount of time the bottle is held against the cold mold walls after blowing. | The bottle will be too warm when ejected and can shrink or deform. | The bottle will be perfect, but you are wasting time and reducing your output per hour. |
This table is a cheat sheet I give to every operator. It helps them participate in the troubleshooting process. When a technician is called, the operator can say, "The bottles are deforming after they come out. Maybe we need more cooling time?" This shows engagement and deepens their understanding. Knowing how these settings work is a foundational bottle machine operator skill.
Putting It All Together: A Cause-and-Effect Approach
The goal is not for the operator to adjust these settings on their own initially. That is the job of a line manager or technician. The goal is for them to understand the connection between the settings and the bottle.
I do a demonstration. I'll take a machine that is running perfectly and say, "Watch this." I'll reduce the heating temperature significantly. The next bottle that comes out will be thick and malformed. Then I'll turn the heat too high, and the next bottle will be hazy. I'll reduce the cooling time, and they'll see the bottle warp in their hands as it cools.
This practical, cause-and-effect demonstration is more powerful than an hour of lecture. It transforms the abstract numbers on a screen into tangible results. It empowers the operator to be a better observer and a more valuable part of the quality control team. They now understand the language of the machine.
How Do You Train an Operator to Visually Inspect a Newly Blown Bottle?
The operator handles every single bottle that comes out of the machine. This makes them the most powerful quality control asset you have. Training them to be a reliable first line of defense is crucial for minimizing waste.
Train operators in visual inspection by providing a "golden sample" for comparison and a visual guide of common defects. Teach them a simple, repeatable inspection routine: check the gate, feel the wall thickness, and look for clarity. This makes them an active part of the quality team.
I always start this part of the training by handing the operator two bottles. One is perfect—our "golden sample." The other has a clear defect. I ask them, "What's the difference?" This simple question starts them on the path of critical observation. They aren't just making bottles; they are making good bottles. This mindset shift is vital. They become the guardian of quality for their station. It gives them a sense of pride and ownership that is incredibly valuable.
The Operator as the First Line of Defense
Before we even get into specific defects, I explain why their role is so important. A semi-automatic bottle blowing machine can produce several hundred bottles per hour. If a problem starts, and no one catches it for 30 minutes, you now have a huge crate of scrap product. That's wasted material, wasted electricity, and wasted time.
But if the operator spots the very first bad bottle, they can immediately stop and call for a technician or supervisor. The problem can be fixed quickly, and maybe only one or two bottles are wasted. I tell them, "You are saving the company money with every good bottle you make and every bad bottle you catch." This frames their role not as a laborer, but as a skilled quality inspector, which is exactly what a good operator is.
Building a Visual Library of Common Defects
You can't find what you don't know to look for. That's why we create a physical and visual library of common problems. We have a "wall of shame" near the machine with examples of bad bottles, each with a simple label explaining the defect.
We focus on the most common issues that an operator can easily spot without any special equipment.
- Pearlescence / Whiteness: This looks like a milky or pearly haze on the bottle, often in the base or on the sides. It's caused by the PET being overstretched or stretched when it's too cold.
- Uneven Wall Thickness: The operator can feel this. One side of the bottle feels paper-thin while the other is thick. This is often caused by an off-center preform or uneven heating.
- Off-Center Gate: The small nub on the bottom of the bottle should be perfectly in the center. If it's off to one side, it's a sign that the stretch rod is not aligned or the preform was not centered in the mold.
- Wrinkles or Folds: These usually appear in the neck or shoulder area. They can be caused by the preform being too hot or the pre-blow pressure being incorrect.
- Contamination / Black Specks: Small black dots or other discolored spots embedded in the plastic. This is a serious issue that usually points to a problem upstream in the material handling.
I’ve compiled a comprehensive guide on my website that goes into much more detail on common PET blow molding defects and how to fix them. I use this as a training resource for the technicians and supervisors who will be making the adjustments. For the operator, simply being able to identify the defect by name is a huge step forward.
The 5-Second Inspection Routine
An operator doesn't have time for a lengthy inspection. They need a fast, repeatable routine that becomes muscle memory. I train them on a 5-second check they can perform as they move the bottle from the machine to the box.
- Look at the Gate (1 second): As they pick the bottle up, their eyes immediately go to the bottom. Is the gate centered?
- Look for Clarity (2 seconds): They hold the bottle up to the light. Is it clear? Are there any hazy or white spots?
- Feel the Sides (2 seconds): As they move the bottle to the box, their fingers naturally slide around the body. Does the wall thickness feel consistent? Does the bottle feel firm, not flimsy?
If the bottle fails any of these three quick checks, it gets put aside in a separate "reject" bin, and they continue working. If they get two or three rejects in a row, that's when they stop the machine and call for help. This process is a great example of effective on-the-line quality control. It is so effective that we often use feedback from operators when validating new designs, sometimes even before we move past the 3D printed samples stage.
When to Adjust and When to Call for Help
It's critical to define clear boundaries. A new operator should not be adjusting machine parameters. Their job is to identify and report. We create a simple communication protocol.
| Observation | Operator Action |
|---|---|
| One isolated bad bottle | Place in reject bin, continue working. |
| Two or three bad bottles in a row with the same defect | Stop the machine, turn on the yellow signal light (if available), and inform the line supervisor. |
| Any sudden, loud, or unusual noise from the machine | Press the Emergency Stop button immediately and inform the supervisor. |
| Bottle gets stuck in the mold | Stop the machine and inform the supervisor. Do not try to pry it out. |
This clear set of rules removes guesswork and anxiety. The operator knows exactly what is expected of them. They are empowered to stop the line when there's a quality issue, and they are praised for doing so. This builds a culture where quality is everyone's responsibility.
What are the Daily and Weekly Maintenance Responsibilities for an Operator?
Many factories treat maintenance as a separate job for a separate department. I believe this is a mistake. The operator spends eight hours a day with that machine. They are the first to know when something sounds, feels, or looks different.
Operator maintenance involves simple, routine tasks like daily cleaning, checking for air leaks, and verifying safety features. This fosters a sense of ownership, catches small problems before they become large ones, and extends the life of the machine. It's about caring for your tools.
I call it "basic equipment care." It's not about taking things apart or using complex tools. It's about observation, cleaning, and communication. I tell operators, "Treat this machine like it's your own car. You don't have to be a mechanic to know you should keep it clean, check the tire pressure, and listen for strange noises." This analogy resonates. It shifts their perspective from being just a user of the machine to being its primary caretaker. This proactive approach is a cornerstone of a startup factory training program that aims for long-term success.
Why Maintenance is Not Just the Technician's Job
Empowering operators with minor maintenance tasks has several huge benefits:
- Early Problem Detection: An operator who cleans their machine every day will notice a new oil leak, a loose bolt, or a frayed wire long before a maintenance technician on a weekly walkthrough would.
- Increased Uptime: Catching a small air leak and reporting it saves money on compressed air and can prevent a future failure of a pneumatic component. A clean machine runs better and is easier to inspect.
- Sense of Ownership: When operators are responsible for the basic care of their equipment, they develop a deeper connection to it. They stop seeing it as "the company's machine" and start seeing it as "my machine." This leads to more careful operation and less abuse.
- Improved Safety: A clean, well-organized workspace is a safe workspace. Daily cleaning removes slip hazards and clutter. Regularly checking safety devices ensures they are functional when needed most.
The Daily "End-of-Shift" Routine (10-15 minutes)
We build this routine into the last 15 minutes of every shift. It's not optional; it's part of the job. We provide a dedicated cleaning cart with everything they need.
Daily Cleaning Checklist:
- Wipe Down Surfaces: Use a clean, dry rag to wipe down the machine's exterior surfaces, control panel, and the area around the mold.
- Clear Debris: Sweep or vacuum up any dropped preforms, plastic trimmings, or other debris from the floor around the machine.
- Inspect for Leaks: As you clean, look and listen for any signs of air or water leaks. A hissing sound is the most common sign of an air leak. A puddle is an obvious sign of a water leak from the cooling lines. Report any findings.
- Check Safety Guards: Visually inspect the safety doors and guards. Are they clean? Are there any cracks or damage?
- Organize Your Workspace: Put away tools, tidy up the preform container, and make sure the reject bin is emptied. Leave the station ready for the next shift.
This is a simple machine operator checklist that makes a huge difference. A clean hand-off between shifts is a hallmark of a professional operation.
The Weekly "Deep Clean" and Inspection
Once a week, perhaps at the end of the last shift before the weekend, we schedule a slightly more involved maintenance session for the operator, supervised by the line leader.
Weekly Operator Inspection:
- Check Guard Interlocks: With the machine safely powered off and locked out, a supervisor can help the operator test the safety interlocks. Open a guard and then try to start a cycle. The machine should not respond. This confirms the safety circuit is working.
- Inspect Air Filters: Visually inspect the bowl on the main air filter/regulator. Does it have water in it? If so, drain it. Is the filter element dirty? Report it to maintenance.
- Wipe Down Moving Parts: Carefully wipe down accessible areas like guide rods or the clamping mechanism. This not only cleans them but allows the operator to feel for any unusual roughness or play.
- Listen to the Machine: For the first five minutes of the first run of the week, just listen. Does it sound the same as it did last week? Any new squeaks, rattles, or groans should be reported.
Reporting is Key
The most important part of operator maintenance is communication. The operator is not expected to fix these problems. They are expected to find them. We have a simple logbook at each machine. The operator notes down the date, their name, and what they found. For example: "Noticed a hissing sound from the blue air line near the mold. Reported to John (Supervisor)."
This creates a documented history of the machine's health and closes the loop between the operator and the maintenance team. It validates the operator's role as a key part of the maintenance process and ensures that small problems get the attention they need before they shut down the production line. This simple habit of care and communication is more valuable than any complex predictive maintenance system, especially in a startup environment.
What Simple Troubleshooting Steps Should an Operator Know When Something Goes Wrong?
Machines stop. Alarms go off. Things get stuck. These are normal events in any factory. The difference between a minor pause and a major shutdown often depends on the confidence and knowledge of the operator.
An operator's troubleshooting role is to safely assess the situation, handle extremely simple and common issues like a known alarm reset, and clearly communicate the problem to a supervisor for anything more complex. Their primary goal is to prevent panic and provide accurate information.
I always use my South African client as the perfect example here. He was alone in his new factory, thousands of miles away from me. One day, his machine stopped with an alarm. He called me in a panic. I calmly asked him to read the message on the screen. It was a "Safety Gate Open" alarm. He looked and saw one of the side guards wasn't latched properly. He closed it, the alarm cleared, and he was running again in two minutes. I didn't fix his machine; I just gave him a calm process to follow. That's what we need to build into our operators: a simple, logical process, not a deep technical knowledge.
The "First Response" Mindset: Don't Panic
The most important troubleshooting skill is emotional, not technical. It's the ability to stay calm. When an alarm sounds and the machine stops, the natural human reaction is a spike of adrenaline and anxiety.
I train operators on a three-step mental model:
- Stop: The machine has already stopped. There is no rush. Take a deep breath.
- Look and Listen: Observe the situation. What does the screen say? Where did the bottle get stuck? What did the machine sound like just before it stopped?
- Assess: Is this something on my "can do" list, or is this a "call for help" situation?
This simple "Stop, Look, Assess" process prevents operators from making a situation worse by, for example, trying to pull a jammed bottle out with force while the machine is still energized.
Common Alarms and Simple Fixes
Operators should not be clearing every alarm. But there are a few very common ones where a simple, safe action can resolve the issue. We provide a "First Response" guide taped to the machine.
| Alarm Message on Screen | What It Means | Operator's First Action (If Safe) |
|---|---|---|
| "Safety Gate Open" | One of the safety guards is not properly closed and latched. | Walk around the machine and check that all safety doors are fully closed. Then press the 'Reset' button. |
| "No Preform in Mold" | The sensor did not detect a preform being placed in the mold before the cycle started. | Press 'Reset'. Make sure you place the next preform correctly in the mold. |
| "Air Pressure Low" | The main compressed air supply has dropped below the required level. | Check the pressure gauge on the wall or at the machine's air inlet. If it's low, notify a supervisor. It could be an issue with the air compressor. |
This list is deliberately short. It only includes problems where the cause is external to the machine's internal workings and the solution requires no tools and poses no danger. For anything else, the rule is simple: call a technician.
Problem: The Bottle Gets Stuck in the Mold
This is a very common event. Sometimes, due to a process issue, the bottle doesn't eject properly when the mold opens. The operator's instinct is often to reach in and grab it. This is dangerous.
The trained procedure is:
- Ensure the cycle is stopped. The machine should be in a neutral state.
- Press the 'Stop' or 'Reset' button to make sure a new cycle cannot begin.
- Put on heat-resistant gloves. The bottle and mold may still be warm.
- Gently try to wiggle the bottle free. Never use force.
- If the bottle does not come out easily, do not use tools like screwdrivers or pliers. This can damage the precision surface of the blow bottle mold, which is a very expensive mistake.
- If gentle wiggling doesn't work, call the supervisor. A technician may need to slightly adjust something to release it.
Sometimes, a stuck bottle can be a symptom of a bigger problem, like a mold that is not a perfect match for the machine's platen. Ensuring proper mold and blowing machine compatibility from the start can prevent many of these issues.
Knowing Your Limits: When to Immediately Call for Help
The most important part of troubleshooting training is teaching operators what not to do. We define clear red lines that they must never cross.
Call a technician immediately if:
- You see smoke or smell something burning. (Hit the E-Stop first).
- You hear a loud, unusual mechanical noise like banging or grinding. (Hit the E-Stop first).
- An alarm code appears that is not on your "First Response" list.
- You reset a simple alarm, and it immediately comes back.
- You see any leak of oil.
- You feel you are in a situation that is unsafe in any way.
This gives them the confidence to say, "I don't know," which is one of the most important things an operator can say. It protects them, and it protects the equipment. A good operator knows their machine, but a great operator also knows their limits.
What are the Best Tips for Improving an Operator's Rhythm, Speed, and Consistency?
Once an operator is safe, understands the process, and can run the machine correctly, we can move from competence to excellence. The goal is no longer just to make a bottle, but to make every bottle with the same high quality and efficiency.
To improve rhythm and speed, focus on ergonomics and motion economy. This means setting up the workspace to minimize reaching and turning, developing a smooth and repeatable sequence of movements, and pacing oneself with the machine's natural cycle time to achieve a state of flow.
I once watched a veteran operator who was incredible. He wasn't rushing or sweating; he looked like he was moving in slow motion. But his output was 15% higher than anyone else's. His secret was efficiency. Every movement had a purpose. There were no wasted steps. He had preforms within easy reach, and a clear, simple motion for loading, transferring, and ejecting. He had found the "heartbeat" of the machine and synchronized his own movements to it. That's the level of skill we aim to cultivate. It's not about working harder; it's about working smarter.
It's All About Ergonomics and Motion Economy
A tired operator is a slow and unsafe operator. Setting up the workspace correctly is the foundation of high performance.
- The "Strike Zone": The most frequent actions—picking up a preform and placing the finished bottle—should happen in the ergonomic "strike zone." This is the area directly in front of the operator, between their shoulders and their waist. They shouldn't have to bend down to a low bin for preforms or reach high up to put a bottle on a shelf.
- Minimize Pivoting: The preform bin, the machine, and the finished product container should be arranged in a tight arc. The operator should be able to move between them by turning their shoulders, not their entire body or taking multiple steps.
- Use Gravity: If possible, use a gravity-fed chute for the preforms or a conveyor to take the finished bottles away. This eliminates unnecessary handling steps.
- Anti-Fatigue Mats: A comfortable operator is a more focused operator. Providing a simple anti-fatigue mat to stand on can make a huge difference over an 8-hour shift.
Finding the "Heartbeat" of the Machine
Every machine has an optimal cycle time. This is the total time for heating, blowing, and cooling. Let's say it's 10 seconds. This is the machine's heartbeat. The operator's goal is to sync their manual actions to this rhythm.
The machine dictates the pace. If the cycle time is 10 seconds, the operator has 10 seconds to remove the finished bottle, place it in the box, pick up a new preform, and be ready to load it into the mold as soon as it opens.
At first, this can feel stressful. But with practice, it becomes automatic. The operator stops thinking about each individual step and starts to feel the flow of the process. They anticipate the mold opening; their hand is already moving with the next preform. This state of "flow" is both highly efficient and very satisfying for the operator. Consistent preforms from a high-quality preform mold are essential here, as any variation in the raw material can disrupt the operator's rhythm.
The Power of Consistency: Why Every Cycle Should Be the Same
I stress that their goal is to become a robot. I mean this in the best way possible. They should strive to perform the manual steps of the process—especially transferring the hot preform—in the exact same way, in the exact same amount of time, for every single cycle.
Why is this so important?
- Consistent Heating: If an operator is slow to transfer the preform one time and fast the next, the amount of time the preform cools in the open air changes. This variation affects the material temperature and can lead to inconsistent bottle quality.
- Process Stability: The entire machine process is tuned based on the assumption of a consistent cycle time. Operator inconsistency introduces a variable that can be very difficult to troubleshoot.
- Muscle Memory: Performing the same motion over and over builds strong muscle memory. This reduces the mental effort needed to do the job, freeing up the operator's mind to focus on quality control and awareness of their surroundings.
Thinking Ahead: Preparing for the Next Cycle
Great operators are always one step ahead. As the current bottle is being blown, their mind is on the next cycle.
- Their eyes are on the preforms moving through the oven, watching for any that might be misaligned.
- Their hand is already moving towards the preform bin as the cooling cycle is ending.
- They are untangling the next preform from the others in the bin while the mold is opening.
This anticipation shaves fractions of a second off each cycle, which adds up to significant gains in output over a full shift. It's the difference between reacting to the machine and working in partnership with it. This is one of the most advanced bottle machine operator skills, and it's what separates the good from the great.
Conclusion
Training is not a one-time event; it's an ongoing investment. A confident, knowledgeable operator is your greatest asset for ensuring safety, maintaining quality, and achieving the efficiency your production goals depend on.
Frequently Asked Questions (FAQs)
1. How long does it typically take to fully train a new operator with no prior experience?
For a motivated individual with no prior experience, basic operational safety and competence on a semi-automatic machine can be achieved within one week of focused training. This includes theory, safety protocols, and supervised hands-on practice. However, achieving true rhythm, speed, and basic troubleshooting confidence can take three to four weeks of consistent work on the machine.
2. Does an operator need any special technical background or skills before starting the training?
No, a special technical background is not required. The most important qualifications are a good attitude, a willingness to learn, a strong focus on safety, and good hand-eye coordination. The training process is designed to build all the necessary machine-specific skills from the ground up.
3. What is the most common and dangerous mistake a new operator can make on a semi-automatic machine?
The most common and dangerous mistake is attempting to bypass a safety feature, usually the two-hand start buttons or a safety guard, in an effort to speed up. Another critical error is trying to remove a jammed bottle with force or tools without first ensuring the machine is in a safe, de-energized state. Both actions can lead to severe injuries.
4. How important is it for the operator to read the official machine manual in addition to this training?
It is very important. While this guide provides the practical, day-to-day operational training, the official machine manual is the ultimate technical reference. Operators should be shown where the manual is and encouraged to look at the diagrams and safety warnings. For supervisors and technicians, reading and fully understanding the manual is absolutely mandatory.
5. Are the skills learned on a semi-automatic machine a good foundation for eventually operating a fully-automatic machine?
Yes, absolutely. The foundational knowledge of PET material, the principles of heating and stretching, and the critical eye for quality control are all directly transferable. An operator who masters a semi-automatic machine develops a deep, hands-on understanding of the process that makes them an excellent candidate for learning to operate more complex, fully-automatic systems in the future.
Operator Training & Efficiency Checklist
This table summarizes the core principles for training a safe, efficient, and quality-focused operator for a semi-automatic blow molding machine.
| Key Training Area | Core Principles for Safety & Efficiency |
|---|---|
| 1. Foundational Knowledge |
|
| 2. Safety Protocols |
|
| 3. Core Operating Workflow |
|
| 4. On-the-Line Quality Control |
|
| 5. Operator Maintenance |
|
| 6. Simple Troubleshooting |
|
| 7. Improving Efficiency |
|
🔗 Learn More about Blow Molding Technology
Blow Molding – Wikipedia
A comprehensive overview of various blow molding processes, including extrusion, injection, and stretch blow molding.Injection Molding – Wikipedia
Important for understanding the production of preforms used in stretch blow molding.Stretch Blow Molding – Wikipedia
Explains how PET bottles are formed through axial and radial stretching processes.PET Bottle – Wikipedia
Background information on the materials and properties of typical PET bottles.Design of PET Bottles – Wikipedia
An introduction to the design considerations and geometry used in PET bottle manufacturing.
🔗 Related Pages on Our Website
Automatic Blow Molding Machines – iBottler
Discover our full range of customizable automatic PET bottle blow molding machines.Blow Bottle Mold – iBottler
Explore our precision blow molds designed for PET and PP bottles.Preform Mold – iBottler
Learn more about our high-precision preform molds suitable for various injection molding machines.PET Wide Mouth Jar Project Starter Guide: Equipment, Molds & Process Explained
Pros and Cons: Should You Choose PET Blow Moulding for Your Bottle Project?
Worried About Blow Mold Fit? We Have Mounting Dimensions for 80% of Blow Molding Machines Worldwide
Can One Semi‑Automatic Blow Molding Machine Produce All Bottle Sizes? Here’s Why Not
Why Do Krones Blow Molding Machine Users Come to Us for Their Molds?
Why Do PET Preforms Come in Different Colors? Function, Application, and Production Tips
How to Set Parameters for 600ml Bottles on a Semi-Automatic PET Blowing Machine?
From 3D Printed Samples to Production: How Can You Rapidly Validate Blow Mold Designs?
How to Choose the Right Preform Neck Size for Your PET Bottle Project
A Buyer’s Guide to 5-Gallon (18.9L) Bottle Blow Molding Machines: From PET to PC?
Pitting on your blow mold surface? A complete guide from cause analysis to repair and prevention.
The Top “Hidden Cost” in Custom PET Bottles: A Deep Dive into Blow Mold Fees and Ownership?
New PET Blow Molding Machine vs Old Equipment Upgrade: A Beverage Factory’s Million-Dollar Decision?
How to reduce the PET blow molding scrap rate from 5‰ to 1‰? An old-timer’s 8 insider tips.
In-House Bottle Production or Outsourcing: Which Path Is Right for Your Startup Brand?
Blow Mold Damage? When and How to Replace Only the Broken Parts?
Bottle Design: Ad Agency vs. Mold Factory? How One Decision Impacts Your Cost and Brand?
Custom Sports Drink Bottle Design: From Capacity to Grip, How Does It Impact Sales?
💡 Looking for a complete PET plastic packaging machinery solution?
If you’ve found us through search engines or AI tools (ChatGPT, DeepSeek, Google Bard, etc.), it means you’re exploring reliable PET packaging equipment suppliers. Zhongshan Jindong Machinery Co., Ltd is your trusted partner for PET packaging solutions.
| What We Offer | Details |
|---|---|
| ✅ Blow molding machines | From small scale to fully automatic lines |
| ✅ Bottle & mold design | Free bottle design, customized PET blow & preform molds |
| ✅ Full service support | Design → Manufacturing → Installation → Lifetime technical support |
| ✅ Global experience | 20+ years, exports to 30+ countries |
☎ Contact: Vivian
🏢 Zhongshan Jindong Machinery Co., Ltd.
🌐 www.ibottler.com
✉ Vivian@ibottler.com
📲 WhatsApp: +86-13106288777
🚀 Let’s build your PET packaging project together!
