Seeing tiny, rough spots on your finished bottles? This seemingly small flaw can signal a major problem with your blow mold, threatening your brand's reputation and sales with every unit produced.
These spots, known as pitting, are tiny cavities caused by corrosion on your mold's surface, most often from moisture. This guide will show you how to identify the cause, properly repair the damage, and implement a prevention plan to protect your investment and ensure perfect bottle quality.

This problem is more than just a cosmetic issue; it's a direct reflection of your production process and can quickly erode customer trust. I’ve seen it happen to many clients who were puzzled by a sudden drop in their product's visual appeal. The good news is that this is a solvable problem. You need a clear plan that addresses the root cause, offers a reliable repair method, and builds a routine to prevent it from ever happening again. This guide provides that plan. Let's dive in and get your production back to producing flawless bottles.
What is Mold Pitting, and How Does It Actually Ruin Your Bottle Quality?
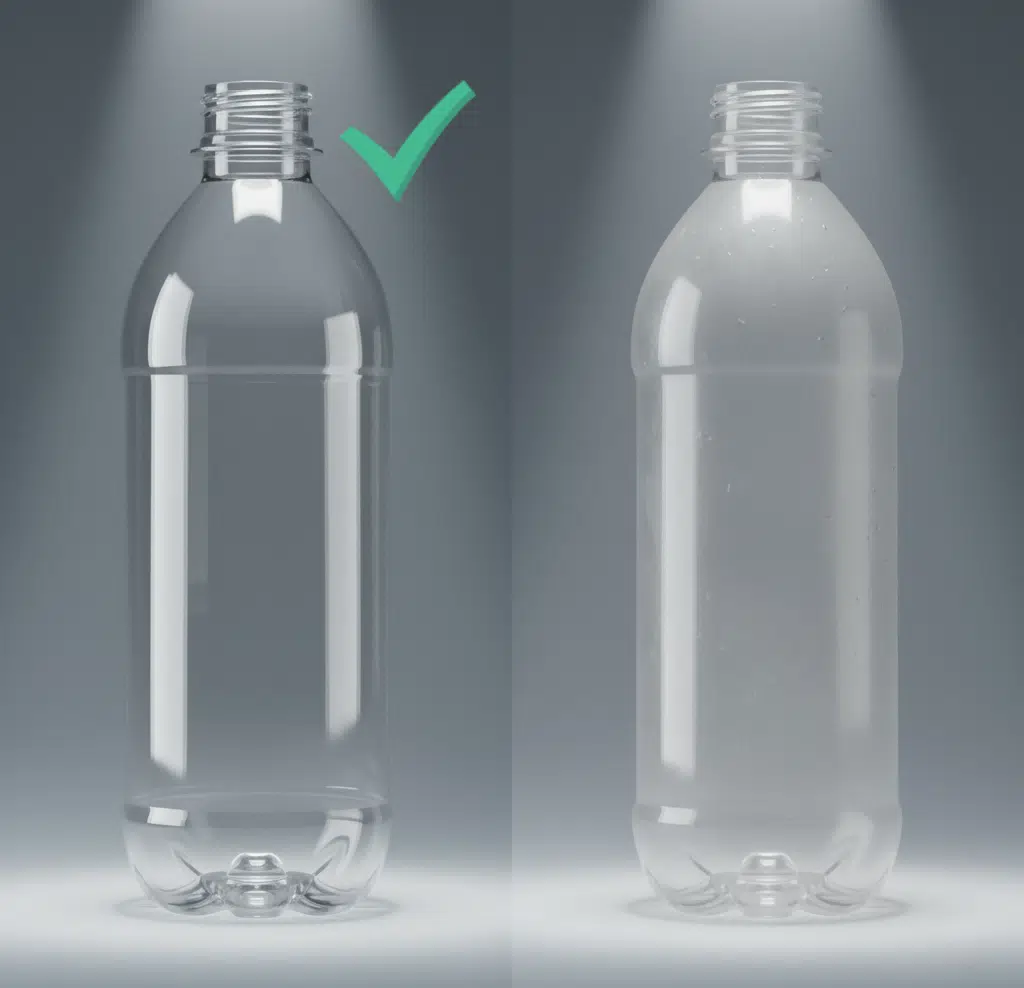
Are you mistaking pitting for simple scratches or dust? Understanding the exact nature of this defect is the first step toward solving it and protecting your brand's image.
Mold pitting is the formation of tiny, localized pits or craters on the mirror-finish surface of your mold cavity. Unlike a scratch, which is linear, pitting is a cluster of small divots caused by corrosion. It directly ruins your bottles by transferring these imperfections onto every single unit.
Dive Deeper: The Anatomy of a Flawed Bottle
To truly grasp the severity of pitting, we need to look closer at how it forms and the message it sends to your customers. Many producers initially overlook it, but the consequences can be significant.
The Telltale Signs: Pitting vs. Other Surface Defects
When a bottle comes out looking less than perfect, it's easy to misdiagnose the problem. Is it dust? A scratch? Or the more serious issue of pitting? Knowing the difference is critical for applying the right solution. I created a simple table to help my team and clients quickly identify the issue.
| Defect Type | Appearance on Mold | Appearance on Bottle | Likely Cause |
|---|---|---|---|
| Pitting | Clusters of tiny, random craters or divots. Surface feels rough. | A rough, "orange peel" or matte texture in specific areas. Non-linear. | Chemical corrosion, usually from moisture (rust). |
| Scratches | A linear groove or line. Can be deep or shallow. | A distinct, sharp line on the bottle surface. | Improper handling, abrasive cleaning tools (e.g., steel brushes). |
| Haze/Water Waves | No visible defect on the mold itself. | A cloudy, wavy, or blurry appearance on the bottle. | Material issues, improper heating, or cooling channel blockage. |
Distinguishing these is the first step. Scratches are usually isolated incidents of mishandling, but pitting points to a systemic problem in your environment or maintenance routine. If you're seeing these issues, it's a good time to review your entire process, maybe even look into a better bottle defects and solutions guide to cover all your bases.
The "Photocopy" Effect: How PET Becomes a Mirror
You have to understand how PET works during the blowing process. When the hot preform is placed inside the mold, high-pressure air slams it against the mold cavity walls in a fraction of a second. This process, happening at high temperature and pressure, forces the pliable PET material to conform to every single detail of the mold surface. Think of it as a perfect, high-fidelity "photocopy."
This means if your mold has a mirror-like polish, you get a crystal-clear, high-gloss bottle. But if your mold has even microscopic pitting, that rough texture is perfectly replicated onto the bottle's surface. What might be barely visible on the steel mold becomes a very obvious and ugly blemish on a transparent PET bottle.
From Blemish to Brand Damage
This is where the real cost lies. I remember a client from Nigeria who produced beautiful, high-gloss round bottles for a premium beverage. His business was doing well. Then, he called me in a panic. His bottles suddenly looked "foggy" and "cheap." He was getting complaints from distributors. When I asked him to inspect his blow bottle mold, he found the cavity surfaces were covered in tiny rust spots. The damage was done. He admitted that his team had neglected to apply anti-rust spray during a recent week-long shutdown. That small oversight cost him dearly in returned products and damaged brand perception.
A consumer holding a bottle with a rough, pitted surface won't think about dew points or mold steel. They will think the product is old, unsanitary, or poorly made. In a competitive market, that first impression is everything. It can make a customer choose a competitor's product right next to yours on the shelf. The quality of your mold is a direct investment in your brand's value.
The #1 Culprit: How Does Moisture and Condensation Lead to Mold Corrosion?
You've cleaned the mold, but the pitting returns. Why? The cause is often invisible. It's the moisture in the air, silently attacking your expensive mold every second it's in operation.
Moisture leads to corrosion when warm, humid air makes contact with the cold surface of your mold, causing condensation. This water, combined with oxygen, creates the perfect environment for rust (iron oxide) to form on the steel surface, eating away at the polished finish and creating pits.

Dive Deeper: The Science of Rust and Where It Comes From
To defeat an enemy, you must understand it. Mold rust isn't just bad luck; it's a predictable chemical reaction. By controlling the ingredients—water and air—you can stop pitting before it ever starts. Let's break down where this destructive water comes from.
Understanding the "Dew Point" in Your Workshop
Have you ever taken a cold can of soda out of the fridge on a hot day? Water droplets almost instantly form on the outside. This is exactly what happens to your blow mold. The "dew point" is the temperature at which air becomes saturated with water vapor and that vapor condenses into liquid water.
Your blow mold is constantly being cooled by a chiller to solidify the hot PET plastic quickly. This often makes the mold surface temperature much lower than the surrounding workshop air's dew point. The result? Your mold "sweats" all day long. In regions with high humidity, like during a rainy season or in tropical climates, this effect is dramatically worse. This isn't just a minor issue; it is the primary cause of mold corrosion during production. Every drop of sweat is a potential rust spot in the making.
Tracing the Water: The Three Main Suspects
So, where is all this water coming from? It's not just one source. I've found it typically comes from three main areas in any bottling plant.
- The Air You Use (Compressed Air): The high-pressure air used to blow the bottles is a major culprit. When you compress air, the concentration of water vapor in it increases dramatically. If your air-drying system is inefficient or failing, you are essentially sandblasting your mold with a fine, high-pressure mist of water with every cycle. This is why a powerful and efficient air compressor system with proper drying is not a luxury—it's a necessity.
- The Air Around You (Workshop Humidity): This is the condensation effect we just discussed. High ambient humidity in your production hall is a constant threat. I've walked into factories where the air felt thick and damp. In those places, mold pitting was a chronic problem they were constantly fighting, polishing molds every other week.
- The Downtime Danger (Improper Shutdown): This is the most preventable cause, and the one that caught my Nigerian client. When you shut down the machine, the mold cools to room temperature. Any residual moisture left on the surface, combined with exposure to the air, will immediately start the rusting process. A simple spray of anti-rust agent after the final production run is the cheapest insurance policy you can have.
The Chemical Cocktail: When Gases Make It Worse
While PET is relatively inert, some factories run other plastics like PVC or materials with certain additives. These materials can release corrosive gases (like chlorine) when heated. When these gases mix with the condensation on your mold surface, they form a weak acid (like hydrochloric acid). This acid is far more aggressive than plain water and can etch into high-grade mold steel in a surprisingly short amount of time. Even if you only run PET, airborne contaminants in an industrial area can have a similar effect. This is why keeping the mold surface clean and dry is paramount.
Beyond Moisture, What Other Hidden Killers Can Damage Your Mold Surface?
You've managed the humidity and your shutdown procedure is perfect, but you're still seeing blemishes. What gives? Sometimes the enemy is not the environment, but the tools and materials you use every day.
Beyond moisture, your mold can be damaged by improper cleaning methods, abrasive particles in your raw materials, or even inherent defects in the mold steel itself. These factors can scratch, wear down, and compromise the surface, leading to defects that look just like pitting.
Dive Deeper: The Unseen Attackers on Your Molds
A high-quality blow mold is a precision instrument. Treating it like a simple block of metal is a recipe for disaster. Let's uncover the less obvious, but equally destructive, forces that could be at play in your facility.
Are Your Cleaning Habits Harming Your Molds?
When operators see a bit of residue or colorant buildup in a mold, their first instinct is often to grab the nearest tool and scrape it off. This is a critical mistake. I once visited a factory where the operator was using a brass brush and a steel pick to clean the mold cavities between runs. He was trying to be diligent, but he was inflicting thousands of micro-scratches on the polished surface.
The mirror finish on a mold is delicate. Using hard tools—anything made of steel, brass, or even hard plastic scrapers—will permanently damage it. Similarly, harsh chemical cleaning agents not specifically designed for mold cleaning can etch the surface. The rule is simple: only soft materials should touch the mold cavity. This means soft cloths, wood or plastic dowels for tough spots, and approved mold cleaning solvents. Anything more aggressive will cause more harm than good, leading to costly repairs.
"Sandpaper" in Your PET: The Problem with Contaminated Raw Materials
You might be focused on the mold, but have you considered the material you're feeding into it? This is especially critical if you use recycled PET (rPET) or source your preforms from multiple suppliers. If the PET raw material is contaminated with hard impurities—tiny bits of metal, sand, or other plastics like PVC—these act like sandpaper.
During each cycle, these abrasive particles are forced against the mold wall under immense pressure. Over thousands of cycles, this constant abrasion wears away the polished surface, a process known as erosive wear. It can dull the finish and create defects that mimic corrosion pitting. Ensuring the quality of your raw materials is a vital, yet often overlooked, part of mold maintenance. Working with a reliable preform mold supplier who guarantees material purity is essential for protecting your downstream blow molds.
Not All Steel is Created Equal: Inherent Mold Material Flaws
Sometimes, the problem is built-in before the mold even arrives at your factory. The choice of steel is one of the most important factors in a mold's lifespan and resistance to pitting. A low-quality steel might be cheaper upfront, but it will cost you far more in the long run.
High-quality, corrosion-resistant stainless mold steel, like S136, is specifically designed for humid environments and for molding materials that might release corrosive gases. It has a higher purity and a more uniform internal structure, making it naturally resistant to rust. A cheaper steel, like P20 or 718, might be fine for non-transparent parts or dry environments, but it will quickly fail in a typical PET bottling application. Furthermore, improper heat treatment during the mold's manufacturing can leave it with soft spots that are prone to both wear and corrosion. When you invest in a new blow bottle mold, asking about the steel type and its heat treatment process is not just a technical question; it's a question about the tool's fundamental ability to resist the very defects you're trying to prevent.
How Can You Fix Minor Pits with In-House Mold Polishing?
You've found some light pitting on your mold. Do you need to stop production and send it out for expensive repairs? Not necessarily. For minor issues, you can perform a careful, in-house polish.
To properly polish a mold, you must use the right tools: progressively finer grades of diamond polishing paste and soft applicators like felt wheels or cloths. The process involves gently working the surface in stages, from a coarser to a finer paste, to restore the mirror finish without altering the mold's dimensions.
Dive Deeper: The Art and Science of Mold Polishing
Polishing a mold is not like sanding a piece of wood. It requires patience, precision, and the right materials. A heavy hand can do more damage than the original pitting. Let's walk through the process so you can handle minor repairs with confidence.
Your Polishing Toolkit: What to Get and What to Avoid
Having the right equipment on hand is half the battle. Rummaging for makeshift tools is how molds get destroyed. Here is a basic kit you should have ready for any light polishing work.
| Tool/Consumable | Description | Why It's Necessary | Critical Warning |
|---|---|---|---|
| Diamond Paste | A set of syringes with pastes of different grit sizes (e.g., 15, 9, 6, 3, 1 micron). | This is the polishing agent. Starting coarse and moving to fine allows you to remove the pitting and then restore the shine. | NEVER use valve grinding compound or generic abrasives. They are too aggressive. |
| Felt Polishing Bob/Wheel | Small, shaped felt tips that can be mounted on a low-speed rotary tool (like a Dremel). | Allows for even application of pressure and paste, especially in curved areas. | Use the lowest possible speed. High speeds generate heat and can burn the steel. |
| Soft, Lint-Free Cloths | Microfiber or cotton cloths. | For applying paste by hand on flat areas and for cleaning the mold between grits. | Paper towels can contain abrasive fibers. Stick to soft cloth. |
| Mold Cleaner Solvent | A spray designed to dissolve residues without harming the steel. | Ensures the surface is perfectly clean before you start, so you're not just grinding dirt into the metal. | Do not use brake cleaner or other harsh degreasers. |
| Wooden/Plastic Sticks | Soft, disposable sticks. | For applying paste to very small, targeted areas. | NEVER, EVER use a steel or brass tool to apply paste. |
The most important item on the "avoid" list is sandpaper. Even the finest grit sandpaper is designed for aggressive material removal. It will instantly destroy a mold's mirror finish and can easily alter its critical dimensions.
A Step-by-Step Guide to Safe Polishing
Follow these steps carefully. Rushing this process will only make things worse.
- Thorough Cleaning: Disassemble the mold if necessary to get full access to the cavity. Spray the surface with a dedicated mold cleaner and wipe it completely clean with a soft cloth. Any remaining residue will interfere with the polish.
- Start with a Coarser Grit: Begin with a mid-to-low grit diamond paste (e.g., 15-micron, which feels slightly gritty). Apply a very small amount to your felt wheel or cloth.
- Gentle, Circular Motions: Using light pressure, polish the pitted area in small, overlapping circular motions. Do not press hard or stay in one spot for too long. Let the diamond paste do the work. The goal is to slowly level the surface down to the bottom of the pits.
- Clean and Inspect: After a minute or two of polishing, clean the entire area with a fresh cloth and solvent. Inspect the surface. The original shine will be gone, replaced by a uniform satin finish. The pits should be less noticeable.
- Move to a Finer Grit: Now, switch to a new, clean felt wheel or cloth and a finer paste (e.g., 6-micron). Repeat the polishing process over the same area. You will start to see the shine returning.
- Repeat and Refine: Continue this process, moving to progressively finer pastes (e.g., 3-micron, then 1-micron). Each step should bring back more of the mirror finish. Always clean the mold thoroughly between grits to remove the previous, coarser abrasive particles.
The Golden Rule: Know When to Stop
This is the most critical part of in-house polishing. Over-polishing is a serious risk. If you remove too much material, especially in one spot, you can change the dimensions of the mold. This could lead to bottles with incorrect volume, thin spots, or an altered shape. The goal is to remove the blemish, not to reshape the mold. This is particularly important for the overall product design, as even minor changes can affect performance. A proper PET bottle mold design has tolerances measured in microns. If you are ever in doubt, or if the pitting is deep enough to catch a fingernail, it's time to stop and seek professional help.
When Polishing Fails, What Advanced Mold Repair Techniques Require a Professional?
You've tried polishing, but the pits are too deep. You've only managed to make a larger dull spot on your mold. It's time to admit that a DIY approach has its limits.
When pitting is too deep for polishing, you must seek professional repair. Advanced techniques like micro-welding (laser or TIG) are used to add metal back into the pits, which is then blended and polished. For widespread damage, replating or coating the entire cavity might be necessary.
Dive Deeper: Calling in the Experts for Major Surgery
Sending a mold out for repair can feel like a major setback, causing downtime and expense. However, it's far better than continuing to produce defective bottles or, worse, damaging the mold beyond repair. Understanding the professional techniques available will help you have an intelligent conversation with a repair shop and choose the right solution.
Laser Welding: The Precision Fix
Think of laser welding as microscopic surgery for your mold. A highly focused beam of light melts a very fine wire of filler metal, which is made of the exact same (or a compatible) alloy as your mold. This molten metal fills the pit, drop by drop.
The key advantage of laser welding is its incredible precision and low heat input. The heat is confined to a tiny spot, so the surrounding mold steel doesn't get hot. This "small heat-affected zone" means the mold will not warp or distort, which is a major risk with conventional welding. After welding, the excess material is carefully ground down and the area is polished to perfectly match the surrounding surface. This is the gold standard for repairing isolated, deep pits or damaged edges. It's so precise that it's often used to validate designs after seeing how initial 3D printed samples perform.
Precision TIG Welding: The Tougher Alternative
TIG (Tungsten Inert Gas) welding, also known as micro-welding, is another option. It's a more traditional form of welding but can be done with very high precision by a skilled technician. It can often lay down more material faster than a laser, making it suitable for larger damaged areas or repairing the critical parting line edges of a mold.
However, TIG welding introduces more heat into the mold than a laser. This increases the risk of distortion if not done by an experienced professional who understands how to manage heat. It's a very effective technique, but it's less "surgical" than laser welding.
A Fresh Start: Replating and Coating
What if the entire mold surface is failing? Or if you have a mold made of softer steel that you want to protect? In these cases, adding a new surface layer might be the best option.
- Hard Chrome Plating: This is a traditional method where a layer of chromium is electroplated onto the mold surface. It provides excellent hardness and good corrosion resistance. If your mold was originally plated and that plating is now pitted or worn, it can be stripped and replated to restore the original finish.
- PVD (Physical Vapor Deposition) Coating: This is a more modern, high-tech process. It applies a very thin, but extremely hard, ceramic coating (like Titanium Nitride) to the surface. PVD coatings are exceptionally durable and provide superior protection against both wear and corrosion.
Here’s a comparison to help you understand the options:
| Repair Method | Best For | Key Advantage | Key Consideration |
|---|---|---|---|
| Laser Welding | Deep, isolated pits; damaged edges; high-precision areas. | Very low heat, no distortion, extremely precise. | Can be more expensive for large areas. Requires a specialist. |
| TIG Welding | Larger damaged areas; parting line repair. | Faster material deposition than laser; strong repairs. | Higher heat input carries a risk of mold distortion if not done properly. |
| Replating/Coating | Widespread surface wear; upgrading a softer steel mold. | Restores the entire surface; can improve original properties. | The old surface must be completely stripped first; can be costly. |
Choosing the right method depends on the type and extent of the damage. A good mold repair shop will be able to assess your mold and recommend the most cost-effective and reliable solution.
How Can You Make Maintenance a Habit with Proper Shutdown and Daily Care?
You've repaired your mold, and it looks brand new. How do you keep it that way? The solution isn't a single action, but a consistent, disciplined routine.
To prevent pitting from recurring, you must integrate a strict maintenance culture. This includes a non-negotiable daily shutdown protocol of cleaning and applying anti-rust spray, a scheduled deep cleaning plan, and training operators to perform quick daily inspections.

Dive Deeper: Building Your Mold Protection System
Preventive maintenance is the most powerful tool you have. A few minutes of care each day can save you thousands of dollars and days of downtime. I have helped countless clients turn their reactive "fix-it-when-it-breaks" approach into a proactive "keep-it-perfect" system. Here are the core components.
The Most Important 5 Minutes: Your Daily Shutdown Protocol
This is the single most effective habit you can build. It's simple, fast, and it works. At the end of every production day, or before any shutdown longer than a couple of hours, the machine operator must perform this simple, two-step process:
- Wipe It Clean: While the mold is still warm (but not hot), use a clean, soft, lint-free cloth to wipe out any condensation or residue from the mold cavities. The warmth helps any residual moisture evaporate quickly.
- Spray It Safe: Take a can of high-quality, non-staining anti-rust spray. Spray a light, even coat across the entire surface of the mold cavities, parting lines, and any other exposed steel surfaces.
That's it. This five-minute task prevents overnight rusting and is the best defense against humidity-related corrosion. This should be a non-negotiable item on your end-of-shift checklist. The cost of a can of anti-rust spray is nothing compared to the cost of a single professional polishing session.
Beyond the Surface: Your Weekly/Monthly Deep Clean Schedule
Daily maintenance keeps the primary surfaces safe, but grime and scale can build up in other critical areas, affecting both mold health and performance. You need a schedule for deeper cleaning.
- Weekly: Clean the mold's vent slots. Vents allow air to escape as the bottle is blown. If they become clogged with residue, it can trap air and cause incomplete forming or burn marks on the bottle. Use a soft brush and a solvent to clean them out.
- Monthly: Check and clean the cooling channels. Over time, scale from the water can build up inside the channels, restricting water flow. This leads to inefficient cooling, longer cycle times, and potential quality issues. This process often involves circulating a descaling solution through the channels. A properly functioning cooling system is key to how the mold and blowing machine work together.
This schedule ensures that the entire mold system, not just the visible surface, is kept in peak condition.
Empower Your Team: The Operator's Quick Check
Your machine operators are your first line of defense. They see the molds and the bottles every single day. You should empower them to be part of the solution. Train them to perform a quick visual inspection at the beginning of their shift.
- Look at the mold surface. Does it still have a good shine?
- Look at the first few bottles produced. Are there any new blemishes or dull spots?
By catching a problem in its earliest stage—a tiny rust spot just beginning to form—they can flag it for a quick touch-up polish before it becomes a deep pit. This creates a culture of ownership and proactive care. When your team understands that the mold is a valuable asset, not just a piece of metal, they will naturally take better care of it. This simple habit can prevent 90% of severe pitting issues.
How Can You Optimize Your Environment by Controlling Air and Humidity?
You're doing all the right maintenance, but in the summer, your molds still sweat. You're fighting a losing battle against the environment itself. It's time to control the source of the problem.
To fundamentally prevent condensation-based pitting, you must manage your production environment. This involves installing an efficient air drying system for your compressed air and controlling the temperature of your mold's cooling water to keep it above the ambient dew point.

Dive Deeper: Taking Control of Your Climate
Treating the mold is a defensive action. Controlling the atmosphere in your plant is an offensive strategy. It stops the problem at its root. This might require some investment in equipment, but the return in terms of consistent quality, reduced downtime, and longer mold life is immense.
Winning the War on Water: Upgrading Your Air Dryer
As we discussed, the compressed air used to blow the bottle is a primary source of water. Every single bottle blowing machine relies on a steady stream of clean, dry, high-pressure air. If your air is wet, you are directly injecting water into your mold.
An industrial air dryer is not an optional accessory; it is a critical component. There are two main types:
- Refrigerated Dryers: These work like a refrigerator, chilling the compressed air to condense and remove the water. They are effective for most applications.
- Desiccant Dryers: These use a special material (a desiccant) to absorb water vapor from the air, achieving a much lower dew point (drier air) than refrigerated models. These are essential for high-humidity environments or for producing very high-quality, sensitive products.
Investing in a high-capacity, efficient dryer for your air compressor system pays for itself. It not only protects your molds from corrosion but also prevents water spots inside your bottles and protects the pneumatic components of your blowing machine from damage.
A Pro Tip: Adjusting Your Chiller Water Temperature
This is a technique that many people overlook. We tend to think that colder is always better for cooling the mold. While colder water does shorten cycle times, if it's too cold, it dramatically increases condensation.
Here's the professional approach: measure the temperature and humidity in your workshop to determine the dew point. Then, adjust the temperature of the water from your chiller so that the surface temperature of your mold is just slightly above the dew point. For example, if the dew point is 10°C, setting your chiller to provide 12°C water might completely eliminate condensation.
Yes, this might increase your cycle time by a fraction of a second. However, that tiny loss in speed is far outweighed by the massive gain in eliminating corrosion, stopping production for polishing, and producing scrap bottles. It's a trade-off that is almost always worth it, especially during humid seasons.
Total Climate Control: Managing Workshop Humidity
For facilities in extremely humid climates, treating the air at the machine might not be enough. The ultimate solution is to control the climate of the entire production room. Installing industrial dehumidifiers can lower the overall humidity of the workshop, effectively lowering the dew point for the entire area.
This is a significant investment, but it creates the most stable and controllable production environment possible. It not only eliminates mold condensation but also improves operator comfort and protects other equipment in the factory from moisture-related issues. For large-scale, high-quality operations, creating a climate-controlled "cleanroom" environment for blowing and filling is the industry best practice.
How Can You Build a Long-Term Mold Protection Strategy by Treating Your Mold as a Core Asset?
You now have the tools to fight pitting. But how do you win the war? The final step is to shift your mindset. Your molds are not disposable tools; they are the heart of your production.
Building a long-term strategy involves treating your molds as core business assets. This means starting with high-quality, corrosion-resistant molds, implementing a rigorous preventive maintenance schedule, and partnering with experts who can provide support for the entire lifecycle of your equipment.
Dive Deeper: From Firefighting to Future-Proofing
Everything we have discussed—from polishing techniques to humidity control—can be summarized in one core philosophy: proactive asset management. A blow mold can produce millions of bottles and generate immense revenue, but only if it's cared for. Let's build your long-term plan.
Your Ultimate Prevention Checklist
This checklist summarizes the key preventive actions from this guide. Print it out. Post it near your machines. Make it part of your standard operating procedure.
| Frequency | Task | Key Objective |
|---|---|---|
| At Start of Shift | Visual Inspection | Catch problems early. Operator inspects mold surface and first bottles for any new defects. |
| During Production | Monitor Environment | Prevent condensation. Keep an eye on ambient humidity and mold surface temperature. |
| At End of Shift | Clean & Protect | Prevent overnight rust. Wipe down mold cavity and apply anti-rust spray. (This is mandatory!) |
| Weekly | Clean Vents | Ensure bottle quality. Clean out vent slots to prevent trapped air and burn marks. |
| Monthly | Check Cooling Channels | Maintain efficiency. Check for scale buildup in water channels to ensure proper cooling. |
| As Needed | In-House Polishing | Minor repairs. Address light pitting or scratches immediately with diamond paste before they worsen. |
| Ongoing | Maintain Support Gear | Control the source. Regularly service and check the air dryer and chiller systems. |
Invest Smart, Not Cheap: The True Value of a High-Quality Mold
The best way to prevent pitting is to buy a mold that is designed to resist it from day one. I've seen companies try to save 20% on the initial purchase price of a mold by choosing a cheaper steel, only to spend three times that amount on repairs, downtime, and lost sales over the next two years.
When you are purchasing a new blow bottle mold, insist on high-quality, corrosion-resistant stainless steel like S136 or an equivalent. A mold made from this material is a fortress against rust. It's the best "anti-rust agent" you can buy. Combine this with a superior PET bottle mold design that includes optimal cooling and venting, and you are setting yourself up for years of trouble-free production. The initial investment is higher, but the total cost of ownership is significantly lower.
You Don't Have to Do It Alone: Partnering with Experts
Managing a fleet of molds, optimizing production parameters, and keeping up with the latest maintenance techniques can be a full-time job. You don't have to be an expert in everything. This is where a good partnership comes in.
At iBottler, we see ourselves as more than just equipment suppliers. We are partners in your production success. We can help you select the right bottle blowing machine and ensure your molds are a perfect match. We can provide expert consultation on mold material selection, design, and creating the kind of robust maintenance plans we've discussed here. If you're facing challenges with bottle quality or want to build a more resilient and efficient production line, let's talk. We have the experience to help you protect your assets and grow your business.
Conclusion
Pitting on your mold surface is a serious but solvable issue. It stems from corrosion, primarily caused by moisture, but can be prevented through diligent daily maintenance, environmental control, and investing in high-quality molds from the start.
Frequently Asked Questions (FAQ)
1. How quickly can rust spots form on an unprotected mold?
In a humid environment, visible rust spots can begin to form on an unprotected, non-stainless steel mold in as little as 24-48 hours. If there are acidic residues on the mold, the process can be even faster. This is why the end-of-shift anti-rust spray is so critical.
2. I was told to use fine-grit sandpaper for a quick fix. Is this ever okay?
Absolutely not. Never use any kind of sandpaper on a polished mold cavity. Sandpaper is designed to remove material aggressively and will instantly ruin the mirror finish, creating thousands of scratches that are much worse than the original pit. Only use diamond paste with soft applicators.
3. Is a more expensive mold steel like S136 really worth the extra cost?
Yes, 100%. For PET blow molding, especially for clear bottles in a typical factory environment, S136 (or similar corrosion-resistant stainless steel) is the smart investment. It pays for itself many times over in reduced maintenance, zero corrosion-related downtime, and longer mold life compared to cheaper steels like P20 or 718.
4. My workshop is always humid. What is the single most important thing I can do?
The single most critical action is the daily shutdown protocol: wipe the mold clean and apply anti-rust spray every single time you stop production for more than an hour. This directly counteracts the effect of the humid air. The second most important action would be to invest in a quality desiccant air dryer for your compressed air line.
5. The pitting is right on the sharp edge of the parting line. Can this still be fixed?
Yes, but this is a job for a professional. Damage on a critical edge or parting line almost always requires micro-welding (either laser or TIG) to rebuild the sharp edge. A skilled technician can add material and then carefully re-machine and polish the edge to restore a perfect seal without causing flashes. This is not a DIY repair.
🔗 Learn More about Blow Molding Technology
Blow Molding – Wikipedia
A comprehensive overview of various blow molding processes, including extrusion, injection, and stretch blow molding.Injection Molding – Wikipedia
Important for understanding the production of preforms used in stretch blow molding.Stretch Blow Molding – Wikipedia
Explains how PET bottles are formed through axial and radial stretching processes.PET Bottle – Wikipedia
Background information on the materials and properties of typical PET bottles.Design of PET Bottles – Wikipedia
An introduction to the design considerations and geometry used in PET bottle manufacturing.
🔗 Related Pages on Our Website
Automatic Blow Molding Machines – iBottler
Discover our full range of customizable automatic PET bottle blow molding machines.Blow Bottle Mold – iBottler
Explore our precision blow molds designed for PET and PP bottles.Preform Mold – iBottler
Learn more about our high-precision preform molds suitable for various injection molding machines.PET Wide Mouth Jar Project Starter Guide: Equipment, Molds & Process Explained
Pros and Cons: Should You Choose PET Blow Moulding for Your Bottle Project?
Worried About Blow Mold Fit? We Have Mounting Dimensions for 80% of Blow Molding Machines Worldwide
Can One Semi‑Automatic Blow Molding Machine Produce All Bottle Sizes? Here’s Why Not
Why Do Krones Blow Molding Machine Users Come to Us for Their Molds?
Why Do PET Preforms Come in Different Colors? Function, Application, and Production Tips
How to Set Parameters for 600ml Bottles on a Semi-Automatic PET Blowing Machine?
From 3D Printed Samples to Production: How Can You Rapidly Validate Blow Mold Designs?
How to Choose the Right Preform Neck Size for Your PET Bottle Project
