Starting with a new machine can feel overwhelming. You have the equipment, but the path from a plastic preform to a perfect bottle seems complex and full of unknowns.
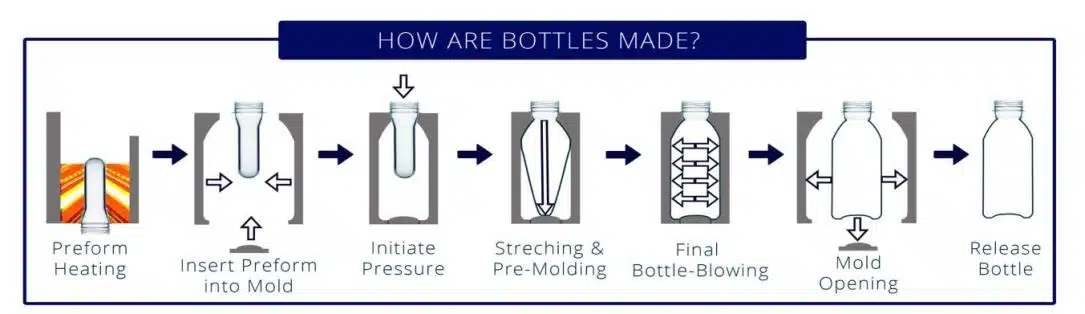
A semi-automatic blow molding machine transforms heated PET preforms into finished bottles through a manually assisted process. The key is to perfectly heat the preform, place it in the mold, and then use a two-stage blowing process with high-pressure air to shape it.
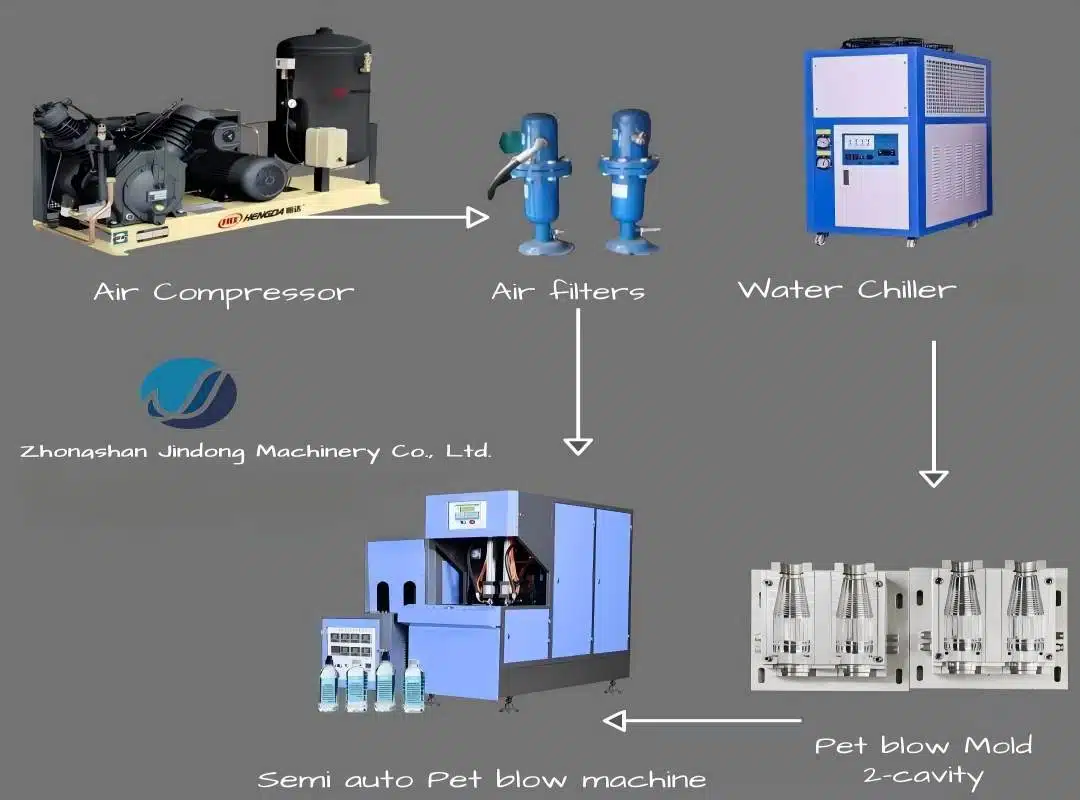
I've been in the PET blow molding industry for 16 years, and I know that semi-automatic machines are the backbone of many small to medium-sized businesses, especially in markets across Southeast Asia. They are a fantastic investment—flexible, affordable, and easy to operate once you know the steps. However, I often see new owners feel stuck. I remember a client in Bangladesh who purchased a complete line from us: a bottle blowing machine, a custom blow mold, an air compressor, and a chiller. Even with installation diagrams, they called me, completely unsure where to begin. That feeling of being lost is real, and I understand it. This guide is my way of walking you through that initial setup, step-by-step, to turn that uncertainty into confidence and start producing quality bottles.
The Core Workflow: From Preform to Final Bottle?
You have a bag of preforms and an empty container for bottles. What happens in between? The process can seem like magic, but it’s a simple, repeatable workflow.
The core workflow of a semi-automatic blow molding machine consists of three clear stages. First, the PET preform is heated in an oven until it's pliable. Second, an operator manually transfers this hot preform into the blow mold. Finally, the machine takes over, stretching and blowing the preform into the final bottle shape.
This workflow is the foundation of everything you'll do with your machine. Understanding this sequence—Heat, Transfer, Blow—is the first step to mastering the operation. Each stage has its own set of variables and techniques, which we will explore in detail. But for now, fixing this simple three-step process in your mind is key. It’s a production line in miniature, where you, the operator, are the crucial link connecting the stages. Getting this flow right ensures consistency, speed, and quality in your bottle production. Let's break down the components that make this workflow possible.
Deconstructing the Journey: A Material's Transformation
The journey from a small, thick-walled preform to a large, thin-walled bottle is a fascinating process of material transformation. It's not just about making it bigger; it's about rearranging the very molecules of the PET plastic to give the final bottle its strength and clarity.
Initial State: The Amorphous Preform
The PET preform you start with is in an "amorphous" state. This means its polymer chains are tangled up randomly, like a bowl of spaghetti. This state makes the preform transparent and relatively brittle. It has not yet been given the properties it needs to function as a durable beverage container.The Heating Stage: Inducing Biaxial Orientation
When you heat the preform, you're not just making it soft. You're giving the polymer chains the energy they need to be reoriented. The goal is "biaxial orientation," which is a fancy term for stretching the plastic in two directions at once.- Axial Stretching (Vertical): The stretch rod that pushes down on the preform creates the primary vertical stretch. This aligns the polymer chains along the length of the bottle.
- Hoop Stretching (Horizontal): The high-pressure air that blows into the preform forces it against the mold walls, creating the horizontal stretch. This aligns polymer chains around the circumference of the bottle.
Final State: The Semi-Crystalline Bottle
This two-way stretching pulls the tangled polymer chains into a more ordered, cross-linked structure. This new structure is called "semi-crystalline." This process, also known as "strain hardening," is what gives a PET bottle its incredible properties:- Strength: It can withstand the pressure of carbonated drinks.
- Clarity: The ordered molecules allow light to pass through clearly.
- Barrier Properties: It's much better at keeping CO2 in and oxygen out.
The table below illustrates this transformation.
| Property | PET Preform (Amorphous) | Finished PET Bottle (Semi-Crystalline) |
|---|---|---|
| Polymer Structure | Random, tangled chains | Ordered, cross-linked chains |
| State | Glassy, brittle | Tough, flexible |
| Strength | Low | High (due to strain hardening) |
| Clarity | Good | Excellent |
| Gas Barrier | Poor | Good |
Understanding this transformation helps you troubleshoot. For example, if a bottle is hazy or brittle, it often means the material didn't achieve proper biaxial orientation, likely due to incorrect heating or stretching parameters. This is a critical concept that separates a button-pusher from a true machine operator.
Understanding Your Machine: Key Components and Their Functions?
Your machine looks complex, with all its pipes, wires, and moving parts. But don't be intimidated. It's really just two main parts and a brain that tells them what to do.
Think of your semi-automatic machine as having three core sections: the preform heater (the oven), the blowing station (where the bottle is made), and the control panel (the brain). The heater prepares the preform, the blowing station forms it, and the control panel coordinates the timing and pressures for the entire process.
Getting to know your machine is like getting to know a new employee. You need to understand what each part is responsible for and how they work together. If something goes wrong, you'll have a much better idea of where to look. Let's take a closer look at each of these key areas so you can operate your machine with confidence and precision.
Dive Deeper: A Detailed Anatomy of the Machine
To truly master your machine, you need to go beyond the basics. Let's break down each main component into its crucial sub-parts. Knowing what each screw, lamp, and valve does will empower you to perform adjustments and maintenance like a pro.
Part 1: The Preform Heater (Oven)
The heater's only job is to get the preform to the perfect, uniform temperature for blowing. Consistency here is non-negotiable for a quality bottle.
- Heating Lamps: These are typically infrared (IR) lamps. They are the heart of the oven. The key is that they are often arranged in different zones. You can adjust the power to each zone to heat the preform body evenly, while keeping the neck thread cool.
- Reflectors: Behind the lamps are polished surfaces that reflect heat onto the preforms, ensuring energy efficiency and even heating. If these are dirty, your heating will be inconsistent and inefficient.
- Preform Holders (Mandrels): These are the spindles that the preforms sit on as they travel through the oven. They must grip the preform securely and rotate it to ensure all sides are heated equally.
- Cooling System for Neck Finish: You'll notice fans or a water-cooling channel near the top of the oven. This is critical. It keeps the preform's neck and thread area cool and rigid. If the neck deforms, it won't seal properly with a cap. When considering your setup, the choice of preform neck size is a foundational decision that impacts this entire process.
- Ventilation Fan: This extracts excess heat from the oven, maintaining a stable operating environment and protecting components.
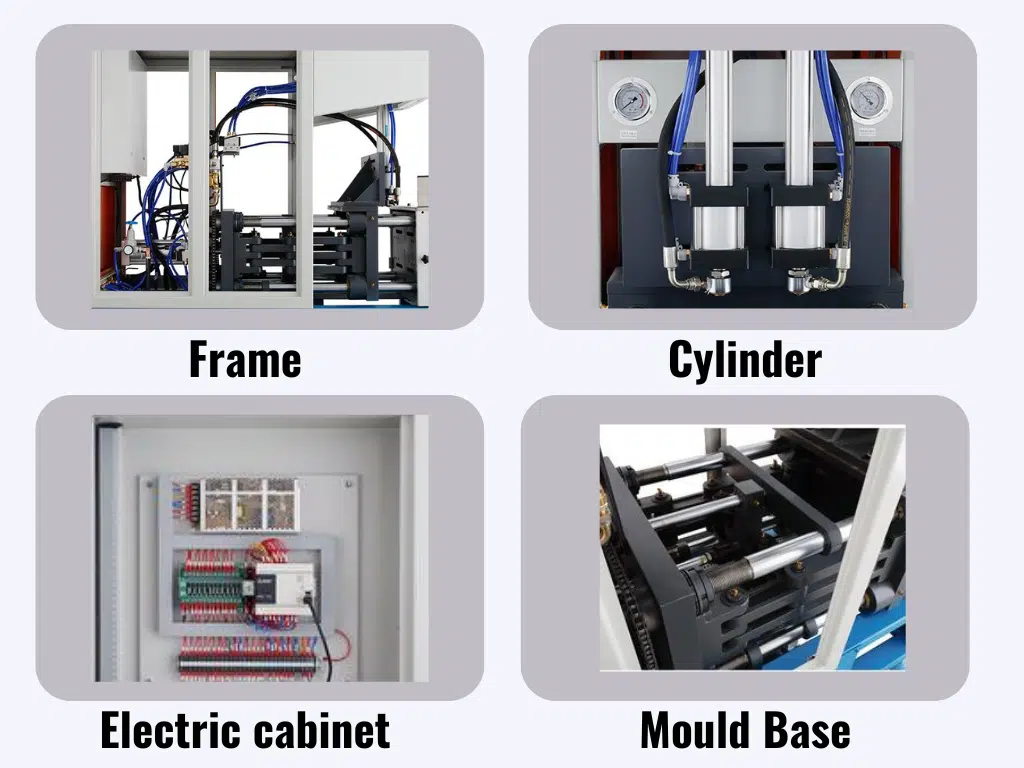
Part 2: The Blowing Station (Clamping Unit)
This is where the action happens. The blowing station is responsible for securely holding the mold, stretching the preform, and injecting the air to form the bottle.
- Clamping Unit: This is the powerful mechanism that opens and closes the two halves of the blow mold. It must be strong enough to resist the high-pressure air during blowing, preventing the mold from flashing (a small leak of plastic at the parting line). A secure clamp is crucial, and you need to ensure your blow bottle mold is mounted correctly and the machine's mounting dimensions are compatible.
- Blow Mold: This is the custom-made tool that defines the final shape of your bottle. It's typically made of aluminum or steel and has cooling channels running through it.
- Stretching Cylinder & Rod: This pneumatic cylinder drives a thin steel rod down into the heated preform, stretching it vertically just before or during the blow phase. The speed and timing of this rod are critical parameters.
- Blowing Nozzles: These seal against the top of the preform neck and deliver the two stages of compressed air: a low-pressure pre-blow and a high-pressure main blow.
- Safety Guards: A transparent, interlocking door that prevents the machine from operating when open. This is your most important safety feature at the blowing station.
Part 3: The Ancillary Systems
These are the support systems that provide the lifeblood to your machine: air and cooling.
- Pneumatic System (Air): This includes the air compressor, filters, regulators, and solenoid valves. It provides the low-pressure air for machine movements (like clamping) and the critical high-pressure air for blowing. A robust air system is essential; you can even learn how to run a whole line with a single high-pressure compressor to improve efficiency.
- Cooling System (Water): PET molding requires the mold to be cool. A chiller circulates cold water through the blow mold to rapidly "set" the plastic bottle after it has been blown. This solidifies the bottle's shape and allows for faster cycle times.
Here is a quick reference table for these components:
| Main Component | Sub-Part | Function | Key Maintenance Tip |
|---|---|---|---|
| Heater | Infrared Lamps | Provide zoned heat to soften the preform body. | Wipe lamps clean daily with a soft cloth. |
| Neck Cooling System | Keeps the neck finish rigid and undeformed. | Ensure fans are running and water channels are clear. | |
| Preform Holders | Rotate preforms for even heating. | Check for wobble or damage. Replace if necessary. | |
| Blowing Station | Clamping Unit | Holds the mold shut against high pressure. | Lubricate moving parts (toggles/pins) weekly. |
| Stretch Rod | Stretches the preform vertically. | Check that the tip is not damaged and the rod is straight. | |
| Blowing Nozzles | Deliver pre-blow and high-pressure air. | Inspect seals for wear or leaks to prevent pressure loss. | |
| Ancillary | Air System | Provides low and high-pressure air. | Drain water from air tanks and filters daily. |
| Cooling System | Cools the mold to set the bottle shape. | Check chiller temperature and water flow regularly. |
Step 1: Preform Heating - The Secret to a Quality Bottle?
Think your bottle's quality is decided when you press the 'blow' button? Wrong. The foundation for a great bottle is laid inside the heater.
The secret to a high-quality, strong, and clear PET bottle lies in achieving perfect, uniform heating of the preform body. The goal is to make the plastic pliable like warm honey, without overheating it, while keeping the neck area cool and rigid. Any inconsistencies here will be magnified in the final product.

I cannot stress this enough: spend most of your setup time getting the heating right. A perfectly heated preform almost blows itself into a good bottle. A poorly heated one will cause endless problems, from thin spots to ugly visual defects. It's a game of patience and observation. Watch how the preforms look as they exit the oven. Are they clear and sagging slightly, or are they hazy and stiff? Let's dive into how to control this crucial first step.
Dive Deeper: Mastering the Art of Zonal Heating
Getting the heat right is more than just setting a single temperature. It's about distributing that heat precisely over the preform's body. This is called zonal heating, and it's what separates amateurs from professionals.
Why Zonal Heating is Crucial
A preform doesn't become a bottle of uniform thickness. Some areas, like the base and shoulders, need to stretch more than the side walls. To control this, you must heat different parts of the preform to different temperatures.
- Heat Zoning: Your heater has multiple lamps stacked vertically. Each lamp or small group of lamps is a "zone." You can typically adjust the power output percentage for each zone from the control panel.
- The Goal: You want to create a specific temperature profile along the preform's length. Areas that need to stretch more (like the section that will become the bottle's base) need more heat to be more pliable. Areas that stretch less can be slightly cooler.
Here's a typical heating strategy for a standard 500ml water bottle:
- Zone 1 (Top, below neck): Lower heat. This area forms the shoulder and doesn't stretch as much. Too much heat here can cause the shoulder to collapse or droop.
- Zone 2 & 3 (Middle): Medium to high heat. This forms the main body or "label panel" of the bottle. It needs good, consistent heat for uniform wall thickness.
- Zone 4 (Above base): Highest heat. This part of the preform has to stretch the most to form the bottom corners and base of the bottle. It needs to be the hottest and most pliable part.
- Zone 5 (Tip): Lower heat. The very tip of the preform contains the injection gate. Overheating this spot can cause it to turn white (crystallize) or become thin and weak in the final bottle.
Setting and Verifying Temperatures
You won't set a direct temperature in Celsius or Fahrenheit. Instead, you'll set a percentage of power for the lamps and a total heating time.
Starting Point for a 500ml, 21g Preform:
- Heating Time: 30-45 seconds (this depends on your machine's oven length)
- Lamp Power (%):
- Zone 1: 50%
- Zone 2: 65%
- Zone 3: 70%
- Zone 4: 75%
- Zone 5: 55%
This is just a starting point. The ideal temperature profile is something you find through experimentation. After the preform exits the oven, let it cool for a moment and then feel it (with gloves!). You should be able to feel a temperature difference between the zones.
Common Heating Problems and How to Fix Them
| Problem | Visual Cue | Likely Cause(s) | Solution(s) |
|---|---|---|---|
| Crystallization | The preform body looks milky or hazy white. | 1. Temperature is too high. 2. Heating time is too long. 3. Preform is held at temperature for too long. | 1. Reduce lamp power in the affected zone. 2. Reduce overall heating time. 3. Speed up transfer from oven to mold. |
| Yellowing | The preform has a yellowish tint. | Temperature is way too high, causing the PET material to degrade. | Immediately lower all lamp power settings and potentially reduce heating time. |
| Cold Spots | Bottle has thick rings or sections. | 1. Uneven heating. 2. Preform is not rotating. 3. A lamp is burned out. | 1. Check if all lamps are working. 2. Verify preform holders are rotating. 3. Adjust zonal heating to add more heat to the cold area. |
| Deformed Neck | The thread area is warped or oval-shaped. | The neck cooling system is insufficient or not working. | 1. Check neck cooling fans/water flow. 2. Ensure the heat shield is properly positioned to protect the neck. |
Mastering preform heating takes practice. Don't be afraid to waste a few preforms to find the perfect settings. A well-heated preform is your best guarantee for a successful production run. When you're ready to expand your production, you may need a new preform mold to create these essential starting components.
Step 2: The Blowing Station - Manual Operation Explained?
You've perfectly heated your preform. Now comes the hands-on part. It’s a fast-paced dance of moving the preform from the oven to the mold before it cools down.
This step requires speed and safety. You will manually take the hot, pliable preform from the heater, quickly place it into the open blow mold, close the safety guard, and press the buttons to initiate the machine's automatic blowing and stretching cycle.
This manual transfer is the "semi-automatic" part of the process. Your speed and consistency here directly impact the final bottle quality and your production rate. A slow transfer means the preform cools too much, leading to defects. A sloppy placement can cause an off-center bottle. Let's walk through the precise movements to make you efficient and safe.
Dive Deeper: The Rhythm of the Operator
The manual operation at the blowing station is a physical skill that you will develop over time. It's all about creating a smooth, repeatable rhythm. A good operator can produce hundreds of bottles per hour with minimal fatigue because they have perfected their movements. Let's break it down into a granular, step-by-step process.
The Step-by-Step Action Sequence
Preparation:
- Put on your gear: Always wear clean, heat-resistant gloves. Safety glasses are also highly recommended.
- Position yourself: Stand comfortably between the heater exit and the blowing station. Your feet should be planted, and you should be able to pivot easily between the two.
The Cycle:
- Retrieve the Preform: As a heated preform arrives at the oven exit, grasp it firmly by its cool neck. Do not touch the hot body. Your movement should be decisive.
- Open the Mold Door: Simultaneously, use your other hand to slide open the safety guard on the blowing station. The blow bottle mold will be open and waiting.
- The Transfer: Pivot your body. Move the preform from the heater to the mold in a smooth, swift arc. The goal is to minimize the time the preform is exposed to the cool ambient air. We're talking 2-3 seconds, max.
- Seat the Preform: Carefully place the preform into the bottom half of the mold. There's a small indentation where the neck ring (the small flange below the threads) sits. You must ensure it is seated perfectly. A poorly seated preform is a primary cause of bottle defects.
- Close the Door: As soon as the preform is seated, release it and immediately slide the safety guard closed with one hand.
- Initiate the Blow Cycle: With both hands now free, press the two "start" buttons on the control panel. Most machines require two-handed operation as a safety feature to ensure your hands are clear of the clamping mechanism.
- The Machine Takes Over: At this point, the machine performs its automatic sequence:
- The mold clamps shut.
- The stretch rod descends.
- The pre-blow and main-blow air is injected.
- The air is exhausted.
- The mold opens.
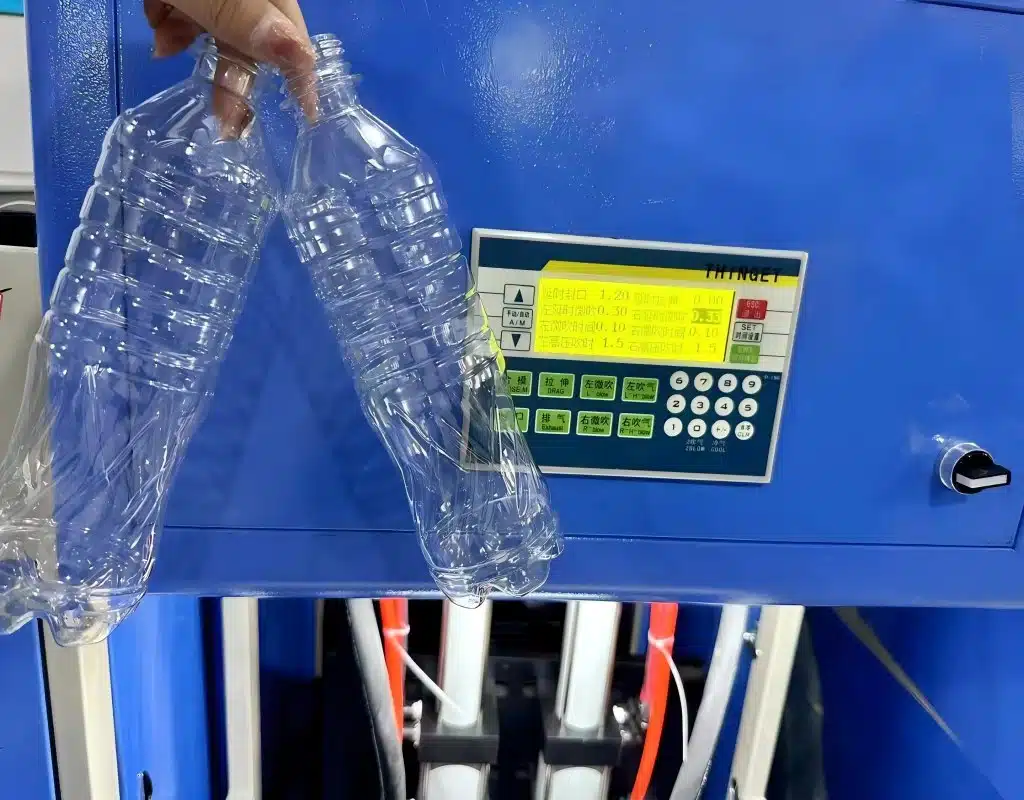
- Eject and Inspect: The finished bottle will now be sitting in the open mold. Remove it and give it a quick visual inspection. Look at the clarity, the base, and the overall shape. Place it in your finished product bin.
- Repeat: The cycle begins again. As you remove the finished bottle, a new heated preform should be arriving at the oven exit.
Efficiency and Ergonomics
An experienced operator makes this look like a single fluid motion.
- Minimize Wasted Movement: Don't take extra steps. Use your body's rotation. Let your hands work in concert. While one hand is placing the preform, the other should be moving to close the guard.
- Develop a Rhythm: The machine's cycle time dictates your pace. Try to match your movements to the machine's timing. You'll soon find a comfortable and efficient rhythm.
- The Importance of a Good Mold: A well-designed mold makes this process easier. If you're struggling to place the preform or eject the bottle, it might be an issue with the PET bottle mold design. A good design considers not just the final bottle shape but also the ease of operation. Sometimes, you might even start with 3D printed samples to validate a design before committing to a final metal mold.
This manual step is what makes semi-automatic machines so flexible. With practice, you'll be able to perform this sequence quickly and accurately, turning out consistent, high-quality bottles every cycle.
Setting Critical Parameters on Your Control Panel?
The control panel is the brain of your operation. It looks intimidating with all its buttons and numbers, but it's just a set of timers and pressure controls.
Setting the right parameters on your control panel is how you tell the machine exactly how to blow the bottle. You'll control the timing of the stretch rod, the pre-blow, the main blow, and the pressure levels. These settings work together with the heat you applied to form the final product.
Don't just copy settings from a manual and hope for the best. Understanding what each parameter does allows you to fine-tune the process and troubleshoot problems effectively. I'll give you a solid starting point that my team often gives to new clients, like the one in Bangladesh, to get them producing their first bottles. From there, you can adjust to perfection.
Dive Deeper: Demystifying the Numbers
The control panel is where you translate your knowledge of the process into concrete instructions for the machine. The settings are typically divided into timing (in seconds) and pressure (in bar or psi). Let's explore the most critical parameters you will adjust.
The Key Parameters and Their Effects
Stretching Delay (or Stretch Rod Start Time): This is the delay, in seconds, from when the mold closes to when the stretch rod begins to move down.
- Effect: A longer delay allows the preform to stabilize inside the mold. A shorter delay starts stretching the plastic sooner. This parameter has a big impact on the material distribution in the bottle's base.
Pre-Blow Time: This is the duration, in seconds, of the initial low-pressure air blast (typically 5-12 bar). This happens while the stretch rod is still moving down.
- Effect: The pre-blow centers the stretching preform in the mold and starts to form the basic shape, preventing the stretch rod from touching the sides. It's crucial for controlling wall thickness. Too little pre-blow time can lead to thin corners at the base. Too much can make the body too wide before it has fully stretched vertically.
High-Pressure Blow Time (Main Blow): This is the duration, in seconds, of the final high-pressure air blast (typically 25-35 bar).
- Effect: This powerful blast forces the plastic to conform to every detail of the mold cavity. The duration needs to be long enough to fully form the bottle and cool it against the mold walls. Too short, and the bottle might be soft or incompletely formed. Too long, and you're just wasting air and cycle time.
Exhaust Time: The duration the machine waits to release the high-pressure air from the bottle before the mold opens.
- Effect: This must be long enough to fully depressurize the bottle. If it's too short, the mold may open under pressure, which is dangerous and can damage the bottle.
A Practical Starting Point: 500ml PET Water Bottle (21g)
I always give my new clients a baseline to start with. This eliminates the guesswork. Here are the typical starting parameters I would provide for a standard 500ml bottle. Remember, your machine and preform may require slight adjustments.
Initial Setup Table for 500ml Bottle
| Parameter | Setting (Seconds) | Pressure (Bar) | Purpose and Effect of Increasing the Value |
|---|---|---|---|
| Stretching Delay | 0.2 s | N/A | Moves material towards the bottle's top. Increases shoulder thickness. |
| Pre-Blow Start Time | 0.3 s | N/A | Starts pre-blow later in the stretch. Good for taller bottles. |
| Pre-Blow Time | 0.4 s | 10 Bar | Increases pre-blow volume. Makes bottle body wider, potentially thinning walls. |
| High-Blow Start Time | 0.7 s | N/A | Delays the final blow. Allows more stretching before locking the shape. |
| High-Blow Time | 1.0 s | 30 Bar | Ensures bottle is fully formed and cooled. Can improve clarity, but too long wastes time. |
| Exhaust Time | 0.5 s | N/A | Ensures complete depressurization before mold opening. Safety-critical. |
The Story of My Bangladeshi Client
When my client in Bangladesh was setting up their machine, they had the heating right, but their bottles were coming out with very thin bottoms and thick shoulders. They were frustrated. We got on a video call, and I had them go to their control panel. Their pre-blow time was too long, and their stretching delay was too short.
I explained it like this: "Right now, you are blowing a balloon in the middle of the bottle before the stretch rod even gets to the bottom. All your plastic is staying at the top."
We made two simple changes based on the table above:
- We increased the stretching delay slightly to let the rod travel further down before any air was introduced.
- We decreased the pre-blow time to prevent the bottle from expanding too early.
The very next bottle was nearly perfect. This is a powerful example of how knowing what just two numbers on the control panel do can solve a major production problem. Don't be afraid to change one parameter at a time, in small increments (e.g., 0.1 seconds), and observe the result. This methodical approach is the key to fine-tuning your process.
Common Problems & Easy Troubleshooting for Beginners?
You've followed the steps, but your bottles aren't perfect. Maybe the bottom is hazy, or one side is thinner than the other. Don't worry, every operator faces these issues.
Every problem you see in a finished bottle is a symptom of an issue in the heating or blowing process. The key is to learn how to read the bottle. The defect itself tells you what you need to adjust, whether it's a temperature setting, a timer, or a pressure level.
Troubleshooting can feel like being a detective. You have clues (the bottle defects), and you have suspects (the machine settings). I've spent years helping clients solve these exact problems over the phone. Let's go through the most common issues and their straightforward solutions. For a more exhaustive list, our guide on common PET blow molding defects is an excellent resource.
Dive Deeper: Your First-Aid Chart for Bottle Defects
When you're starting out, problems will happen. The goal is not to avoid them entirely, but to be able to identify and fix them quickly. Below is a detailed troubleshooting chart that covers the most frequent issues new operators encounter. Remember the core principle: Change one thing at a time.
Troubleshooting Table: From Defect to Solution
| Defect Description | Photo Cue | Likely Cause(s) | Step-by-Step Solutions (Try in this order) |
|---|---|---|---|
| Off-Center Gate | The small dot on the bottom of the bottle is not in the center. | 1. Stretch rod is misaligned. 2. Preform was not seated correctly in the mold. 3. Pre-blow pressure is too low or too late. | 1. Re-check your manual preform placement. Ensure it's perfectly seated every time. 2. Increase Pre-Blow Pressure: Go up by 1 bar. 3. Decrease Pre-Blow Start Time: Try starting it 0.1s earlier. 4. Mechanical Check: Power down and check if the stretch rod is perfectly centered over the mold cavity. |
| Pearlescence / Haziness | The bottle has a pearly or hazy appearance, often at the base. | The PET was over-stretched or stretched while it was too cold. The material structure is fractured instead of oriented. | 1. Increase Heat: Add 5% more power to the lamp zone heating the affected area (usually the bottom zones). 2. Slow the Stretch Rod: If your machine allows, slightly decrease the stretch rod speed. 3. Increase Stretch Delay: Delay the stretch rod by 0.1-0.2s to let the preform 'soak' in heat. |
| Thin Walls / Sections | You can easily press in one side of the bottle, or a section feels much thinner than the rest. | The plastic has stretched too much in that area. This is a material distribution problem. | 1. Heating Issue: The thin area was too hot. Decrease the lamp power in the corresponding zone. 2. Thick Area Issue: The opposite is also true. The thick area was too cold. Increase lamp power in the zone corresponding to the thick section to encourage it to stretch more. |
| Collapsed or Droopy Shoulders | The shoulder area below the neck is sunken or deformed. | The top of the preform body (just below the neck) is too hot. | 1. Reduce Top Zone Heat: Significantly lower the power percentage for the top-most heating lamp (Zone 1). 2. Check Neck Cooling: Ensure the cooling fan for the neck area is working effectively. |
| Flashing on Seams | A thin, sharp line of excess plastic is present on the side or bottom parting lines of the bottle. | The mold did not close completely, or the blowing pressure is too high for the clamping force. | 1. Check for Debris: Open the mold and carefully clean the parting surfaces. Even a tiny piece of plastic can prevent a seal. 2. Reduce Blowing Pressure: Lower the high-blow pressure by 2-3 bar. 3. Check Clamping Force: Ensure your machine's clamping pressure is set correctly (if adjustable). |
| Incompletely Formed Details | Corners are too rounded, or embossed logos are not sharp. | The plastic didn't have enough pressure or time to push into the small details of the mold. | 1. Increase High-Blow Pressure: Go up by 2-3 bar. 2. Increase High-Blow Time: Add 0.2-0.3 seconds to the high-blow duration to give it more time to pack out. 3. Ensure Mold is Cool: Check that your chiller is running at the correct temperature. A warm mold won't set the details properly. |
This table should be your go-to guide. Print it out and keep it by your machine. When a problem occurs, find it on the chart and methodically try the solutions. This systematic approach will build your skills and confidence, turning frustration into a valuable learning experience.
Safety First: Essential Precautions for Every Operator?
A blow molding machine is a powerful piece of industrial equipment. It uses high pressures, high temperatures, and fast-moving parts. Your safety is more important than any bottle.
Before you even turn on the machine, you must understand the risks and respect the equipment. Following basic safety protocols every single time you operate the machine is non-negotiable. This protects you, your colleagues, and your investment in the machinery.
I have seen operators become complacent after months or years on the job, and that is when accidents happen. Whether it's your first day or your thousandth, the safety rules are the same. Let's build good habits from the very beginning. These precautions are simple, but they are critical.
Dive Deeper: A Culture of Safety
Safety isn't just a list of rules; it's a mindset. It's about being aware of your surroundings and understanding the potential energy in the machine. A safe operator is a productive operator. Let's create a detailed safety checklist that should become second nature.
Pre-Operation Safety Checklist
Before you start your shift, take two minutes to walk through this checklist. This simple habit can prevent the vast majority of accidents.
| Check Area | Item to Verify | Why It's Important |
|---|---|---|
| Personal Protective Equipment (PPE) | Are you wearing your safety glasses? | Protects your eyes from flying debris or high-pressure air leaks. |
| Are you wearing your heat-resistant gloves? | The heater and hot preforms can cause serious burns instantly. | |
| Are you wearing closed-toe shoes? | Protects your feet from dropped tools or parts. | |
| Is loose clothing secured and long hair tied back? | Prevents getting caught in any moving parts of the machine. | |
| Machine Guards & Sensors | Is the blowing station safety guard in place and moving freely? | This is your primary protection from the clamping mechanism. |
| Does the machine stop immediately if you open the guard during a cycle? (Test this with care) | The interlock sensor is a critical safety feature. If it fails, the machine must be stopped and repaired. | |
| Emergency Stops | Do you know where all the red Emergency Stop (E-Stop) buttons are? | In an emergency, your first instinct must be to hit the nearest E-Stop, which shuts down all machine functions. |
| Are the E-Stop buttons unobstructed and easily accessible? | You shouldn't have to reach over or around things to access them. | |
| Work Area | Is the floor around the machine clean, dry, and free of clutter? | Prevents slips, trips, and falls, which are common workplace accidents. |
| Are tools and materials stored in their proper places? | A tidy workspace is a safe workspace. | |
| Energy Sources | Are high-pressure air lines free from visible damage or kinks? | A ruptured high-pressure line is extremely dangerous. |
| Are electrical panels closed and wires free from damage? | Prevents electrical shock hazards. |
Understanding the Specific Dangers
- High-Pressure Air: The air used for blowing (up to 40 bar / 580 psi) is powerful enough to cause serious injury. Never treat air lines lightly. Before performing maintenance, always follow the lock-out/tag-out procedure to completely de-pressurize the system.
- Clamping Force: The clamping unit generates tons of force to hold the mold shut. Never, ever place your hands or any object inside the clamping area while the machine is powered on. Your only interaction with the mold should be when the safety guard is open and the machine is in a safe, stopped state.
- Hot Surfaces: The oven, the lamps inside it, and the preforms coming out of it are all extremely hot (over 100°C / 212°F). Burns are a common but easily preventable injury. Always wear your gloves and be mindful of where you place your hands.
I tell every one of my clients that their most important job is to go home safely at the end of the day. The machine can be repaired, and bottles can be remade, but you cannot be replaced. Treat these safety rules with the seriousness they deserve.
Daily Maintenance Checklist for Optimal Performance?
You wouldn't drive your car for years without changing the oil. Your blow molding machine is the same. A little bit of daily care keeps it running smoothly and prevents big, expensive problems down the road.
Regular maintenance is the key to longevity and consistent performance. A simple daily and weekly checklist ensures that your machine stays in peak condition. This isn't a job for a technician; it's a simple routine for the operator to protect their equipment.
Taking just 10-15 minutes at the start or end of each day for basic upkeep can save you hours of downtime and thousands of dollars in repairs. It also helps you spot small issues before they become major failures. Let's create an actionable checklist you can start using today.
Dive Deeper: Your Proactive Maintenance Schedule
Maintenance can be broken down into simple tasks based on frequency. By creating a schedule, you ensure nothing gets missed. This proactive approach is far better than reacting to a breakdown. Here is a comprehensive schedule you can adapt for your specific machine.
Daily Checklist (Performed at the Start or End of Every Shift)
| Task | Area | Instructions | Tools Needed |
|---|---|---|---|
| Clean Heater Reflectors & Lamps | Heater | With the machine cool, wipe down the interior reflectors and the exterior of the quartz lamps. | Soft, lint-free cloth. A little isopropyl alcohol can help with stubborn residue. |
| Drain Air Filters & Tank | Air System | Locate the petcock valves on the bottom of your air filter bowls and main air tank. Open them briefly to release any condensed water. | Rag to catch water. |
| Visual Inspection of Air Lines | Air System | Look at all visible air hoses. Check for cracks, abrasion, or bulging. Listen for the hiss of any leaks. | Your eyes and ears. |
| Wipe Down Mold Surfaces | Blowing Station | With the mold open, wipe the interior cavity and parting line surfaces clean. | Clean, soft cloth. |
| General Machine Cleaning | Entire Machine | Wipe down the exterior surfaces and clean up any plastic bits or oil from the surrounding area. | Rags, broom, dustpan. |
Weekly Checklist (Performed Once a Week, e.g., Friday Afternoon)
| Task | Area | Instructions | Tools Needed |
|---|---|---|---|
| Check Lubrication Points | Clamping Unit | Look for grease fittings (zerks) on the moving joints of the clamping mechanism (like toggle pins). Apply grease as needed. | Grease gun with appropriate grease type. |
| Check Stretch Rod | Blowing Station | Inspect the stretch rod for any bends or damage to the tip. Ensure it moves smoothly. | Your eyes. |
| Verify Safety Interlocks | Safety Systems | Carefully test the function of the safety guard interlock switch to ensure it stops the machine reliably. | N/A |
| Check Chiller Water Level & Temp | Cooling System | Verify the water/glycol level in your chiller's reservoir and confirm it's holding the set temperature. | Your eyes. |
| Inspect Preform Holders | Heater | Check that the preform holders (mandrels) are all secure and rotate freely as the chain moves. | Your hands (with machine off). |
Monthly Checklist (More In-Depth Checks)
| Task | Area | Instructions | Tools Needed |
|---|---|---|---|
| Check for Air Leaks Thoroughly | Air System | With the system pressurized and the machine quiet, use a soapy water solution to spray on fittings and connections. Look for bubbles. | Spray bottle with soapy water. |
| Inspect Electrical Connections | Control Cabinet | (Qualified personnel only) Open the control panel and visually inspect for any loose wires or signs of overheating. | Your eyes. |
| Clean Heater Ventilation Fans | Heater | The fans that cool the oven and neck area can accumulate dust. Wipe the blades and guards clean for optimal airflow. | Rags, brush. |
This checklist is a living document. You might find your specific bottle blowing machine has unique needs. The goal is to make maintenance a routine, not an afterthought. A well-maintained machine is a reliable machine. It will produce better quality bottles, run more efficiently, and serve your business for many years to come.
Conclusion
Operating a semi-automatic blow molding machine is a skill you build with practice. By understanding the core workflow, your machine's components, and key parameters, you can confidently turn preforms into quality bottles.
Frequently Asked Questions (FAQ)
1. Why are my bottles coming out hazy or white, especially at the bottom?
This is almost always a temperature issue called crystallization or pearlescence. It means the PET material was either too cold when it was stretched, or it was stretched too quickly. The solution is to increase the heat in the specific oven zone that corresponds to the hazy area of the bottle. For the base, this is usually the lowest heating zones. Try increasing the lamp power by 5-10% in that area. If that doesn't work, slightly increasing the overall heating time or delaying the stretch rod start time can also help.
2. What is the difference between pre-blow and high-pressure blow? Why do I need both?
They serve two very different purposes.
- Pre-Blow: This is a short burst of low-pressure air (5-12 bar) that happens while the stretch rod is pushing the preform down. Its job is to gently inflate the preform, centering it in the mold and preventing the hot plastic from touching the stretch rod. It defines the basic material distribution before the final shape is locked in.
- High-Pressure Blow: This is a longer blast of high-pressure air (25-35 bar) that slams the pre-blown plastic against the cold mold walls. This is what forms the final, detailed shape of the bottle and rapidly cools the plastic to make it rigid.
You need both for proper material control. Without pre-blow, you'd likely get off-center, uneven bottles. Without high-pressure blow, you wouldn't get the sharp details or strength required.
3. How often should I clean the blow mold, and what's the best way to do it?
You should wipe the mold's internal surfaces with a clean, soft, lint-free cloth at the beginning of every shift. This prevents dust or small plastic particles from causing defects on your bottles. For a deeper clean, especially if you notice residue building up, use a soft cloth with a mild solvent approved for aluminum or steel, like isopropyl alcohol. Never use abrasive pads, screwdrivers, or harsh chemicals, as this will permanently damage the polished surface of the mold cavity. A pristine mold surface is critical for a glossy bottle finish.
4. My machine came with a chiller. Do I really need to use it?
Absolutely, yes. The chiller is not an optional accessory; it is essential for quality and productivity. The chiller circulates cold water through channels inside your blow bottle mold. This does two critical things:
- Sets the Bottle Shape: It rapidly cools the hot, blown plastic, "freezing" the oriented molecules in place. This makes the bottle strong and clear. Without a chiller, the bottle would be soft, shrink after molding, and have poor quality.
- Increases Production Speed: By cooling the bottle quickly, you can reduce your cycle time and eject the bottle sooner, allowing you to make more bottles per hour. Running without a chiller will lead to poor quality and slow production.
5. I have a mold from a different machine supplier. How do I know if it will fit my new machine?
This is a very common and important question. Molds are not universally interchangeable. The fit depends on several critical dimensions: the mold's overall size (length, width, height), the platen mounting pattern (the location and size of the bolt holes), and the location of the neck relative to the mold center. Before buying a machine or mold, you must confirm these dimensions. As an expert in this field, we've compiled data on the mounting dimensions for a vast number of machines worldwide. If you're ever worried about compatibility, you can check resources like our guide on ensuring blow mold fit, or simply send the technical drawings of your mold to your machine supplier (or vice versa) for confirmation. This simple check can save you from a very costly mistake.
🔗 Related Pages on Our Website
Semi-Automatic Blow Molding Machines – iBottler
Ideal solutions for startups and small-scale PET bottle production.Blow Bottle Mold – iBottler
Explore our precision blow molds designed for PET and PP bottles.Preform Mold – iBottler
Learn more about our high-precision preform molds suitable for various injection molding machines.PET Wide Mouth Jar Project Starter Guide: Equipment, Molds & Process Explained
Worried About Blow Mold Fit? We Have Mounting Dimensions for 80% of Blow Molding Machines Worldwide
Can One Semi‑Automatic Blow Molding Machine Produce All Bottle Sizes? Here’s Why Not
Why Do Krones Blow Molding Machine Users Come to Us for Their Molds?
Why Do PET Preforms Come in Different Colors? Function, Application, and Production Tips
How to Set Parameters for 600ml Bottles on a Semi-Automatic PET Blowing Machine?
From 3D Printed Samples to Production: How Can You Rapidly Validate Blow Mold Designs?
How to Choose the Right Preform Neck Size for Your PET Bottle Project
