Your current machine produces 3025 water bottles perfectly, but the market is shifting. You see an opportunity in juices and drinks that require a wider 38mm mouth, but a new machine is a huge investment.
The answer is yes, you can upgrade your existing 3025 machine to produce 38mm bottles. This technical conversion involves replacing key components like grippers, preform holders, and the sealing unit, and recalibrating the heating and pneumatic systems to handle the larger, heavier preform.
This upgrade seems complex, but it's a path many have taken to adapt and grow. I recently worked with a client in Ethiopia who faced this exact problem. His budget was tight due to the tough economic climate, and buying a new machine was out of the question. He wanted to shift from water bottles to a new line of 38mm juice bottles. I helped him through this process, and his success story is proof that this upgrade is not only possible but also a smart business move. This guide is your complete technical checklist, walking you through every challenge and every step, just as I did for him.
Feasibility Analysis: Is Upgrading from a 3025 to a 38mm Neck Really Possible?
You're looking at your reliable 3025 machine and a new 38mm bottle design. The question is big: can this old workhorse learn a new trick? You worry it’s too complex or expensive.
Yes, a 3025 to 38mm neck upgrade is technically feasible. It requires a systematic replacement of format-dependent parts beyond just the blow mold. The core challenge is adapting the machine's mechanics and process parameters to accommodate a significantly larger and heavier preform.
This isn't just a simple swap. It’s a re-engineering project on a smaller scale. Think of it like tuning a car engine. You can't just put in a bigger turbo and expect it to work; you also need to upgrade the fuel injectors, the exhaust, and the engine control unit (ECU) map. Similarly, moving from a 3025 preform to a 38mm one introduces fundamental changes that ripple through the entire machine. My client in Ethiopia initially thought it might just be a new blow bottle mold. I had to walk him through the entire chain of events, from the moment the preform is picked up to the moment the final bottle is ejected.
Understanding the Core Challenge: Preform Differences
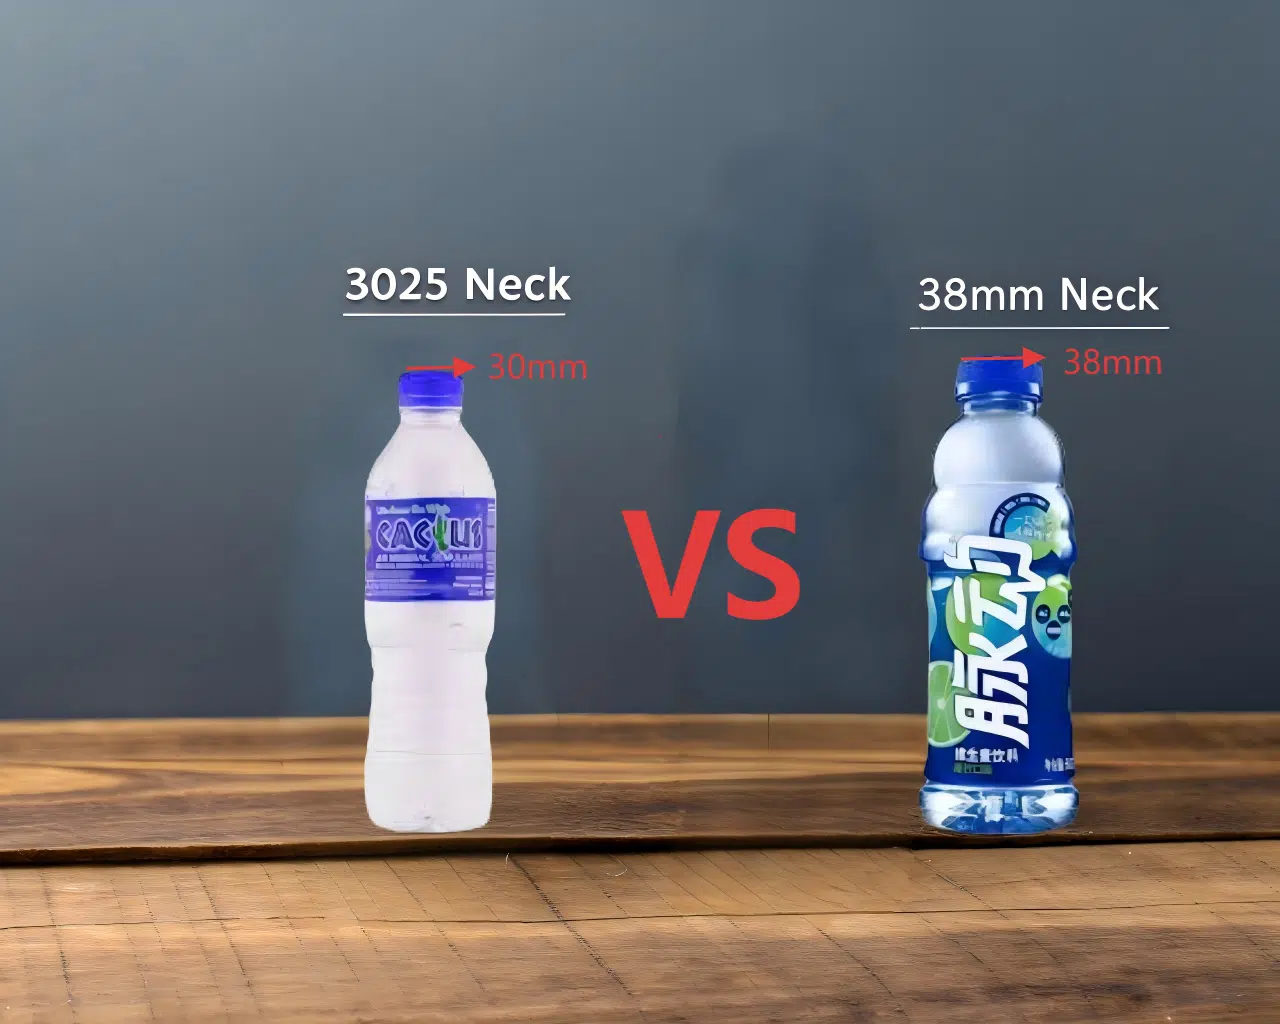
The heart of the issue lies in the preform itself. A 38mm preform is not just a 3025 preform with a wider opening. It is different in almost every critical dimension.
- Neck Finish: This is the obvious change. The entire geometry of the neck, including the thread, support ring, and outer diameter, is larger.
- Weight and Mass: To form a larger bottle, the 38mm preform is heavier. It contains more PET material. This added mass requires more energy to heat to the correct temperature.
- Body Diameter and Length: The body of the preform is often wider and sometimes longer to provide enough material for the final bottle shape without over-stretching.
Let's look at a typical comparison.
| Feature | Typical 3025 Preform (for 500ml) | Typical 38mm Preform (for 500ml) | Technical Implication of Change |
|---|---|---|---|
| Neck Diameter | 30mm | 38mm | Requires new grippers, holders, and sealing unit. |
| Typical Weight | 13g - 18g | 22g - 28g | Needs more heating energy and longer cooling time. |
| Support Ring Dia. | ~34mm | ~42mm | Preform holders on the heating chain must be replaced. |
| Body Diameter | ~21mm | ~25mm | Heating oven reflectors may need adjustment for even heat. |
This table clearly shows that we are dealing with a different class of component. The machine was originally designed and timed based on the physical properties of the smaller 3025 preform. Every station—handling, heating, blowing, sealing, and ejecting—is calibrated for that specific size and weight. When my Ethiopian client saw this breakdown, he understood why we needed a comprehensive upgrade kit and not just a mold. Understanding how to choose the right preform neck size from the start is crucial, but adapting later is entirely possible with the right plan.
Machine-Level Considerations
Beyond the preform, you must assess your base bottle blowing machine. Is the chassis, or the main frame and its components, robust enough for this change?
- Platen Size: The platens are the large plates that hold the two halves of the blow mold. You must ensure the external dimensions of the new, wider 38mm mold can physically fit within the machine's platen area and between the tie bars.
- Clamping Force: A larger bottle often has a larger surface area, which can require more clamping force to keep the mold shut against the high-pressure blowing air. You need to verify that your machine's stated clamping tonnage is sufficient for the new application.
- Controller & Software: The machine's PLC (Programmable Logic Controller) stores all the recipes and process parameters. While usually flexible, you need to ensure it can store a new set of parameters for the 38mm bottle without any issues. The new process will have different heating profiles, blowing times, and delays.
This feasibility check is the most important step. It's about gathering data and making an informed decision. For my client, we spent a full day reviewing his machine's technical manuals and taking measurements before ordering a single part. This diligence saved us from costly surprises later. It’s a process of de-risking the investment and ensuring the upgrade will deliver the desired performance.
Technical Challenge #1: The Preform Handling and Heating System?
Your machine expertly handles small preforms, but a larger 38mm preform is coming. Will the existing system drop it, or fail to heat it properly, causing massive production waste?
Yes, the original preform handling and heating system is a major bottleneck. The 3025 grippers, holders, and heating setup are too small and must be replaced and reconfigured to securely transport and evenly heat the larger 38mm preform.

The journey of a PET preform from the hopper to the blow mold is a precise and fast-paced ballet of moving parts. For a successful upgrade, this entire choreography must be re-written for a new, larger dancer—the 38mm preform. If the handling is unstable or the heating is uneven, you will face a cascade of problems, from simple production jams to severe common PET blow molding defects like pearlescence or uneven wall thickness. Let's break down this first major technical hurdle into its three key components.
Component 1: Grippers (The Mechanical Hands)
The journey begins when a mechanical gripper picks a preform from the infeed rail and places it onto the heating chain.
- The Problem: The grippers designed for a 3025 neck have a specific curvature and clamping surface area. They are simply too small to get a secure, stable hold on the 3gmm preform's larger neck finish. Using the old grippers would be like trying to pick up a basketball with small salad tongs. The preform would likely be unstable, misaligned, or dropped during the high-speed transfer. This leads to machine stoppages and potential damage.
- The Solution: This is a non-negotiable replacement. You must install a new set of grippers specifically machined for the 38mm neck profile. These new parts will have a wider opening and a correctly shaped contact surface to grip the preform just below the support ring, ensuring it remains perfectly vertical and stable as it's placed into the preform holder. During my client's upgrade, this was one of the first parts we identified. The new grippers ensured that the first step of the process was as reliable as the last.
Component 2: Preform Holders (The Transport Seats)
Once gripped, the preform is placed into a preform holder (also called a spindle or mandrel) on the heating oven chain. This holder carries the preform through the heating oven.
- The Problem: The preform holder's primary job is to support the preform by its support ring, allowing it to rotate as it passes in front of the heating lamps. The holder for a 3025 preform has a diameter designed to match the ~34mm support ring of a 3025 preform. A 38mm preform, with its ~42mm support ring, will not sit properly on the old holder. It will be unstable, potentially tilted, and will not be at the correct distance from the heating lamps.
- The Solution: The entire set of preform holders on the heating chain must be replaced with new ones designed for the 38mm preform's support ring. This ensures that every preform is held securely, at the correct height, and rotates smoothly through the oven. This guarantees that the heating process starts with a correctly positioned preform, which is essential for the next step.
Component 3: The Heating Heads / Oven (The Tanning Salon)
This is where the magic of blow molding begins. The preform travels through an oven with multiple zones of infrared lamps to soften the PET plastic to the ideal temperature for stretching and blowing.
- The Problem: A 38mm preform isn't just wider at the neck; its body is usually wider as well. The heating oven in a 3025 machine is configured to focus infrared energy very precisely onto the narrower body of a 3025 preform. If you pass a wider 38mm preform through this same setup, the heating will be uneven. The areas of the preform body closest to the lamps will get too hot, while the sides might remain too cold. This temperature differential is a recipe for disaster in the blowing stage.
- The Solution: This requires careful adjustment, and sometimes, modification.
- Lamp Positioning: The vertical and horizontal positions of the heating lamps may need to be adjusted to create a larger, more uniform heating zone.
- Reflector Adjustment: Behind each lamp is a reflector that directs the energy. These reflectors often need to be angled differently or even modified to ensure the infrared waves are distributed evenly across the entire surface of the wider preform.
- Ventilation: A heavier preform retains more heat. The ventilation and cooling systems around the oven, especially the fans that cool the preform necks, may need to be adjusted to prevent the neck area from overheating and deforming.
For the Ethiopian project, we spent several hours tuning the oven. We used an infrared pyrometer to measure the preform's surface temperature as it exited the oven, making small adjustments to the lamp power percentages and positions until we achieved a consistent and even heat profile. This meticulous work on the handling and heating system laid the foundation for a smooth and successful blowing process.
Technical Challenge #2: The Blowing and Sealing Station?
You've successfully heated the new preform. But can the old blowing station seal the massive 38mm opening and stretch the material correctly? A poor seal means wasted air and failed bottles.
No, the blowing and sealing station is not plug-and-play. The sealing unit is the most critical component that must be upgraded to create a perfect airtight seal on the 38mm mouth. Stretch rod parameters and mold fit must also be verified.

After the preform is perfectly heated, it is transferred to the blow mold. This is where the transformation from a small tube into a full-sized bottle happens in a fraction of a second. This station is the heart of the bottle blowing machine, and for a successful neck size conversion, its key components must be carefully evaluated and, in most cases, replaced. The forces and dimensions involved here are critical; any mismatch will result in immediate failure.
Component 1: Sealing Cylinders (The Airtight Gate)
Before high-pressure air is injected, a sealing unit presses down on top of the preform's neck finish, creating an airtight seal. This prevents the valuable high-pressure air from escaping.
- The Problem: This is often the most significant mechanical challenge in a 3025-to-38mm upgrade. The sealing cylinder designed for a 3025 neck has a sealing head with a diameter just over 30mm. It simply does not have enough surface area to cover and seal the wider 38mm opening. Attempting to use the old unit would result in a massive air leak. The machine would be unable to build enough pressure inside the preform to form the bottle correctly, leading to incompletely formed bottles and a huge waste of compressed air.
- The Solution: You must replace the entire sealing unit, or at the very least, the sealing cylinder and head assembly. The new unit must be engineered with a larger diameter to perfectly match the 38mm preform's top surface. It's not just about diameter; the pneumatic cylinder that provides the downward force may also need to be more powerful to ensure a tight seal against the blowing pressure. When I prepared the parts list for my client, the 38mm sealing unit was the most crucial and specialized component. Its proper installation is the key to an efficient blowing process. A failure here is a failure of the entire system. This is a critical factor when considering if your blow mold will fit your machine.
Component 2: Stretch Rods (The Internal Shaper)
Simultaneously with the sealing, a thin steel stretch rod descends into the preform, stretching it vertically downwards towards the bottom of the mold. This axial stretching is what gives the PET bottle its vertical strength.
- The Problem: The dimensions of the new bottle might require different stretching parameters.
- Length: If the new 38mm bottle design is taller or has a different base shape than the old 3025 bottle, the stroke length of the stretch rod may need to be adjusted. If the rod doesn't travel far enough, the bottle's base will be too thick. If it travels too far, it could puncture the preform.
- Diameter: While less common for a simple neck change, a radical change in bottle volume or shape might benefit from a stretch rod with a different tip design or diameter to optimize material distribution.
- The Solution: In many cases, the existing stretch rod mechanism is adjustable. The upgrade process involves a technician carefully setting the new stroke length in the machine's control panel or via mechanical stops. For my client's juice bottle, we had to slightly shorten the stroke compared to his water bottle to get the perfect base formation. We fine-tuned this during the trial production phase, making millimeter-level adjustments until the material distribution was perfect.
Component 3: The Mold Clamping Unit (The Power Press)
The clamping unit is the powerful hydraulic or pneumatic system that holds the two halves of the aluminum blow bottle mold tightly closed during the high-pressure blowing phase.
- The Problem: The clamping unit itself usually doesn't need to be changed. Its force is a fixed specification of your machine. However, the problem is one of physical space. A mold for a wider 38mm bottle is often physically wider than a mold for a 3025 bottle, even if the bottle volume is the same. This is because more metal is needed around the larger neck cavity.
- The Solution: This is a crucial step in the design phase of the new mold. Before manufacturing the mold, you must provide the mold maker with the exact platen dimensions of your machine: the distance between the tie bars (horizontal and vertical) and the maximum mold thickness the machine can accommodate. The new 38mm mold must be engineered to fit within these constraints. If the mold is too big, it simply won't fit into the machine, and the entire project comes to a halt. We triple-checked these dimensions before we started manufacturing my client’s new mold.
Technical Challenge #3: The Pneumatic System and Air Supply?
You've adapted the machine's mechanics. But a bigger bottle needs more air. Will your existing compressor be able to keep up, or will your production speed grind to a halt?
Your air supply is a critical point of failure. A larger 38mm bottle requires a significantly larger volume of high-pressure air. You must re-evaluate your air compressor's capacity to avoid a production bottleneck.
Blow molding is fundamentally about using compressed air to shape plastic. It's easy to overlook this "utility" aspect of the process, but the pneumatic system is just as important as the mechanical hardware on the machine itself. Converting to a larger bottle is like swapping a small engine for a big V8 in a car; you also need a bigger gas tank and fuel pump. In our case, the "fuel" is high-pressure compressed air, and the demand is about to go up.
The Core Issue: Increased Air Consumption
The physics are simple: a larger volume requires more air to fill it to the same pressure. Even if your new 38mm bottle has the same volume as your old 3025 bottle (e.g., 500ml), the process of forming the larger bottle often requires more air.
- Higher Preform Volume: The internal volume of the thicker, heavier 38mm preform is larger.
- "Wasted" Air: More air is typically consumed to rapidly stretch and form the bottle against the mold walls. The total volume of air used per cycle will increase.
This increased demand has a direct impact on your entire compressed air infrastructure. My client in Ethiopia was running his operation with an air compressor that was perfectly sized for his 2-cavity machine producing 3025 water bottles. When we planned the upgrade, the first thing I asked for was the specification sheet for his compressor. We had to do the math to see if it could handle the new load.
Evaluating Your Air Compressor Capacity
The output of an air compressor is measured in Liters per minute (L/min) or Cubic Feet per Minute (CFM) at a specific pressure (PSI or Bar). You must determine if your current compressor's output is sufficient for the new, higher demand.
Here’s a simplified comparison of air demand:
| Machine Configuration | Bottle Type | Est. High-Pressure Air (40 bar) Consumption | Potential Impact on Compressor |
|---|---|---|---|
| 2-Cavity Blower | 500ml, 3025 Neck, 13g | ~1.2 m³/min (1200 L/min) | Compressor runs at its designed capacity. |
| 2-Cavity Blower | 500ml, 38mm Neck, 24g | ~1.8 m³/min (1800 L/min) | 50% Increase! The compressor may run constantly and fail to keep up. |
How to Check:
- Consult the Manual: Your bottle blowing machine manual should provide an estimated air consumption figure for different bottle sizes.
- Consult Your Supplier: A knowledgeable supplier can provide a very accurate estimate of the new air consumption based on your new 38mm bottle design.
- Check the Compressor Plate: Look at the metal plate on your compressor. It will state its maximum output (L/min or CFM) and pressure.
The Consequence of an Undersized Compressor: If your compressor cannot supply the required volume of air, the pressure in the storage tank will drop. When the pressure falls below the minimum required for blowing, the machine will either produce malformed bottles or pause until the pressure recovers. The result is the same: a drastic reduction in your production speed (BPH - Bottles Per Hour). You might have a machine capable of 3000 BPH, but an undersized compressor could throttle it down to 1500 BPH, completely defeating the purpose of the upgrade. Luckily for my client, his compressor had about 25% spare capacity, which was just enough to run the new 38mm bottles, albeit at a slightly lower cycle speed than the theoretical maximum. For many, a compressor upgrade is a necessary part of the project, something we discuss in our guide on cost-efficient air systems.
Air Recovery System and Other Considerations
- Air Recovery: Many modern machines are equipped with a high-pressure air recovery system. This system captures some of the high-pressure air at the end of the blowing cycle and recycles it for use in the machine's low-pressure pneumatic actuators. After an upgrade, the parameters of this system may need to be retuned. The timing and valve settings might need adjustment to optimize the recovery efficiency with the new, larger air volume.
- Piping and Tanks: Ensure the air pipes running from the compressor to the machine are large enough to handle the increased flow rate without a significant pressure drop. An air storage tank that is too small can also cause pressure fluctuations.
The pneumatic system is the lifeblood of your operation. A thorough evaluation before the upgrade is critical to ensure that your newly modified machine isn't left gasping for air.
Technical Challenge #4: The Bottle Mold, Is It More Than Just a New Cavity?
You know you need a new mold. But is it just about getting the shape right? If the design is wrong, it won't fit, won't cool properly, and won't work with your machine, wasting thousands of dollars.
A new 38mm blow bottle mold is far more than a new cavity. It's a custom-engineered tool where cooling channel design, material choice, and compatibility with your machine's specific platen size and clamping force are critical for success.

The blow mold is the most visible part of the upgrade. It's the component that physically shapes your final product. However, its performance and longevity depend on sophisticated design principles that go far beyond just milling out the bottle's shape. When I worked with my Ethiopian client, we spent a significant amount of our planning phase on the mold design. A well-designed mold runs efficiently for millions of cycles; a poorly designed one is a constant source of problems. Following a detailed PET bottle mold design guide is not optional, it's essential.
Requirement 1: A New, Custom-Designed Mold is Non-Negotiable
It might seem obvious, but it's worth stating clearly: you cannot modify a 3025 mold to become a 38mm mold. The entire neck area, which is integrated into the mold body, is different. The cavity volume and shape will be different. A brand new, custom-designed mold is the only path forward. This process begins with a bottle design, which can then be validated rapidly using methods like 3D printed samples before any metal is cut.
Requirement 2: The Critical Role of Cooling Channels
This is arguably the most important aspect of high-performance mold design, especially when moving to a heavier preform.
- The Problem: The 38mm preform contains more plastic (mass) than the 3025 preform. After blowing, this extra mass holds more heat. The bottle must be cooled down sufficiently inside the mold so that it is rigid enough to be ejected without deforming. If the cooling is inefficient, you have two bad options: 1) eject the bottle too early and have it warp, or 2) extend the cooling time in the cycle, which drastically reduces your production speed (BPH).
- The Solution: An expert mold designer will create a complex network of cooling channels that follow the contour of the bottle cavity. These channels circulate chilled water to draw heat out of the plastic as quickly and evenly as possible. The placement, diameter, and flow rate of these channels are calculated to optimize the cooling process. A superior cooling design is what allows you to maintain a fast cycle time even with a heavier bottle. This is why connecting the mold to a properly sized industrial chiller is essential. For my client's mold, we added extra cooling circuits around the thicker base area of his juice bottle to ensure it set properly without slowing down the machine.
Requirement 3: Engineering for Your Specific Machine
A mold is not a one-size-fits-all component. It must be a perfect mechanical match for your machine.
- Platen Fit: As mentioned earlier, the mold's external dimensions (width, height, thickness) must fit within the machine's platen area and between the tie bars. The mold maker needs these "mounting dimensions" before starting. We have a vast database to ensure we can design a mold that is a perfect fit for 80% of blow molding machines worldwide.
- Clamping Force Compatibility: The mold's material and construction must withstand the machine's clamping force cycle after cycle. Most high-quality PET blow molds are made from aircraft-grade aluminum alloy (like 7075), which offers an excellent combination of light weight (for fast movements), high thermal conductivity (for cooling), and durability.
- Alignment Features: The mold must have precise alignment pins, bushings, and mounting holes that match your machine's platen. This ensures the two halves of the mold close perfectly every time, which is critical for preventing flash (thin plastic leaking out at the parting line).
The table below summarizes key design considerations for the new mold.
| Mold Design Feature | Why It's Critical for a 38mm Upgrade | Consequence of Poor Design |
|---|---|---|
| Cooling Channel Design | The heavier preform retains more heat. Efficient cooling is needed to maintain cycle time. | Longer cycle times (lower BPH), bottle deformation after ejection. |
| Material Selection | Must be durable enough for clamping force and have good thermal conductivity. | Premature mold wear, inefficient cooling, shorter mold life. |
| Machine Compatibility | Mold must physically fit and align with the machine's platens and clamping system. | Mold won't fit in the machine, misalignment causes bottle defects. |
| Venting | Micro-vents allow trapped air to escape as the bottle forms, ensuring sharp details. | Incomplete bottle formation, dull or missing details (e.g., logos). |
The mold is a significant part of the upgrade's cost, but it's also a critical investment in the quality and efficiency of your new production line. Cutting corners here will inevitably lead to production headaches down the road.
The Upgrade Process: What Is the Step-by-Step Checklist?
The idea of an upgrade is good, but how do you actually execute it? Without a clear plan, you risk ordering wrong parts, facing unexpected downtime, and a chaotic installation process.
A successful upgrade follows a structured, four-step process: 1) Technical Consultation & Feasibility Check, 2) Ordering all necessary replacement parts, 3) Installation and Mechanical Adjustment, and finally, 4) Parameter Tuning & Trial Production.
Transforming your machine is a project that demands careful planning and execution. A chaotic approach will lead to extended downtime and frustration. I guide my clients, including the one in Ethiopia, through a clear, methodical process to ensure the transition is as smooth and predictable as possible. Think of it as a pre-flight checklist for an airplane; every step is there for a reason and ensures a safe and successful journey. Here is the detailed checklist you should follow for your 3025 to 38mm bottle machine conversion kit installation.
Step 1: Technical Consultation & Feasibility Check
This is the foundation of the entire project. Do not skip this or rush it.
- Objective: To confirm the upgrade is possible and to create a definitive list of all required parts and actions.
- Actions:
- Gather all technical documentation for your existing
blow molding machine. This includes the operator manual, electrical diagrams, and pneumatic schematics. - Take precise measurements of the key areas: platen size, distance between tie bars, maximum mold height, and the current sealing unit's dimensions.
- Take clear photos and videos of the key systems: the preform loading area, grippers, heating chain, and the blowing station.
- Consult with an expert. This could be the original machine manufacturer or an experienced third-party supplier (like us). Share all the collected data. This consultation will result in a final "go" or "no-go" decision and a detailed quotation for the necessary parts. For my client, this step was done entirely over WhatsApp with videos and photos, proving it can be done remotely and efficiently.
- Gather all technical documentation for your existing
Step 2: Order Replacement Parts
Once you have the green light and the final parts list, place the order.
- Objective: To procure every single component needed for the conversion.
- Key Parts to Order (The Conversion Kit):
- New Blow Mold (38mm)
- New Preform Grippers (38mm)
- New Preform Holders for the heating chain (38mm)
- New Sealing Unit / Cylinder (38mm)
- (Optional, if needed) New Stretch Rods or tips.
- (Good practice) A set of spare seals and O-rings for the new components.
- Pro Tip: Order all parts from a single, reliable supplier. This ensures all components are designed to work together and simplifies troubleshooting if any issues arise.
Step 3: Installation and Mechanical Adjustment
This is the hands-on phase where the machine is physically transformed.
- Objective: To safely remove the old 3025 components and install the new 38mm components.
- Checklist:
- Schedule Downtime: Plan for at least 8-16 hours of machine downtime, depending on the complexity and the skill of the technician.
- Safety First: Lock out and tag out all energy sources (electrical, pneumatic, hydraulic) before starting any work.
- Systematic Removal: Carefully remove the old mold, sealing units, stretch rods, grippers, and preform holders. Label and store them properly if you plan to switch back in the future.
- Installation: Install the new 38mm parts in reverse order. Pay close attention to bolt torque specifications and proper alignment.
- Mechanical Checks: After installation, manually cycle the machine (with power off) to check for any physical interference or collision between moving parts. Check that the new mold opens and closes smoothly.
Step 4: Parameter Tuning & Trial Production
This is where you teach the machine how to work with the new components.
- Objective: To dial in the process parameters to produce high-quality 38mm bottles consistently.
- Tuning Checklist:
| Parameter Group | Specific Settings to Adjust | Goal |
|---|---|---|
| Heating Oven | Lamp power percentages (by zone), ventilation fan speed, overall heating time. | Achieve a uniform preform temperature (typically 100-110°C) for even material distribution. |
| Blowing | Pre-blow pressure/time, high-blow pressure/time, exhaust time. | Control material stretching and form the bottle perfectly against the mold. |
| Timings | Delays between sealing, stretching, pre-blow, and high-blow. | Optimize the stretching process for the specific large neck preform. |
| Mechanical | Stretch rod speed and position, mold cooling time. | Fine-tune material distribution (especially in the base) and ensure the bottle is stable before ejection. |
- Process: Start with a conservative, safe set of baseline parameters. Produce a few bottles and inspect them. Then, make one small adjustment at a time and observe the effect. This iterative process of "adjust and inspect" is key. For the Ethiopian project, this phase took us about 4 hours, but at the end, he was producing crystal-clear, strong juice bottles, and he knew exactly which settings to tweak for future adjustments.
Cost vs. Benefit Analysis: Is the Upgrade Worth It?
This all sounds like a lot of work and expense. Is it actually a smart financial move, or would it be better to just save up for a completely new machine?
An upgrade is a highly cost-effective strategy. While it requires an upfront investment in parts and labor, this cost is typically only 20-30% of buying a new machine, allowing you to enter new markets with minimal capital outlay.
Every business decision comes down to the numbers. A technical project like this is no different. The question "Is it worth it?" is not just about technical feasibility, but about financial viability and strategic advantage. For my Ethiopian client, this analysis was simple. His business was struggling, and capital for a new machine was non-existent. The choice was between adapting his existing asset or potentially closing down a production line. The upgrade was the only logical path forward. Let's break down the analysis so you can apply it to your own situation.
The Cost Side of the Equation
The primary costs associated with the upgrade are clear and quantifiable.
- The Conversion Kit: This is the biggest expense. It includes the new custom blow mold, the 38mm sealing unit, grippers, and preform holders. The price of the mold will vary based on its complexity and the number of cavities.
- Labor/Technician Fees: You will need a skilled technician to perform the installation and tuning. This could be your own in-house staff or a service engineer from your supplier. Factor in the cost of their time.
- Downtime: While the technician is working, your machine is not producing. You must account for the cost of this lost production. A well-planned upgrade minimizes this, but it's still a real cost.
- Potential Ancillary Costs: As we discussed, you might discover your air compressor or chiller is undersized. While not part of the direct conversion kit, this is a potential follow-on investment that needs to be considered in your budget.
Let's look at a hypothetical cost comparison:
| Item | Upgrade Existing 2-Cavity Machine | Purchase New 2-Cavity Machine |
|---|---|---|
| Primary Equipment Cost | $10,000 - $15,000 (for mold & conversion kit) | $50,000 - $70,000 (for a new machine) |
| Installation & Labor | $1,000 - $2,500 | Included, but shipping & commissioning are extra. |
| Downtime | 1-2 days | Weeks or months for manufacturing and shipping. |
| Total Initial Outlay | ~$11,000 - $17,500 | ~$50,000 - $70,000+ |
As the table shows, the initial capital required for an upgrade is a fraction of the cost of a new machine. This was the deciding factor for my client. He could fund the upgrade from his operational cash flow without needing to seek external financing.
The Benefit Side of the Equation
The benefits are even more compelling and often provide a very rapid return on investment.
- Entering New Markets: This is the primary driver. A 38mm neck finish opens the door to a whole new range of products that were previously inaccessible. This includes juices, smoothies, dairy drinks, sauces, and other products that benefit from a wide-mouth opening for easier pouring and consumption. You can now compete in these higher-margin markets.
- Increased Versatility & Asset Utilization: Your machine is no longer a one-trick pony. It becomes a more versatile asset capable of producing multiple product lines. If the market for water bottles slumps, you can pivot to producing juice bottles. This flexibility is a huge strategic advantage in a fast-changing market.
- Extended Equipment Lifespan: An upgrade breathes new life into your existing investment. Instead of retiring a perfectly good machine because its product is no longer in demand, you are adapting it to meet new demands. This maximizes the return on your original capital investment.
- Minimal Infrastructure Change: A full machine replacement often requires changes to your factory layout, electrical connections, and compressed air piping. An upgrade utilizes your existing machine's footprint and connections, making it a much less disruptive process.
For my client, the benefit was immediate. He was able to launch his new juice line within weeks of the upgrade. The new product was successful, and the profits from it paid for the entire upgrade project in less than six months. His story is a powerful testament to the financial wisdom of adapting existing machinery when capital is tight.
Why Partner with an Expert for a Seamless Transition?
You have the checklist and you understand the parts. You're tempted to order components online and do it yourself to save money. But what if the parts don't fit or you can't get the settings right?
A DIY approach is risky. Upgrading a blow molder is a complex technical task where small mistakes lead to big problems. Partnering with an experienced supplier ensures you get the right, compatible parts and the expert guidance to guarantee a fast, successful transition.

In today's world of online tutorials and global parts marketplaces, the temptation to take a Do-It-Yourself approach is strong. I've spoken with factory owners who thought they could save a few thousand dollars by piecing together an upgrade themselves. Some succeed, but many find themselves in a difficult situation with a machine that is down for weeks, parts that don't fit, and a production schedule in chaos. The transition from a small 3025 neck to a large 38mm neck is one of the more complex blow molder modification projects. This is not like changing a tire on a car; it's more like rebuilding the transmission.
The Risks of a DIY or Inexperienced Approach
- Incorrect or Incompatible Parts: This is the number one risk. A supplier might sell you a "38mm sealing unit," but is it designed for your specific machine brand and model? Does it have the correct mounting pattern, stroke length, and pneumatic fittings? Ordering the wrong part means delays and wasted money. I ensure that every part I send to a client is verified against their machine's specific serial number and configuration.
- Extended and Unplanned Downtime: An experienced technician can perform this upgrade in a day or two. Someone learning as they go might take a week or more. Every extra day of downtime is a day of lost revenue and can jeopardize your relationships with your customers who are waiting for your product.
- Sub-Optimal Performance: Getting the machine to run is one thing. Getting it to run efficiently is another. An expert knows the subtle tricks of parameter tuning to maximize output speed (BPH) while maintaining top bottle quality. A non-expert might get the machine working but leave it running 20% slower than its potential, costing you money on every single bottle produced.
- Safety Hazards: These are powerful industrial machines. Improper installation of pneumatic or mechanical components can create serious safety risks for your operators. An expert is trained to work safely and ensure the machine is left in a safe operational state.
The Value of an Expert Partner
Working with a knowledgeable supplier or the original manufacturer transforms the upgrade from a risky gamble into a predictable project. This was the core of my relationship with the client in Ethiopia. I wasn't just a parts seller; I was his technical partner.
- Guaranteed Compatibility: An expert partner takes responsibility for ensuring every single part in the conversion kit is a perfect fit for your machine. This eliminates the biggest risk of the project.
- Streamlined Process: We provide the checklists, the technical drawings, and the step-by-step guidance. We know the potential pitfalls and how to avoid them because we have done this many times before.
- Expert Troubleshooting and Support: When the machine is started for the first time, issues can arise. What do you do if the bottle base is too thin? Or if there's a slight air leak from the seal? An expert partner is just a phone call or video chat away to help you diagnose the problem and find the solution quickly, minimizing your trial-and-error time.
- A Single Point of Accountability: If something isn't right, you have one company to call. You're not stuck between a mold maker who blames the sealing unit supplier, who in turn blames the gripper manufacturer. A single, expert partner is accountable for the success of the entire project.
The small premium you might pay for an expert-led upgrade is an insurance policy. It protects you against catastrophic downtime, incorrect parts, and poor performance. It ensures your transition to the new 38mm market is fast, efficient, and profitable from day one.
Conclusion
Upgrading your 3025 machine to a 38mm neck is not only technically possible but is a smart, cost-effective strategy to expand your product line and increase the versatility of your investment.
Frequently Asked Questions (FAQ)
1. What is the estimated cost of converting a 2-cavity machine from 3025 to 38mm, excluding the mold?
Excluding the blow mold, the cost for the core conversion kit (including the 38mm sealing unit, preform grippers, and preform holders) typically ranges from $3,000 to $5,000 USD. This can vary depending on the specific make and model of your blow molding machine. The sealing unit is usually the most expensive component in this kit.
2. How much downtime should I expect for the complete conversion process?
You should plan for a total of 8 to 16 hours of machine downtime. This can be broken down into approximately 4-6 hours for the mechanical installation of the new parts by a skilled technician, and another 4-10 hours for the process tuning, trial production, and fine-tuning of the parameters to achieve stable, high-quality bottle production.
3. Is it possible to switch back to the 3025 neck finish after the upgrade?
Yes, the conversion is completely reversible. We recommend that you carefully label and store all the original 3025 components (mold, sealing unit, grippers, holders). With these parts on hand, a technician can switch the machine back to the 3025 configuration in about the same amount of time it took to perform the initial upgrade. This gives you valuable production flexibility.
4. Will converting to a larger neck size affect the machine's output speed (BPH)?
It can, but not always significantly. The primary factor that can slow down the machine is the need for longer cooling time due to the heavier 38mm preform. However, a well-designed mold with excellent cooling channels can mitigate this effect. In many cases, you can maintain a production speed that is within 5-10% of the original speed for the 3025 bottles. An undersized air compressor is the other major factor that will definitely reduce your BPH.
5. Does this process also apply if I want to change from a 38mm to a 28mm neck (large to small)?
Yes, the technical principles and the overall process are exactly the same, just in reverse. You would need a new conversion kit consisting of a 28mm blow mold, 28mm sealing unit, 28mm grippers, and 28mm preform holders. The challenges of part compatibility, mechanical installation, and parameter tuning remain identical. Whether you are going from small-to-large or large-to-small, a systematic approach is key.
🔗 Learn More about Blow Molding Technology
Blow Molding – Wikipedia
A comprehensive overview of various blow molding processes, including extrusion, injection, and stretch blow molding.Injection Molding – Wikipedia
Important for understanding the production of preforms used in stretch blow molding.Stretch Blow Molding – Wikipedia
Explains how PET bottles are formed through axial and radial stretching processes.PET Bottle – Wikipedia
Background information on the materials and properties of typical PET bottles.Design of PET Bottles – Wikipedia
An introduction to the design considerations and geometry used in PET bottle manufacturing.
🔗 Related Pages on Our Website
Automatic Blow Molding Machines – iBottler
Discover our full range of customizable automatic PET bottle blow molding machines.Blow Bottle Mold – iBottler
Explore our precision blow molds designed for PET and PP bottles.Preform Mold – iBottler
Learn more about our high-precision preform molds suitable for various injection molding machines.PET Wide Mouth Jar Project Starter Guide: Equipment, Molds & Process Explained
Pros and Cons: Should You Choose PET Blow Moulding for Your Bottle Project?
Worried About Blow Mold Fit? We Have Mounting Dimensions for 80% of Blow Molding Machines Worldwide
Can One Semi‑Automatic Blow Molding Machine Produce All Bottle Sizes? Here’s Why Not
Why Do Krones Blow Molding Machine Users Come to Us for Their Molds?
Why Do PET Preforms Come in Different Colors? Function, Application, and Production Tips
How to Set Parameters for 600ml Bottles on a Semi-Automatic PET Blowing Machine?
From 3D Printed Samples to Production: How Can You Rapidly Validate Blow Mold Designs?
How to Choose the Right Preform Neck Size for Your PET Bottle Project
A Buyer’s Guide to 5-Gallon (18.9L) Bottle Blow Molding Machines: From PET to PC?
Pitting on your blow mold surface? A complete guide from cause analysis to repair and prevention.
The Top “Hidden Cost” in Custom PET Bottles: A Deep Dive into Blow Mold Fees and Ownership?
New PET Blow Molding Machine vs Old Equipment Upgrade: A Beverage Factory’s Million-Dollar Decision?
How to reduce the PET blow molding scrap rate from 5‰ to 1‰? An old-timer’s 8 insider tips.
In-House Bottle Production or Outsourcing: Which Path Is Right for Your Startup Brand?
Blow Mold Damage? When and How to Replace Only the Broken Parts?
Bottle Design: Ad Agency vs. Mold Factory? How One Decision Impacts Your Cost and Brand?
Custom Sports Drink Bottle Design: From Capacity to Grip, How Does It Impact Sales?
