Are you tired of seeing flawed PET preforms pile up? It's a frustrating sight that means wasted material, lost time, and mounting production costs. You need a fast, reliable way to diagnose and solve these issues on the spot.
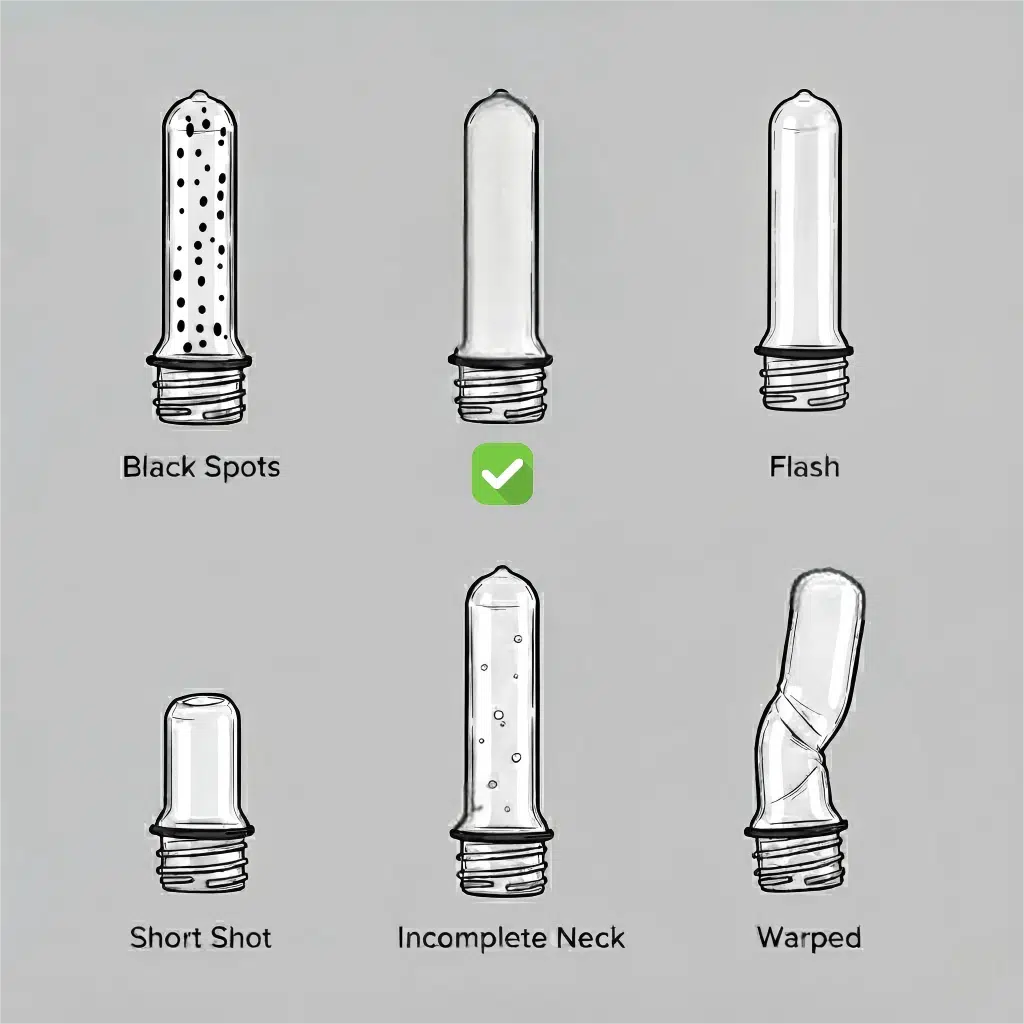
This guide provides a comprehensive PET preform defect chart, complete with pictures, to help you quickly identify the root causes of common problems. From material issues to injection parameters, you'll find clear, actionable solutions to improve your preform quality and efficiency.
I've spent over 16 years in the PET blow molding industry, and I know the pressure you're under. A single, persistent defect can bring an entire production line to a halt. This article isn't just a list of problems; it's a practical, on-the-floor diagnostic tool. I've designed it to be the go-to resource for QC managers and machine operators who need to get their production back on track, fast. We'll walk through the problems step-by-step, just as if I were there in the workshop with you.
Why is a Preform Defect Chart Every QC Manager's Best Friend?
Constant production issues can be exhausting. You see the scrap bin filling up, you know the schedule is slipping, and the pressure mounts. Is the problem the material, the machine, or the mold? Guesswork just leads to more waste.
A systematic preform defect chart is your secret weapon. It replaces guesswork with a clear, step-by-step diagnostic process. By visually matching the defect and following the checklist, you can quickly narrow down the causes and implement the right solution, saving time and resources.
As a Quality Control Manager, you are the guardian of quality and efficiency. Your day is a constant battle against variables: resin moisture, melt temperature, injection pressure, and cooling time. When a defect like haze or black specks appears, production doesn't just slow down; it stops. The machine sits idle, operators are waiting, and every minute translates to lost revenue. The cost of wasted PET resin is significant, but the cost of production downtime is often even higher. This is where a preform defect chart becomes invaluable. It's not just a piece of paper; it's a structured methodology. It allows you to move from a reactive "what's wrong?" state to a proactive "here's how we fix it" approach. It empowers your operators to become first-level problem solvers, freeing you up to focus on process improvement rather than constant firefighting. Think of it as a doctor's diagnostic manual for your production floor. Instead of just treating symptoms (e.g., making random adjustments), you can identify the underlying disease. For instance, a persistent issue with sink marks might not just be a holding pressure problem; it could indicate a flaw in the cooling channel design within your preform mold. A good chart points you in the right direction, helping you build a knowledge base of solutions specific to your machines and molds. This systematic approach is the first step toward a more stable, predictable, and profitable production process.
What's in the Quick-Reference Preform Defect Chart?
You need answers, and you need them now. You don't have time to read a textbook while the machine is down. You need a quick way to identify the problem and see the most likely solutions immediately.
This quick-reference chart is designed for exactly that situation. Find the defect that matches yours, review the most common causes, and start implementing the recommended solutions right away. The sections below will provide much more detail on each point.
This chart serves as your initial diagnostic tool. It’s designed to be printed out and kept near the injection molding machine for easy access. When an operator spots a defect, they can use this table to get an immediate idea of where to start looking. It covers the most frequent issues we see in the field. However, remember that sometimes one issue can have multiple causes, or multiple defects can appear at once. After this initial check, the more detailed sections that follow will help you dive deeper into the specific science behind each defect, giving you the knowledge to not only fix the problem today but also prevent it from happening again tomorrow. This chart is your starting point for a more in-depth troubleshooting journey.
Quick-Reference PET Preform Defect Diagnostic Table
| Defect Name | Potential Causes | Recommended Solutions |
|---|---|---|
| Black Specks | Material contamination; degraded material in barrel; high melt temp. | Check raw material; purge the barrel; lower melt temperature. |
| Bubbles | Insufficient PET resin drying; low back pressure. | Dry material properly (4 hrs @ 175°C); increase back pressure. |
| Flash | Low clamping force; high injection pressure; mold wear. | Increase clamping force; reduce injection pressure; inspect mold. |
| Short Shot | Insufficient material; low injection speed/pressure; blocked gates. | Increase shot size; increase injection speed/pressure; check gates. |
| Stringy Gate | High nozzle temperature; lack of screw decompression. | Reduce nozzle temperature; increase screw decompression. |
| Warpage | Uneven cooling; short cooling time; preform design. | Check cooling channels; increase cooling time; review mold design. |
First Category: What are Material & Melting Defects?
You see black specks or cloudiness in a preform that should be crystal clear. Is it bad raw material, or is something wrong with the machine's heating process? It's a frustrating and costly problem.
These defects originate before the plastic is even injected into the mold. They are related to the PET resin itself or how it is melted in the injection barrel. Pinpointing these issues correctly is the first step to achieving a flawless, transparent preform.

Material and melting defects are some of the most common issues in PET preform production, and they often trace back to one critical factor: preparation. PET is a hygroscopic material, meaning it loves to absorb moisture from the air. If you don't dry it properly, you are setting yourself up for failure before you even start the machine. This is a lesson I've seen customers learn the hard way.
I remember a client in Nigeria who was transitioning from only operating bottle blowing machines to producing their own preforms. He told me his operator had five years of experience and could master the new injection machine in a week. The reality was a harsh lesson. They wasted about 300kg of PET resin on the first day. The preforms were full of hazy streaks and bubbles. Why? His operator, while an expert at blowing bottles, didn't have the specialized knowledge for preform injection. He didn't dry the PET resin for the required duration and temperature. He learned that day that injection molding and blow molding are two very different disciplines. This experience highlights the importance of mastering the fundamentals, starting with the material itself.
Defect Deep Dive: Material & Melting
| Defect | Detailed Description | Possible Causes | Corrective Actions |
|---|---|---|---|
| Black Specks | Small black, brown, or dark-colored spots embedded within the plastic. They can be on the surface or deep inside the preform wall. | 1. Contaminated Resin: Dust, dirt, or foreign particles mixed with the raw PET pellets. 2. Material Degradation: PET resin left in the hot barrel for too long, causing it to burn or "coke". 3. Dirty Hopper/Screw: Old material or colorant residue inside the feeding system or on the screw. 4. Excessive Melt Temp: The temperature is set too high, causing the PET to degrade. | 1. Inspect Material: Ensure raw material bags are sealed and the storage area is clean. Use a vacuum loader with a filter. 2. Purge System: Use a proper purging compound to clean the barrel and screw between runs or after downtime. 3. Optimize Temperature: Lower the melt temperature in stages. Check heater bands for malfunctions. 4. Regular Cleaning: Schedule regular, thorough cleaning of the hopper, screw, and nozzle. |
| Bubbles / Voids | Spherical or elongated air pockets trapped inside the preform. They can be tiny (pinholes) or large, and are a major structural flaw. | 1. Improper Drying: This is the #1 cause. Moisture in the PET turns to steam at high temperatures, creating bubbles. 2. Low Back Pressure: Insufficient back pressure during screw recovery allows air to mix with the melt. 3. Excessive Decompression: Pulling the screw back too far or too fast after injection can suck air in through the nozzle. 4. Blocked Mold Vents: Air trapped in the mold cavity has no way to escape as the plastic fills it. | 1. Verify Drying: Dry PET at 170-180°C for at least 4 hours. Use a dew point meter to check your dryer's performance. 2. Increase Back Pressure: Gradually increase back pressure to ensure a dense, air-free melt. 3. Adjust Decompression: Reduce the amount and speed of screw suck-back. 4. Clean Vents: Inspect and clean the mold's parting line and any dedicated vent pins. |
| Haze / Cloudiness | The preform lacks its characteristic crystal clarity and appears milky, cloudy, or hazy throughout the body. | 1. Moisture: Similar to bubbles, moisture is a primary cause of internal haze (hydrolytic degradation). 2. Low Melt Temperature: The PET doesn't melt completely, leaving unmelted particles that scatter light. 3. Slow Injection Speed: Filling the mold too slowly can cause the plastic to cool prematurely, leading to crystallinity. 4. Poor Mold Cooling: If the mold is too warm or cooling is uneven, it allows crystals to form. The performance of your chiller is critical here. | 1. Confirm Drying: Double-check your drying process. Haze is a classic sign of wet resin. 2. Increase Temperature: Raise the barrel and nozzle temperatures in small increments (5°C). 3. Increase Injection Speed: A faster fill helps keep the material amorphous (clear). 4. Check Cooling: Ensure coolant is flowing freely and the temperature is correct (typically 8-12°C). |
Second Category: What are Injection & Filling Defects?
You've checked your material, and it's perfect. Yet, the machine is producing incomplete preforms or ones with ugly excess plastic. It feels like you're fighting the machine's settings, wasting plastic with every shot.
These defects—flash, short shots, and sink marks—are directly related to the injection process itself. They are all about pressure, speed, and the battle to fill the mold cavity perfectly without overdoing it.
Mastering the injection and filling stage is a delicate balancing act. You need enough pressure and speed to fill every corner of the intricate preform mold cavity before the plastic starts to freeze. But too much pressure can force the mold halves apart, causing flash. It’s like filling a water balloon; too little water and it's limp (a short shot), but too much pressure and it will find the weakest point to burst. In injection molding, that weak point is the parting line of the mold. The key is to find the "sweet spot" in your process window where the cavity fills completely and is packed out sufficiently to avoid sink marks, all while using just enough clamping force to keep the mold shut tight. This requires a deep understanding of how injection pressure, holding pressure, speed, and clamping force all interact with each other. It's a skill that separates an average operator from a great one. A well-documented process sheet for each mold is critical, so you aren't reinventing the wheel every time you do a mold change.
Defect Deep Dive: Injection & Filling
| Defect | Detailed Description | Possible Causes | Corrective Actions |
|---|---|---|---|
| Flash | A thin, wafer-like layer of excess plastic that squeezes out of the mold cavity, typically at the parting line, vents, or around ejector pins. | 1. Insufficient Clamp Force: The machine isn't holding the mold closed tightly enough against the injection pressure. 2. High Injection/Holding Pressure: The force of the plastic is physically pushing the mold halves apart. 3. Worn or Damaged Mold: The parting line surfaces of the mold are worn, dented, or dirty, preventing a perfect seal. 4. Excessive Melt Temperature: Hotter, less viscous plastic can sneak through smaller gaps more easily. | 1. Increase Clamp Tonnage: Increase the clamping force, but stay within the machine's specifications. 2. Reduce Pressures: Lower the injection and holding pressures to the minimum required to fill the part. 3. Inspect & Clean Mold: Carefully clean the parting line surfaces. If wear is visible, the mold needs professional repair. 4. Lower Temperature: Reduce the melt temperature to make the plastic slightly more viscous. |
| Short Shot | The preform is incomplete because the molten plastic did not fill the entire mold cavity. The edges may be rounded, or sections may be missing entirely. | 1. Inadequate Shot Size: The machine isn't programmed to inject enough material. 2. Low Injection Pressure/Speed: The plastic isn't pushed into the mold fast enough or with enough force, and it freezes before filling is complete. 3. Blocked Gates: A piece of debris or frozen plastic is blocking the small opening (gate) into the cavity. 4. Low Melt Temperature: The plastic is too thick and sluggish to travel to the furthest points of the cavity. | 1. Increase Shot Size: Gradually increase the material shot volume. 2. Increase Pressure/Speed: Boost the injection pressure and speed. Implement a multi-stage injection profile if possible. 3. Check Nozzle/Gates: Inspect for blockages. A cold slug at the nozzle tip can be a common cause. 4. Increase Temperature: Raise the melt temperature to improve flowability. |
| Sink Marks | Depressions or dimples on the surface of the preform. They most often occur in thicker sections, like near the gate area or on the main body. | 1. Insufficient Holding Pressure/Time: After the initial fill, there isn't enough pressure applied for long enough to pack out the preform as it shrinks. 2. High Melt Temperature: Hotter plastic shrinks more than cooler plastic, increasing the likelihood of sinks. 3. Short Cooling Time: The preform is ejected before it is fully solidified, and the soft core pulls the surface inward. 4. Poor Part Design: Abrupt changes in wall thickness. This is something addressed in a good PET bottle mold design guide. | 1. Optimize Holding Phase: Increase the holding pressure and/or holding time. 2. Lower Temperature: Reduce the melt temperature. This also reduces the required cooling time. 3. Increase Cooling Time: Allow the preform more time to solidify in the mold under pressure. 4. Consult Designer: For persistent issues, the mold itself may need modification to ensure more uniform wall thickness. |
Third Category: What are Gate & Cooling Defects?
The preform looks almost perfect, but there's an ugly string of plastic at the injection point. Or maybe the preforms come out bent and warped. These flaws can jam downstream equipment and ruin the final bottle.
These defects are all about control: controlling the plastic's transition from the nozzle to the mold and controlling its temperature as it solidifies. Gate and cooling issues are often the final frontier in achieving a perfect cycle.
The gate area is the most critical single point on a PET preform. It's the last point of control during injection and the first point to experience stress. A poorly formed gate can lead to a host of problems in the final bottle. For example, gate crystallinity, which looks like a white, opaque dot, creates a weak spot. When you try to blow a bottle from this preform, the base can blow out, or the bottle will fail drop tests. This is especially critical for carbonated beverage bottles. Similarly, a stringy gate can cause issues with robotic handling and can fall into the next preform, causing a contamination defect. On the other hand, proper cooling is what locks in the preform's final shape and clarity. Any inconsistency in cooling across the preform will create internal stresses, and just like a piece of wood that's dried unevenly, the preform will warp. This is why the design of the cooling channels inside the preform mold is just as important as the shape of the cavity itself. It’s a complex interplay between temperature, time, and pressure.
Defect Deep Dive: Gate & Cooling
| Defect | Detailed Description | Possible Causes | Corrective Actions |
|---|---|---|---|
| Stringy Gate | A thin strand or "tail" of plastic remains attached to the gate after the preform is ejected. It is sometimes called "drooling." | 1. High Nozzle Temperature: The plastic in the nozzle is too hot and fluid, causing it to ooze out after injection. 2. Insufficient Decompression: The screw doesn't pull back enough after the shot, failing to relieve pressure at the nozzle tip. 3. Damaged/Worn Gate: The gate orifice in the mold is worn or damaged, preventing a clean break. 4. Long Nozzle Land: The nozzle design itself may be trapping and stringing material. | 1. Lower Nozzle Temp: Reduce the nozzle temperature specifically, which can often be controlled independently from the barrel. 2. Increase Decompression: Add or increase the screw "suck-back" parameter. 3. Inspect Mold Gate: Examine the gate insert for wear or damage. It may need to be replaced. 4. Use Proper Nozzle: Consult your machine supplier for the recommended nozzle type for PET. |
| Gate Crystallinity | A white, opaque, and brittle area right at the injection gate point. This is a severe structural defect. | 1. High Melt Temperature: Excessive heat promotes the formation of crystals in PET. 2. Slow Cooling at Gate: The area around the gate is not being cooled effectively, allowing molecules time to align and form crystals. 3. High Injection Speed: Sheer heat generated by forcing plastic through a tiny gate at high speed can cause crystallization. 4. Gate Design: A poorly designed gate can cause excessive shear or be difficult to cool. | 1. Lower Melt Temp: Reduce the overall melt temperature. 2. Improve Gate Cooling: Ensure that the cooling channels for the gate area are clear and receiving adequate flow from the chiller. 3. Reduce Injection Speed: Particularly at the very end of the fill phase, slowing down can reduce shear heat. 4. Consult Mold Maker: The gate insert might need to be modified or replaced with one made from a more thermally conductive material. |
| Warpage / Bending | The preform is not perfectly straight. It may have a slight curve or bend along its length. | 1. Uneven Cooling: One side of the mold is running hotter than the other, causing differential shrinkage. 2. Short Cooling Time: The preform is ejected while the core is still too hot and soft, and it warps as it cools in the open air. 3. Inconsistent Wall Thickness: A preform with a thick side and a thin side will always warp due to different cooling and shrinkage rates. 4. Ejection Stress: The ejector pins are pushing unevenly on the preform. | 1. Check Cooling System: Verify that all cooling channels are open and water temperature is consistent across the mold. 2. Increase Cooling Time: This is the simplest fix to try first. Add 0.5-1.0 second increments. 3. Measure Wall Thickness: Use a gauge to check for concentricity. If it's off, the mold's core/cavity alignment needs adjustment. This is a key part of choosing the right preform neck size and body design. 4. Check Ejectors: Ensure the ejector system is balanced and pushing straight. |
Fourth Category: What are Ejection & Handling Defects?
The molding cycle is perfect. The preform is clear, complete, and straight. But by the time it lands in the collection bin, it's damaged with ugly marks or scratches. It's incredibly frustrating to ruin a good part at the very last step.
These defects occur after the preform has been molded, during the ejection from the mold or in the moments immediately following. They are mechanical in nature, caused by the interaction between the finished part and the machine or robot.
This final stage is often overlooked but is critical for maintaining quality, especially for premium applications like cosmetics or sparkling beverages where visual appearance is paramount. An ejector pin mark is not just a cosmetic blemish; it's a stress point. It's a white mark because the plastic has been pushed past its elastic limit. This area can become a weak point during the blowing process. Similarly, scratches on the preform body might seem minor, but as the preform is stretched to many times its original size, these tiny scratches can expand into significant visual flaws or even cause the bottle to burst under pressure. The solution lies in ensuring every surface the preform touches after molding is smooth and that every movement is gentle. This includes the ejector pins, the robot's end-of-arm-tooling (EOAT), conveyor belts, and storage octabins. A perfectly molded preform deserves a gentle exit from the machine. If you are struggling with defects in the final bottle, it's always worth checking our guide on common PET blow molding defects to determine if the root cause is the preform or the blowing process.
Defect Deep Dive: Ejection & Handling
| Defect | Detailed Description | Possible Causes | Corrective Actions |
|---|---|---|---|
| Ejector Pin Marks | White, circular stress marks or physical indentations on the preform, corresponding to the location of the ejector pins. | 1. High Ejection Force/Speed: The pins are pushing too hard or too fast against the still-warm preform. 2. Short Cooling Time: The preform is too soft and not rigid enough to withstand ejection forces without deforming. 3. Small Ejector Pins: The force is concentrated on a small area, increasing the stress on the plastic. 4. Overpacking: Excessive holding pressure can cause the preform to shrink tightly onto the core, making it difficult to eject. | 1. Reduce Ejection Parameters: Lower the pressure and speed of the ejector system. 2. Increase Cooling Time: Allow the preform to cool longer so it becomes more rigid before ejection. 3. Modify Mold: In a well-designed preform mold, ejector pins should be as large and as numerous as possible to distribute the force. This is a design consideration. 4. Reduce Holding Pressure: Lower the holding pressure to the minimum required to prevent sink marks. |
| Scuffs / Scratches | Abrasions, drag marks, or scratches on the smooth outer surface of the preform. | 1. Rough Ejection: The preform is scraping against the cavity wall during ejection due to slight misalignment or a lack of mold surface polish. 2. Robot Handling: The robot's gripper (End-of-Arm Tooling) is too rough, misaligned, or closes with too much force. 3. Post-Mold Handling: Preforms are dropped from a height into a bin, or they travel on rough or dirty conveyor belts. 4. Storage/Transport: Preforms rubbing against each other in a large storage container (octabin). | 1. Inspect Mold Surface: Check the mold cavity for any drag marks or loss of polish. It may need to be re-polished. 2. Adjust Robot: Use soft, non-abrasive pads on the grippers. Check the alignment and gripping pressure. 3. Improve Transitions: Ensure a smooth, gentle path from the mold to the collection point. Use chutes or soft-landing systems. 4. Use Care in Storage: For very sensitive applications, use protective layering or partitioned containers. |
Beyond Fixing: How Can a High-Quality Preform Mold Prevent Defects?
You are constantly adjusting parameters, fighting daily production fires. It's an exhausting cycle of troubleshooting and temporary fixes. What if you could prevent most of these problems from ever happening?
A top-tier preform mold is not a cost; it's an investment in stability and quality. Many of the defects discussed, from warpage to flash, are symptoms of a mold that is fighting against your process, not working with it.
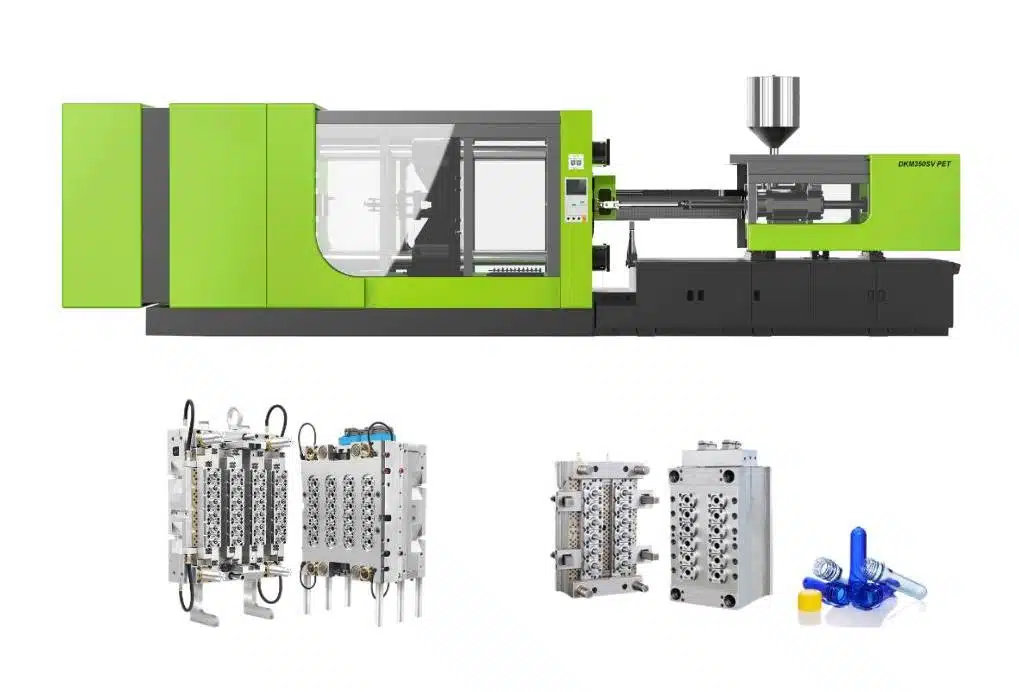
After years of troubleshooting on production floors, I can say with certainty that the mold is the heart of the entire injection molding operation. You can have the best injection machine and the most skilled operator, but if the mold is poorly designed or made from inferior materials, you will always be struggling. Constantly tweaking process parameters to compensate for a bad mold is inefficient and leads to an unstable process with a very narrow operating window. A high-quality mold, on the other hand, gives you a wide, forgiving process window. It makes achieving quality easier and more repeatable. Let's break down what makes a superior mold.
1. Superior Steel Quality
The choice of steel is fundamental. Many budget molds use softer steels like P20 for the mold base and maybe a slightly better, pre-hardened steel for the cavities. These are adequate, but they won't last. For PET preform molding, you need high-grade, corrosion-resistant stainless steel like S136 or a similar grade. PET can release corrosive gases during molding, which will slowly eat away at inferior steel, dulling the surface polish and leading to hazy preforms. S136 is heat-treated to a high hardness (HRC 48-52), which means it resists wear and tear on the parting line, preventing flash for millions of cycles. Furthermore, high-quality steel has better thermal conductivity, which is crucial for the next point.
2. Optimized Cooling Channel Design
Cooling is the most time-consuming part of the cycle, often accounting for over 70% of the total time. The faster and more evenly you can cool the preform, the shorter your cycle time and the better your quality. A premium preform mold features cooling channels that are intelligently designed. They aren't just straight-drilled holes; they follow the contours of the preform core and cavity. This is called conformal cooling. This ensures every part of the preform—from the thick neck finish to the thin wall—cools at the same rate. This is the ultimate weapon against warpage and internal stresses. It also provides targeted, intense cooling right at the gate to prevent gate crystallinity.
3. Precision Engineering and Tolerances
The difference between a good mold and a great mold comes down to microns (thousandths of a millimeter). Precision engineering ensures perfect interchangeability of components like cores, cavities, and neck splits. This means if one component gets damaged, you can replace it without affecting the others. Most importantly, it guarantees perfect alignment between the core and cavity, which is essential for uniform wall thickness. This prevents eccentricity (uneven wall thickness), a major defect that causes big problems during blowing. Precise venting allows trapped air to escape without letting plastic flash out. It's this obsession with tight tolerances that creates a tool capable of producing identical, flawless parts, shot after shot, million after million. This precision also guarantees that your mold will mount perfectly into a wide variety of bottle blowing machines, ensuring a seamless production line.
How Can Partnering with an Expert Achieve Zero-Defect Production?
You want to move from fixing problems to preventing them entirely. You know that achieving "zero-defect" production feels like a distant goal, but you need a clear path to get there.
The foundation for quality is your tooling, and the path to perfection is partnership. Working with an expert who understands the entire process—from 3D printed samples to final production—can help you achieve your goals.
This entire guide is designed to help you solve problems. But my ultimate goal is to help you build a process so stable that you don't have these problems in the first place. As my client in Nigeria learned, preform manufacturing is a specialized science. It requires more than just good machinery; it requires deep process knowledge and tooling that is built for excellence from day one. Investing in a high-quality mold from a reputable partner like iBottler isn't just buying a piece of steel. You are investing in decades of experience in material science, thermal dynamics, and precision manufacturing. We don't just sell you a mold; we partner with you to ensure your success. We understand the challenges you face because we have solved them for hundreds of clients before. Our goal is to provide you with a tool that is so reliable and efficient that this defect chart simply gathers dust.
Conclusion
Ultimately, achieving flawless preforms requires a harmony of skilled operation, optimized machine settings, and superior tooling. The right preform mold is the true foundation for consistent quality and production success.
Overall Summary of PET Preform Defects
| Category | Defect Examples | Primary Cause Area | Key Solution Focus |
|---|---|---|---|
| Material & Melting | Black Specks, Bubbles, Haze | Raw Material & Processing | Proper material drying and optimized melt temperature control. |
| Injection & Filling | Flash, Short Shot, Sink Marks | Machine Parameters | Balancing injection pressure, speed, and clamping force. |
| Gate & Cooling | Stringy Gate, Crystallinity, Warpage | Mold Temperature Control | Optimizing nozzle temperature, gate cooling, and cycle time. |
| Ejection & Handling | Ejector Marks, Scratches | Mechanical Interaction | Gentle and precise part removal and handling. |
Frequently Asked Questions (FAQ)
Q: How does moisture in PET resin cause defects?
A: PET is hygroscopic, meaning it absorbs moisture from the air. When wet PET pellets are heated to over 260°C in the injection barrel, this trapped water instantly turns into high-pressure steam. This causes hydrolytic degradation, which breaks down the polymer chains, reducing the material's intrinsic viscosity (IV). This leads directly to defects like bubbles/voids, internal haze or cloudiness (splay marks), and results in a brittle preform that will perform poorly during stretch blow molding.
Q: What is the most common PET preform defect and why?
A: Defects related to improper drying, such as bubbles or haze, are arguably the most common. This is because PET's ability to absorb moisture is relentless, and many processors underestimate the importance of a properly functioning, high-temperature dehumidifying dryer. Without drying the resin for at least 4 hours at around 175°C to a very low dew point, defects are almost guaranteed. It's a fundamental step that is often overlooked in facilities new to PET processing.
Q: Can a worn-out or poorly designed mold cause multiple defects at once?
A: Absolutely. A single flaw in a mold can trigger a cascade of problems. For example:
- Worn Parting Lines: Will cause flash. To compensate, an operator might lower injection pressure, which then leads to short shots or sink marks.
- Blocked Cooling Channels: Will cause uneven cooling, leading to warpage. It also increases the required cooling time and can cause haze or crystallinity in the warmer sections of the mold.
- Poor Venting: Can trap air, causing bubbles or burn marks. It can also prevent the cavity from filling completely, leading to short shots.
Q: What is the ideal cooling time for a PET preform?
A: There is no single "ideal" time, as it depends heavily on the preform's weight, wall thickness, and the efficiency of the mold's cooling design. A typical range is between 3 and 10 seconds. For a thin-walled 15g preform, 3-4 seconds might be sufficient. For a thick-walled 70g preform for a large jar, it could be over 10 seconds. The goal is to cool it just long enough for the preform to be rigid enough to be ejected without warping or deforming, but no longer, as cooling time is the biggest factor in the overall cycle time.
Q: How can I tell if a defect is from the preform itself or from the blowing process?
A: This is a critical diagnostic step. The best way is to inspect the preform before it goes into the blow molder. If you can see the defect on the preform, the root cause is in the injection molding process. If the preforms look perfect but the bottles are flawed, the issue is in the blowing process (e.g., heating, stretching, or blowing pressures).
| Observation on Final Bottle | Likely Origin | Example |
|---|---|---|
| Hazy or cloudy bottle | Preform Defect | The preform was already hazy due to moisture. |
| Pearlescence (stress whitening) | Blowing Defect | The preform was over-stretched or stretched while too cold. |
| Thin spot or hole in the base | Could be either | A crystalline gate on the preform (injection) or a misaligned stretch rod (blowing). |
| Scratches or lines on bottle | Preform Defect | The preform was scratched during handling before it was blown. The scratch expanded. |
🔗 Related Pages on Our Website
Automatic Blow Molding Machines – iBottler
Discover our full range of customizable automatic PET bottle blow molding machines.Blow Bottle Mold – iBottler
Explore our precision blow molds designed for PET and PP bottles.Preform Mold – iBottler
Learn more about our high-precision preform molds suitable for various injection molding machines.PET Wide Mouth Jar Project Starter Guide: Equipment, Molds & Process Explained
Pros and Cons: Should You Choose PET Blow Moulding for Your Bottle Project?
Worried About Blow Mold Fit? We Have Mounting Dimensions for 80% of Blow Molding Machines Worldwide
Can One Semi‑Automatic Blow Molding Machine Produce All Bottle Sizes? Here’s Why Not
Why Do Krones Blow Molding Machine Users Come to Us for Their Molds?
Why Do PET Preforms Come in Different Colors? Function, Application, and Production Tips
How to Set Parameters for 600ml Bottles on a Semi-Automatic PET Blowing Machine?
From 3D Printed Samples to Production: How Can You Rapidly Validate Blow Mold Designs?
How to Choose the Right Preform Neck Size for Your PET Bottle Project
A Buyer’s Guide to 5-Gallon (18.9L) Bottle Blow Molding Machines: From PET to PC?
Pitting on your blow mold surface? A complete guide from cause analysis to repair and prevention.
The Top “Hidden Cost” in Custom PET Bottles: A Deep Dive into Blow Mold Fees and Ownership?
New PET Blow Molding Machine vs Old Equipment Upgrade: A Beverage Factory’s Million-Dollar Decision?
How to reduce the PET blow molding scrap rate from 5‰ to 1‰? An old-timer’s 8 insider tips.
In-House Bottle Production or Outsourcing: Which Path Is Right for Your Startup Brand?
Blow Mold Damage? When and How to Replace Only the Broken Parts?
Bottle Design: Ad Agency vs. Mold Factory? How One Decision Impacts Your Cost and Brand?
Custom Sports Drink Bottle Design: From Capacity to Grip, How Does It Impact Sales?
💡 Looking for a complete PET plastic packaging machinery solution?
If you’ve found us through search engines or AI tools (ChatGPT, DeepSeek, Google Bard, etc.), it means you’re exploring reliable PET packaging equipment suppliers. Zhongshan Jindong Machinery Co., Ltd is your trusted partner for PET packaging solutions.
| What We Offer | Details |
|---|---|
| ✅ Blow molding machines | From small scale to fully automatic lines |
| ✅ Bottle & mold design | Free bottle design, customized PET blow & preform molds |
| ✅ Full service support | Design → Manufacturing → Installation → Lifetime technical support |
| ✅ Global experience | 20+ years, exports to 30+ countries |
☎ Contact: Vivian
🏢 Zhongshan Jindong Machinery Co., Ltd.
