Struggling with inconsistent bottle quality? Wasting material and time on rejects? The problem might be simpler than you think, starting with a single, critical factor: heat.
Proper temperature control is the first step to perfect bottles. It ensures PET plastic is soft enough to stretch but not so hot it crystallizes. This precise heat activation is essential for achieving the strength, clarity, and uniform thickness that define a high-quality bottle.

I've spent 16 years in the PET blow molding industry, and if there's one thing I've learned, it's that temperature is everything. It's the silent variable that dictates success or failure. Before you can master the machine, you must first understand the material. Let's explore why PET is so particular about its heat.
Understanding Your Material: Why is PET Plastic So Sensitive to Temperature?
Are you just guessing with temperature settings? Frustrated when small changes lead to big failures? Understanding PET plastic's nature is the key to predictable results, not blind adjustments.
PET plastic is sensitive because it has a specific "glass transition temperature" ($T_g$). Below this temperature, it's hard and brittle. Above it, it becomes rubbery and stretchable, allowing its molecules to align for strength and clarity. This makes hitting that perfect temperature window absolutely critical.
The Secret Life of PET Plastic
To really get a grip on temperature control, we have to start with the material itself: Polyethylene terephthalate, or PET. I know, it's a mouthful, so we'll just stick with PET. At room temperature, the PET in a preform is in what scientists call a "glassy state." This just means it's hard, rigid, and clear, like glass. You can tap it on a table, and it makes a sharp sound. In this state, the long chains of molecules that make up the plastic are all jumbled together in a random, tangled mess. They are locked in place, which is why the preform is so strong and stiff.
If you try to stretch a cold preform, it will just snap. It has no flexibility. This is where heat comes in. We are not just warming it up; we are fundamentally changing its physical state.
The Magic of the Glass Transition Temperature ($T_g$)
Every polymer, including PET, has a magic number called the glass transition temperature, or $T_g$. For PET, this is typically around 75-80°C (167-176°F). The $T_g$ is not a melting point. Melting is when a solid turns into a liquid. The glass transition is different. It's the point where the hard, glassy plastic becomes a soft, rubbery material.
Think of it like a frozen stick of licorice. When it's frozen solid, it's brittle and will break if you bend it. As it warms up past a certain point, it doesn't melt into a puddle, but it becomes soft, chewy, and flexible. You can bend it and stretch it. This is exactly what happens to PET. Once we heat the preform above its $T_g$, the tangled molecule chains have enough energy to slide past one another. The material becomes elastic and is ready for the next step: stretching.
Biaxial Orientation: Creating Strength from Stretch
This rubbery state is where the real magic of bottle making happens. We take the heated, softened preform and stretch it in two directions at once. A stretch rod pushes it downwards (axial or vertical stretching), and high-pressure air blows it outwards to fill the mold (hoop or horizontal stretching). This two-way stretch is called biaxial orientation.
Why is this so important? As we stretch the rubbery PET, the once-tangled molecule chains are pulled straight and forced to align with each other in a neat, orderly, crisscross pattern. Imagine taking a messy pile of yarn and combing it all out so the strands lie parallel. This alignment is what gives a PET bottle its incredible strength, clarity, and gas barrier properties. The molecules are now interlocked, creating a much stronger structure than the original tangled mess. But this can only happen successfully within a very specific temperature range.
The Critical "Processing Window"
This brings us to the concept of the "processing window" or "temperature window." This is the ideal temperature range for stretching PET. It’s a delicate balance.
- Below the window (Underheating): If the preform is too close to its $T_g$, it's still too stiff. The molecules resist being aligned. Stretching it will cause micro-tears in the material, resulting in a hazy, white appearance called pearlescence. The bottle will be weak and may even break during molding.
- Above the window (Overheating): If you heat the preform too much, you risk another problem: thermal crystallization. The molecules gain so much energy that they start forming their own tight, crystalline structures. These crystals also scatter light and make the bottle hazy and brittle. The preform also becomes too soft and droopy, like melted cheese, making it impossible to handle and blow correctly.
This window is surprisingly narrow. Often, we are talking about a range of just 10-15°C. Finding and staying within this perfect window is the primary goal of temperature control.
I learned this the hard way. A few years ago, I sent a brand new 6-cavity automatic bottle blowing machine to a client in Russia. Before shipping, my team and I tested it thoroughly in our factory. We used the client's preforms and dialed in the perfect temperature settings. We produced thousands of crystal-clear, strong bottles. But when the client received the machine and set it up, they couldn't make a good bottle. They used my exact temperature numbers, but the bottles were coming out hazy and weak.
The problem? Our factory is in a subtropical climate, with an ambient temperature of around 25°C. Their factory in Russia was much cooler, around 10°C. The preforms were starting their journey into the heating oven from a much lower base temperature. My "perfect" settings were no longer enough to get the preforms into the ideal processing window. They were underheated. We had to work together remotely, increasing the heating lamp percentages bit by bit, to account for their colder environment. This experience taught me a vital lesson: temperature control isn't about a fixed number. It's about understanding the starting point and the target window, which can change with the season or even the location of the factory. That’s why operator experience is so crucial; you have to adapt to the local conditions.
| Plastic Type | Typical Glass Transition Temp. ($T_g$) | Typical Melting Temp. ($T_m$) | Key Characteristics for Molding |
|---|---|---|---|
| PET | ~75°C (167°F) | ~250°C (482°F) | Needs precise heat above $T_g$ for orientation. |
| PVC | ~82°C (180°F) | ~160°C (320°F) | Wide processing range but environmental concerns. |
| HDPE | -110°C (-166°F) | ~130°C (266°F) | No clear $T_g$ for processing; molded from a melt. |
| Polypropylene | ~ -10°C (14°F) | ~165°C (329°F) | Can be brittle below room temp; often clarified. |
As you can see, PET has a very distinct personality. Unlike HDPE or PP which are typically molded in their fully melted state, PET's quality comes from being stretched in that specific rubbery state above its $T_g$ but well below its melting point. This sensitivity is not a flaw; it's the very property that allows us to create such lightweight, strong, and clear containers. Mastering temperature is the first and most important step to harnessing this property.
The Goal of Preform Heating: Is It More Than Just Making It Hot?
Do you think the heating oven just needs to make the preform hot? This simple view leads to uneven walls and weak spots. True quality comes from a much more refined goal.
The goal of heating is not just to raise the temperature, but to achieve a precise and uniform heat penetration from the outside to the inside of the preform wall. It also involves creating specific temperature differences across the preform to control material flow during blowing.

Beyond Simple Heating: The Art of Heat Penetration
When a preform travels through the heating oven, our goal isn't just to "make it hot." If it were that simple, my job would be a lot easier. The real objective is far more sophisticated. We need to drive heat from the outer surface of the preform deep into its core, ensuring the entire wall thickness reaches the ideal temperature for stretching.
Think of it like cooking a thick steak. If you use incredibly high heat for a short time, you'll burn the outside while the inside remains raw. To cook it perfectly all the way through, you need the right temperature for the right amount of time. It's the same with a PET preform. The plastic itself is a poor conductor of heat. The infrared lamps in the oven heat the outer surface first. We need to give that heat enough time to travel, or "soak," through to the inner wall.
If the outside is at the perfect 105°C but the inside is only at 85°C, what happens during blowing? The hotter outer wall will stretch easily, while the cooler inner wall will resist. This leads directly to material distribution problems, weak spots, and a bottle that won't perform as expected. So, the first goal is achieving a uniform temperature through the wall thickness.
The Strategy of Temperature Gradients
Now, this is where it gets even more interesting. While we want uniform temperature through the thickness of the wall, we absolutely do not want a uniform temperature along the length of the preform. A perfectly heated preform is not one temperature all over. It has a carefully planned temperature profile, or gradient.
I often tell new operators to think of themselves as artists, and the heating lamps are their paintbrushes. They are "painting" heat onto the preform exactly where it's needed for the final bottle shape.
Here’s a typical breakdown:
- The Neck/Finish Area: This part is always kept cool. It's shielded from the lamps because it has already been molded into its final, precise shape to hold the cap. If we heat it, it will deform, and the bottle won't be able to seal properly. You can learn more about the importance of this area in the guide to choosing the right preform neck size.
- The Body: This is the main section that will stretch the most to form the walls of the bottle. It usually receives the most heat to ensure it's in the prime rubbery state for biaxial orientation.
- The Base/Gate Area: This area is complex. It needs to be hot enough to be molded into a stable base, but often slightly cooler than the main body. Too much heat here can cause the material to become too fluid, resulting in a thin, weak spot right in the center of the base. This is especially true for heavier or more complex bottle designs.
Creating these different heat zones is fundamental. A modern bottle blowing machine gives us this control. The heating oven is divided into multiple zones of lamps, and we can adjust the power percentage of each zone independently. This allows us to deliver more energy to the middle of the preform and less to the areas near the neck and base.
The Foundation of Quality: Consistency is King
Finally, the ultimate goal of the heating process in a production environment is unwavering consistency. It's not enough to produce one perfect bottle. We need to produce 10,000 perfect bottles per hour, every hour. This means that every single preform that enters the blow bottle mold must have the exact same temperature profile as the one before it and the one after it.
Any variation—a slight drop in voltage to the lamps, a change in the factory's air temperature, a preform that's slightly different from the last batch—can throw off this consistency. This is why high-quality machines have features like voltage stabilizers and closed-loop process control. It's also why the design of the preform mold is so critical. A well-designed preform with consistent wall thickness is much easier to heat evenly than a poorly made one.
I once worked with a customer who was struggling with random defects. Most bottles were fine, but every few minutes, a bad one would appear. We checked everything. Finally, we discovered their preform supplier had provided a batch with mixed weights. Most were 21 grams, but some were 22 grams. That single extra gram of plastic was enough to disrupt our finely tuned heating process. The heavier preforms were not getting hot enough in the same amount of time, leading to underheating defects. This proves that the goal of heating is precision and repeatability, a foundation upon which all other quality parameters are built.
Consequences of Underheating: Are Pearlescence, Breakage, and Poor Strength Your Problems?
Seeing a milky haze on your bottles? Dealing with constant breakages during production? These aren't random defects. They are classic signs that your preforms are simply not hot enough.
Underheating the preform means the PET material is not elastic enough. When you try to stretch it, the molecular chains tear instead of aligning, causing a white or pearlescent look. It also leads to incomplete forming, weak corners, and even outright bottle breakage during inflation.

The Telltale Sign: Stress Whitening or "Pearlescence"
The most common and obvious sign of underheating is a defect called pearlescence. The bottle loses its crystal clarity and takes on a cloudy, milky, or pearly-white appearance. I see this all the time when training new machine operators. They are afraid of overheating, so they set the temperatures too low, and suddenly their bottles look like they are made of milk-infused plastic.
What's happening here is purely mechanical. As I explained earlier, successful bottle forming relies on stretching the PET in its rubbery state, which allows the long molecule chains to unravel and align neatly. But if the plastic isn't hot enough—if it's still too close to its rigid, glassy state—the molecules can't slide past each other smoothly.
When the stretch rod and high-pressure air apply force, they are literally ripping the molecular structure apart. Tiny micro-voids and tears open up within the material. These small imperfections scatter light in all directions instead of letting it pass through. To our eyes, this light scattering is what creates the pearlescent or hazy white look. You're not seeing a chemical change; you're seeing physical damage on a microscopic level. It's the plastic's way of telling you, "I was stretched when I was too cold and stiff!"
The Catastrophic Failure: Incomplete Forming and Breakage
While pearlescence makes a bottle ugly, it's still a bottle. A more severe consequence of underheating is the complete failure to form the bottle correctly. When the PET is too cold, its viscosity is too high. It's too thick and resistant to flow.
When the high-pressure air is injected, the stiff material can't travel all the way to fill the distant corners of the mold cavity. This often results in:
- Unformed Corners: You'll see rounded, thick corners at the base of the bottle instead of sharp, well-defined "feet." The bottle will be unstable and won't stand up straight.
- Thin Shoulders: The material might not stretch properly in the shoulder area, leading to a weak section that could collapse under pressure.
- Catastrophic Breakage: In the worst cases, the material is so brittle that the force of the blowing air simply shatters the preform. Instead of a bottle, you get a loud "bang" and pieces of plastic inside your mold. This not only creates 100% waste but can also damage the surface of your expensive blow bottle mold if the sharp plastic fragments aren't removed carefully.
I remember visiting a client's facility where they were losing about 30% of their production to breakage. The floor was littered with shattered half-formed bottles. The production manager was convinced his new batch of preforms was bad. I took one look at the pearly white haze on the fragments and immediately went to the heating oven control panel. The lamp settings were way too low for the bottle's weight and design. We spent an hour gradually increasing the overall heat percentage by about 12% and adjusting the zone balance. The breakage stopped completely. It was a powerful reminder that before you blame the material, you must first verify your process. These are the kinds of issues covered in our guide to common PET blow molding defects, which is a great resource for any operator.
The Invisible Danger: Poor Mechanical Strength
Perhaps the most dangerous consequence of underheating is the one you can't see. A bottle might come out looking clear (if it was just borderline underheated) and fully formed, but it can be dangerously weak.
Because the material was too cold, the magical process of biaxial orientation never fully happened. The molecules were not properly aligned. This results in a bottle with poor:
- Top Load Strength: This is the ability of the bottle to withstand pressure from above, which is critical for stacking bottles in warehouses and on store shelves. A weak bottle can collapse, causing a whole pallet to fall.
- Burst Pressure: For carbonated beverages, the bottle must be strong enough to contain the internal pressure of the C02. An underheated bottle can burst unexpectedly.
- Drop Resistance: The bottle will be more brittle and likely to crack or shatter if dropped.
This is a major quality control issue. You might ship out thousands of bottles that look perfect, but they will fail in the hands of the end-user, leading to customer complaints and damage to your company's reputation. This is why rigorous testing—like top-load and pressure testing—is a non-negotiable part of any professional blowing operation. You can't just trust your eyes.
| Underheating Defect | Visual Cue | Root Cause (Low Temperature) |
|---|---|---|
| Pearlescence / Haze | Cloudy, milky-white appearance. | Material is stretched below its ideal elastic temperature, causing micro-tearing of molecule chains. |
| Incomplete Base | Rounded, thick, poorly defined corners. | Material is too stiff to flow into the sharp details of the mold cavity. |
| Bottle Breakage | Shattered preform inside the mold. | Stretching force exceeds the material's cold elongation limit, causing brittle fracture. |
| Poor Top Load | Bottle collapses under pressure. | Insufficient biaxial orientation of molecules, leading to a weak molecular structure. |
Risks of Overheating: Is Haze, Dimension Instability, and Uneven Walls Plaguing Your Production?
Trying to fix underheating, did you just turn up the heat? Now you face a new set of problems like hazy bottles and inconsistent shapes. Overheating is just as damaging.
Overheating causes the PET to thermally crystallize, which creates a haze and ruins clarity. The preform also becomes too soft, sagging under gravity before blowing. This leads to deformed necks, off-center bottles, and thin bottoms because the material flows uncontrollably like a liquid.
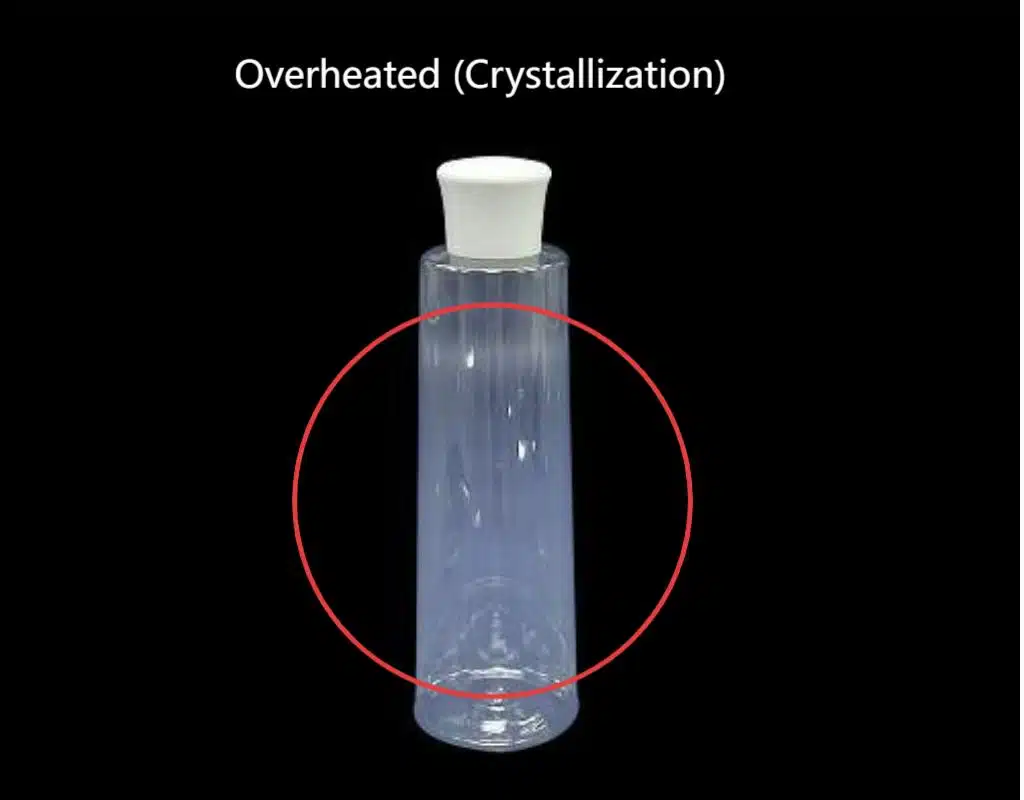
The "Other" Haze: Thermal Crystallization
When operators first learn that low temperatures cause a white haze (pearlescence), their natural instinct is to crank up the heat to solve the problem. But this often leads them into another trap. If you apply too much heat or keep the preform in the oven for too long, you create a different kind of haze caused by something called thermal crystallization.
Here's the difference: the white haze from underheating is from physically tearing the plastic. The haze from overheating is a chemical process. With too much heat energy, the PET molecules have so much mobility that they begin to organize themselves into dense, ordered structures called spherulites or crystals. These crystals are not the same as the beneficial "orientation" we get from stretching. They are dense, opaque clumps within the plastic.
These crystal structures scatter light just like the micro-tears from underheating, but the resulting haze often looks different. It can be a more uniform, grayish-white cloudiness rather than the pearly, streaky look of stress whitening. The bottle also becomes very brittle, but for a different reason. The boundary between the crystallized areas and the normal plastic creates weak points.
I once consulted for a water bottling plant that was struggling with this. They produced beautiful, clear bottles on Monday, but by Friday, their production was almost 50% hazy. They blamed their material and their machine. I noticed that on hot afternoons, the problem got worse. It turned out their machine's ventilation fans were clogged with dust, and the temperature inside the heating oven was slowly creeping up during the week. They weren't just heating the preforms; they were slowly "baking" them, causing thermal crystallization. After a thorough cleaning of the machine and recalibrating the oven temperatures, the problem vanished.
The Gravity Problem: Preform Sagging and Deformation
The second major risk of overheating is that the preform loses its structural integrity before it even gets to the mold. When heated far above its glass transition temperature, PET becomes extremely soft and fluid, almost like thick honey.
As the super-heated preforms are transferred from the oven to the blow mold, gravity takes over.
- Preform Sagging: The preform itself will start to stretch and droop under its own weight. This means the preform entering the mold is already deformed.
- Off-Center Bottles: When a saggy preform is blown, the gate mark on the bottom of the bottle will not be in the center. This leads to a bottle with one side of the wall thicker than the other, making it unstable and weak.
- Deformed Neck Finish: While the neck area is shielded from heat, intense ambient heat from an overheated oven can still soften it. This can cause the precise threads of the neck finish to warp, leading to sealing problems with the cap.
This is a nightmare for consistency. You can't produce a uniform product if your starting material changes shape every time. A well-designed production line, from the preform mold to the blowing machine, is built on the assumption of a consistent, stable preform shape entering the mold. Overheating shatters this assumption.
Loss of Control: Unpredictable Material Flow
The final consequence of overheating is the complete loss of control over how the material behaves inside the mold. The goal of blowing is to distribute a specific amount of plastic evenly to create a container with a planned wall thickness. This relies on the plastic having a certain level of viscosity—a resistance to flow.
When the PET is overheated, its viscosity drops dramatically. It flows too easily, like water instead of molasses. When the high-pressure air hits it, the material doesn't stretch in a controlled way. Instead, it blows out uncontrollably.
The most common result is a bottle with a very thin base and thick shoulders. The hot, fluid material at the bottom of the preform shoots to the corners of the mold instantly, stretching to its limit and becoming paper-thin. Meanwhile, the material at the top doesn't stretch down properly and accumulates in the upper body and shoulder area. This creates a bottle that is dangerously weak at the bottom and wastefully thick at the top. It's a classic sign that your heat profile is far too high. This is another one of the many issues detailed in our guide on fixing common blow molding defects, and it's almost always traced back to excessive heat.
The challenge for every operator is to find that "sweet spot" in the processing window, hot enough to avoid pearlescence but cool enough to prevent crystallization and sag. It's a skill that combines scientific understanding with hands-on experience.
Temperature Uniformity: Is It The Critical Factor for Bottle Wall Thickness?
Is one side of your bottle always thinner than the other? This frustrating problem isn't in the mold itself. It's a direct result of uneven heating of your preform.
Yes, temperature uniformity is the single most critical factor for consistent wall thickness. If one side of the preform is even slightly hotter, it will stretch much more easily during blowing, creating a thin, weak spot, while the cooler side remains thick.
The Inside-Out Challenge: Through-Wall Uniformity
When we talk about uniformity, the first dimension we have to consider is from the outside of the preform wall to the inside. The infrared lamps in the heating oven heat the preform from the outside. As I've mentioned, PET is not a great conductor of heat. It takes time for that thermal energy to soak through the plastic and warm up the inner wall.
If you rush this process, you end up with a preform that has a very hot outer surface and a significantly cooler inner surface. During the blowing stage, this temperature difference has a huge impact. The hot, pliable outer wall will stretch easily and become very thin. The cooler, stiffer inner wall will resist stretching. The final result is a bottle that may look fine from the outside, but it has a poorly balanced wall structure and compromised strength. This is why the "soaking" time, the period after the main heating lamps where the temperature is allowed to equalize, is a critical part of the heating cycle in any quality bottle blowing machine.
The 360-Degree Problem: Circumferential Uniformity
The most common wall thickness issue I encounter in the field is circumferential variation—meaning one side of the bottle is thick and the other is thin. 99% of the time, the root cause is uneven heating around the circumference of the preform.
To combat this, preforms are continuously rotated as they travel through the heating oven. They spin on their own axis (like a planet rotating) while moving along the chain (like a planet orbiting the sun). This is designed to expose all sides of the preform to the heat lamps equally.
However, problems can still arise:
- Faulty Spinners: If the small mandrels that are supposed to spin the preforms get stuck or become inconsistent, one side of the preform will face the lamps longer than the other. That side gets hotter.
- Uneven Lamp Output: Heating lamps can age and lose intensity. If one lamp in a bank is weaker than the others, the part of the preform that passes in front of it will be cooler.
- External Factors: Sometimes the cause is as simple as a draft. I've seen factories where a cool breeze from an open door or a ventilation unit blows on one side of the heating oven. This is enough to cool one side of the preforms slightly, leading directly to a thick/thin wall defect.
When the preform with this circumferential temperature difference enters the mold and is blown, the hotter side stretches more easily and becomes thin, while the cooler side resists stretching and remains thick. If you cut the bottle open and measure the wall, you'll see the imbalance clearly. A good machine operator learns to spot this and immediately begins to investigate the preform rotation and the heating environment.
The Art of Profiling: Vertical Uniformity
The final dimension of uniformity is along the vertical axis of the preform, from the neck down to the base. As we discussed earlier, we don't want the same temperature everywhere. Instead, we want a precise, repeatable profile. The ability to create and maintain this profile is what separates a basic machine from an advanced one.
This is where the design of the oven and its control system is paramount. High-quality ovens are divided into multiple, independently controlled heating zones. For example, a tall bottle might need an oven with 8 or 10 vertical zones. This allows the operator to create a very specific heat recipe.
| Bottle Section | Desired Temperature | Reason | Consequence of Error |
|---|---|---|---|
| Neck Finish | Cool (Ambient) | Must not deform to ensure a perfect seal. | Heated neck leads to ovality and cap leaks. |
| Shoulder Area | Moderately Hot | Needs to stretch but also support the structure. | Too hot = thin, weak shoulder. Too cold = won't form. |
| Main Body | Hottest Zone | This area undergoes the most stretching. | Must be in the perfect processing window for strength. |
| Base/Gate | Hot, but often cooler than body | Needs to form sharp corners but not be too fluid. | Too hot = thin center gate. Too cold = undefined feet. |
Achieving this perfect profile, consistently, across thousands of preforms, is the key to high-quality production. It's directly influenced by the final bottle shape detailed in the PET bottle mold design guide. A complex bottle with sharp angles and a specific panel design requires a much more precise temperature profile than a simple round water bottle. This is why investing in a machine with a powerful and flexible heating oven is not a luxury; it's a necessity for anyone serious about bottle quality.
Temperature and Shelf Life: Is There a Direct Link to Gas Barrier Properties?
Are your carbonated drinks going flat too quickly? Is your product's shelf life shorter than expected? The invisible shield protecting your product is formed by temperature, and it might be failing.
Absolutely. The bottle's ability to block gases (like CO2 from escaping or O2 from entering) depends directly on how well the PET molecules were aligned. This alignment, or biaxial orientation, is only achieved at the optimal stretching temperature, creating a dense barrier.
Creating the Invisible Wall: Molecular Orientation as a Barrier
When we successfully heat a PET preform to its ideal processing window and stretch it biaxially, we are doing more than just shaping it. We are creating a microscopic shield. The process of aligning the long PET molecule chains into a tightly packed, crisscross structure doesn't just add strength—it also dramatically improves the material's barrier properties.
Think of it this way: In an un-stretched preform, the jumbled mess of molecules leaves relatively large gaps between the chains. Gas molecules, like carbon dioxide ($CO_2$) or oxygen ($O_2$), can slowly wiggle their way through these gaps. However, in a properly oriented bottle wall, the aligned molecules are packed so tightly together that there are far fewer and smaller paths for the gas molecules to take. The material becomes much more dense and less permeable.
This tightly woven molecular structure acts like a wall, making it much harder for gases to pass through. The better the biaxial orientation, the stronger and more effective this wall is. And since perfect orientation can only be achieved with perfect temperature control, there is a direct and undeniable link between your heating process and your product's shelf life.
Keeping the Fizz: The Importance for Carbonated Beverages
For anyone bottling carbonated soft drinks (CSDs), beer, or sparkling water, this is a make-or-break issue. The fizz in these drinks is dissolved $CO_2$ gas held under pressure. From the moment the bottle is filled, that $CO_2$ is trying to escape through the walls of the PET bottle.
If the bottle was made from a preform that was underheated or overheated, the molecular orientation will be poor. The "wall" will be weak and porous. The $CO_2$ will escape much more quickly, and the drink will go flat on the shelf long before its expiration date. This leads to a terrible customer experience. No one wants to buy a soda that has no fizz.
I worked with a CSD startup company that was getting complaints about flat drinks. They had invested in a cheap, basic bottle blowing machine to save money. We analyzed their bottles and found that the biaxial orientation levels were extremely low and inconsistent. Their simple heating oven couldn't maintain a stable temperature profile. After they upgraded their machine to one with better heating control, we were able to increase the orientation level by over 30%. Their carbonation retention improved dramatically, and the customer complaints stopped. It was a clear demonstration of how equipment quality directly impacts the final product's quality on the shelf.
Protecting the Product: The Oxygen Barrier for Foods and Juices
While CSDs are concerned with gas escaping, many other products are concerned with gas getting in. Oxygen is the enemy of many food products, including juices, teas, sauces, and dairy products. When oxygen from the outside air permeates through the bottle wall, it can cause:
- Oxidation: This can ruin the flavor, color, and aroma of the product. It's why apple juice can turn brown and an oily sauce can taste stale.
- Vitamin Degradation: Oxygen can destroy essential vitamins like Vitamin C, reducing the nutritional value of the product.
- Microbial Growth: While less common in shelf-stable products, the presence of oxygen can enable the growth of certain spoilage microorganisms.
A bottle with poor barrier properties will allow more oxygen to enter, significantly shortening the product's viable shelf life. This can lead to massive waste and product recalls. For products that are highly sensitive to oxygen, sometimes a standard PET bottle isn't enough. In these cases, special multi-layer preforms with an embedded oxygen-scavenging layer are used. However, even with these advanced preforms, the blowing process is critical. Improper temperature control can damage the delicate barrier layer, rendering it useless. The fundamental principle remains the same: good temperature control equals a good barrier. This process starts right from the beginning, and understanding the basics like how to choose the right preform neck size is part of the holistic approach to ensuring a good seal and maximum shelf life.
Temperature and Production Efficiency: Is It the Driver Behind Scrap Rate and Energy Costs?
Focusing only on bottle quality and ignoring costs? The way you manage temperature is secretly controlling your scrap rate, production speed, and electricity bill. A small tweak can have huge financial impact.
Yes, optimized temperature control is a massive driver of efficiency. A stable, correct temperature profile directly lowers the scrap rate. It can also allow for a faster production cycle and significantly reduces energy consumption from the heating ovens, boosting your bottom line.
The Most Obvious Win: Slashing Your Scrap Rate
The most direct impact of poor temperature control on your bottom line is the scrap rate. Every time you produce a bottle that is pearlescent, hazy, incompletely formed, or broken, you are throwing money away. You lose the cost of the preform, the energy used to heat it, the compressed air used to blow it, and the machine time it consumed.
A stable, well-optimized temperature process is the number one defense against a high scrap rate. When every preform is heated correctly, the number of defects plummets. I've seen factories running with scrap rates of 5% or even higher, simply because they never took the time to properly profile their heating process. They accepted this waste as a "cost of doing business."
By spending a day or two systematically adjusting heating zones and finding the optimal temperature window, we can often cut that scrap rate to less than 1%. Let's look at the numbers. Imagine a factory producing 10,000 bottles per hour.
| Metric | Scenario A: Poor Control | Scenario B: Optimized Control |
|---|---|---|
| Scrap Rate | 5% | 1% |
| Good Bottles / Hour | 9,500 | 9,900 |
| Scrap Bottles / Hour | 500 | 100 |
| Preforms Wasted / Hour | 500 | 100 |
| Preforms Saved / Hour | - | 400 |
If a preform costs $0.02, saving 400 preforms per hour is a saving of $8 per hour. Over a 24-hour day, that's $192. Over a 300-day production year, that's a saving of $57,600 from a single production line, just from reducing waste. This is money that goes directly back into the business.
The Need for Speed: Improving Cycle Time
Efficiency isn't just about waste; it's also about speed. The total time it takes to produce one batch of bottles is called the cycle time. In many automatic blow molding machines, the heating process is the longest part of the cycle. Therefore, it is often the bottleneck that limits the overall output of the machine.
An inefficient heating setup might require a longer time in the oven to ensure the heat soaks through to the core of the preform. However, by optimizing the heating process, you can often deliver the required energy to the preform more effectively and in less time. This could mean:
- Using a more efficient lamp configuration.
- Optimizing the oven's ventilation to keep heat focused on the preforms.
- Ensuring the reflectors behind the lamps are clean and working properly.
If you can safely reduce the heating time by even a fraction of a second without compromising quality, you shorten the entire machine cycle. Shortening the cycle time means you produce more bottles per hour. An increase from 9,800 bottles per hour to 10,000 bottles per hour might seem small, but over a year, that's millions of extra bottles of capacity from the same machine, with the same labor and overhead costs. This is a massive boost to productivity. Part of this optimization includes ensuring all your auxiliary equipment, like the chiller that cools the mold, is working efficiently to allow for rapid and consistent cycles.
The Hidden Cost: Reducing Energy Consumption
The heating oven on a blow molding machine is an energy beast. It's essentially a tunnel of powerful infrared lamps running for hours on end. The electricity required to power these lamps is one of the single biggest operational costs in a bottling plant. Therefore, any reduction in the energy needed for heating has a significant and immediate impact on the company's electricity bill.
The goal is to find the lowest possible temperature settings that still produce a perfect bottle. Every percentage point you can reduce on those lamp settings is a direct energy saving. Operators often have a tendency to use more heat than necessary "just to be safe." They want to avoid underheating defects, so they run the process a little too hot. This is not only risky for quality (as it can cause overheating defects), but it's also incredibly wasteful.
A systematic approach involves starting from a known good setting and then slowly, carefully, reducing the overall heat percentage by 1% at a time, while rigorously testing the bottles for top load, wall thickness, and visual defects. You will eventually find the bottom edge of the processing window, where quality is still perfect, but energy use is at its minimum. Running the machine at this optimized setpoint can reduce energy consumption by 5-15% or even more. When your electricity bill is tens of thousands of dollars a month, that saving is enormous. It's also environmentally responsible. This efficiency mindset extends to the whole system, including finding ways a single high-pressure air compressor can service the entire line, further reducing energy costs.
Conclusion: How Can You Achieve Perfect Blow Molding Temperature Control?
You understand the theory, but how do you apply it? Achieving perfect temperature control isn't magic. It's a combination of the right tools, knowledge, and systematic processes.
Achieve perfect control by investing in precise equipment with features like closed-loop controls, training operators on the why behind adjustments, and creating a database of proven process parameters for each specific bottle and preform combination you run.
Start with the Right Tools: Invest in Precision Equipment
You can't expect a master painter to create a masterpiece with a cheap, frayed brush. In the same way, you cannot achieve perfect temperature control with outdated or inadequate equipment. The foundation of process control is a high-quality machine. When you're looking at a bottle blowing machine, you need to look specifically at the heating technology.
Modern machines from a supplier like iBottler offer critical features:
- Multi-Zone Heating: The ability to independently control at least 7-10 heating zones is not a luxury, it's essential for creating the precise temperature profiles required for complex bottle shapes.
- Closed-Loop Control: Advanced systems use infrared sensors to measure the actual temperature of the preforms as they exit the oven. This data is fed back to the controller, which can automatically adjust lamp power to compensate for any variations, ensuring every preform is heated perfectly.
- Efficient Ventilation and Reflectors: A well-designed oven keeps the heat focused on the preforms and away from the neck finish and the machine itself. This provides stability and saves energy.
- Reliable Mechanical Systems: Consistent preform spinning and transfer mechanisms are crucial for uniform heating.
The investment is not just in the machine, but in the entire system, including high-quality blow bottle molds that heat and cool efficiently. It's also important to ensure compatibility. For example, we know that many clients worry about fit, which is why we've compiled mounting dimensions for 80% of blow molding machines worldwide, to make integration seamless.
Empower Your People: Systematic Operator Training
A great machine is only as good as the person running it. I have seen companies invest hundreds of thousands of dollars in new equipment only to have it run by operators who were never trained on the "why" behind the buttons they were pushing. An operator who only knows to "turn up the heat" when they see a white bottle is a liability.
A truly skilled operator understands the concepts we've discussed: the glass transition temperature, biaxial orientation, and the different consequences of underheating and overheating. They know how to diagnose a problem by looking at a defective bottle and can then make intelligent, targeted adjustments to the heating profile.
Training shouldn't be a one-time event. It should be an ongoing process. Regular refresher courses and sharing knowledge between shifts are vital. When an operator solves a tricky problem, that solution should be documented and shared with the whole team. Empower your operators to be process technicians, not just machine minders.
Build Your Library: Create a Process Parameter Database
Finally, the key to long-term, repeatable success is to stop relying on memory and "feel." You must be systematic. For every single combination of preform and bottle shape that you run, you should perform a rigorous process of optimization to find the perfect settings.
This process involves:
- Starting with a baseline: Use settings from a similar bottle or the machine manufacturer's recommendation.
- Making small, one-at-a-time adjustments: Change only one variable at a time (e.g., one heating zone by 2%) and observe the result.
- Rigorous testing: Test the resulting bottles for wall thickness, top load, clarity, and other critical parameters.
- Documenting everything: Once you have found the optimal settings that produce a perfect bottle with the lowest possible energy use, document them meticulously.
Create a "recipe book" or a process database. This database should list the bottle name, the preform weight, and the exact temperature percentage for every single heating zone, along with cycle time, blowing pressures, and quality control results. Validating these designs can be sped up significantly by using modern techniques like 3D printed samples to rapidly validate blow mold designs before ever cutting steel for a production mold.
This database becomes your company's most valuable asset. When you need to change production to a different bottle, you can simply pull up the "recipe" and be confident of good production from the very first run. This is what I had to do with my Russian client. The parameters I set in my factory were a starting point. They then had to perform this optimization process in their own environment to create their own, perfect recipe. This disciplined, data-driven approach is the ultimate secret to achieving perfect blow molding temperature control.
Conclusion
Perfect bottles start with perfect heat. Master temperature control through the right equipment, skilled operators, and systematic processes, and you will master your production quality and efficiency.
Frequently Asked Questions (FAQ)
1. Why can't I use one standard temperature setting for all my PET bottles?
Every bottle is different. A bottle's final shape, weight, wall thickness, and even the specific PET resin used in the preform all dictate a unique heating requirement. A heavy, complex-shaped bottle needs a very different temperature profile than a lightweight, simple round bottle. A single standard setting would lead to severe underheating for some bottles and gross overheating for others. Each bottle needs its own "recipe."
2. How does the color of my PET preform affect the heating settings?
The color of the preform has a significant impact on heating. Darker colors, like amber or dark green, absorb infrared energy much more efficiently than clear preforms. Therefore, they require lower temperature settings or less time in the oven to reach the target temperature. If you use the same settings for a clear preform on a dark one, you will almost certainly overheat it, causing crystallization and defects. You must have separate, lower-energy process parameters for every colored preform you run.
3. My factory is in a hot climate. Do I need to adjust my machine's temperature settings compared to a machine in a cold climate?
Yes, absolutely. The ambient temperature of your factory affects the starting temperature of the preforms before they enter the oven. In a hot climate (e.g., 35°C), the preforms need less energy to reach the target temperature of ~105°C compared to a factory in a cold climate (e.g., 15°C). You will likely need to run with slightly lower overall heating percentages to avoid overheating. Conversely, a machine in a colder environment will need higher settings to achieve the same result.
4. What's the first thing I should check if I suddenly start producing a lot of bad bottles?
If your process was running well and suddenly starts producing defects, don't immediately change your temperature settings. First, become a detective. Check for simple changes. Is the plant air pressure stable? Is the cooling water from the chiller at the correct temperature? Did you just start a new box of preforms from a different batch or supplier? Is there a draft from an open door? 90% of sudden problems are caused by a change in input materials or environmental conditions, not a random failure of the process settings.
5. Is it better to have the preform slightly too hot or slightly too cold?
This is a tricky question that operators often debate. In my experience, it is generally safer to be slightly too cold than slightly too hot. A slightly underheated preform might produce some minor pearlescence or a slight loss in top-load strength, which can be identified and corrected. However, a slightly overheated preform can lead to thermal crystallization, which is an irreversible chemical change that makes the bottle hazy and brittle. It's often easier to recover the process by adding a little heat than it is to deal with the consequences of "baking" the preforms.
🔗 Learn More about Blow Molding Technology
Blow Molding – Wikipedia
A comprehensive overview of various blow molding processes, including extrusion, injection, and stretch blow molding.Injection Molding – Wikipedia
Important for understanding the production of preforms used in stretch blow molding.Stretch Blow Molding – Wikipedia
Explains how PET bottles are formed through axial and radial stretching processes.PET Bottle – Wikipedia
Background information on the materials and properties of typical PET bottles.Design of PET Bottles – Wikipedia
An introduction to the design considerations and geometry used in PET bottle manufacturing.
🔗 Related Pages on Our Website
Automatic Blow Molding Machines – iBottler
Discover our full range of customizable automatic PET bottle blow molding machines.Blow Bottle Mold – iBottler
Explore our precision blow molds designed for PET and PP bottles.Preform Mold – iBottler
Learn more about our high-precision preform molds suitable for various injection molding machines.PET Wide Mouth Jar Project Starter Guide: Equipment, Molds & Process Explained
Pros and Cons: Should You Choose PET Blow Moulding for Your Bottle Project?
Worried About Blow Mold Fit? We Have Mounting Dimensions for 80% of Blow Molding Machines Worldwide
Can One Semi‑Automatic Blow Molding Machine Produce All Bottle Sizes? Here’s Why Not
Why Do Krones Blow Molding Machine Users Come to Us for Their Molds?
Why Do PET Preforms Come in Different Colors? Function, Application, and Production Tips
How to Set Parameters for 600ml Bottles on a Semi-Automatic PET Blowing Machine?
From 3D Printed Samples to Production: How Can You Rapidly Validate Blow Mold Designs?
How to Choose the Right Preform Neck Size for Your PET Bottle Project
