Struggling with bottle defects and production losses? The cause is often a simple, overlooked detail. The secret to a perfect bottle lies in what you don't heat.
The preform neck must remain cool because its precise dimensions are critical for a proper seal. Heating softens the PET material, causing the neck to deform. This leads to capping failures, leaks, and costly production stops. The neck's job is to stay rigid and unchanged.
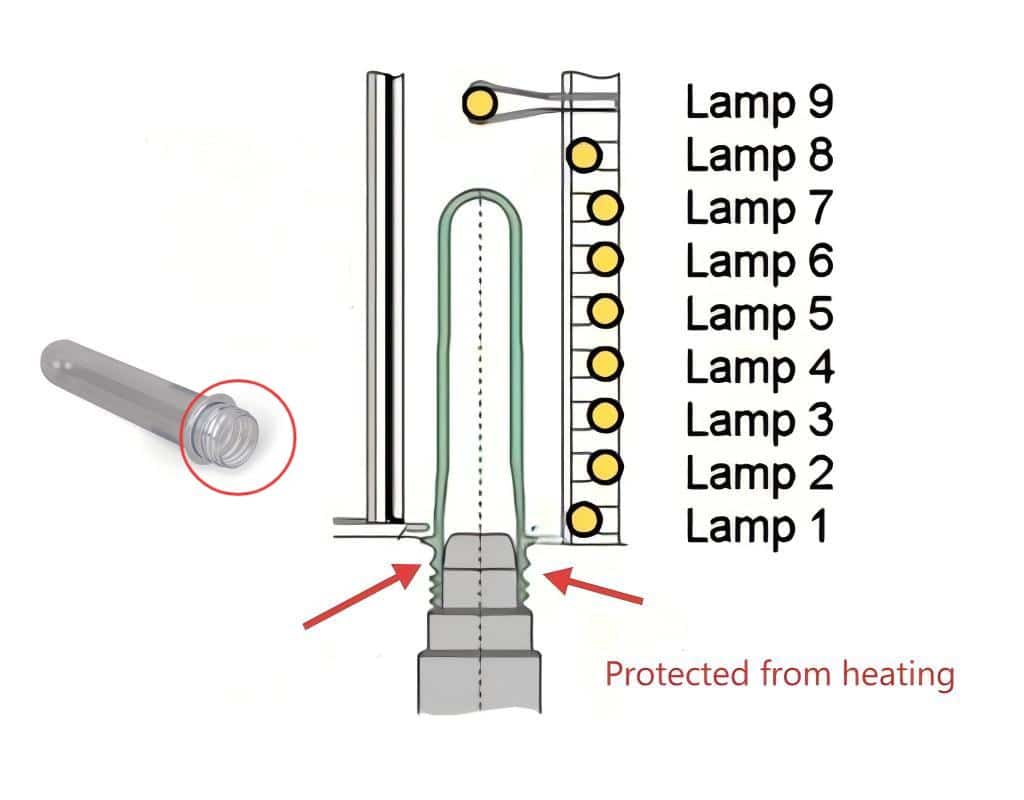
I've seen many production lines struggle with this issue. It's frustrating to see good materials turn into waste because of one small process error. But once you understand why the neck is so important and how to protect it, you can solve these problems for good. Let's dive into how you can protect this critical area and ensure every bottle comes out perfectly.
What is the Role of the Preform Neck in Blow Molding?
You see the preform neck every day, but do you understand its true function? It's the foundation of your entire bottle. A weak foundation means the final product will fail.
The preform neck is the bottle's "standard interface." It is the only part that must mate perfectly with a cap. Therefore, its dimensions, strength, and roundness must be exact and must not change during the blowing process. It holds the entire bottle during production.
The Neck as the Standard Interface
Think of the neck finish as a universal connector. It has several critical jobs. First, it provides the threads for the cap to screw onto, creating a tight seal that prevents leaks and preserves the product inside. Second, the small flange below the threads, often called the support ring, is what the bottle blowing machine grips to carry the preform through the heating and blowing stages. If this area is compromised, the entire process fails. The neck must maintain its structural integrity under the pressure of capping and the stresses of daily use. Any change in its shape can lead to significant problems down the line. The design of this part is determined not by the bottle shape, but by the cap it needs to fit, making a quality preform mold absolutely essential for its creation.
Why the Neck Remains Unchanged
The magic of blow molding happens in the body and base of the preform. The PET material there is heated to a temperature above its glass transition point, making it soft and stretchable like rubber. A stretch rod then pulls it vertically, and high-pressure air inflates it horizontally to fit the shape of the blow bottle mold. During this entire violent process, the neck is held firmly in place by the machine's grippers and is shielded from both the heat and the stretching forces. It serves as the stable anchor point from which the rest of the bottle is formed. If the neck were to also heat up and soften, it would deform under the gripping force, making a successful blow impossible.
| Feature | Preform Neck | Preform Body/Base |
|---|---|---|
| Primary Role | Sealing, Handling, Structural Anchor | Stretching and Inflation |
| During Heating | Must remain cool and rigid | Must be heated until soft and pliable |
| During Blowing | Held stationary by machine | Stretched and expanded to final shape |
| Final State | Dimensions must be identical to preform | Shape is completely transformed |
What Happens if the Preform Neck Gets Too Hot?
Seeing perfectly good preforms turn into useless, deformed bottles is frustrating. This common problem often comes from a single, overlooked cause: excess heat reaching the neck area.
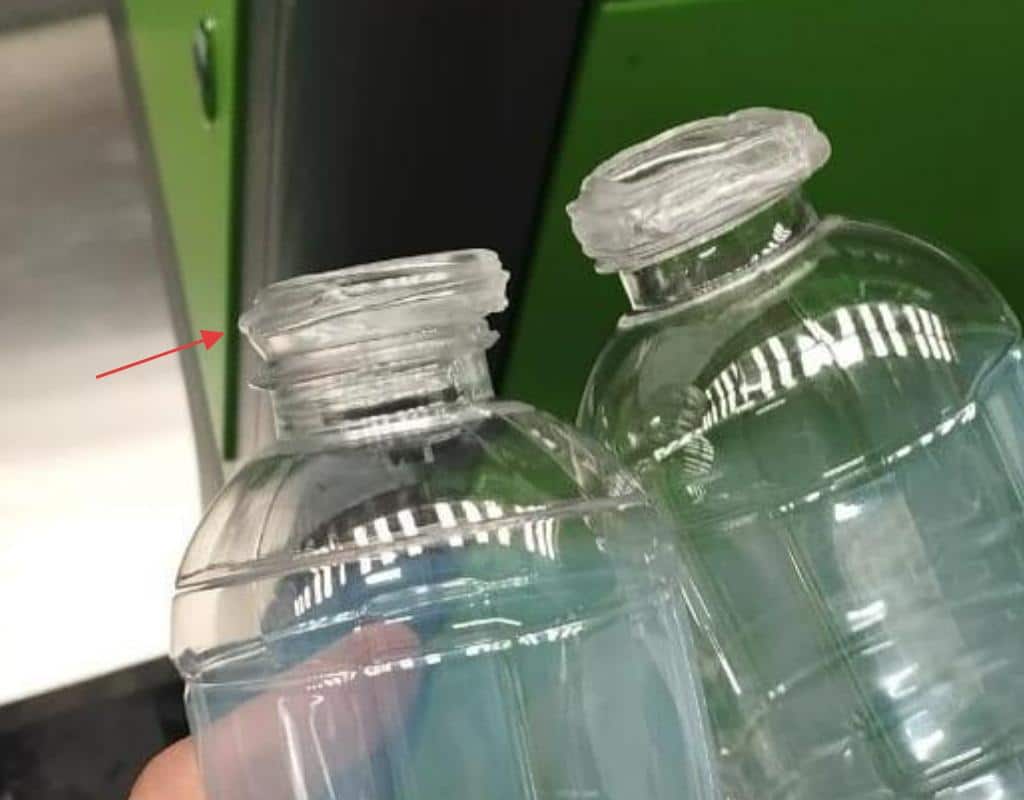
If the neck heats up, the PET material softens and loses its structural integrity. This causes it to twist, shrink, or collapse under the machine's grip. This leads to misalignment during blowing and, for the bottles that are formed, severe capping and sealing issues.
Material Softening and Its Consequences
PET plastic has a glass transition temperature (Tg) of around 75-80°C (167-176°F). In the heating ovens of a bottle blowing machine, the preform body is heated well above this to make it malleable. However, the neck must stay well below this temperature. If heating lamps are misaligned or shields are missing, the neck can easily exceed its Tg. When this happens, the rigid, crystalline structure of the PET turns amorphous and soft. The clamping force of the machine, which is designed to hold a solid object, will then crush or distort the now-soft neck. The support ring can warp, making it impossible for the preform to hang straight or be held securely.
Production Failures from Neck Deformation
A soft neck triggers a chain reaction of failures. First, the machine may fail to grip the preform properly, causing it to drop or become misaligned before it even enters the blow bottle mold. This causes an immediate production halt. If the preform does make it into the mold, a deformed neck will not align correctly with the blow nozzle. This can result in an off-center bottle or a complete blow-out failure. For bottles that are somehow successfully blown, the problem moves downstream. A warped or oval-shaped neck will not seal correctly with a cap. This results in stripped threads, caps that pop off, slow leaks, or catastrophic product spoilage. These quality control failures can lead to massive financial losses and damage to a brand's reputation.
| Problem | Root Cause (Neck Overheating) | Consequence |
|---|---|---|
| Machine Stoppage | Preform neck softens and is crushed by grippers. | Preform is dropped or misaligned; machine sensors halt production. |
| Blowing Failure | Neck deforms, failing to align with the blow nozzle. | Off-center bottle, uneven wall thickness, or blow-out. |
| Capping & Sealing Issues | Neck finish is no longer round or to specification. | Leaks, stripped cap threads, product contamination, customer complaints. |
How Do Heating Zones Protect the Preform Neck?
You rely on your heating oven to prepare preforms for blowing. But is it also protecting the most critical part? An improper heater setup can sabotage your entire process without you noticing.
Heating ovens in blow molding machines are specifically designed to heat only the preform's body and base. The neck area is actively protected by physical shields, reflective covers, or even advanced cooling systems using forced air or water to keep it rigid.

Strategic Heating Lamp Placement
The first line of defense is the design of the heating oven itself. The infrared heating lamps are positioned in zones, and their height and angle are adjustable. A proper setup ensures that the energy from the lamps is focused exclusively on the parts of the preform that need to be stretched—the body and the base. The lamps should never be positioned so high that their energy directly radiates onto the neck and support ring area. The number of active heating zones and the power percentage of each lamp are carefully calibrated to create a precise temperature profile in the preform wall, while leaving the neck cold.
Protective Hardware
Nearly all bottle blowing machine ovens are equipped with hardware to shield the neck. This often includes metal plates or shields that sit just above the heating lamps, physically blocking infrared radiation from reaching the neck finish. Sometimes, these are reflective to bounce the heat back down toward the preform body, improving energy efficiency. On the preform holders themselves, there are often protective covers that shield the top of the neck and the support ring. It's critical that these shields are in place and correctly adjusted for the specific preform being used.
Advanced Cooling Methods
In higher-speed or more sophisticated machines, passive shielding isn't enough. These systems use active cooling to guarantee the neck stays at the proper temperature. This is most commonly done with targeted forced air. A series of blowers or nozzles are aimed directly at the preform support rings as they travel through the oven. This constant airflow carries away any residual heat that might conduct up from the body or radiate from the oven walls. In some very high-output applications, a water-cooling circuit is built into the preform holder spindles. This provides the most stable and effective method of neck cooling, ensuring temperature consistency regardless of ambient conditions or production speed.
How Did One Plant Lose 20% Yield From an Overheated Neck?
A 20% drop in yield is a nightmare for any plant manager. One of my clients faced this disaster right after a simple mold change, and the cause was completely hidden at first glance.
A valued client had just invested in a new preform mold to produce a lighter bottle. But they forgot to adjust the heater settings on their blow molder. This simple oversight caused the new preforms' necks to overheat, leading to stripped caps and a shocking 20% loss in saleable products.
The Initial Problem: New Preform Mold, Old Settings
I remember getting the call. The client was panicking. They had successfully used our machines for years, but after introducing a new, lighter-weight preform, their quality control was catching thousands of faulty bottles. The main complaint was that the caps were "spinning" or stripping when applied, indicating a poor seal. Their team had checked the capper, the caps, and everything they could think of, but the problem persisted. Because the bottle body looked perfect, they didn't initially suspect the blowing process. They were losing a huge amount of money every day in wasted materials and production time.
The Diagnosis and Solution
I asked them to send me a video of their bottle blowing machine in operation, focusing on the preforms as they exited the heating oven. The problem was immediately clear to me. The infrared lamps were positioned too high for the new, slightly shorter preform. I could see a slight shimmer on the neck finish, a telltale sign that it was getting soft. The old, heavier preform could absorb this slight excess heat without deforming, but the new, thinner-walled preform could not. Its neck was becoming oval-shaped and warping under the heat.
I walked them through a three-step solution over a video call:
- Install Neck Cooling Shields: Their machine had protective shields, but they had been removed for maintenance and never re-installed. We put those back on immediately.
- Lower the Lamp Angle: We adjusted the top one or two rows of heating lamps, angling them slightly downward to focus their energy away from the neck and more toward the preform shoulder.
- Enhance Support Ring Cooling: I had them check the air pressure for the cooling fans directed at the support ring. It was a bit low, so we increased it to provide more aggressive cooling right where it was needed.
The results were immediate. The neck deformation stopped, the caps sealed perfectly, and their yield went right back to 99%. It was a powerful lesson in how a small change in tooling, like a new blow bottle mold, requires a full process review.
What are the Best Techniques to Protect the Preform Neck?
Are you taking active steps to protect your preform necks? Relying on the machine's default settings is a common but potentially costly mistake. A few simple checks can save you from major headaches.
The best practices are straightforward: use aluminum shields to physically block heat from the neck, install fans that blow cool air directly onto the support ring, and always verify that your heating lamps are the correct length and do not radiate heat onto the neck area.
Physical Shielding
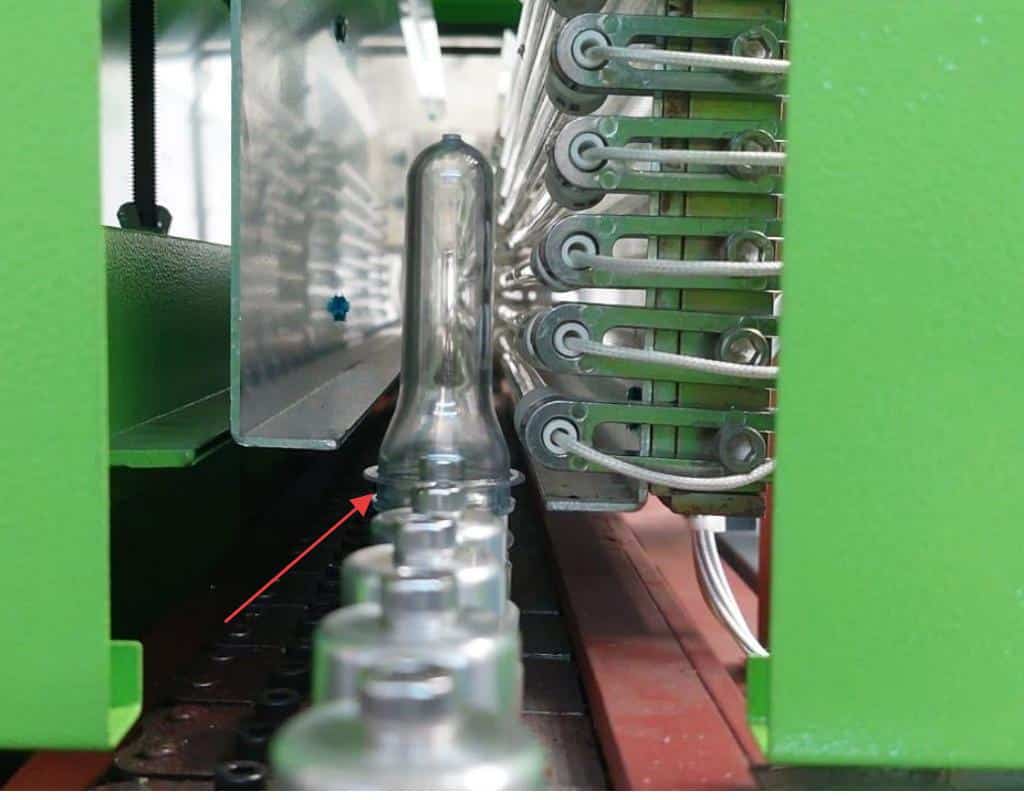
The most direct way to protect the neck is to block the heat. This is usually done with custom-fit aluminum or stainless steel plates that sit between the heating lamps and the preforms. These shields must be positioned correctly, allowing the preform body to be exposed to the infrared energy while completely covering the neck and support ring. If your machine did not come with these, they can often be fabricated. When setting up for a new bottle, always check that the shields are correctly aligned for the specific preform length and that there are no gaps where heat can leak through.
Active Air Cooling
Passive shielding is good, but active cooling is better. Most modern machines have built-in cooling systems, but they need to be maintained and optimized. Ensure that the fans or air nozzles are clean and aimed directly at the line of preform support rings as they pass through the oven. Check the airflow; it should be strong and consistent. For older machines without this feature, retrofitting a simple fan or a compressed air line can make a world of difference. This constant airflow is crucial for dissipating any heat that conducts up the preform wall from the body, keeping the neck well below its glass transition temperature.
Heater Lamp Audits
Not all problems are with shielding or cooling. Sometimes, the issue is the heat source itself. It's important to conduct regular audits of your heating lamps. Check that the length of the lamps is appropriate for the preform. A lamp that is too long can easily extend past the body and heat the neck directly. Also, verify their vertical position and angle. The top row of lamps is the most critical; it should be low enough and angled correctly to target the shoulder of the preform, not the neck.
Here is a simple checklist for your operators:
| Checkpoint | Procedure | Frequency |
|---|---|---|
| Shield Alignment | Visually inspect that shields fully cover the neck area for the current preform. | At every job change, start of shift. |
| Cooling Airflow | Place your hand in the path of the cooling air to feel for strong, consistent flow. | Daily. |
| Lamp Position | With the oven off, measure the position of the top lamps relative to the preform height. | At every job change. |
| Visual Inspection | Look for signs of discoloration or warping on preform necks exiting the oven. | Continuously during production. |
Following these simple techniques will help you maintain control over the heating process and protect the most critical part of your preform, ensuring a stable and high-quality production run with any blow bottle mold.
What are the Telltale Signs of an Overheating Preform Neck?
Production issues can be mysterious and frustrating. But the clues are often right in front of you if you know what to look for. Learning to spot the signs of neck overheating saves time and money.
The most obvious signs of an overheating neck are visible and physical. Look for necks that are oval instead of perfectly round, listen for caps that strip or jam during application, and watch for preforms that fail to be gripped properly by the machine.
Visual and Physical Defects
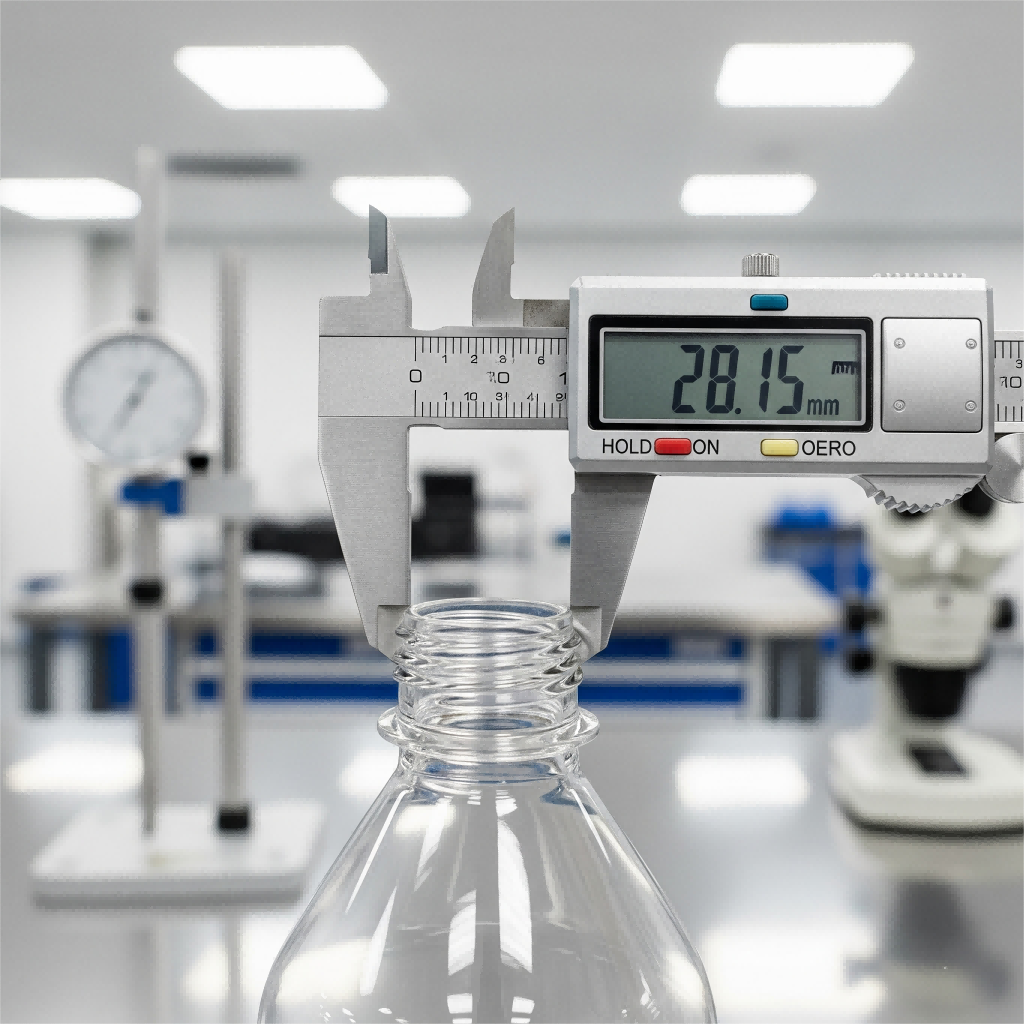
The first place to check for trouble is the finished bottle. A properly formed bottle will have a perfectly round neck finish. If the neck was overheated, it will likely be slightly oval-shaped. You can check this with calipers or sometimes just by eye. This "ovality" is a direct result of the soft neck being deformed by the machine's grippers. Another major red flag is capping problems. If you find that caps are not screwing on smoothly, are stripping their threads, or are breaking during tightening, the root cause is very often a deformed neck. The threads are no longer in the correct shape to mate with the cap, leading to a failed seal.
Machine-Level Indicators
Sometimes the problem shows up before a single bottle is even made. The most dramatic sign is a machine stoppage. Watch the preforms as they are transferred from the heating oven to the blow bottle mold. If the neck is soft, the grippers may crush it, causing the preform to be dropped and triggering a machine fault.
I once helped an Indonesian client who had this exact problem. He had six of our two-cavity semi-automatic machines and was very experienced. But he had just purchased a new four-cavity semi-automatic bottle blowing machine and was having a strange issue. He called me and insisted that the machine's main cylinder was "double-blowing." I couldn't understand what he meant. After a long video call where I had him walk me through every part of the process, I spotted it. His heater setup was wrong, and the preform necks were getting extremely soft. When the stretch rod and blow nozzle assembly came down to seal on the preform, it didn't stop. It pushed the entire soft preform further down into the mold cavity. This extra movement was what he was describing as a "second blow." We adjusted his heaters to protect the neck, and the problem vanished instantly.
| Sign | Where to Look | What it Means |
|---|---|---|
| Oval Neck Finish | Finished bottles, quality control area | Neck softened and was deformed by grippers. |
| Stripped/Jamming Caps | Capping station, finished product | Neck threads are warped and do not align with the cap. |
| Dropped Preforms | Transfer area between oven and mold | Neck is too soft to be held securely by the machine's grippers. |
| Strange Machine Motion | Blowing station | A soft neck can collapse under pressure from the blow nozzle, causing unexpected movement. |
Do Preform Material or Color Change the Neck Heating Risk?
You might assume all PET preforms behave the same way in a heater. However, subtle differences in color, weight, or material composition can dramatically alter how they absorb heat, creating hidden risks.
Yes, these factors absolutely matter. Darker colored preforms absorb infrared heat more readily than clear ones. More importantly, lightweight or thin-walled preforms are far more sensitive to overheating because the heat penetrates their walls much faster, reducing the margin for error.

The Impact of Color
The color of a preform has a significant effect on how it interacts with the infrared lamps in the heating oven. Clear, transparent preforms allow infrared energy to pass through them more easily, heating the material from the inside out. In contrast, opaque or dark-colored preforms (like amber, green, or black) absorb much more of that energy right at the surface. This means a dark preform can heat up much faster than a clear one with the same lamp settings. While this difference primarily affects the heating profile of the preform body, it can increase the risk to the neck. If any stray radiation hits the neck of a dark preform, it will absorb that heat much more efficiently, increasing the chance of softening. Therefore, when switching from clear to colored preforms, it is essential to re-evaluate and likely lower your overall heating percentages.
The Role of Preform Weight and Wall Thickness
Perhaps even more critical than color is the preform's design, specifically its weight and wall thickness. The trend in the industry is toward "lightweighting"—using less plastic to create the same bottle, which requires a lighter preform mold design. While this is great for cost savings and sustainability, it presents a major challenge in the heating process. A preform with thinner walls heats up much more quickly and has less material to distribute that heat. This drastically shrinks the "processing window." The temperature difference between a body that is hot enough to stretch and a neck that is too hot becomes very small. This makes lightweight preforms extremely sensitive to overheating. The slightest imperfection in the heating setup—a misaligned lamp or insufficient cooling—can instantly cause the neck to deform. This demands much more precise control over the heating zones and makes robust neck shielding and cooling absolutely non-negotiable.
| Preform Type | Heating Characteristic | Neck Overheating Risk | Key Consideration |
|---|---|---|---|
| Standard Clear | Heats evenly, relatively forgiving. | Low | Establish a baseline process here. |
| Dark Colored | Absorbs heat quickly at the surface. | Medium | Reduce lamp power; ensure no stray radiation hits the neck. |
| Lightweight/Thin-Wall | Heats very rapidly; small processing window. | High | Requires precise heating control and very effective neck cooling. |
How Can We Help You Optimize Your Blowing Setup?
Are you tired of guessing with your heating settings? Wasting valuable time and materials on trial and error is an expensive way to run a bottling plant. You can get expert guidance to set up your process perfectly from the very first bottle.
We provide comprehensive support for your entire blowing process. We can assess your bottle drawings and blow bottle mold designs, give you specific, actionable advice on setting up your heater lamps and zones, and guide you through debugging to prevent these costly neck-heating errors.
Our Consultation Process
Getting a high-quality bottle at a high-efficiency rate is a science. Our goal is to take the guesswork out of it for you. My approach is hands-on and tailored to your specific equipment and products. It typically involves a few key steps. First, we start with your designs. I'll evaluate your bottle and preform drawings to identify any potential processing challenges before you even start production. Second, based on your specific bottle blowing machine and preform, I will provide concrete recommendations for setting up the heating oven. This includes which lamps to use, what power percentages to start with, and how to position your cooling and shielding for maximum protection. Finally, I can guide your team, either remotely or on-site, through the commissioning and fine-tuning process to achieve a stable, efficient setup.
Free Remote Assistance
I know that not everyone has the budget for on-site consultations, and travel isn't always possible. But that shouldn't stop you from getting the help you need. That is why I am proud to offer free video assistance to help my clients solve these exact kinds of problems. We can schedule a video call, and you can walk me through your production line. You can show me your preforms, your heater setup, and the bottles you are producing. From my experience with countless machine setups, I can often spot the issue in minutes, just as I did for my Indonesian client with his new preform mold. Whether it's a problem with preform grippers, lamp positioning, or cooling adjustments, I can provide clear, step-by-step instructions to get you back to producing perfect bottles. My goal is to help you avoid losses and maximize the value of your equipment.
Conclusion
Protecting the preform neck from heat is not just a suggestion; it is fundamental. It is the key to high-quality bottles, an efficient production line, and overall plant profitability.
Frequently Asked Questions (FAQ)
1. Why is my bottle neck oval instead of round after blowing?
This is a classic sign that the preform neck is overheating during the heating stage. The PET material becomes soft, and the machine's grippers deform its shape from round to oval. You should immediately check your neck shielding and cooling systems.
2. Can I use the same heater settings for clear and colored preforms?
No, you should never assume the same settings will work. Dark-colored preforms absorb infrared heat much more quickly than clear ones. You will almost always need to lower the heater lamp percentages for colored preforms to avoid overheating, especially in the neck area.
3. What is the easiest and most effective way to cool the preform neck?
The easiest method is to ensure your machine's built-in metal shields are properly positioned between the lamps and the neck. The most effective method is active cooling, using fans or a compressed air line aimed directly at the preform support rings as they pass through the oven.
4. My bottle caps are stripping when I apply them. Is this a cap problem or a bottle problem?
While it could be a cap issue, it is very frequently a bottle problem caused by neck deformation. If the neck becomes oval or the threads are warped from overheating, the cap cannot get a proper grip and will strip. Check your bottle necks for ovality first.
5. How often should I check my heater lamp setup and neck protection?
You should perform a quick visual check at the start of every shift. You must perform a full check and recalibration every single time you change the preform type, preform supplier, color, or install a new blow bottle mold.
🔗 Related Pages on Our Website
Automatic Blow Molding Machines – iBottler
Discover our full range of customizable automatic PET bottle blow molding machines.Blow Bottle Mold – iBottler
Explore our precision blow molds designed for PET and PP bottles.Preform Mold – iBottler
Learn more about our high-precision preform molds suitable for various injection molding machines.PET Wide Mouth Jar Project Starter Guide: Equipment, Molds & Process Explained
How to Choose the Right Preform Neck Size for Your PET Bottle Project
Share:
- Click to share on WhatsApp (Opens in new window) WhatsApp
- Click to share on Facebook (Opens in new window) Facebook
- Click to share on X (Opens in new window) X
- Click to share on LinkedIn (Opens in new window) LinkedIn
- Click to email a link to a friend (Opens in new window) Email
- Click to share on Tumblr (Opens in new window) Tumblr
