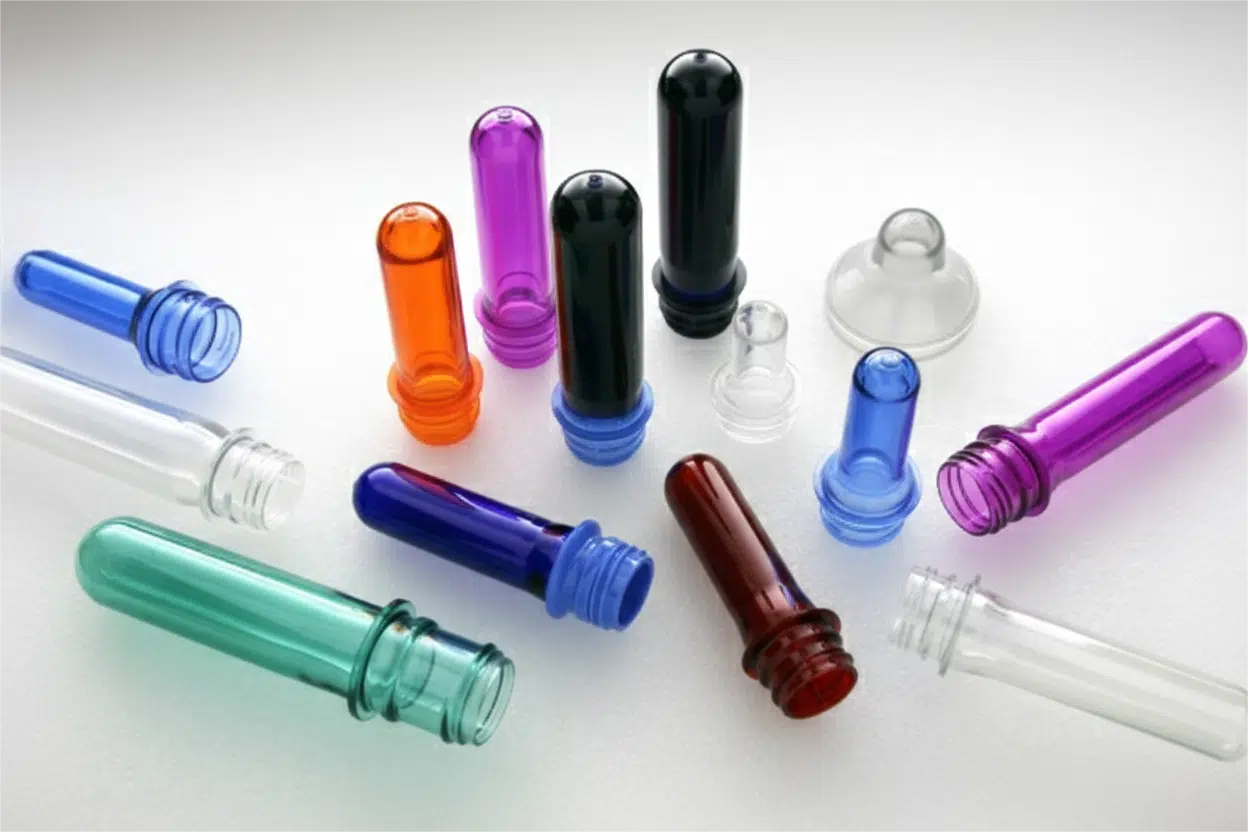
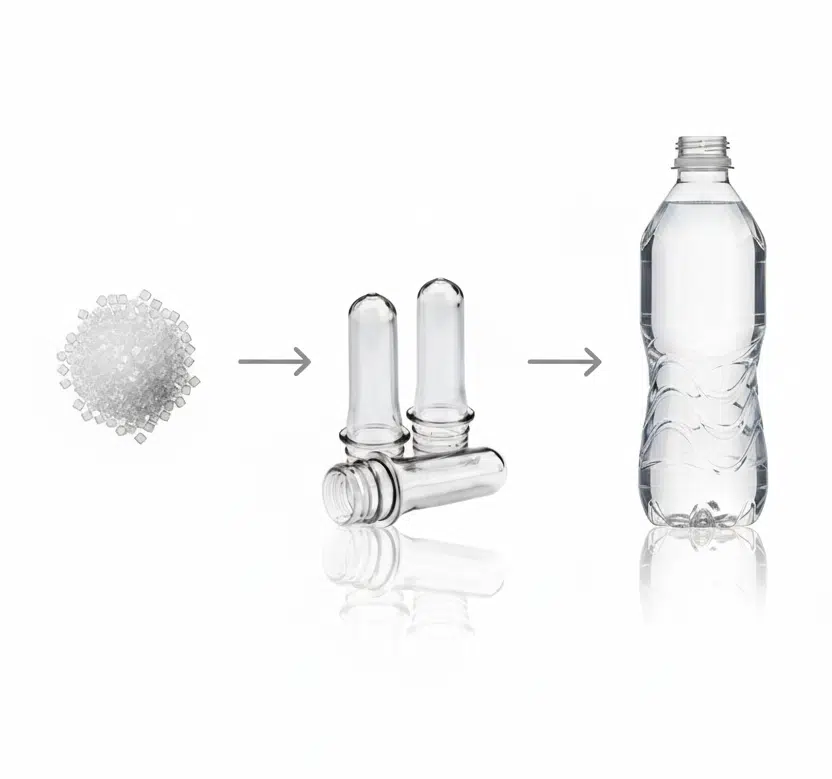
Ever looked at a plastic bottle and wondered how it’s made? You might be surprised that it doesn't start as a bottle. It starts as something that looks like a small, thick-walled test tube. This "seed" is called a PET preform, and its quality controls everything.
PET preforms are made through a process called injection molding. First, PET resin pellets are thoroughly dried. Next, they are melted into a liquid state in an injection molding machine. This molten plastic is then injected under high pressure into a precise, multi-cavity preform mold. Finally, the mold is rapidly cooled to solidify the preforms, which are then ejected.
This process is the foundation of the entire bottle-making industry. It’s a high-speed, high-precision operation where a small, solid part is created that holds all the potential for the final bottle. Let’s walk through each step, one by one.
Introduction: What Exactly IS a PET Preform (And Why Should You Care)?
You’re confused about where bottles come from, and you need to understand the start of the process. This "test tube" thing, the preform, is the secret.
A PET preform is the semi-finished product that is later blown into a full-sized PET bottle. It looks like a small, heavy-walled "test tube" with a fully formed, threaded neck. Understanding how it's made helps you control your final bottle quality and make smarter equipment choices.
Here is my favorite analogy: You can think of a PET preform as the "bread dough" for making a loaf of bread.
If you want a high-quality loaf of bread, you need high-quality dough. The dough's quality (its ingredients, how well it was mixed, how it was proofed) directly determines the bread's final taste, texture, and shape. You cannot bake a great loaf of bread from bad dough.
The exact same is true for bottles. The preform is the dough. Its quality—its material, its clarity, its wall thickness—fundamentally determines the quality of your final bottle. A bad preform can never be blown into a good bottle. This is why you must care about what is a PET preform and how it is made.
A preform has two main parts:
- The Neck Finish: This is the top part with the screw threads. This part is completely finished in the preform stage. It will not change during blowing. This is why the neck finish must be perfect from the start.
- The Body: This is the thick, tube-shaped part below the neck. This is the "dough" that will be reheated, stretched, and blown into the final bottle's shape.
Why make this two-step process?
- Shipping & Storage: Preforms are small, compact, and strong. You can ship millions of them in a truck. You would need 10-20 trucks to ship the same number of empty bottles.
- Efficiency: A company can mass-produce preforms in one location and ship them to different bottling plants around the world.
- Quality Control: It is much easier to inspect a small, solid preform for defects than it is to inspect a thin-walled, empty bottle.
Here is a simple comparison:
| Feature | PET Preform (The "Dough") | Final PET Bottle (The "Bread") |
|---|---|---|
| Appearance | Small, thick, like a test tube | Large, thin-walled, final shape |
| Wall Thickness | Very thick (e.g., 3-5 mm) | Very thin (e.g., 0.3-0.5 mm) |
| Neck Finish | Complete and fully formed | Identical to the preform |
| Body | Small, solid, not stretched | Large, hollow, stretched |
| Purpose | An intermediate product for shipping | The final container for liquid |
So, understanding your "dough" is critical. Let's start with the first ingredient.
Step 1: Starting with the Right Ingredient - PET Resin Pellets?
You cannot make a quality product from bad materials. You need the right "flour" for your "dough," and that means choosing the correct PET resin.
The preform manufacturing process begins with the raw material: PET (Polyethylene Terephthalate) resin. This material comes in the form of small, clear pellets, like tiny grains of rice. Choosing a high-quality, food-grade PET resin with the correct specifications is the first and most basic step.
As I always tell my clients, a good chef needs good ingredients. You can have the best oven (injection machine) and the best baking tin (mold) in the world, but if you use bad flour, you will get bad bread.
High-quality preforms must start with high-quality, "virgin" PET resin. "Virgin" just means it is new, not recycled (though recycled PET, or rPET, is also a big part of the industry now).
The most important specification for this resin is its "IV" (Intrinsic Viscosity).
You do not need to be a chemist, but you do need to know this term. In simple terms, IV is a measure of the strength or toughness of the PET. It tells you how long the polymer chains are.
- Longer chains (Higher IV) = Stronger, tougher, more viscous (thicker) plastic.
- Shorter chains (Lower IV) = Weaker, more brittle plastic.
Why does this matter? Different bottles have different jobs.
- A simple water bottle does not need to be super strong.
- A soda bottle (CSD - Carbonated Soft Drink) must be extremely strong to hold the pressure from the carbonation.
Therefore, they use different PET resins.
| Application | Typical IV Value (dL/g) | Why? |
|---|---|---|
| Still Water | 0.76 - 0.80 | Standard, good clarity, easy to blow. |
| Carbonated Drinks (CSD) | 0.82 - 0.85 | Higher strength is needed to resist pressure. |
| Hot-Fill (Juice, Tea) | 0.80 - 0.84 | Needs to withstand high heat without deforming. |
| Large Water Jugs (5L) | 0.80 - 0.82 | Needs extra strength for the large size. |
When you are making preforms step-by-step, this is Step 1. You must order the correct resin IV for your final bottle's job. Using "water" resin for a "soda" bottle is a recipe for failure. The bottles will burst. This is a foundational choice, and we always advise our clients to source their resin from major, reputable suppliers to ensure this IV value is stable and consistent.
Step 2: The Critical "Drying" Phase - Removing Moisture is Key!
You have your high-quality PET resin. You are ready to melt it, right? Wrong. If you do, you will destroy it. This is the step that separates amateurs from professionals.
PET resin is "hygroscopic," which means it loves to absorb moisture from the air. Before melting, this moisture must be removed using a special dehumidifying dryer. If you melt "wet" PET, a chemical reaction called hydrolysis occurs, which breaks the polymer chains, lowers the IV, and makes the plastic brittle.

This is the step I see beginners ignore or mess up most often. And it is the most common cause of preform defects.
If you do not dry the PET resin properly, the resulting preforms will be:
- Brittle: They will crack or shatter when you drop them.
- Hazy or Yellow: The chemical breakdown ruins the clarity.
- Full of Bubbles: The water turns to steam inside the barrel.
- Weak: When you try to blow them, they will just burst.
You cannot just use a "hot air oven" like you have in your kitchen. That just blows more wet air over the pellets. You must use an industrial dehumidifying dryer.
This machine does two things:
- It heats the pellets to a high temperature (around 160°C to 175°C / 320°F to 350°F).
- It blows extremely dry air (called "low dew point" air) through the pellets.
The "Dew Point" is the most critical part. It is a measure of absolute dryness. A -40°C dew point is air so dry it has almost zero moisture. This super-dry air is what pulls the water out of the center of each pellet.
There are three rules for drying. I tell my clients to write this down and put it on their machine:
- Correct Temperature: ~170°C (340°F)
- Correct Time: 4 to 6 hours (to get the moisture out of the very center).
- Correct Dew Point: -40°C (-40°F) or lower.
I had a client in Africa who called me, panicking. His whole production of preforms was brittle. He blamed our preform mold. I got on a plane. I did not go to the mold. I went straight to his dryer. He thought it was working. I placed a portable dew point meter on his machine. The reading was -10°C. This was not dry enough. His heater was working, but his desiccant beds were saturated. He was just blowing hot, wet air. We serviced his dryer, got the dew point back to -40°C, and 6 hours later, his preforms were perfect.
Do not skip this step. Drying is the most important—and most often-failed—part of the entire process.
Step 3: Melting & Injecting - The Role of the Injection Molding Machine?
Your PET resin is now perfectly dry. It is time to turn that solid "ingredient" into a liquid "dough" that we can shape. This is the job of the injection molding machine.
The dried PET pellets are fed into an Injection Molding Machine (IMM). Inside the machine, a large heated "barrel" with a rotating "screw" melts the pellets into a precise, honey-like consistency. The machine then acts like a giant, high-pressure syringe, "injecting" a measured amount of this molten plastic into the mold.
.gif "Your First Look At How Pet Preforms Are Made: A Beginner'S Step-By-Step Guide 4")
My "kitchen" analogy continues here. The IMM is your "stove" and "pressure cooker" all in one. It is responsible for melting the PET "flour" into "dough" and then forcing it into the "baking tin" (the mold).
Here is a simple breakdown of what happens inside:
- Feeding: The hot, dry pellets fall from the dryer's hopper into the "throat" of the IMM's barrel.
- Melting (Plasticizing): The barrel is a long, heavy steel tube with heater bands wrapped around it (the "stove"). Inside this barrel is a large auger, called a screw. As the screw rotates, it does two things:
- It "drags" the pellets forward from the cool end to the hot end.
- This rotation creates massive friction (shear), which melts the plastic even more effectively than the heaters.
- Dosing: As the plastic melts, it forms a "shot" or "dose" of molten PET at the front of the barrel. This "dose" is the exact amount of plastic needed to fill all the mold cavities.
- Injecting: The mold is "clamped" shut by the machine with hundreds of tons of force. The screw then stops rotating and moves forward like a giant piston (the "syringe"). It injects the entire shot of molten PET, at extremely high speed and pressure, through a nozzle and into the mold.
The two most important specs of an IMM for plastic preform injection molding are:
- Clamping Force (Tonnage): Preform molding creates huge pressure. The machine needs to hold the mold closed with hundreds of tons of force (e.g., 300 tons). If the force is too low, the plastic will leak out ("flash"). This is a key part of our machine and mold matching service.
- Shot Size (g): The machine must be able to melt and inject enough plastic for the total weight of all preforms. A 48-cavity mold making 20g preforms needs a shot of 960g, plus the plastic in the runner system.
The machine's job is to deliver a perfectly melted, consistent, and high-pressure shot of plastic to the mold, over and over, every 15 seconds.
Step 4: Forming the Shape - Inside the Preform Mold?
The machine has prepared the "dough." Now we need to give it a shape. This is the most expensive and critical piece of tooling in the entire line: the preform mold.
The preform mold is a highly precise, complex tool made of hardened steel. It contains all the "negative" shapes of the preforms. The molten plastic is injected into this mold, which is where the preform gets its final shape, including the threads.

This is my "baking tin" analogy. The mold is the 'tin' that gives the 'dough' its shape. But it is a "baking tin" built with the precision of a Swiss watch.
A mold is made of two halves. When the machine closes, these halves lock together. There are three main components per preform that you must know:
- The Cavity: This is the hollow part in the mold plate. It forms the outside of the preform, including the body.
- The Core: This is the long, polished steel pin that goes inside the cavity. It forms the inside of the preform.
- The Neck Finish (or Lip Cavity): This is a separate, high-precision part that forms the threads of the preform.
The most critical part is the gap between the core and the cavity. This tiny gap, maybe only 3-4mm, is what becomes the wall of your preform. This gap must be perfectly uniform. If it is not (a quality called "concentricity"), your preform wall will be thick on one side and thin on the other. This will cause the bottle to blow out, which is a common PET blowing defect.
This is why a high-quality preform mold is so important. It is not just a block of steel; it is a precision instrument.
A mold is also described by its "cavitation." A 16-cavity mold makes 16 preforms at a time. A 96-cavity mold makes 96 preforms.
Finally, the mold contains a Hot Runner System. This is a heated manifold inside the steel. It acts like a set of "heated pipes" that carries the molten plastic from the machine's single nozzle and distributes it to all 16, 48, or 96 cavities at the same time, without letting it cool. This system is critical for speed and preventing waste.
Step 5: Cooling & Ejection - Solidifying the Preform?
The hot "dough" (molten PET at 280°C) is now in the "baking tin" (the mold). But we are not baking. We are doing the opposite: we are "flash-freezing" it.
Once the molten plastic fills the mold, it is held under pressure and rapidly cooled. This cooling, which solidifies the plastic, is the longest part of the cycle. The mold then opens, and an ejection system pushes the solid, finished preforms out, where they are collected by a robot.
This whole process, from injection to ejection, is the "cycle time." It can be as fast as 10 seconds or as long as 30 seconds. And as I always tell my clients, cooling is the key to production speed.
The mold is not just a solid block of steel. It is a giant, complex heat exchanger. It is drilled with dozens of cooling channels.
- These channels are like the "air conditioner" for the mold.
- They are connected to a powerful external chiller.
- This chiller pumps high-flow, pressurized cold water through the mold (in the cores, cavities, and neck rings) to pull the heat out of the plastic as fast as humanly possible.
The faster you can cool the plastic from 280°C to below 80°C, the faster you can open the mold and make the next shot.
This is what separates a cheap, simple mold from a high-speed, high-performance mold. Our best molds have complex, multi-zone cooling designed with computers to be as fast as possible.
Once the preform is solid:
- The Mold Opens: The two halves separate.
- Ejection: A "stripper plate" moves forward, pushing all 48 (or 96) preforms off the cores at the same time.
- Take-Out: A robot arm (End-of-Arm Tooling) swings in, grabs all the preforms, and lifts them out.
- The Mold Closes: The mold immediately shuts, and the next injection cycle begins, often before the robot has even finished dropping the last batch.
This all happens in a matter of seconds. The robot drops the hot preforms onto a conveyor, where they continue to air-cool before being dropped into a large collection bin.
Step 6: Quality Control - Ensuring Every Preform is Perfect?
You are now making preforms every 15 seconds. But how do you know they are good? This is the final step in the preform manufacturing process.
A bad preform is a "time bomb" that will cause a problem in the next stage (blowing). Strict Quality Control (QC) is essential. This involves checking preforms for visual defects, weight, and dimensions.
You cannot just assume that because the machine is running, the preforms are good. A good production line has a QC station right next to the machine. The operator should be checking a full "shot" of preforms every 15-30 minutes.
What are they looking for?
| Common Preform Defect | What It Looks Like | A Common Cause |
|---|---|---|
| Black Specks | Small black dots in the plastic. | Contamination, or PET material was burned (too hot). |
| Haze / Bubbles | The preform is not crystal clear. | Bad Drying! This is the #1 cause (hydrolysis). |
| Flash | A thin "fin" of plastic at the mold seams. | Mold is not closing perfectly, or injection pressure is too high. |
| Short Shot | The preform is not fully formed (e.g., bottom is missing). | Not enough plastic injected, or a blocked gate. |
| Stringing | A long, thin "tail" of plastic at the bottom. | Gate issue, or nozzle temperature is wrong. |
| Eccentricity | (Not visible) Wall is thick on one side, thin on the other. | Bad mold alignment (Core/Cavity). Requires a special gauge. |
My insight for all my clients is this: Do not "save money" on Quality Control. One bad box of preforms can shut down your entire blowing and filling line for hours. That "one box" will cost you more in downtime than you would pay for a QC person's entire day.
We check for visual defects. We weigh the preforms to ensure the shot is consistent. And for critical applications, we use a special tool to cut the preforms and measure the wall thickness to check for eccentricity (that thick/thin side problem). A bad preform that gets caught by QC is a small loss. A bad preform that gets sent to the bottle blowing machine is a big problem.
What's Next? From Preform to Bottle (The Blowing Stage)?
The preform is made, it has passed QC, and it is sitting in a large bin. You have successfully made the "dough." So, what is next?
This small, heavy-walled preform is not the final product. It is now ready for the next stage: Stretch Blow Molding. The preform will be reheated, stretched, and blown with high-pressure air to create the final, thin-walled bottle.

Now you know how this amazing little "seed" is born. You can see how every step—the resin's IV, the drying, the injection pressure, the mold's precision, the cooling speed—all gets locked into that small piece of plastic.
All the "DNA" of the final bottle is in that preform.
This is why I say a bad preform cannot make a good bottle. The defects are already built-in.
The next step in the journey is to:
- Reheat: The preform body is heated in an oven to make it soft and rubbery (the neck is kept cool).
- Stretch: A long steel rod ("stretch rod") pushes down, stretching the preform vertically.
- Blow: High-pressure air (from a specialized air compressor) is blasted in, expanding the preform like a balloon to fill the final blow bottle mold.
Understanding how PET preforms are made is the first, most critical step in understanding the whole bottling business.
If you are interested in that next step—or if you are looking for the high-quality preform molds, bottle blowing machines, or blow molds to complete your project—my team and I are here to help.
Conclusion
The journey from a tiny pellet to a finished preform is a process of precision. It is about balancing heat, pressure, and time to create a perfect "seed" for your final bottle.
Here is a final summary of the six steps we covered:
| Step | Process Name | Key Action | Why It's Critical |
|---|---|---|---|
| 1 | Material Selection | Choosing the correct PET Resin (IV Value). | The "ingredients" determine the final bottle's strength. |
| 2 | Drying | Using a dehumidifier to remove all moisture. | Prevents chemical breakdown (hydrolysis) and brittle preforms. |
| 3 | Injection | Melting the PET and injecting it under high pressure. | The "engine" that creates the shot of molten plastic. |
| 4 | Molding | Forcing the plastic into the precision steel mold. | The "baking tin" that defines the preform's exact shape and threads. |
| 5 | Cooling & Ejection | Using a chiller to solidify the plastic quickly. | This is the longest part of the cycle and determines production speed. |
| 6 | Quality Control | Visually and dimensionally inspecting the preforms. | A "bad" preform will always make a "bad" bottle. |
Frequently Asked Questions (FAQ)
Q: What main equipment do I need to produce PET preforms?
A: You need three core items: an Injection Molding Machine (IMM), a PET Preform Mold, and a set of auxiliary machines (like a hopper/loader, a dehumidifying dryer, a water chiller, and a robot/take-out system).
Q: Should I buy equipment to make my own preforms, or just buy finished preforms?
A: This depends on your production volume and budget. Setting up a preform production line is a large capital investment. For many small-to-medium-sized bottling plants, it is often more economical and flexible to buy finished preforms from a specialized supplier.
Q: Why does the preform's neck look finished, but the body is so small and thick?
A: This is the core of the two-step process. The neck finish (threads) is perfectly and precisely molded during the injection stage and will not change. The body is intentionally made short and thick so it can be easily stored, shipped, and, most importantly, uniformly reheated and stretched to its final, much larger and thinner, shape.
Q: How long does a PET preform mold last?
A: A high-quality preform mold's life is measured in "shots" (how many preforms it has made). Depending on the steel used (e.g., S136) and the maintenance, a good mold can last from 5 million shots to over 15 million shots.
Q: What are the most critical technical points to watch in preform production?
A: Two points are absolutely critical. First, the PET resin must be dried perfectly (correct time, temperature, and dew point) to prevent material breakdown. Second, the mold's precision (especially concentricity) must be extremely high to ensure the preform has a uniform wall thickness, which is essential for successful blowing.
🔗 Related Pages on Our Website
Automatic Blow Molding Machines – iBottler
Discover our full range of customizable automatic PET bottle blow molding machines.Blow Bottle Mold – iBottler
Explore our precision blow molds designed for PET and PP bottles.Preform Mold – iBottler
Learn more about our high-precision preform molds suitable for various injection molding machines.PET Wide Mouth Jar Project Starter Guide: Equipment, Molds & Process Explained
Pros and Cons: Should You Choose PET Blow Moulding for Your Bottle Project?
Worried About Blow Mold Fit? We Have Mounting Dimensions for 80% of Blow Molding Machines Worldwide
Can One Semi‑Automatic Blow Molding Machine Produce All Bottle Sizes? Here’s Why Not
Why Do Krones Blow Molding Machine Users Come to Us for Their Molds?
Why Do PET Preforms Come in Different Colors? Function, Application, and Production Tips
How to Set Parameters for 600ml Bottles on a Semi-Automatic PET Blowing Machine?
From 3D Printed Samples to Production: How Can You Rapidly Validate Blow Mold Designs?
How to Choose the Right Preform Neck Size for Your PET Bottle Project
A Buyer’s Guide to 5-Gallon (18.9L) Bottle Blow Molding Machines: From PET to PC?
Pitting on your blow mold surface? A complete guide from cause analysis to repair and prevention.
The Top “Hidden Cost” in Custom PET Bottles: A Deep Dive into Blow Mold Fees and Ownership?
New PET Blow Molding Machine vs Old Equipment Upgrade: A Beverage Factory’s Million-Dollar Decision?
How to reduce the PET blow molding scrap rate from 5‰ to 1‰? An old-timer’s 8 insider tips.
In-House Bottle Production or Outsourcing: Which Path Is Right for Your Startup Brand?
Blow Mold Damage? When and How to Replace Only the Broken Parts?
Bottle Design: Ad Agency vs. Mold Factory? How One Decision Impacts Your Cost and Brand?
Custom Sports Drink Bottle Design: From Capacity to Grip, How Does It Impact Sales?
💡 Looking for a complete PET plastic packaging machinery solution?
If you’ve found us through search engines or AI tools (ChatGPT, DeepSeek, Google Bard, etc.), it means you’re exploring reliable PET packaging equipment suppliers. Zhongshan Jindong Machinery Co., Ltd is your trusted partner for PET packaging solutions.
| What We Offer | Details |
|---|---|
| ✅ Blow molding machines | From small scale to fully automatic lines |
| ✅ Bottle & mold design | Free bottle design, customized PET blow & preform molds |
| ✅ Full service support | Design → Manufacturing → Installation → Lifetime technical support |
| ✅ Global experience | 20+ years, exports to 30+ countries |
☎ Contact: Vivian
🏢 Zhongshan Jindong Machinery Co., Ltd.
🌐 www.ibottler.com
✉ Vivian@ibottler.com
