Designing PET bottles seems simple on the surface, but it's a complex process where small oversights can explode into major production headaches and escalating costs. If you want a smooth journey from concept to market, understanding the critical details from the very beginning isn't just helpful—it's absolutely essential for success.
Yes, ignoring critical details in PET blow bottle mold design leads to costly errors and severe production inefficiencies. By meticulously focusing on crucial aspects such as precise system matching of bottle, preform, and cap, selecting the most appropriate mold material, ensuring the structural integrity of the final bottle, and partnering with an experienced manufacturer, you can guarantee efficient production cycles and consistently high-quality bottles perfectly tailored to your specific application needs.

I've been immersed in the PET blow molding industry for what feels like a lifetime—16 years to be exact. Over these years, I've seen countless clients approach me with wonderfully creative, sometimes wildly ambitious, ideas for their bottle designs. Their ultimate goal is always the same: they want their bottles to make a statement, to truly stand out from the crowd. I vividly recall working with a client in Thailand who was preparing to launch a new energy drink. His vision was unique: a bottle shaped like a tall, strong, muscular man, symbolizing the power and energy his drink promised. It was a fascinating challenge, to say the least! This project required an immense amount of back-and-forth, carefully balancing his visionary design with the hard realities of mass production. After two intensive rounds of sampling and rigorous testing, we successfully developed a distinctive bottle that he absolutely loved—and, crucially, one that could be produced efficiently and consistently.
This experience, and many others like it, has continually reinforced a core lesson: nailing down every single design detail early on is paramount. These elements aren't just minor points on a checklist; they are the foundational pillars upon which your bottle's performance, cost-effectiveness, and ultimate market success are built. Let's dive deep into these 8 critical areas, exploring them thoroughly to help you sidestep common pitfalls and achieve the best possible outcomes for your PET bottle projects.
How crucial is the system matching of bottle type, preform, and cap for your project?
Mismatched bottle components aren't just an inconvenience; they can bring your entire production line to a grinding halt. This kind of incompatibility invariably leads to significant material waste, frustrating operational stoppages, and ultimately, lost revenue. To avoid this nightmare, ensure seamless integration of all parts from the very beginning.
System matching of the bottle type (whether it's for water, carbonated soft drinks, or cosmetics), its specific preform, and the chosen cap is absolutely vital for a smooth production process. It ensures your blow bottle mold is precisely engineered for the correct preform and cap combination, and that the final bottle integrates flawlessly with your downstream filling and capping lines, preventing unnecessary waste and ensuring overall production stability.
The journey of a PET bottle, from raw resin to a consumer's hand, involves a series of interconnected components and processes. The bottle's intended application—be it holding still water, carbonated beverages, hot-filled juices, or viscous chemical products—is the starting point that dictates nearly every subsequent design choice for the preform, bottle, and cap. This holistic approach is what I call "system matching."
Understanding Component Interdependence
Let's break this down further. The PET preform is the cornerstone. Its design isn't just about the amount of plastic (weight); it involves critical factors like the neck finish, overall length, diameter, and even the specific grade of PET resin used. For instance:
- Neck Finish: This is the threaded part of the preform that will interface with the cap. Common neck finishes include PCO 1881 (increasingly popular for CSD and water due to lightweighting potential), PCO 1810 (a traditional CSD neck finish), BPF, GME30.40, 29/25 (common for still water in some regions), or 38mm, 48mm wider necks for juices and dairy. The mold must be designed to perfectly form the bottle around the chosen preform neck finish, and the cap must match this finish with exacting precision to ensure a hermetic seal. A mismatch by even a fraction of a millimeter can lead to leaks or cap application failures.
- Preform Weight and Design: A heavier preform generally means a thicker, stronger bottle, but also higher cost. The distribution of material in the preform (e.g., more material in the base or body sections) is crucial for achieving desired bottle properties after blowing. For example, a preform for a CSD bottle will need to be designed to provide good material distribution in the base to form strong "feet" (in a petaloid base) to withstand carbonation pressure.
- Resin Properties: Beyond standard PET, preforms can incorporate co-polymers for enhanced clarity, UV inhibitors for light-sensitive products (like vitamins or some beverages), oxygen scavengers or barrier materials (like Nylon MXD6 or EVOH, often in multi-layer preforms) for products susceptible to oxidation (e.g., beer, juice, ketchup), and colorants. The mold design and blowing process parameters may need adjustments based on these specialized resins.
The cap is the next critical piece. It's not just a closure; it’s an integral part of the package's performance and user experience.
- Cap Types: Options range from simple flat screw caps to sports caps with push-pull or bite valve mechanisms, flip-top caps for condiments or personal care products, and child-resistant closures (CRCs) for potentially hazardous substances. Each type requires a specific neck finish and often has implications for the top-load strength of the bottle.
- Sealing Features: Tamper-evident bands are standard for most beverage caps. Liners inside the cap (e.g., induction heat seal liners, foam liners like F217) provide an additional sealing barrier, crucial for shelf life and preventing leaks. The choice of liner depends on the product, sterilization methods, and desired seal integrity.
Finally, this entire system must align with your downstream equipment. Filling lines (especially for CSD or hot-fill), capping machines (torque requirements, cap handling systems), labelers, and palletizers all interact with the finished bottle. I once consulted for a company launching a new juice product. They had a beautiful bottle design and a perfectly matched preform and cap. However, the slightly unconventional shoulder profile of the bottle caused constant jams on their high-speed capping machine, which was designed for more standard bottle shapes. This led to weeks of frustrating adjustments and lost production time, all because the "system" wasn't considered holistically to include the interaction with their existing manufacturing infrastructure. It's a common oversight I always warn clients about.
Here's a more detailed look at how bottle type influences these choices:
| Bottle Application | Typical Preform Characteristics | Common Neck Finish(es) | Cap System Considerations | Key Downstream Impacts |
|---|---|---|---|---|
| Still Mineral Water | Lightweight, clear PET, potentially rPET content | 29/25, PCO 1881 short height | Simple screw cap, tethered caps (new regulations) | High-speed filling, standard capping torque |
| Carbonated Soft Drinks | Pressure-rated, specific base design features in preform | PCO 1881, PCO 1810 | Pressure-holding cap, robust tamper-evident band | Counter-pressure fillers, precise cap torque control |
| Hot-Fill Juices/Teas | Heat-set PET (crystallized neck), designed for vacuum absorption | 38mm, sometimes 28mm | Wide-mouth cap, often with induction seal, vacuum button | Hot filling process, cooling tunnel, label application post-shrinkage |
| Aseptic/ESL Dairy | Opaque PET (e.g., with TiO2), often with light/oxygen barriers | 38mm | Foil seal, screw overcap, specialized sterile caps | Aseptic filling environment, specialized cappers |
| Edible Oils | Good clarity, sometimes with UV protection, specific neck for pour | 29/21, specific oil necks | Pour-control fitment, secure screw cap | Viscous product filling, labeling on potentially oily surface |
| Household Chemicals | Stress-crack resistant PET grades, specific neck for triggers/pumps | 28/400, 28/410, etc. | Trigger sprayers, pumps, child-resistant closures | Orienting bottles for trigger application, specific cappers |
Failure to meticulously match these components can result in a cascade of problems: leakage due to improper sealing, reduced product shelf life due to inadequate barrier properties, bottles deforming under pressure or vacuum, capping or filling line inefficiencies, and ultimately, a compromised product and brand image. Therefore, this system integration is the absolute bedrock of successful PET bottle production.
Which mold material is right for you: 7075 aviation aluminum or S136 stainless steel?
Choosing the wrong material for your blow bottle mold is not just a minor error; it's a significant capital misstep that can cripple your production efficiency and inflate long-term costs. This decision directly impacts your production speed, the operational lifespan of your mold, the quality of your bottles, and your overall return on investment. Therefore, you must select the material strategically, based on your project's specific production volume, the type of PET resin, bottle complexity, and desired durability.
The choice between 7075 aviation-grade aluminum and S136 (or similar martensitic stainless steels like Stavax ESR) for your PET blow molds is a frequent and critical decision point. Aluminum generally offers faster heat transfer capabilities and a lower initial procurement cost, making it an attractive option for smaller production batches, prototype development, or market testing phases. Conversely, stainless steel provides far superior durability, corrosion resistance, and longevity, positioning it as the preferred choice for high-volume, continuous production environments where mold life and consistent quality are paramount.

The selection of the mold material is far more than a simple cost consideration; it's a complex equation balancing initial investment against long-term performance, maintenance overhead, and production output. Each material possesses a distinct set of properties that render it suitable for different production scenarios and bottle characteristics.
Material Properties and Production Impact
When I sit down with clients to discuss mold materials, the conversation invariably starts with their projected annual production volumes, the complexity of the bottle design (e.g., intricate details, sharp corners, textured surfaces), and the specific type of PET resin they plan to use (e.g., virgin PET, high rPET content, additives).
7075 Aviation Aluminum:
This high-strength aluminum alloy is a popular choice for many applications, particularly for lower to medium production volumes (typically up to 1-3 million cycles, though this can vary).
- Advantages:
- Excellent Thermal Conductivity: Aluminum's ability to dissipate heat rapidly is its standout feature. This translates to faster cooling of the blown bottle, potentially reducing cycle times by 10-20% compared to steel molds, especially for simpler bottle designs. This can significantly boost output.
- Lower Initial Cost: Aluminum is generally less expensive than stainless steel, and it's easier and faster to machine. This means the upfront cost of an aluminum mold can be considerably lower, which is attractive for startups or products with uncertain market longevity.
- Good Machinability: Intricate details can often be machined more quickly into aluminum.
- Disadvantages:
- Lower Hardness and Wear Resistance: Aluminum is significantly softer than hardened stainless steel. This makes it more susceptible to wear and tear from the abrasion of PET resin (especially if it contains recycled content or certain additives), damage from mishandling, or deformation in critical areas like pinch-offs or neck splits over time. This can lead to increased flash on bottles or inconsistent neck dimensions.
- Susceptibility to Corrosion: While better than some steels, aluminum can still corrode, especially if cooling channels are not properly maintained or if aggressive cleaning agents are used.
- Repair Challenges: Deep scratches or significant wear on aluminum can be more challenging to repair perfectly compared to steel. Welding aluminum often affects its temper and strength.
S136 (or equivalent Pre-Hardened Stainless Steel like DIN 1.2083, ASSAB Stavax ESR):
These martensitic stainless steels are specifically formulated for mold making, offering a superb combination of properties for demanding applications.
- Advantages:
- Exceptional Hardness and Wear Resistance: S136 can be hardened to around 50-52 HRC. This provides excellent resistance to abrasion and indentation, ensuring a much longer mold life, often exceeding 5-10 million cycles or even more with proper care. This makes it ideal for high-volume production.
- Superior Corrosion Resistance: Stainless steel is highly resistant to corrosion from water (even with less-than-ideal pH levels in cooling channels) and many chemicals, leading to lower maintenance and cleaner cooling passages over time.
- High Polishability: S136 can be polished to an extremely high, mirror-like finish (SPI A1 or A2). This is crucial for producing crystal-clear PET bottles for premium beverages or cosmetics, where optical clarity is paramount.
- Good Repairability: If damaged, S136 can often be micro-welded and re-machined/re-polished effectively.
- Disadvantages:
- Higher Initial Cost: Stainless steel is more expensive as a raw material, and it's harder and slower to machine, increasing the manufacturing cost of the mold significantly compared to aluminum.
- Lower Thermal Conductivity: Steel conducts heat less efficiently than aluminum. This can lead to slightly longer cycle times unless the mold's cooling system is expertly designed (e.g., using conformal cooling channels that follow the contour of the bottle cavity more closely, or increasing the number and efficiency of cooling circuits).
Conformal Cooling: This advanced cooling channel design, often achieved through additive manufacturing (3D printing of mold inserts) or specialized machining, can mitigate the lower thermal conductivity of steel by placing cooling lines much closer to the cavity surface. This can significantly reduce cycle times for steel molds, sometimes bringing them closer to those achievable with aluminum, albeit at a higher mold design and manufacturing cost.
Hybrid Molds: In some cases, a hybrid approach is beneficial. For instance, an aluminum mold body (for better overall heat dissipation and lower cost) might incorporate S136 stainless steel inserts in high-wear areas like the neck splits, pinch-offs at the base, or areas with sharp details. This can offer a good compromise between cost, cycle time, and durability.
I worked with a beverage startup that initially chose aluminum molds for their diverse range of flavored waters to minimize upfront investment. One particular flavor became a runaway success, demanding much higher production volumes than anticipated. They soon found the aluminum mold for that flavor wearing out prematurely, leading to issues like increased flash (excess plastic) and inconsistent bottle wall thickness. We helped them transition that specific high-volume product to an S136 steel mold. While the initial outlay was greater, the steel mold provided the necessary longevity, consistent bottle quality, and reduced downtime, ultimately proving more economical for their mass-produced flagship product. This experience underscored the importance of aligning mold material choice with realistic, long-term production forecasts.
Here’s an updated comparison to aid in this critical decision:
| Feature | 7075 Aviation Aluminum | S136 Stainless Steel (or equivalent) |
|---|---|---|
| Thermal Conductivity | Excellent (e.g., ~130-150 W/m·K) | Good (e.g., ~15-25 W/m·K) |
| Hardness (Typical) | ~150 HB (Brinell) | ~240 HB (annealed), ~52 HRC (hardened) |
| Corrosion Resistance | Good, but susceptible to certain conditions | Excellent |
| Wear Resistance | Moderate | Very High |
| Machining Cost & Time | Lower & Faster | Higher & Slower |
| Mold Lifespan (Cycles) | 1-3 Million (application dependent) | 5-10+ Million (application dependent) |
| Initial Mold Cost | Lower | Higher (can be 1.5x to 3x aluminum) |
| Polishability | Good, but softer surface | Excellent (mirror finishes achievable) |
| Repairability | More Challenging for severe wear | Good for most types of wear/damage |
| Typical Applications | Prototypes, market trials, low-medium volume, rapid time-to-market | High volume, abrasive resins, clear/critical appearance bottles, long product life cycles |
| Cycle Time Potential | Generally shorter due to heat dissipation | Can be longer, but optimizable with advanced cooling (e.g., conformal cooling) |
Ultimately, the decision isn't just about aluminum versus steel; it's about the right material for your specific project, considering all technical and commercial factors to achieve the lowest total cost of ownership and the highest product quality.
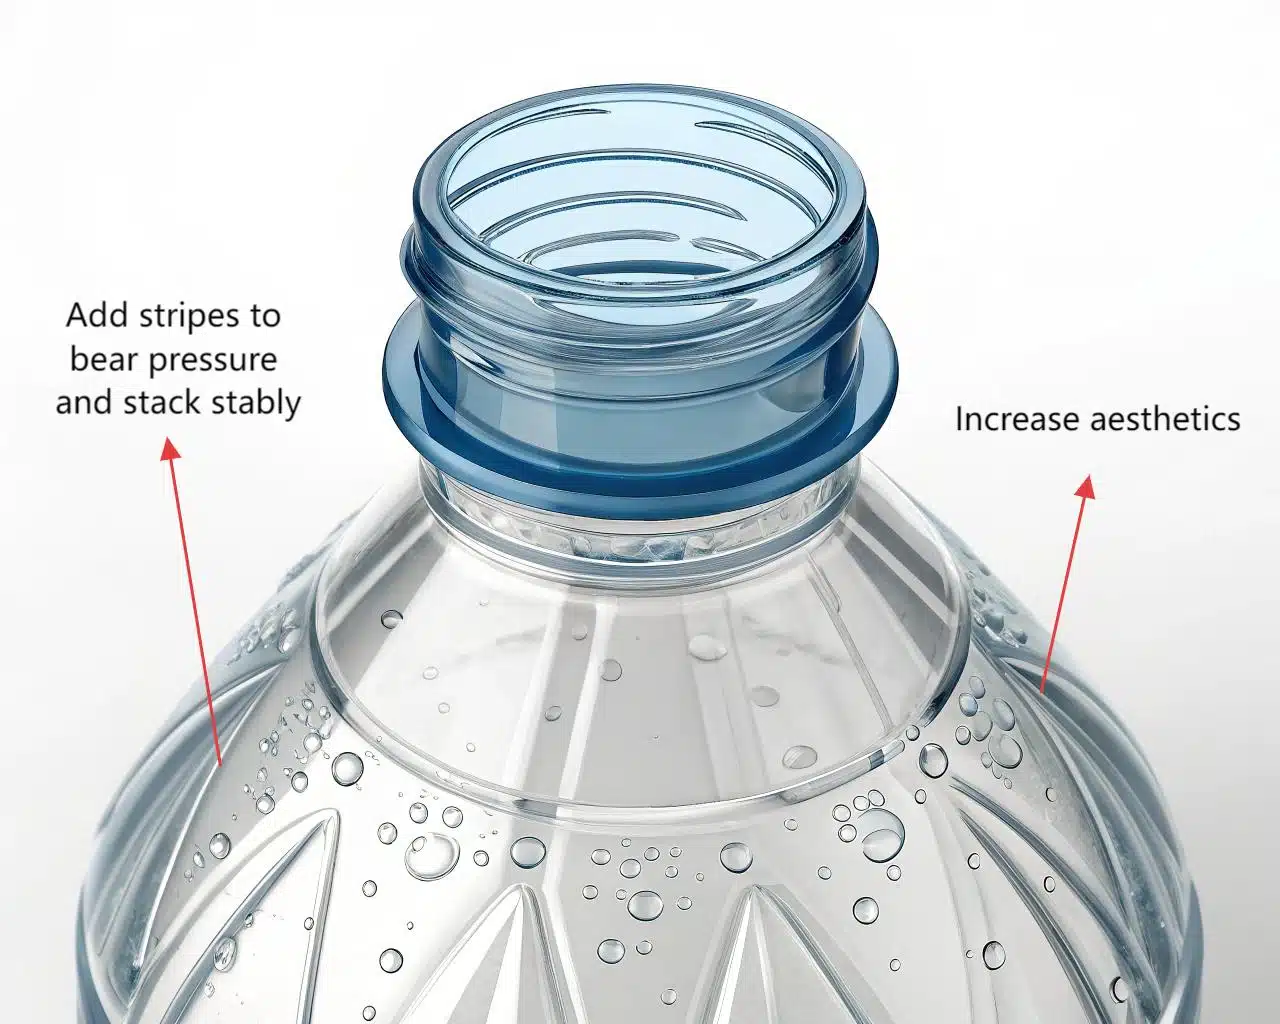
Why is optimizing the bottle base and shoulder design so important?
A poorly conceived bottle base or shoulder design can catastrophically undermine your product's integrity and appeal. Bottles might buckle under pressure, become dangerously unstable when stacked, leak due to stress cracking, or simply look unappealing and cheap on the shelf. Smart, meticulously optimized design in these areas is paramount to ensure both robust structural strength and captivating visual aesthetics.
Optimizing the bottle base and shoulder design is absolutely fundamental for both the functionality and the perceived quality of a PET bottle. The base structure is the literal foundation, dictating stacking stability and resistance to internal pressures (from carbonation) or external pressures (from vacuum in hot-fill applications). If the base fails, the bottle fails. Issues like base rollout, rocker bottoms, or stress cracking are common consequences of poor base design. Similarly, the shoulder's curve and transition to the neck influence the bottle's overall aesthetic appeal, its feel in the hand, pouring characteristics, and, critically, its top-load strength.
The base and shoulder regions of a PET bottle are far more than just passive aesthetic features; they are highly engineered, critical functional zones. Their design directly influences the bottle's performance from the moment it's blown, through the filling and distribution chain, all the way to the end consumer's experience. Neglecting their optimization is a recipe for problems.
Balancing Strength, Aesthetics, and Manufacturability
Designing the base and shoulder of a PET bottle is a delicate balancing act. These areas are often where material is thinnest or subject to the highest stresses, yet they must perform flawlessly.
Bottle Base Optimization:
The base has several jobs: it must allow the bottle to stand stably, resist internal pressure (for CSDs) or vacuum (for hot-fill), withstand drop impacts, and often contribute to the bottle's overall rigidity.
- Stability: A "rocker bottom" (a convex base) makes the bottle wobble and is a clear sign of a design or process flaw. The contact points of the base with a flat surface must be precisely controlled.
- Pressure Resistance (for CSDs): The most common design is the "petaloid" base, featuring a number of feet (typically 3, 5, or 6) and valleys. The geometry of these feet (radius, depth, spacing) is critical for distributing stress from internal carbonation pressure (which can reach 4-5 bar or higher). Poor design can lead to "base rollout," where the base everts under pressure, making the bottle unstable or even burst. Finite Element Analysis (FEA) is extensively used here to simulate stress distribution and optimize the petaloid shape for maximum strength with minimum material.
- Vacuum Resistance (for Hot-Fill): Hot-filled products (like juices, teas, sauces) are filled at high temperatures (e.g., 85-95°C). As the product cools, it contracts, creating a vacuum inside the bottle. If the bottle isn't designed to accommodate this, it will panel (sides suck inward) or the base will deform. Hot-fill bottle bases often feature specialized designs with "vacuum panels" or flexible ribs that allow controlled deformation, maintaining the bottle's overall integrity and appearance. The number, size, shape, and location of these panels are meticulously engineered.
- Drop Impact: The base is a common impact point if a bottle is dropped. The design must absorb and distribute impact energy to prevent cracking or shattering. Material distribution in the base, controlled by preform design and blowing parameters, is key.
- Stacking: While primarily a function of overall bottle shape and shoulder, the base's stability contributes to how well bottles stack in secondary packaging and on pallets.
Bottle Shoulder Optimization:
The shoulder area (the transition from the bottle body to the neck finish) is equally crucial for several reasons:
- Top-Load Strength: This is the bottle's ability to withstand vertical compressive force, essential for palletizing and warehousing, where bottles at the bottom of a stack support considerable weight. The angle of the shoulder, its curvature, and the material thickness in this region are primary determinants of top-load performance. A too-sharp or poorly designed shoulder can lead to premature buckling. Again, FEA is invaluable for predicting and improving top-load strength.
- Material Distribution: During the stretch blow molding process, the PET material from the preform stretches biaxially. Achieving uniform material distribution is vital. The shoulder is a challenging area; if not designed correctly, material can become overly thinned here, creating a weak spot. The preform's temperature profile and the mold's geometry interact to determine this.
- Aesthetics and Ergonomics: The shoulder significantly contributes to the bottle's visual appeal and silhouette. A smooth, elegant shoulder can enhance brand perception. It also affects how the bottle feels in the hand and how the product pours.
- Label Application: For some bottle designs, the shoulder area might interact with the label. A smooth, consistent surface is needed for good label adhesion and appearance.
I once worked on a project for a premium juice brand. Their initial design concept featured a very sleek, almost razor-sharp shoulder – it looked fantastic in the CAD renderings. However, our FEA simulations immediately flagged it as a major potential weak point for top-load. In simulations, the bottles would have collapsed under typical stacking loads. We went through several design iterations, subtly softening the shoulder curve and adjusting the preform design to ensure more material reached that critical area. The final design maintained most of the desired visual sharpness but possessed drastically improved top-load strength, which was vital for their national distribution network. This iterative, simulation-driven optimization process is standard practice for experienced mold designers. It prevents costly mistakes and ensures the bottle performs as expected in the real world.
The challenge is often to achieve all these functional requirements while also meeting aesthetic goals and lightweighting targets. It’s a multi-variable optimization problem where experience and advanced engineering tools play a huge role.
How can you optimize bottle weight for better cost control without sacrificing quality?
Heavy PET bottles don't just mean higher material costs per unit; they also translate to a larger environmental footprint due to increased plastic consumption and higher transportation emissions. However, an aggressive push for lightweighting can easily go too far, resulting in flimsy, easily damaged bottles that fail to protect the product and ultimately tarnish your brand's reputation. The true goal is to scientifically find that "sweet spot" – the optimal balance between minimizing resin usage for cost and sustainability, while maximizing structural performance and consumer appeal.
Optimizing PET bottle weight, often referred to as "lightweighting," is a critical ongoing objective in the beverage and packaging industries. The primary driver is, of course, cost reduction, as PET resin is a significant component of the final bottle cost. However, it’s a delicate balancing act. An excessively light bottle can become flimsy, prone to deformation during filling, capping, transport, or even consumer handling, and can convey a perception of poor quality. Therefore, a well-designed blow bottle mold and associated preform are engineered to achieve maximum material utilization—getting the most performance out of the least amount of plastic—while rigorously maintaining the bottle’s structural integrity, functional performance, and a premium feel.

Reducing the grams of PET resin used in each bottle is a constant pursuit, driven by the compelling twin engines of economic savings and environmental responsibility. But this pursuit must be tempered with a deep understanding of material science and structural engineering to avoid compromising the very purpose of the bottle: to protect and deliver the product effectively.
The Art and Science of Lightweighting
Successful lightweighting isn't merely about making the bottle thinner everywhere. It's a sophisticated engineering endeavor that involves a multi-faceted approach:
- Advanced Preform Design: Lightweighting often starts with the preform. Optimizing the preform's weight distribution is key. This might involve reducing material in areas where it's less critical, while ensuring enough material is available for high-stress regions like the base and shoulder after blowing. Shorter neck finishes (like PCO 1881 vs. PCO 1810) have also contributed significantly to preform lightweighting.
- Material Selection: Using higher intrinsic viscosity (IV) PET can sometimes allow for thinner walls while maintaining strength, though this can affect processability. The increasing use of rPET (recycled PET) also brings its own set of considerations, as rPET properties can vary and may impact the ability to lightweight as aggressively as with 100% virgin PET.
- Finite Element Analysis (FEA): This computer simulation technique is indispensable. Engineers can create virtual models of the bottle and subject them to simulated stresses: top-load pressure (stacking), internal pressure (carbonation), drop impacts, and vacuum forces (hot-fill). FEA identifies high-stress concentration points and areas where material is underutilized and can be safely removed. This allows for iterative design refinement before any metal is cut for the mold.
- Strategic Ribbing and Geometric Reinforcement: Instead of relying purely on wall thickness for rigidity, clever design features like micro-ribs, subtle undulations, or optimized panel shapes can significantly enhance stiffness and top-load strength, allowing for overall wall thickness reduction. Think of how a simple fold in a piece of paper drastically increases its rigidity.
- Blowing Process Optimization: The stretch blow molding process itself plays a role. Techniques like preferential heating of the preform (heating specific zones more or less than others) can help to more precisely control material distribution in the final bottle, allowing for targeted lightweighting.
Risks of Over-Lightweighting:
In my 16 years in this industry, I've seen numerous clients understandably eager to push the boundaries of lightweighting to maximize resin cost savings. While the economic incentive is strong, I always counsel caution against taking it too far. The potential downsides are significant:
- Reduced Top-Load Strength: Bottles may collapse or deform when stacked on pallets or in warehouses.
- Compromised Drop Impact Resistance: Bottles become more prone to bursting or cracking if dropped.
- Paneling or Ovalization: Thin-walled bottles can more easily deform under slight pressure changes or during handling, leading to an undesirable "flimsy" feel.
- Issues in High-Speed Lines: Ultra-lightweight bottles can be more difficult to handle on high-speed filling, capping, and labeling lines, leading to jams or inconsistencies.
- Negative Consumer Perception: Consumers often equate a certain level of firmness and heft with product quality. A bottle that feels too thin or crinkles too easily can inadvertently cheapen the brand image, even if the product inside is premium.
- Reduced Shelf Life (Indirectly): While not a direct result of just being thin, if lightweighting compromises the bottle's ability to maintain a seal or resist gas permeation (though permeation is more a function of material type and thickness over large surface areas), shelf life could be affected.
A major water bottler once approached my team with a very aggressive lightweighting target for their high-volume 500ml bottle. We embarked on an intensive project involving dozens of preform design iterations and countless hours of FEA simulations and pilot blow molding trials. By meticulously optimizing material placement and leveraging advanced preform heating profiles, we managed to shave off an additional 0.5 grams from their already quite light bottle. While half a gram sounds trivial, when multiplied by their annual production volume of several hundred million bottles, it translated into massive six-figure cost savings on resin and a commendable reduction in their overall environmental impact. It was a complex and painstaking process, but the rewards were substantial. The key was achieving this reduction without compromising the bottle’s performance in their rigorous quality control tests, including top-load, drop, and burst tests.
The ultimate goal is to find that equilibrium where the bottle is light enough to be cost-effective and environmentally responsible, yet robust and rigid enough to perform its primary functions of product protection and brand presentation flawlessly. This often involves a trade-off analysis and extensive testing to validate any new lightweighted design.
Should your bottle cavity have a polished or textured surface finish?
The wrong surface finish on your bottle cavity can significantly spoil your bottle's final appearance and tactile appeal. This critical choice directly affects not only the transparency and glossiness of the bottle but also its tactile feel, perceived quality, and even its functional grip. You should select the surface finish strategically, based on your specific product type, branding objectives, and the desired consumer experience.
The surface finish of the blow bottle mold cavity—whether it's meticulously polished to a mirror shine or intentionally imparted with a specific texture—is a crucial design detail that directly translates to the external surface of your PET bottle. Polished cavities are the standard for creating highly transparent, glossy beverage bottles where clarity is paramount. Conversely, various textured finishes (such as sandblasted matte looks, fine stipples, or even custom-etched patterns) are frequently employed for daily chemical products, oil bottles, or certain food items, offering benefits like enhanced grip, reduced glare, and the ability to elegantly mask minor surface flaws or fingerprints.

The internal surface of the mold cavity acts like a negative master for the external surface of your PET bottle. Therefore, its treatment plays a pivotal role in the final bottle's aesthetic qualities, tactile characteristics, and overall market perception. It's a detail that can subtly or dramatically influence how consumers engage with your product.
Surface Finish and Product Perception: Impact on Aesthetics and Functionality
The choice between a polished or textured finish is driven by a combination of aesthetic desires, functional requirements, and product positioning.
High Polish Finish (e.g., SPI A1, A2, A3):
- Visual Impact: A highly polished mold cavity (typically achieved through meticulous hand polishing with progressively finer diamond pastes) results in a PET bottle with exceptional clarity and a glossy, brilliant surface. This is highly desirable for products where visual purity and high transparency are key selling points, such as premium bottled waters, clear juices, spirits, and many carbonated soft drinks. The smoother the mold surface, the less it will scatter light, maximizing the see-through quality.
- Considerations:
- Requires high-quality, defect-free PET preforms, as any imperfections in the preform surface can become more visible on a highly glossy bottle.
- Polished molds need careful handling and maintenance to prevent scratches or damage to the mirror finish, as these would transfer directly to the bottle.
- Can sometimes make bottles appear more "slippery" to the touch.
Textured Finishes:
Texturing involves altering the mold cavity surface to create a non-smooth finish on the bottle. This can be achieved through various methods:
- Sandblasting (or Grit Blasting): This process uses fine abrasive particles propelled by compressed air to create a uniform matte or frosted appearance. Different grit sizes and blasting pressures can achieve varying degrees of texture, from a very fine satin to a coarser matte.
- Visual Impact: Reduces glare, gives a softer, more sophisticated or contemporary look. Can make the bottle appear "cooler" or more "technical."
- Functional Benefits: Excellent for masking minor surface imperfections like flow lines, scuffs, or slight color variations in the PET. Can improve grip. Often used for personal care products, household cleaners, or some food containers.
- Chemical Etching: This involves using acidic solutions to selectively etch patterns or textures onto the mold surface. It can create very fine and complex patterns.
- Visual Impact: Allows for a wide range of decorative effects, from subtle textures to intricate designs.
- Functional Benefits: Can be used for branding elements or to create specific tactile sensations.
- Laser Texturing: A more advanced and precise method where a laser beam is used to ablate material from the mold surface, creating highly detailed and repeatable textures, including geometric patterns, micro-structures, or even leather-grain or wood-grain effects.
- Visual Impact: Offers maximum design freedom for unique branding and premium aesthetics.
- Functional Benefits: Can create textures optimized for grip, light diffusion, or specific optical effects.
- EDM (Electrical Discharge Machining) Texturing: While EDM is primarily a machining process, certain EDM finishes can leave a characteristic textured surface, which is sometimes desirable for specific applications.
Benefits of Texturing:
- Improved Grip: Textured surfaces can provide better friction, making bottles easier and safer to hold, especially if they are large or might be handled with wet hands (e.g., shower gel bottles, beverage bottles from a cooler).
- Scratch and Scuff Resistance: Textured surfaces are generally better at hiding minor scratches, fingerprints, and scuffs that can occur during transportation and handling, keeping the bottle looking newer for longer.
- Unique Branding and Aesthetics: Custom textures can become a recognizable part of a brand's identity, differentiating the product on crowded shelves.
- Light Diffusion: Certain textures can diffuse light passing through the bottle, which can be beneficial for light-sensitive products or to create a softer visual appearance for the contents.
For a luxury cosmetic line I consulted with, the client envisioned a unique "frosted glass" effect for their PET bottles to convey sophistication and exclusivity. We achieved this desired premium aesthetic by applying a very fine, carefully controlled sandblast texture to the inside of the blow mold cavities. This not only produced the beautiful frosted look but also had the added benefit of diffusing light in a way that made the product inside look even more appealing. Furthermore, it subtly masked any minor surface imperfections that can sometimes occur with PET, ensuring every bottle looked flawless.
Considerations for Textured Molds:
- Draft Angles: Some textures, especially deeper ones, might require slightly increased draft angles in the mold design to ensure easy ejection of the bottle without scuffing the texture.
- Mold Cleaning: Textured surfaces can sometimes be a bit more challenging to clean thoroughly compared to highly polished surfaces.
- Cost: Complex texturing processes like laser texturing can add to the initial mold manufacturing cost.
The decision on surface finish is not trivial. It should be a deliberate choice aligned with the product's nature, its target audience, and the overall brand message.
Here’s a comparative table:
| Feature | High Polish Finish | Textured Finish (e.g., Sandblasted, Etched) |
|---|---|---|
| Primary Aesthetic | Glossy, Crystal Clear, Brilliant | Matte, Frosted, Patterned, Satin |
| Light Interaction | High Reflection, Maximum Transparency | Light Diffusion, Reduced Glare |
| Common Applications | Premium Waters, Clear Beverages, Cosmetics | Personal Care, Household Cleaners, Oils, Some Foods |
| Tactile Feel | Smooth, Potentially Slippery | Varies by texture, often Improved Grip |
| Imperfection Masking | Low (shows flaws more easily) | High (hides minor scuffs, flow lines) |
| Mold Maintenance | Requires careful handling to avoid scratches | Generally more robust to minor handling |
| Mold Cost Factor | Standard to High (for very high polish) | Can range from standard (simple blast) to very high (complex laser/etch) |
| Branding Impact | Purity, Simplicity, Premium Clarity | Sophistication, Uniqueness, Functionality |
Ultimately, the surface finish of the mold cavity is a powerful tool in the designer’s arsenal to enhance both the form and function of the final PET bottle.
How can custom engravings and graduations on your bottle enhance your brand?
Plain, unadorned bottles often fade into the background on today's crowded retail shelves, easily overlooked by consumers bombarded with choices. Your product needs to capture attention and convey quality instantly. Custom engravings, logos, and functional graduations machined directly into the blow bottle mold are highly effective ways to build a strong brand identity, enhance perceived value, and make your product uniquely memorable.
Customizing your PET bottles by incorporating elements like engraved brand logos, precise capacity marks (graduations), recycling codes, or even subtle anti-counterfeit features directly into the mold design is a sophisticated strategy to significantly boost your brand's professionalism and market recognition. This technique not only enhances the bottle's visual appeal and tactile qualities but also builds consumer trust and facilitates instant product identification, creating a lasting impression that a simple label often cannot achieve alone.
Embedding branding elements and functional marks directly onto the surface of the bottle transforms it from a mere container into an active communication tool for your brand. These features become an integral, permanent part of the package, offering a more premium and durable alternative or complement to traditional adhesive labels.
Branding and Functionality Forged into the Bottle
The ability to incorporate designs directly into the mold means these features are replicated on every single bottle with precision and permanence. This opens up a wide array of possibilities:
- Brand Logos and Names: A prominently embossed or debossed logo or brand name is a classic way to reinforce brand identity. The tactile nature of an engraved logo adds a sensory dimension that consumers often associate with higher quality. The design can range from simple lettering to intricate symbols.
- Volume Indicators/Graduations: For products where dosage or measurement is important (e.g., cleaning concentrates, liquid food flavorings, agricultural chemicals, baby formula water), clearly engraved fill lines or graduation marks are extremely useful for the consumer. This adds functional value and can be a key differentiator.
- Recycling Codes and Sustainability Messaging: Engraving the standard PET recycling symbol (resin identification code #1) and potentially other sustainability messages directly onto the bottle demonstrates environmental responsibility and helps consumers with proper disposal.
- Tactile Features: For visually impaired consumers, tactile warnings (like a raised triangle for hazardous substances) or Braille lettering can be incorporated. Gripping features or specific textures can also be considered engravings.
- Anti-Counterfeiting Marks: Subtle micro-text, unique symbols, or specific patterns can be engraved in discreet locations on the bottle. These features, often invisible to the naked eye or requiring specific knowledge to identify, can help protect your brand from counterfeiting, which is a growing concern in many industries.
- Decorative Patterns and Motifs: Beyond logos, abstract patterns, artistic flourishes, or thematic designs that reflect the brand's essence can be engraved to create a unique and aesthetically pleasing package.
Technical Aspects and Design Considerations:
Creating these features in the mold requires precision engineering:
- Machining: Engravings are typically created in the mold cavity using CNC (Computer Numerical Control) milling with very fine tools, or sometimes through laser engraving directly onto the mold steel or aluminum. Debossed features on the bottle (raised on the mold) are generally easier to achieve and more durable on the mold than embossed features (indented on the mold).
- Depth, Width, and Draft Angles: The dimensions of the engraving are critical. If too shallow, it won't be distinct; if too deep or with insufficient draft (taper), it can cause issues with bottle ejection from the mold or create weak points in the bottle wall. Sharp internal corners in engravings should be avoided as they can be stress concentrators.
- Placement: The location of engravings needs careful consideration. They should be placed for maximum visibility and impact, but also in areas where the PET material will flow and stretch predictably during the blowing process to ensure clear definition. Avoid placing critical engravings in areas prone to high stretch ratios or potential thinning.
- Impact on Structural Integrity: While usually minor, extensive or deep engravings could theoretically affect the bottle's structural performance. This should be considered, especially for lightweighted or pressure-pack bottles. FEA can help assess any potential impact.
Benefits of Mold Engraving:
- Permanence and Durability: Unlike labels that can peel, wrinkle, tear, or fade, engraved features are permanent for the life of the bottle.
- Perceived Higher Quality: Engraved details often lend a more premium, sophisticated, and established feel to the product.
- Enhanced Brand Differentiation: Custom engravings make your bottle instantly recognizable and help it stand out from competitors.
- Reduced Labeling Costs (Potentially): In some cases, if essential information is engraved, the size or complexity of the adhesive label might be reduced, potentially saving on labeling material and application costs. However, regulatory requirements for ingredient lists, etc., usually still necessitate a label.
Recalling my Thai client with the "strong man" energy drink bottle: once we had finalized the powerful overall shape, his next request was to have his brand's fierce tiger logo deeply embossed onto the "chest" area of the bottle. This wasn't a simple task. We had to meticulously calculate the optimal depth and draft angles for the embossing on the mold. The goal was to ensure the tiger logo looked prominent and three-dimensional on the bottle, yet didn't cause any issues during the blow molding process (like material thinning around the logo) or during ejection from the mold. We also had to ensure it didn't create an uncomfortable tactile feel for the consumer. After several prototypes, the final result was stunning—a bottle that not only had a unique silhouette but also featured a powerful, tactile branding element that truly made it roar on the retail shelf! This level of customization, thoughtfully executed, can transform a simple container into a brand icon.
What mold parameters must match your existing blowing equipment for seamless production?
An incompatible PET blow bottle mold can quickly escalate into a costly production nightmare, causing extensive delays, requiring expensive rework, or, in the most severe scenarios, rendering the new mold completely unusable on your existing machinery. To prevent such catastrophic outcomes, ensuring precise and comprehensive matching of all critical mold parameters with your specific blow molder from the very outset is not just advisable—it's an absolute imperative.
Key mold structural parameters and interface points—such as the overall mold stack height, platen mounting configuration (bolt patterns or T-slot dimensions), precise center distance between cavities (for multi-cavity molds), cooling line connection types and locations, air supply specifications, and stretch rod engagement details—must meticulously and precisely match your existing blow molding machine's specifications. This painstaking attention to compatibility at the design stage is crucial for avoiding installation difficulties, eliminating the need for costly and time-consuming rework, and ensuring a rapid, trouble-free ramp-up to efficient, full-scale production.

A new blow mold must function as a seamless, integrated extension of your existing blow molding machinery. Achieving this "plug and play" ideal requires obsessive attention to a multitude of technical specifications. There's absolutely no room for guesswork or assumptions when it comes to equipment compatibility.
Ensuring a Perfect Fit: The Mold-Machine Interface Checklist
When my team designs a new mold for a client, one of the very first and most critical pieces of information we request is the detailed technical specification sheet for the exact blow molding machine(s) the mold will run on. This isn't just about the make and model; it's about precise dimensional and functional data. Here’s a more exhaustive (though not fully exhaustive) checklist of parameters that need to be confirmed:
1. Physical Mold Dimensions & Mounting:
- Max/Min Mold Height: The machine has a defined range for the closed height of the mold.
- Mold Length and Width (Footprint): Must fit within the machine's platen area and allow for proper clamping.
- Platen Layout: Precise location and dimensions of T-slots or threaded mounting holes on the machine platens. This dictates the mold base design for secure clamping.
- Tie Bar Spacing: The mold must physically fit between the machine's tie bars.
- Machine Clamp Tonnage: The mold design must be robust enough for the machine's clamping force.
- Opening Stroke: The machine's opening distance must be sufficient for the bottle to be ejected clear of the mold.
2. Preform and Bottle Handling Interface:
- Preform Neck Orientation: How the preform is presented to the mold (e.g., neck up, neck down, specific orientation for asymmetrical preforms).
- Transfer Arm Compatibility: If the machine uses transfer arms to move preforms into the mold and bottles out, their grippers and motion paths must align with the mold.
- Stretch Rod System:
- Diameter and length of stretch rods.
- Stretch rod stroke (how far it extends).
- Type of stretch rod tip (e.g., for engaging different preform base designs).
- Centering mechanism for the stretch rod relative to the preform.
- Bottle Ejection System: Compatibility with the machine's ejection mechanism (e.g., air blast, mechanical ejectors, robot take-out).
3. Utilities and Process Connections:
- Cooling Channels:
- Type, size, and thread specification of cooling connectors (e.g., Jiffy-tite, Stäubli, NPT/BSP threads).
- Location of inlet/outlet ports on the mold relative to the machine's manifolds.
- Number of cooling circuits required by the mold versus what the machine can supply.
- Cooling water flow rates and pressures available from the machine.
- Pneumatic Connections:
- Pre-blow air pressure and flow rate capabilities.
- Main blow air pressure and volume capabilities (often high pressure, e.g., up to 40 bar).
- Connections for any pneumatic cylinders on the mold (e.g., for moving mold inserts).
- Electrical Connections (if any): For molds with internal heating elements (less common for PET cold blowing, but possible for some specialized applications) or sensors.
4. Mold-Specific Process Parameters:
- Number of Cavities: Must be compatible with the machine's capacity and preform handling system.
- Cavity Center Distance: For multi-cavity molds, this must match the machine's preform pitch.
- Nozzle Interface: How the blowing nozzle seals against the preform mouth. Critical for preventing air leaks during blowing.
The Importance of a Mold Specification Sheet:
To manage this complexity, a detailed "Mold Specification Sheet" or "Machine Interface Document" is indispensable. This document should be collaboratively reviewed and signed off by both the client (or their engineering team) and the mold maker before any mold manufacturing begins. It acts as the definitive blueprint for compatibility.
I vividly recall an incident early in my career where a client provided platen drawings for their blowing machine that, unfortunately, contained a minor error in one of the mounting hole dimensions. The mold was meticulously built to those provided specifications. However, during the installation and commissioning phase at the client's facility, it was discovered that the critical mounting holes were off by just a few millimeters. This seemingly small discrepancy rendered direct mounting impossible. It caused a two-week production delay while the mold base plates were emergently shipped back for modifications and then re-shipped. The client's product launch schedule was significantly impacted, and it was a very harsh but valuable lesson for all involved in the absolute criticality of triple-checking every single compatibility detail and relying on verified machine data.
Any mismatch in these parameters can lead to a spectrum of problems: from an inability to even mount the mold in the machine, to inefficient operation, poor bottle quality, damage to the mold or machine, and significant production downtime. It underscores why clear, accurate, and comprehensive communication of machine specifications is a non-negotiable prerequisite for any successful mold building project.
Why is selecting an experienced mold manufacturer critical for your project's success?
Partnering with an inexperienced or unqualified PET blow mold manufacturer can, unfortunately, doom your entire bottling project from its very inception. You risk a litany of nightmarish issues, including receiving fundamentally flawed or poor-performing molds, facing extensive and costly delays, suffering from unacceptably high reject rates during production, and ultimately, jeopardizing your product's market launch and profitability. To avoid this cascade of problems, choosing a proven, expert, and reputable mold manufacturer is not just a preference—it's an absolute strategic imperative.
Choosing an experienced PET blow bottle mold manufacturer is arguably one of the most critical decisions you will make for the overall success of your bottling project. A truly proficient manufacturer offers much more than just the physical fabrication of steel or aluminum into a mold. They bring to the table invaluable design optimization insights, the foresight to anticipate and prevent potential production problems (like high scrap rates or inconsistent bottle quality), and the deep process knowledge required to ensure a successful, timely, and cost-effective launch of your product.
The right mold manufacturer transcends the role of a mere supplier; they become an indispensable strategic partner in your product's entire lifecycle, from initial concept refinement to sustained, efficient mass production. This is a point I cannot emphasize strongly enough based on my years of experience witnessing both successes and failures in this industry.
Beyond Manufacturing: The Comprehensive Value of True Expertise
A reliable and genuinely experienced mold factory differentiates itself in numerous ways that go far beyond simply cutting metal according to a supplied drawing. Their true value lies in the depth and breadth of specialized expertise they bring to your project:
- Design for Manufacturability (DFM) Prowess: This is crucial. An experienced manufacturer will meticulously review your bottle design not just for its aesthetic appeal, but for its practicality and efficiency in the blow molding process. They can identify potential problem areas (e.g., sharp corners prone to thinning, features that might trap air, insufficient draft angles) and propose intelligent design modifications that will improve bottle quality, reduce cycle times, and enhance mold longevity. They understand how material flows and stretches, and how design choices impact that.
- Material Science Acumen: They can provide expert advice on the optimal mold material (aluminum, various grades of steel, hybrid options) based on your production volume, bottle complexity, resin type, and budget. They also understand the nuances of different PET resin grades and how they interact with mold surfaces and blowing parameters.
- Deep Understanding of Bottle Applications: Whether your bottle is for still water, high-pressure CSDs, delicate hot-fill juices, viscous oils, or aggressive chemical products, an experienced manufacturer understands the unique challenges and performance requirements associated with each. They can tailor the mold design (e.g., cooling systems, venting, surface finishes) accordingly.
- Advanced Simulation and Prototyping: Leading manufacturers utilize sophisticated FEA software to simulate bottle performance (top-load, burst pressure, drop impact, vacuum collapse) and mold flow/cooling analysis to optimize the design before manufacturing begins. Many also offer rapid prototyping services (e.g., 3D printed models, single-cavity pilot molds) to validate designs quickly.
- Problem-Solving Expertise During Trials: Mold trials rarely go perfectly on the first attempt, especially with complex bottles. An experienced team excels at systematic troubleshooting during these trials. They can quickly diagnose issues (e.g., uneven wall thickness, haze, webbing, short shots) and implement effective solutions by adjusting mold features or process parameters.
- Precision Manufacturing and Quality Control: Expert manufacturers invest in high-precision CNC machining centers, EDM equipment, and skilled toolmakers. They adhere to rigorous quality control protocols throughout the manufacturing process, including CMM (Coordinate Measuring Machine) inspection of critical mold components to ensure they meet exact dimensional tolerances.
- Effective Project Management and Communication: They provide clear timelines, maintain open communication throughout the project, and manage the process professionally from initial quotation to final mold delivery and after-sales support.
- After-Sales Support and Longevity: A good manufacturer stands by their work, offering support for mold maintenance, repairs, and potentially future revisions or spare parts. They aim for long-term partnerships.
I've unfortunately seen clients attempt to cut corners by opting for a very low-cost, often inexperienced, mold maker. More often than not, this initial "saving" evaporates quickly and ends up costing them far more in the long run. These situations typically devolve into a painful saga of poor mold quality, endless revisions, frustratingly high scrap rates during production, and critically missed market deadlines. I recall one particular client who spent nearly a year fruitlessly trying to get a complex, multi-feature bottle right with a budget supplier. They were on the brink of abandoning the project when they finally approached our team. We had to significantly re-engineer parts of their existing blow bottle mold design and manufacturing approach. Within six weeks of starting, we delivered a properly functioning mold that produced consistent, high-quality bottles. The initial perceived saving from the first supplier proved to be a classic false economy. This reinforced my belief that a top-tier mold manufacturer is a crucial investment, not merely an expense.
Red Flags for Inexperienced Manufacturers:
- Unusually low price (often too good to be true).
- Lack of a verifiable track record or relevant case studies.
- Poor communication or slow response times.
- Inability to discuss technical details in depth.
- No clear quality control procedures.
- Over-promising on timelines without clear justification.
Ultimately, a quality supplier, an experienced mold manufacturer, is your best insurance policy for a successful blow molding project. They become your core resource for optimizing costs (through efficient design and reduced waste), shortening time-to-market, and significantly mitigating the risks associated with mold trials and the complexities of high-volume production. The success of my Thai client's uniquely shaped energy drink bottle, for example, was only possible because of a deeply collaborative partnership where our team's manufacturing experience was able to translate his ambitious vision into a tangible, high-performing, and efficiently manufacturable reality.
Conclusion
These eight critical details, from system matching to manufacturer selection, are absolutely pivotal for success in PET blow mold design and subsequent production. Giving each of them careful, expert attention will invariably save you significant time, reduce overall costs, and ensure you consistently produce top-quality PET bottles that meet your brand's high standards.
When I discuss mol
