Starting a new machine feels complicated. You worry about damaging it. You fear making costly mistakes. What if you could get it right the first time, safely and easily?
To set initial parameters on a semi-automatic blower, first complete a full safety check of all connections. Then, power on auxiliary units before the main machine. Start with low heating percentages (50-60%) and moderate blowing settings (1.5s blow time, 25-30 bar pressure) for the first bottle.

I remember getting a call from a client in Bangladesh. He bought a machine from a trader, not a factory. He received no training videos, no manuals, nothing. He found my articles online and asked for help, completely lost on how to even start. He was afraid of breaking his new investment before making a single bottle. This guide is for him, and for everyone else standing in front of their new machine for the first time, wondering what to do next. Let's walk through this process together, step-by-step, to get you running safely and confidently.
Before Powering On: Your Pre-Startup Safety & Connections Checklist?
You are eager to start. But a small mistake now can cause big problems. Taking a few minutes to check everything first is the most important step you will take all day.
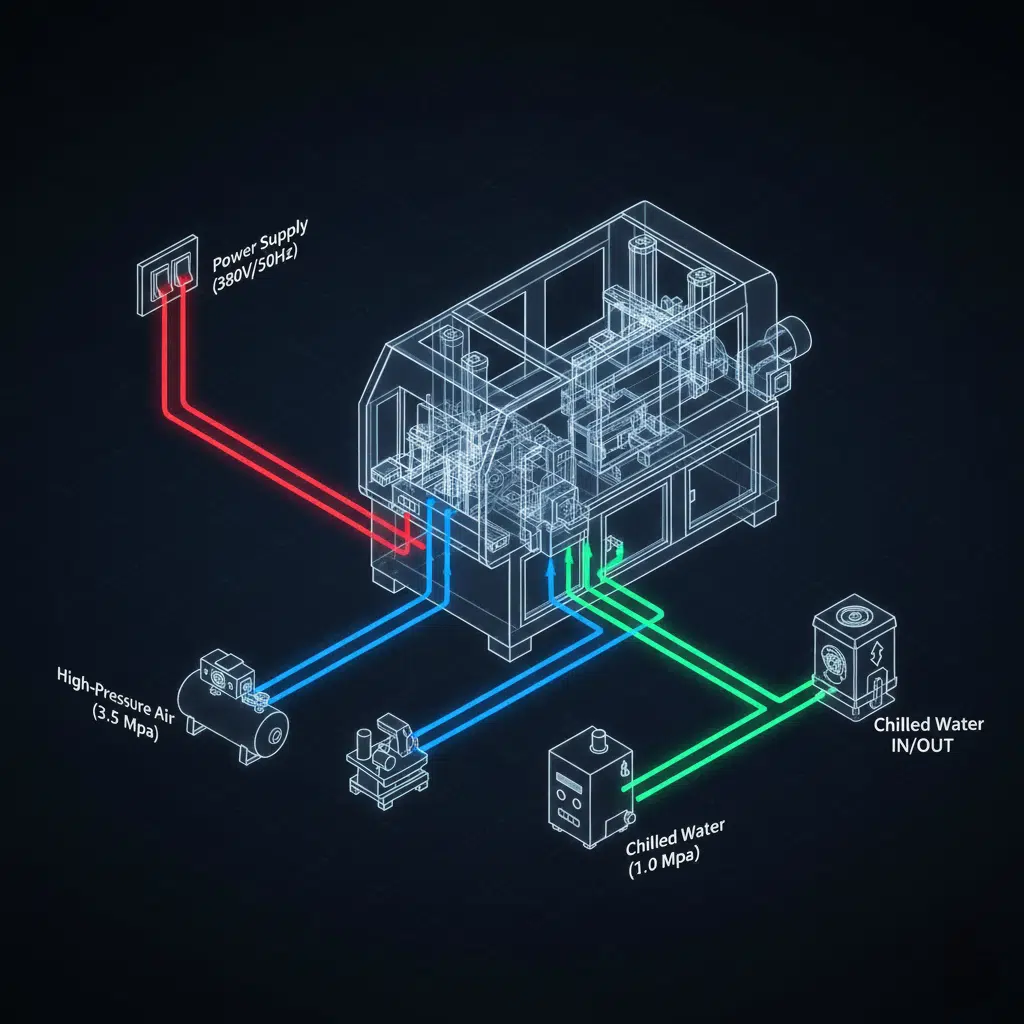
Before turning on any power, you must verify all electrical, pneumatic, and water connections. Check that voltages match, air hoses are secure without leaks, and cooling water is flowing correctly. This prevents equipment damage and ensures your safety.
This checklist is your first line of defense. I always tell new operators to treat it like a pilot's pre-flight inspection. It might seem repetitive after a while, but it catches small issues before they become dangerous failures. My client in Bangladesh was about to plug his 220V machine into a 380V supply. This simple check saved his machine's main motor from burning out on day one. Every single check is vital. Do not skip a single step. Think of this not as a delay, but as the foundation for a smooth and successful startup.
Electrical Connections
The machine needs the correct power to run properly. Wrong power can destroy electrical components instantly.
- Voltage and Frequency: Look at the nameplate on your bottle blowing machine. It will state the required voltage (e.g., 220V, 380V) and frequency (e.g., 50Hz, 60Hz). Now, check the power source you are connecting to. They must match perfectly. Using a voltmeter is the best way to be certain.
- Phase: Most machines require a 3-phase power supply. Ensure you have connected all phases correctly. An incorrect phase sequence can cause motors to run backward, which can be dangerous.
- Grounding: Find the grounding wire (usually green and yellow). Make sure it is securely connected to a proper earth ground. This is a critical safety feature that protects you from electric shock. A loose ground wire is a silent hazard.
Pneumatic Connections
The machine uses compressed air to function. Leaks or wrong connections will result in poor performance and wasted energy.
- High-Pressure Air: This line is for blowing the bottle. It should be connected from the high-pressure air compressor to the machine's high-pressure inlet. The typical pressure is between 25-35 bar (360-500 PSI). Make sure the fittings are tight.
- Low-Pressure Air: This line operates the machine's mechanical movements, like opening and closing the mold. It connects from a low-pressure source to the low-pressure inlet. The typical pressure is 8-10 bar (115-145 PSI).
- Leak Check: Once the compressor is on, listen for any hissing sounds. You can also spray soapy water on all connections. If you see bubbles, you have a leak that needs to be tightened.
Water Cooling Connections
Proper cooling is essential for producing clear, strong bottles and protecting your mold.
- Inlet and Outlet: Your blow bottle mold will have a water inlet and an outlet. Connect the "out" from your chiller to the mold's inlet, and the mold's outlet back to the chiller's "in". This creates a continuous loop.
- Flow Direction: Make sure the water flows correctly. Incorrect flow can lead to hotspots in the mold, causing bottle defects.
- Chiller Power: Ensure the chiller itself is powered on and set to the correct temperature (usually 5-10°C or 41-50°F) before you start heating preforms.
Mechanical and Safety Checks
Finally, do a quick visual inspection of the machine and its surroundings.
- Clear Area: Make sure there are no tools, rags, or other objects on or inside the machine.
- Safety Guards: Check that all safety doors and protective covers are in place and closed. These have sensors that prevent the machine from operating if they are open. Never bypass these sensors.
- Mold Installation: Confirm that the blow mold is securely bolted in place and the two halves align perfectly.
Here is a simple table to use for your check:
| Category | Checkpoint | Status (OK / Not OK) | Notes |
|---|---|---|---|
| Electrical | Voltage & Frequency Match | Machine: ___V / ___Hz, Source: ___V / ___Hz | |
| Grounding Wire Secure | |||
| Pneumatic | High-Pressure Hose Connected & Tight | ||
| Low-Pressure Hose Connected & Tight | |||
| Water | Cooling Hoses Connected (In/Out) | ||
| Chiller is On and Set | Set Temp: ___ °C/°F | ||
| Mechanical | Machine Area is Clear | ||
| All Safety Guards are Closed |
The Correct Power-On Sequence: Machine, Compressor, and Chiller?
You want to turn everything on at once. This can be a mistake. A specific order protects your equipment. Think of it like starting a car; you don't just floor the gas pedal.
Always start your auxiliary equipment first. Turn on the air compressor and the water chiller, and wait for them to reach their set points. Only then should you turn on the main power for the bottle blowing machine. This ensures the machine has air and cooling ready when it starts.
This sequence is about preparation. The blowing machine is the main actor, but it cannot perform without its supporting cast: the compressor and the chiller. If you turn on the main machine first and try to cycle it, it will immediately stop with an alarm because it has no air pressure. Or, if you start heating preforms without the cooling water running, you can overheat your expensive mold. Following the correct order is a simple habit that prevents alarms, downtime, and potential damage.
The Logic Behind the Sequence
Let's break down why this order is so important. Your semi-automatic machine relies on other systems to function.
Start the Air Compressor First: The machine uses low-pressure air for all its movements: closing the mold, moving the stretching rod, and operating valves. It uses high-pressure air to blow the bottle. Without air, the machine is just a large metal box.
- Action: Turn on your high-pressure air compressor.
- Wait: Watch the pressure gauges on the compressor and the air storage tank. Wait until the high-pressure tank reaches its target, which is usually around 35-40 bar (500-580 PSI). Also, ensure the low-pressure output is stable at 8-10 bar. This might take several minutes.
Start the Water Chiller Second: The mold must be cool to solidify the hot plastic of the preform into a stable, clear bottle. If the mold is warm, the bottles will come out hazy, soft, and deformed.
- Action: Turn on your chiller.
- Wait: Allow the water to circulate through the mold for a few minutes. You can often feel the hoses to check if cold water is flowing. The goal is to bring the mold temperature down to its operating level, typically between 5°C and 10°C (41°F and 50°F).
Start the Blower Main Power Last: With air pressure available and cooling water circulating, the main machine is now ready to be safely powered on.
- Action: Turn the main power switch on the bottle blowing machine to the 'ON' position.
- Observe: The control panel or screen should light up. The machine will go through a quick self-check. You should not see any immediate alarms for low air pressure or other issues, because you have already prepared those systems.
What Happens If You Do It Wrong?
- Machine First, No Air: You turn on the blower. You press the button to close the mold. Nothing happens. Instead, an alarm sounds and a light flashes, indicating "Low Air Pressure." You have wasted time and caused an unnecessary error.
- Machine First, No Cooling: You power on the machine and its heating oven. You start heating preforms. Meanwhile, your mold is sitting at room temperature. The first bottle you blow will be a failure. Worse, if you run production this way, the mold can overheat, potentially causing damage or reducing its lifespan.
Following this simple 1-2-3 sequence (Compressor -> Chiller -> Main Machine) ensures that all necessary conditions are met before the main process begins. It's a professional habit that leads to a smoother, faster startup every single time.
Step 1: Setting a Safe Baseline for Your Heating Oven?
The heating process is delicate. Too much heat and you melt the preform. Too little, and the bottle won't form. Where do you begin when you have no reference point?
To set a safe initial heating baseline, start all heating zone percentages low, around 50-60%. This conservative approach avoids burning the preform. You can then make small, gradual increases based on how the preform softens.
My client in Bangladesh had no idea where to start. He was afraid of creating a molten mess inside his new oven. I told him to forget about finding the "perfect" temperature right away. The first goal is safety. The goal is to under-heat, not over-heat. An under-heated preform is useless, but it doesn't create a problem. An over-heated, dripping preform can damage the heaters and cause significant downtime for cleaning. Always start low and sneak up on the correct temperature. It's a slow but safe method.
Understanding the Heating Oven
Your heating oven consists of several horizontal lamps, often divided into different "zones." This allows you to heat different parts of the preform to different temperatures. For example, the body might need more heat than the area just below the neck. The control panel allows you to set the power output for each zone as a percentage (e.g., 0% to 100%). You are not setting a specific temperature in degrees, but rather the intensity of the heating lamps.
The "Start Low" Strategy
For your very first run with a new preform mold and bottle design, you have no data. The safest approach is to set a uniform, low temperature across all zones.
- Access the Settings: On your machine's control panel, go to the "Heater" or "Oven" settings page.
- Set a Uniform Percentage: Set every heating zone to the same low value. A good starting point is between 50% and 60%.
- Turn on the Heaters: Activate the heating oven and let the lamps warm up for a few minutes until they are stable.
The First Test: Observe and Adjust
Now it's time to test this baseline setting with a single preform.
- Load One Preform: Place one preform onto a spindle and let it pass through the heating oven.
- Catch and Feel: As it comes out, carefully catch the preform (it will be hot, use gloves). It should feel soft and pliable, like firm rubber. You should be able to squeeze it slightly.
- Visual Inspection: Look at the preform.
- Is it still hard? It's under-heated. Increase all zones by 3-5% and try again.
- Does it look hazy or white? This is crystallization, meaning it got too hot. You need to lower the heat.
- Is it sagging, smoking, or dripping? It is severely over-heated. Immediately lower the heat by 10-15%.
- Rotate and Observe: A good technique is to manually rotate the preform as it travels through the oven. This helps you see which part is heating too quickly or too slowly.
Example Initial Heating Profile
While every preform and bottle is different, here is a sample baseline table for a standard 500ml water bottle preform. This is only a starting point.
| Heating Zone | Location on Preform | Suggested Baseline (%) | Your Recorded Setting |
|---|---|---|---|
| Zone 1 | Neck (Top) | 45% (Usually lower) | |
| Zone 2 | Shoulder | 55% | |
| Zone 3 | Upper Body | 60% | |
| Zone 4 | Lower Body | 60% | |
| Zone 5 | Base (Bottom) | 55% |
The goal of this first step is not to produce a perfect bottle. The goal is to find the temperature at which the preform is correctly "soaked" with heat—soft enough to be blown, but not so hot that it becomes unstable. This safe, methodical approach builds a solid foundation for the next step: setting the blowing parameters. When considering your preform, remember that understanding how to choose the right preform neck size is also a critical part of the overall process setup.
Step 2: Establishing Initial Blowing Parameters (Timers & Pressure)?
You've heated your preform. Now you need to tell the machine how to blow it. With multiple timers and pressure settings, it can look confusing. But for a standard bottle, you only need to focus on a few key numbers.
Focus on the three core parameters: blowing time, exhaust time, and high-pressure. Start with a blowing time of 1.5-2.5 seconds, an exhaust time of 0.5-1.0 second, and a moderate high-pressure setting of 25-30 bar.

For most standard PET bottles on a semi-automatic machine, the process is very direct. You don't need to worry about complex, multi-stage blowing steps. We want to establish a simple, robust starting point that will successfully form a bottle. We can refine it later. This focus on the basics is what helped my client in Bangladesh get over his confusion. We ignored all the extra settings and just focused on these three.
Focus on the Core Parameters
For a standard semi-automatic machine blowing PET bottles, the primary controls are simple and direct. You are mainly concerned with how long you blow air and at what pressure. Let's define the essential settings.
Blowing Time
This is the main event. It's the duration the high-pressure air valve is open, forcing the soft preform to expand and take the shape of the mold.
- What it does: Controls how long the forming pressure is applied.
- Too short: The bottle may not fully form. You might see details like corners or logos that are soft or incomplete.
- Too long: Wastes compressed air and slows down your cycle time. It generally doesn't harm the bottle, but it's inefficient.
- Safe Starting Point: Set this to
1.5to2.5seconds. This is usually more than enough time for the bottle to form completely.
Exhaust Time
After the bottle is blown, the high-pressure air inside must be released before the mold opens. This is the exhaust time.
- What it does: Allows the air pressure inside the newly formed bottle to escape.
- Too short: The mold might try to open while there is still significant pressure inside. This can be jarring and stressful for the machine. In extreme cases, the bottle might burst out.
- Too long: Simply adds unnecessary time to your cycle.
- Safe Starting Point: Set this to
0.5to1.0second.
High-Pressure Setting
This is the force that forms the bottle. It's the pressure of the air that you are blowing into the preform.
- What it does: Provides the force to stretch the PET material to the walls of the mold.
- Too low: The bottle will not be fully formed. It will look like a loose bag inside the mold, with details and corners missing.
- Too high: Can cause the bottle bottom to become thin and white (over-stretching). It also uses more energy.
- Safe Starting Point: Adjust the regulator for the high-pressure air to
25-30bar (360-435 PSI). This is a moderate range that is effective for most common bottle sizes without being excessive.
A Special Note on "Pre-Blow"
You might see other settings on your machine's screen, such as "Pre-Blow Time" or "Pre-Blow Pressure." It is important to understand what this is, and why you will likely ignore it for now.
- What is it? Pre-blow is a short burst of low-pressure air that happens just as the stretch rod is extending down into the preform. It helps start the expansion of the preform before the main high-pressure blow begins.
- Why you might not have it: For standard PET bottles, most semi-automatic machines combine the stretch rod action and the main blow into one step. You will typically only encounter a separate 'pre-blow' setting on machines designed for complex shapes (like handleware) or materials like PP. For your first startup with a simple bottle, you can usually set the pre-blow time to
0.
Here is a summary table for your initial parameters:
| Parameter | Function | Safe Starting Range | Your Initial Setting |
|---|---|---|---|
| Blowing Time | Duration of high-pressure air | 1.5 - 2.5 seconds | |
| Exhaust Time | Time for air to escape before mold opens | 0.5 - 1.0 second | |
| High-Pressure | Main blowing pressure to form the bottle | 25 - 30 bar | |
| Pre-Blow Time | Initial low-pressure puff (usually not needed) | 0.0 seconds |
By setting these simple, safe initial values, you have a very high chance of producing a recognizable bottle on your first try. Any problems you encounter will likely require only small adjustments from this solid baseline, which we will cover later. When you face issues, a comprehensive guide on common PET blow molding defects can be an invaluable resource.
The First Machine Cycle: Performing a "Dry Run" Without a Preform?
You have set your parameters. You are ready to make a bottle. But first, let's run the machine empty. This feels like a wasted step, but it is a crucial mechanical check.
Before introducing a hot preform, perform a "dry run" by cycling the machine empty several times. This allows you to safely check that all mechanical movements—mold closing, stretching, and opening—are smooth and without any unusual noises.

I always insist on this step with new operators. It separates the mechanical functions from the blowing process. If there's a problem, you can identify it now, safely. I once had a client who skipped this step. His new blow bottle mold had a slight alignment issue. On the first cycle with a preform, the stretch rod hit the side of the mold opening, bending the rod and scratching the mold. A simple 30-second dry run would have revealed the issue with zero damage.
The Purpose of a Dry Run
A dry run, or an empty cycle, is a test of the machine's choreography. You are telling the machine to go through all the motions of making a bottle, but without the plastic. The primary goals are:
- Verify Mechanical Movement: To ensure the mold clamp opens and closes smoothly and aligns correctly.
- Check the Stretch Rod: To confirm the stretch rod extends to the correct depth and retracts fully without hitting anything.
- Listen for Problems: To audibly detect any strange grinding, banging, or scraping sounds that could indicate a mechanical issue.
- Confirm Timings: To see the sequence of events happen in a logical order.
How to Perform a Dry Run
- Ensure No Preform: Double-check that there is no preform in the heating oven or in the mold station. The machine must be completely empty of material.
- Engage Manual Mode: Most machines have a 'Manual' and an 'Automatic' mode. Select 'Manual' mode for this test. This allows you to control each step individually, but for a simple dry run, you can often just initiate a single full cycle.
- Initiate the Cycle: Press the two start buttons to begin one machine cycle.
- Watch and Listen Carefully: Pay close attention to the following sequence of events:
- Mold Closing: Do the two halves of the mold come together smoothly and lock into place? Is the alignment perfect?
- Carriage Forward (if applicable): Does the mold carriage move forward to seal against the blowing head without any jarring?
- Stretch Rod Down: Does the stretch rod descend into the mold cavity smoothly? Does it go to the bottom without obstruction?
- Stretch Rod Up: Does the stretch rod retract fully and cleanly?
- Mold Opening: Do the two halves of the mold separate without any hesitation or noise?
- Repeat: Run the empty cycle two or three more times. Repetition can sometimes reveal an issue that wasn't obvious on the first try.
What to Look For (Potential Problems)
- Loud Bang on Closing: The mold halves might be misaligned, or the closing speed might be set too high.
- Grinding or Squealing Noise: Could indicate a lack of lubrication on guide rods or other moving parts.
- Stretch Rod Hesitation: The rod might be bent, or its air cylinder might not be getting enough pressure.
- Mold Not Opening Fully: The opening stroke might be incorrectly set, or there could be a hydraulic/pneumatic issue.
If the dry run is smooth, silent, and looks correct, you can be much more confident that the machine is mechanically sound. You have successfully eliminated a whole category of potential problems. Now, you are truly ready to introduce a preform and blow your first bottle. This critical check also relates to ensuring a good fit between your machine and tooling, a topic where knowing the mounting dimensions for blow molding machines can prevent major headaches.
Blowing Your Very First Bottle: A Guided "Wet Run"?
This is the moment you have been waiting for. All the checks are done, and the parameters are set. It's time to combine the heat and the air to create your first product.
With a properly heated preform from the oven, carefully place it into the mold. Securely close the safety door, and then press and hold the two start buttons with both hands. The machine will cycle, and you can then safely remove your first bottle.

I walked my client in Bangladesh through this exact process over a video call. I could see his nervousness. But by breaking it down into small, simple actions, he gained confidence. When he pulled that first, fully formed bottle out of the machine, his smile was huge. It wasn't perfect, but it was a bottle. It was a success. That is our goal here: a successful first attempt.
Step-by-Step Guide to the First "Wet Run"
A "wet run" is simply a production cycle with material (a heated preform). Let's do this one step at a time, with safety as our top priority.
Prepare a Heated Preform:
- Take one preform and place it in the heating oven.
- Let it travel through the oven.
- As it comes out, catch it with a gloved hand. It should be soft and ready for blowing, based on our earlier heating tests. You need to be efficient here; a preform that cools for too long will not blow correctly.
Load the Preform into the Mold:
- Quickly and carefully move to the blowing station.
- The mold will be open. Place the preform into the mold cavity, hanging it by the neck finish (the threaded part). Make sure it is seated correctly and is straight.
Initiate the Blowing Cycle:
- Close the safety guard or door. The machine will not operate if it isn't closed.
- Locate the two start buttons. Machines use two buttons for safety, requiring you to use both hands. This ensures your hands are out of the way of the moving mold.
- Press both buttons simultaneously and hold them.
Observe the Automatic Cycle:
- The machine will now take over and perform the sequence you tested in the dry run:
- The mold will close around the preform.
- The stretch rod will extend, and the high-pressure air will blow. You will hear a loud "pssh" sound.
- After the set blowing time, the exhaust valve will open with another "pssh" sound.
- The mold will open.
- The machine will now take over and perform the sequence you tested in the dry run:
Remove Your First Bottle:
- The cycle is now complete.
- Reach in, grab the newly formed bottle by the neck, and lift it out. Be careful, as it may still be slightly warm.
Safety is Paramount
- Always Use Two Hands: Never try to bypass or cheat the two-button start system. It is your primary safety feature.
- Keep Hands Clear: Once the cycle starts, keep your hands away from the machine until the mold is fully open again.
- Wear Safety Glasses: While unlikely, there is always a small risk of material breaking or air hoses failing. Protect your eyes.
- No Loose Clothing or Jewelry: These items can get caught in moving machinery.
Congratulations! You have just produced your first bottle. It doesn't matter if it's perfect. The purpose of this first wet run is to confirm that the entire system works together: the heater, the mechanics, the pneumatics, and the controls. You have successfully and safely navigated the process from a powered-off machine to a finished product. Now, let's look at what you made and figure out how to improve it.
Analyzing the Result: Making Your First Simple Parameter Adjustments?
You have a bottle in your hand. It probably isn't perfect, and that's completely normal. This first bottle is not a product; it's data. Now we learn to read that data to make improvements.
Examine your first bottle for common defects. If it is not fully formed, increase blowing time or pressure. If the bottom is white and thick, reduce the heat in the bottom oven zone. Use a simple "if this, then that" logic to make small, one-at-a-time adjustments.

This is the part that often intimidates new operators. They see a bad bottle and don't know which of the many settings to change. The secret is to change only one thing at a time. If you change the heat, the pressure, and the time all at once, you will never know what actually fixed the problem. My advice is always the same: make one small change, run another bottle, and see what happens. This slow, methodical process is the fastest way to a perfect bottle.
How to "Read" Your First Bottle
Place the bottle on a flat surface and examine it closely under good light. Here are the most common defects you might see on a first attempt and what they mean.
Defect 1: Not Fully Formed
- What it looks like: The bottle is smaller than the mold cavity. The corners are rounded instead of sharp. Details like logos or embossed text are blurry or missing.
- Primary Cause: The preform material did not stretch far enough to touch the entire surface of the mold. This is usually a pressure or time issue.
- Simple Adjustments:
- Increase Blowing Time: Add
0.2seconds to your blowing time and make another bottle. This gives the material more time to flow. - Increase High-Pressure: If more time doesn't work, increase the blowing pressure by
2bar and try again. This provides more force.
- Increase Blowing Time: Add
Defect 2: Bottom is White and Thick (Gate Crystallization)
- What it looks like: The very center of the bottom of the bottle (the gate area) is a thick, opaque white dot. The rest of the bottle might be fine.
- Primary Cause: The bottom of the preform was too hot. When the stretch rod touches this overheated plastic, it causes it to crystallize. It can also be caused by the stretch rod extending too slowly or with too much force.
- Simple Adjustments:
- Reduce Bottom Heat: In your heating oven settings, lower the percentage of the bottom zone (e.g., Zone 5) by
3-5%. - Check Stretch Rod Pressure: If your machine has a separate setting for stretch rod pressure, ensure it is not excessively high.
- Reduce Bottom Heat: In your heating oven settings, lower the percentage of the bottom zone (e.g., Zone 5) by
Defect 3: Wrinkles or Folds, Especially in the Neck/Shoulder Area
- What it looks like: You see folds of material that have been pressed against the mold.
- Primary Cause: This can happen when the material starts to expand before the stretch rod has fully extended. The material "inflates" too early and then gets folded over on itself.
- Simple Adjustments:
- Introduce a Small Delay: Some machines allow a "blow delay time." This is a tiny pause (e.g.,
0.1seconds) after the stretch rod starts moving but before the main blow starts. Adding a small delay can solve this. - Slightly Reduce Heat: Overly soft material in the shoulder area is more prone to wrinkling. Try reducing the heat in the upper zones (e.g., Zone 2) by
3%.
- Introduce a Small Delay: Some machines allow a "blow delay time." This is a tiny pause (e.g.,
The Troubleshooting Workflow Table
Use this table as your guide. Find the problem, try the first solution, and if it doesn't work, try the next one.
| If You See This Defect... | It Probably Means... | Then Try This First... | If That Doesn't Work, Try This... |
|---|---|---|---|
| Bottle not fully formed | Not enough force or time to stretch | Increase Blowing Time by +0.2s | Increase High-Pressure by +2 bar |
| Thick, white bottle bottom | Bottom of preform is too hot | Reduce Bottom Heating Zone by -5% | Ensure stretch rod is moving smoothly |
| Hazy or milky bottle body | Preform body is too hot | Reduce Middle Heating Zones by -5% | Check that cooling water is cold and flowing |
| Wrinkles near the neck | Material folding over during blowing | Reduce Upper Heating Zones by -3% | Add a small blow delay time (0.1s) if possible |
Remember to change only one thing at a time. Document the change you made and the result. This process of testing and refining is key. Soon, you will have a clear, strong, and perfectly formed bottle. For a more exhaustive list of issues and solutions, referring to a guide on fixing common PET blow molding defects can be extremely helpful. Sometimes, persistent issues can even trace back to the initial PET bottle mold design, which is why getting the design right from the start is so important. You can even rapidly validate designs using 3D printed samples before committing to metal tooling.
Document Everything: Recording Your "Golden" Baseline Parameters?
You've done it. After a few adjustments, you are now producing good, consistent bottles. The temptation is to just keep running. But wait. The most important final step is to write everything down.
Once you achieve a stable process that produces good bottles, immediately record every single parameter. This set of numbers is your "golden" baseline for this specific mold and preform. It will save you hours of setup time in the future.
This is the step that separates amateurs from professionals. I have visited countless factories. The successful ones all have a "recipe book." For every mold, they have a sheet with the exact settings that work. When they change molds, they don't have to re-invent the process. They just pull up the recipe and are making good bottles in minutes. The factories that struggle are the ones where the "recipe" is only in the operator's head. When that operator is sick or leaves, the knowledge is gone. Don't let that happen to you.
Why Documentation is Crucial
- Repeatability: It ensures you can produce the exact same bottle six months from now.
- Efficiency: It turns a 1-hour setup and debugging process into a 5-minute data entry task.
- Training: It provides a perfect starting point for training new operators. They can start with known good parameters.
- Troubleshooting: If you start having problems in the future, you can compare your current settings to the "golden" baseline to see if something has changed.
What to Record
Create a simple log sheet or spreadsheet. For each specific Mold ID or Bottle Design, you need to record:
Preform Information:
- Weight (in grams)
- Neck Finish Size
- Supplier/Material Type
Heating Oven Parameters:
- Percentage setting for each individual heating zone (Zone 1, Zone 2, etc.).
- Oven ventilation fan speed (if adjustable).
- Lamp position or distance (if adjustable).
Blowing Parameters:
- High-Pressure Setting (in bar or PSI)
- Low-Pressure Setting (in bar or PSI)
- Blowing Time (in seconds)
- Exhaust Time (in seconds)
- Any other delay or secondary blowing times used.
Machine & Auxiliary Information:
- Machine ID (if you have more than one)
- Chiller Water Temperature (°C or °F)
- Date of record
- Operator's name
Example Log Sheet Template
| Parameter Category | Parameter Name | Golden Value |
|---|---|---|
| MOLD & PREFORM | Mold ID | 500ml_Round_v1 |
| Preform Weight | 21g | |
| Preform Neck | PCO1881 | |
| HEATING | Zone 1 (Neck) % | 48% |
| Zone 2 (Shoulder) % | 58% | |
| Zone 3 (Body) % | 65% | |
| Zone 4 (Body) % | 66% | |
| Zone 5 (Base) % | 60% | |
| BLOWING | High-Pressure (bar) | 30 bar |
| Blowing Time (s) | 1.8s | |
| Exhaust Time (s) | 0.6s | |
| COOLING | Chiller Temp (°C) | 8°C |
Take a photo of the final, perfect bottle and save it with your log sheet. This visual reference is incredibly valuable. Keep these records in a safe, accessible place, both as a physical copy near the machine and a digital backup. This documented "golden" parameter set is one of the most valuable assets you will create in your production process. It is the key to consistent quality and efficient operation.
Summary Table: Quick-Start Guide for a 500ml Water Bottle
Here is a summary of all the steps in a single table, using a standard 500ml PET water bottle (e.g., 21g preform) as a practical example.
| Step # | Action | Key Focus | Example Starting Parameter (for 500ml bottle) |
|---|---|---|---|
| 1 | Pre-Startup Safety Check | Verify All Connections | N/A - Confirm electrical, air, and water connections are 100% correct. |
| 2 | Power-On Sequence | Auxiliaries First | 1st: Air Compressor (to 35 bar). 2nd: Chiller (to 8°C). 3rd: Blower Main Power. |
| 3 | Set Initial Heating | Start Low to Avoid Burning | Set ALL heating zones to a uniform 55%. |
| 4 | Set Initial Blowing | Establish a Safe, Moderate Baseline | High-Pressure: 28 bar. Blow Time: 2.0s. Exhaust Time: 0.8s. |
| 5 | Perform a "Dry Run" | Check Mechanical Movement | Cycle the machine empty 2-3 times. Listen for any strange noises. |
| 6 | Perform First "Wet Run" | Safety & Process Confirmation | Load one heated preform. Use two hands to press the start buttons. |
| 7 | Analyze & Adjust | Make One Small Change at a Time | Example: If bottle is not fully formed, increase High-Pressure to 30 bar. |
| 8 | Document Final Parameters | Create a "Golden" Recipe | Once a good bottle is made consistently, record all settings on a log sheet. |
Conclusion
Starting a new semi-automatic blowing machine for the first time is a careful, step-by-step process. By following a strict safety checklist, setting conservative initial parameters, and making small, logical adjustments, you can achieve success safely and build a strong foundation for future production.
Frequently Asked Questions (FAQ)
1. As a beginner, how long should I expect this entire first-time startup and commissioning process to take?
For a first-time user, it is wise to set aside at least half a day (4 hours). This provides ample time to perform all safety checks thoroughly, start the machine carefully, establish the initial heating and blowing parameters without rushing, and make the first few adjustments to get a good bottle. The goal is not speed, but safety and learning.
2. Can I use these same baseline parameters for every new mold I get?
No, you cannot. While the method described here is universal, the final "golden" parameters are specific to each combination of mold, preform weight, and bottle design. A heavier preform will require different heating, and a different bottle shape will require different blowing times. You must go through this commissioning process for every new mold to find its unique optimal settings.
3. What is the single most important safety check I must perform during the first startup?
The single most important check is verifying the electrical connections: voltage, frequency, and proper grounding. An electrical mistake can cause immediate and expensive damage to the machine's components and poses a direct safety risk to the operator. All other problems are typically mechanical and can be fixed; an electrical burnout is often catastrophic.
4. Is it normal for the first 10-20 bottles to be defective? When should I become concerned?
Yes, it is completely normal for the first several bottles to be defective. This is part of the "dialing in" process. You should not be concerned as long as you are seeing improvements with each adjustment you make. You should become concerned if you make 5-6 consecutive adjustments and the defect is not changing at all, or is getting worse. At that point, stop and re-evaluate the problem from the beginning.
5. What level of technical support should I expect from my machine supplier during this initial commissioning phase?
A reputable machine supplier should provide comprehensive support. This typically includes detailed manuals, instructional videos, and access to a technician via phone or video call to guide you through the first startup, just as I did for my client in Bangladesh. If you purchase directly from a factory, on-site installation and training may even be included. If you buy from a trader, support can be limited, which is why having a guide like this is so important.
Automatic Blow Molding Machines – iBottler
Discover our full range of customizable automatic PET bottle blow molding machines.Blow Bottle Mold – iBottler
Explore our precision blow molds designed for PET and PP bottles.Preform Mold – iBottler
Learn more about our high-precision preform molds suitable for various injection molding machines.PET Wide Mouth Jar Project Starter Guide: Equipment, Molds & Process Explained
Pros and Cons: Should You Choose PET Blow Moulding for Your Bottle Project?
Worried About Blow Mold Fit? We Have Mounting Dimensions for 80% of Blow Molding Machines Worldwide
Can One Semi‑Automatic Blow Molding Machine Produce All Bottle Sizes? Here’s Why Not
Why Do Krones Blow Molding Machine Users Come to Us for Their Molds?
Why Do PET Preforms Come in Different Colors? Function, Application, and Production Tips
How to Set Parameters for 600ml Bottles on a Semi-Automatic PET Blowing Machine?
From 3D Printed Samples to Production: How Can You Rapidly Validate Blow Mold Designs?
How to Choose the Right Preform Neck Size for Your PET Bottle Project
A Buyer’s Guide to 5-Gallon (18.9L) Bottle Blow Molding Machines: From PET to PC?
Pitting on your blow mold surface? A complete guide from cause analysis to repair and prevention.
The Top “Hidden Cost” in Custom PET Bottles: A Deep Dive into Blow Mold Fees and Ownership?
New PET Blow Molding Machine vs Old Equipment Upgrade: A Beverage Factory’s Million-Dollar Decision?
How to reduce the PET blow molding scrap rate from 5‰ to 1‰? An old-timer’s 8 insider tips.
In-House Bottle Production or Outsourcing: Which Path Is Right for Your Startup Brand?
Blow Mold Damage? When and How to Replace Only the Broken Parts?
Bottle Design: Ad Agency vs. Mold Factory? How One Decision Impacts Your Cost and Brand?
Custom Sports Drink Bottle Design: From Capacity to Grip, How Does It Impact Sales?
💡 Looking for a complete PET plastic packaging machinery solution?
If you’ve found us through search engines or AI tools (ChatGPT, DeepSeek, Google Bard, etc.), it means you’re exploring reliable PET packaging equipment suppliers. Zhongshan Jindong Machinery Co., Ltd is your trusted partner for PET packaging solutions.
| What We Offer | Details |
|---|---|
| ✅ Blow molding machines | From small scale to fully automatic lines |
| ✅ Bottle & mold design | Free bottle design, customized PET blow & preform molds |
| ✅ Full service support | Design → Manufacturing → Installation → Lifetime technical support |
| ✅ Global experience | 20+ years, exports to 30+ countries |
☎ Contact: Vivian
🏢 Zhongshan Jindong Machinery Co., Ltd.
🌐 www.ibottler.com
🚀 Let’s build your PET packaging project together!
