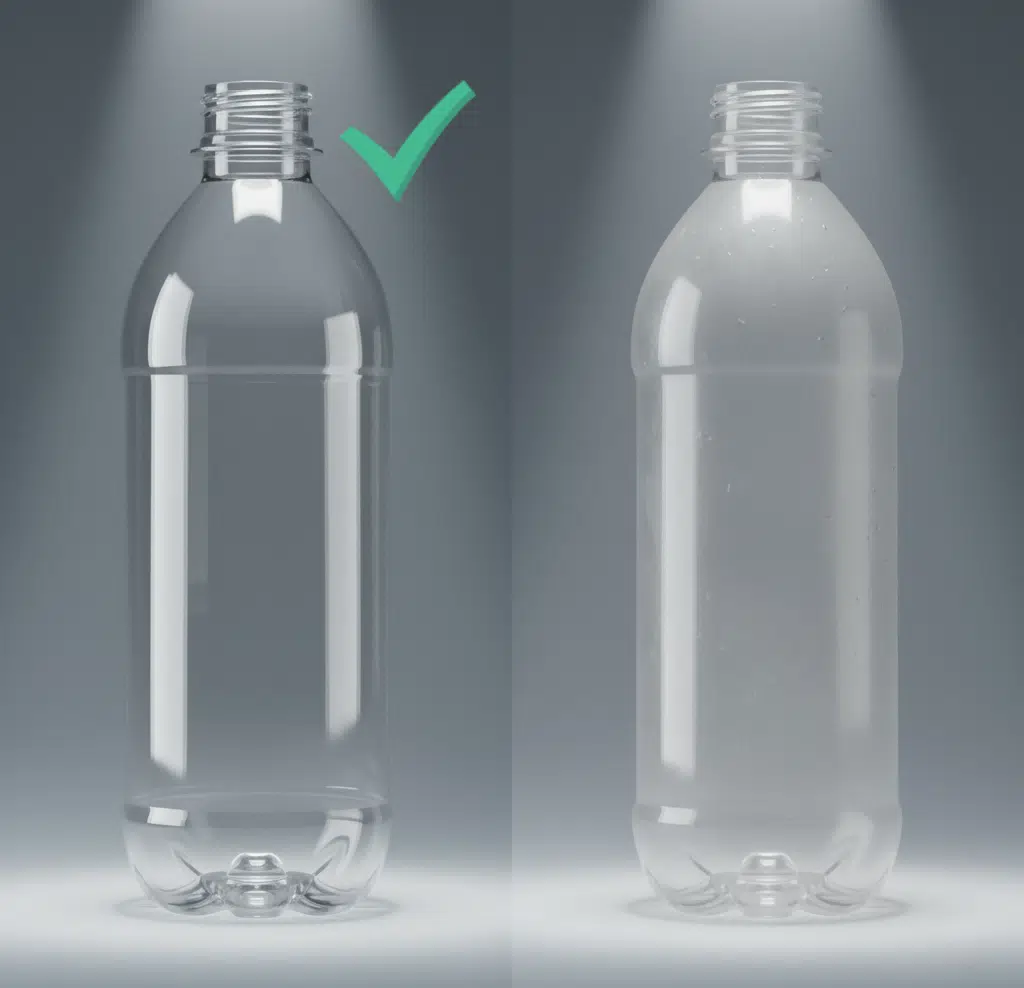
Your product is premium, but the bottle looks cloudy. This haze makes your beverage look cheap or old, undoing all your hard work. What's causing this frustrating clarity issue?
Haze in PET bottles is typically caused by microscopic crystals that form when the material is processed incorrectly. The most common culprits are improperly dried raw material, overheating the preforms in the oven, insufficient mold cooling, or an inadequate stretch ratio during the blowing process.
Just yesterday, I got a call from a client in Thailand. He was distressed because his latest batch of bottles had a foggy, dull appearance. "They look like they've been left in the sun for a year," he said. During our video call, we went through a systematic check. The mold surface was perfect, his machine seemed to be running as usual, but when he showed me the preforms, something looked off. Even through the video feed, they lacked a certain sparkle.
After a step-by-step investigation that eliminated the machine and the mold, we zeroed in on the raw material. It turned out his preform supplier had used PET resin that wasn't dried properly. This single, upstream error was the root cause of his entire production headache. This is a very common problem, and this guide will walk you through the exact troubleshooting process I used with him, helping you diagnose and solve any haze issue you encounter.
Quick Reference: Top 5 Causes of Haze in PET Bottles
| Rank | Cause | Key Indicator(s) | Primary Solution |
|---|---|---|---|
| 1 | Preform Overheating | Haze appears uniformly, especially in thicker sections. Preform may look slightly yellowed. | Reduce overall oven temperature by 2-3% and check ventilation. |
| 2 | Improperly Dried Resin | Haze is often accompanied by streaks (splay) or brittleness. Preforms themselves may look dull. | Verify preform moisture content is below 50 PPM. Switch preform supplier if necessary. |
| 3 | Insufficient Mold Cooling | Haze is more pronounced at the base or thickest parts of the bottle. Mold feels warm to the touch. | Check chiller temperature (target 8-12°C) and ensure good water flow through the mold. |
| 4 | Inadequate Stretch Ratio | Pearlescence or a milky appearance, especially in corners or areas with low stretch. | Review preform vs. bottle design. Adjust process to ensure balanced biaxial stretching. |
| 5 | Mold Surface Issues | Dull, non-glossy surface finish rather than internal cloudiness. May see water spot patterns. | Inspect mold for condensation (increase mold temp slightly) and check for a high-quality surface polish. |
What is "Haze" in PET Bottles and Why Does It Hurt Your Brand?
You see the problem, but what exactly is it? "Haze" isn't just a visual imperfection; it's a physical change in the material that has a major impact on your business.
Haze is a cloudy or milky appearance in PET caused by the formation of microscopic crystals. These tiny crystals scatter light instead of letting it pass through directly, which reduces the bottle's transparency. This visual flaw can make a pristine product look old, cheap, or even contaminated, severely damaging consumer trust.
For a moment, let's stop thinking like engineers and start thinking like customers. A customer walking down a supermarket aisle makes a purchase decision in seconds. They rely on visual cues to judge a product's quality and freshness. Crystal clarity in a bottle subconsciously communicates purity, quality, and cleanliness. It's the reason we package water in clear bottles—it's meant to look as pure as a mountain spring.
When a bottle is hazy, it sends the opposite message:
- It looks old: A hazy bottle can look like it's been sitting on a shelf for months, even if it was produced yesterday. It loses that fresh, new sparkle.
- It seems impure: For products like water, juice, or teas, clarity is paramount. Haze introduces a visual contaminant that makes the customer question what's inside. Is the product safe? Has it gone bad?
- It feels cheap: High-quality products come in high-quality packaging. Haze gives the impression of poor manufacturing and low standards, which directly reflects on the brand. No one wants to pay a premium price for a product that looks like it came from a discount bin.
The financial impact is direct and significant. Aesthetically unappealing products get left on the shelf. Retailers may refuse shipments, and your brand's reputation, which you've worked so hard to build, can be damaged by a completely avoidable processing issue.
The goal of this guide is to move beyond the frustration and provide a clear, systematic path to a solution. By understanding the causes of haze, you can take control of your process and ensure that every bottle you produce is as crystal-clear as your customers expect. We will follow a logical progression, starting from the raw material and moving through each stage of the blow molding process to pinpoint and eliminate the source of the problem.
The First Suspect: Is Your Raw Material (PET Resin) the Culprit?
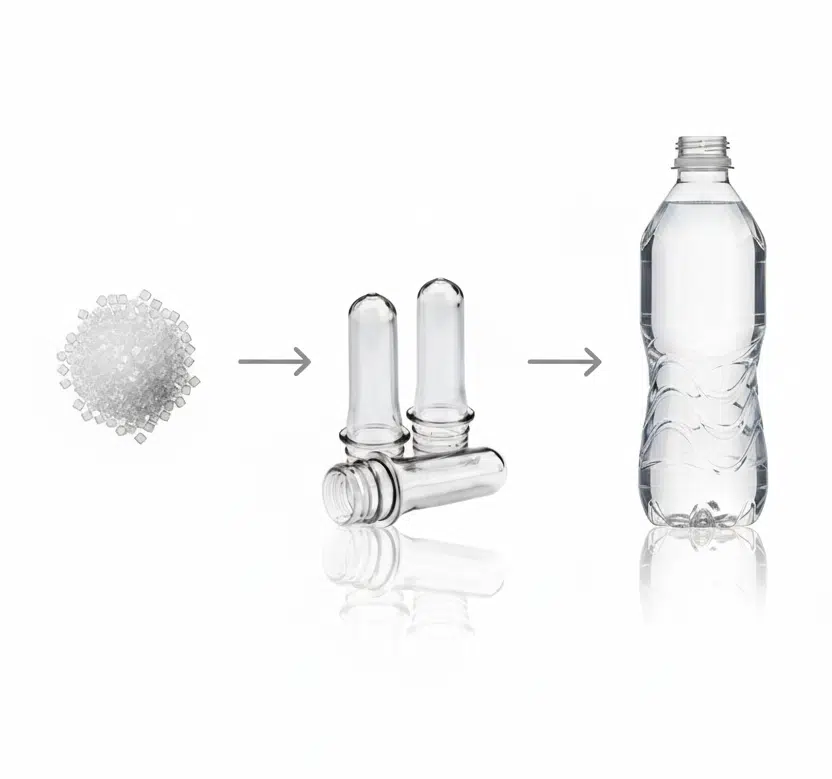
Before you touch a single setting on your bottle blowing machine, you must first investigate your starting material. A flawless process cannot fix a flawed preform.
The quality of your PET resin is the foundation of bottle clarity. The three most common raw material issues that cause haze are excessive moisture content leading to degradation, an incorrect or inconsistent Intrinsic Viscosity (IV), and contaminants within recycled PET (rPET).
This was the exact starting point for my Thai client. His process hadn't changed, yet the problem suddenly appeared. This often points to a change in the raw materials. Let's break down the key suspects.
1. Moisture Content: The Hidden Enemy
This was the culprit in my client's case and is a very common source of haze. PET is a hygroscopic polymer, meaning it naturally absorbs moisture from the air. If preforms are made from PET resin that hasn't been dried to the correct specification, disaster awaits.
- The Science (Hydrolysis): When wet PET is heated to high temperatures (like in a preform injection molding machine), a process called hydrolysis occurs. The water molecules (H₂O) chemically attack and break the long polymer chains of the PET. This shortens the chains, reduces the material's structural integrity (lowers its IV), and creates microscopic imperfections that scatter light, resulting in haze.
- How to Check: The industry standard for PET resin moisture content before processing is less than 50 parts per million (PPM), and ideally below 30 PPM. This is far too low to "feel" by hand. It must be measured with a specialized moisture analyzer. If you don't have one, your preform supplier absolutely should. Ask them for a Certificate of Analysis (COA) for your preform batch that includes a moisture content reading. This was the smoking gun for my Thai client; the COA from his supplier's new batch showed a moisture level of over 150 PPM.
2. Intrinsic Viscosity (IV): The Measure of Strength
IV is a measure of the length of the PET polymer chains. The longer the chains, the higher the IV, and the stronger and more viscous the material is when melted.
- Why it Matters for Clarity: Using the wrong IV grade can force you to use processing parameters that induce haze. For example, if you use a high-IV resin (meant for thick-walled containers) for a thin water bottle, you might have to overheat it just to get it to flow properly, causing crystallization haze. Conversely, a low-IV resin might not have enough melt strength to stretch properly, leading to haze from under-orientation.
- Consistency is Key: Inconsistent IV from batch to batch will wreak havoc on your process stability, leading to unpredictable results, including haze. A good preform mold supplier will use a consistent, high-quality resin with a stable IV.
3. Recycled PET (rPET): A Special Case
Using rPET is fantastic for sustainability, but it adds a layer of complexity.
- Contamination: The quality of the rPET flake is paramount. Even small amounts of contamination from other plastics (like PVC, PE, or PP), old labels, or adhesive residue can cause significant haze, as these materials do not melt or process in the same way as PET.
- Quality Control: When using rPET, it's critical to partner with a supplier who has a robust purification and cleaning process. They should be able to provide data on the purity and IV of their rPET blend.
Before you spend hours tweaking your machine, demand transparency from your preform supplier. Good preforms are the easiest and most effective way to guarantee clear bottles.
The Heat is On: How Overheating Your Preforms Causes Crystallization Haze?
You've confirmed your preforms are high quality. Now we move to the next step: the heating process. This is, by far, the most common process-related cause of bottle haze.
Overheating is the number one enemy of PET clarity. When a preform is heated too intensely or held at a high temperature for too long, the PET molecules gain enough energy to arrange themselves into organized, crystalline structures. These structures are opaque and are the direct cause of crystallization haze.
Think of PET in its ideal, clear state as "amorphous"—the molecules are jumbled together like a tangled plate of spaghetti. This random arrangement allows light to pass through easily. When you apply too much heat, you give those spaghetti strands the energy and time to neatly stack themselves into crystals. This organized, crystalline state blocks and scatters light, making the material look cloudy or milky. This is the haze you see in your bottle.
During our troubleshooting session, after confirming the raw material was the primary issue, I still had my Thai client check his heating process. It's a critical step that can either cause haze on its own or make a bad situation with moist preforms even worse.
Here are the key areas to investigate in your oven:
1. Overall Oven Temperature Settings
This is the simplest and most direct control you have. Your machine's control panel will have a setting for the overall power percentage for the heating lamps.
- The Problem: Operators sometimes increase the heat to compensate for other issues or to try and speed up the cycle. However, if the overall temperature is too high, the entire preform gets "overcooked."
- The First Action: As a simple first step, try reducing the overall heating percentage by 2-3%. For example, if you are running at 85% power, drop it to 82-83%. Run a few bottles and see if the clarity improves. This single adjustment can often solve minor haze problems immediately.
2. Individual Heating Zones
A more nuanced problem is an imbalanced heating profile.
- The Problem: You may have specific zones in your oven that are too hot. This is common in the thicker sections of the preform (near the neck), which require more energy to penetrate. If these zones are too aggressive, they can overheat the surface of the preform while the core is still coming up to temperature.
- The Action: Analyze your bottle to see if the haze is concentrated in one area. If the shoulder is hazy, for example, try slightly reducing the power to the lamps in the upper heating zones.
3. Oven Ventilation
Heat and airflow go hand-in-hand. Every oven has ventilation fans designed to remove excess heat and ensure an even temperature distribution.
- The Problem: If these fans are caked with dust or are not functioning, hot air becomes trapped around the preform. This leads to surface overheating and crystallization, even if your lamp settings are correct.
- The Action: Perform a simple visual inspection. Are the fans spinning? Are they and their filters clean? A simple cleaning can dramatically improve airflow and solve stubborn haze issues. You can even hold a small, light piece of paper near the vents to visually confirm that air is moving correctly. This is a critical but often overlooked piece of basic maintenance for any list of common PET blow molding defects and their solutions.
The Magic of Stretching: Is Insufficient Stretch Ratio Leaving Your Bottles Cloudy?
Your preforms are good, your heating is optimized, but you still see a faint cloudiness. The next critical factor to examine is the physical transformation of the preform into a bottle: the stretch ratio.
Crystal clarity in PET is not its natural state; it is created through the magic of biaxial orientation. If a preform is not stretched enough in both the vertical and horizontal directions, its polymer chains will not be sufficiently aligned, resulting in a weaker, hazier, and less transparent bottle.
 3")
The science behind PET clarity is fascinating. The process of rapidly stretching the heated, amorphous PET in two directions does something amazing at a molecular level: it pulls the tangled polymer chains into a highly organized, parallel, and interwoven structure. This strain-induced orientation is what "locks in" the amorphous, clear state and prevents the molecules from crystallizing. It's also what gives the bottle its strength.
If the stretch is insufficient, you don't achieve this full molecular alignment. The material is left in a state that is closer to its natural, semi-crystalline (and therefore hazier) form.
How to Evaluate Your Stretch Ratio
The stretch ratio is a simple calculation based on the dimensions of your preform and your final bottle.
| Ratio Type | Calculation Formula | What it Measures |
|---|---|---|
| Axial Ratio (Vertical) | (Length of Bottle from Neck) / (Length of Preform from Neck) | How much the preform is stretched vertically by the stretch rod. |
| Hoop Ratio (Horizontal) | (Max Diameter of Bottle) / (Inner Diameter of Preform) | How much the preform is stretched horizontally by the air pressure. |
| Total Ratio | Axial Ratio x Hoop Ratio | The overall amount of stretching the material undergoes. |
A low stretch ratio is a common issue when the preform design is poorly matched to the final bottle design.
- Example of a Bad Match: Imagine using a very long, thin preform to make a short, wide jar. The axial (vertical) stretch would be very low, leading to a hazy base and sidewall because the material was barely stretched in that direction.
- Example of a Good Match: A well-designed process ensures a balanced stretch. For a typical 500ml water bottle, you might aim for an axial ratio of around 2.5-3.0 and a hoop ratio of 3.5-4.0. The goal is to ensure that every part of the preform is adequately stretched to form the bottle.
What to Do If You Suspect Under-stretching
- Calculate Your Ratios: First, do the math. If your total stretch ratio is below 8, or if either the axial or hoop ratio is very low (e.g., below 2), you have likely found your problem.
- Review Your Preform Choice: This is the most fundamental solution. Is your preform the right shape and size for your bottle? A knowledgeable partner can help you select the ideal preform from a catalog or design a custom one. A comprehensive PET bottle mold design guide should always consider the preform as the first step.
- Optimize Process Timing: You can make minor adjustments. For instance, delaying the start of the main blow pressure can allow the stretch rod to complete more of the vertical stretch before the horizontal stretch begins, which can sometimes help improve orientation in tall, narrow bottles.
Proper stretching is fundamental to both the clarity and performance of your bottle. It's where the raw material is truly transformed.
Mold Matters: The Critical Role of Cooling, Condensation, and Surface Finish?
The final stage of transformation happens inside the blow bottle mold. This is where the bottle's shape and clarity are locked in. Several mold-related issues can be the culprit behind a hazy appearance.
An improperly cooled or prepared mold can ruin a perfectly heated and stretched bottle. Insufficient cooling allows time for haze-causing crystals to form, condensation on the mold surface can cause blemishes, and a poor surface polish will result in a dull, non-glossy finish.

During the video call with my Thai client, one of the first things I asked him to do was show me the inside of his mold. While his issue was ultimately the raw material, a visual inspection of the mold is a critical and easy diagnostic step. Here’s what we look for.
1. Insufficient Mold Cooling: The Race Against Crystallization
- The Science: The goal of mold cooling is to "quench" the bottle as rapidly as possible—bringing its temperature from ~110°C down below its glass transition temperature (~75°C) in a fraction of a second. This rapid cooling freezes the PET molecules in their clear, amorphous state. If the mold is too warm and the bottle cools slowly, you are giving the molecules the exact conditions they need (time and temperature) to organize into hazy crystals.
- What to Check:
- Chiller Temperature: Is your chiller set correctly? For most PET applications, the cooling water temperature should be between 8°C and 12°C (46°F and 54°F).
- Water Flow Rate: Temperature alone isn't enough. You need sufficient water flow to carry the heat away. Check for kinked hoses or clogged cooling channels inside the mold, which can restrict flow. You should feel a strong flow of water returning from the mold.
2. Condensation (Sweating): When Too Cold is a Problem
- The Science: This is a problem in humid environments, like Thailand. Every factory's air has a "dew point"—the temperature at which moisture will condense out of the air. If the surface of your mold is colder than the dew point, water droplets will form on it, just like on a cold glass of iced tea. When the hot PET bottle is blown against these droplets, they create tiny surface imperfections that mar the finish and look like a hazy film.
- What to Check:
- Visual Inspection: Look for moisture inside the open mold. Touch the cavity surface; does it feel wet?
- Solution: You need to either decrease the humidity in your production area (which is expensive) or, more practically, slightly increase the temperature of your cooling water. Raising the temperature to 13-15°C is often enough to keep the mold surface above the dew point and prevent sweating, without significantly slowing down the cooling process.
3. Mold Polish: The Source of the Sparkle
- The Science: The surface of your bottle is a mirror image of the mold cavity it was formed in. The brilliant, glossy shine of a new PET bottle comes from it being blown against a mold surface that is polished to a mirror-like finish.
- What to Check:
- Visual Inspection: A high-quality mold for clear bottles should have a cavity with an SPI A-2 finish or better, meaning it should look like a flawless chrome mirror.
- The Problem: If the mold surface is worn, corroded, or was never polished correctly, it will impart a dull, matte texture to the bottle. This isn't technically internal "haze," but to the consumer, the result is the same: a bottle that lacks sparkle and looks cheap. The solution is to have the mold professionally re-polished.
Beyond the Process: Could Your Additives or Masterbatch Be the Cause?
You have systematically checked your material, heating, stretching, and mold. If you're still chasing a haze issue, it's time to look at the "extras"—the additives and colors you might be putting into your PET.
While the PET resin itself is the primary factor, certain additives or the carrier material used in color masterbatches can be incompatible with the PET matrix or used in incorrect concentrations, leading to a significant increase in haze and a reduction in clarity.
For most standard clear bottles, this is less of a concern. But for bottles that require special properties—like UV protection for juice or a specific tint of color—the chemistry of what you add is critical. Every ingredient you introduce has the potential to affect the final clarity.
1. Performance-Enhancing Additives
Additives are used to give PET properties it doesn't naturally have. However, they can come with trade-offs.
- UV Inhibitors: These are essential for protecting light-sensitive products like juices or some dairy products. However, some types of UV blockers are not perfectly soluble in the PET and can act as nucleation sites, promoting the formation of micro-crystals and increasing haze. It's crucial to work with your supplier to choose a UV additive that is specifically designed for high-clarity PET applications.
- Reheat Agents: In two-stage blow molding, small amounts of reheat agents (often microscopic carbon-based particles) are added to preforms to help them absorb energy from the heating lamps more efficiently. This allows for faster cycle times. However, if the wrong type or too high a concentration is used, these particles themselves can contribute to a darker, grayish, or slightly hazy appearance.
2. Color Masterbatch
When you want to add a transparent color to your bottle (like a classic green or blue), you use a masterbatch. This is a concentrated dose of pigment mixed with a "carrier" resin.
- The Pigment: The pigment itself is usually not the problem, as they are selected for transparency.
- The Carrier Resin: This is the key. The carrier resin used in the masterbatch must be highly compatible with the main PET resin. If the carrier is a different type of polymer (like a polyethylene-based carrier, which is common and cheap), it will not mix properly with the PET on a molecular level. This incompatibility creates microscopic domains of a different material within your bottle wall, which are a major cause of haze.
- Rule of Thumb: Always insist on a PET-based or a universally compatible copolyester-based carrier for your masterbatches when clarity is the goal. Before committing to a large production run with a new color, always run a trial with a small sample bag. This simple test can save you from turning thousands of pounds of clear resin into hazy, unusable bottles.
When you're troubleshooting, don't forget to consider every single ingredient in your recipe. If you've recently changed your color or added a new additive, that should be high on your list of suspects.
Your Comprehensive Haze Troubleshooting Checklist?
When haze appears, a systematic approach is the fastest way to a solution. Use this step-by-step checklist to guide your investigation from the most likely causes to the least common.
This checklist provides a logical workflow to diagnose the root cause of haze in your PET bottles. Start at Step 1 and only proceed to the next step if the problem persists. Document your changes and results at each stage.
Step-by-Step Haze Elimination Protocol
Step 1: Verify Raw Material Quality (The Foundation)
- Action: Contact your preform supplier immediately.
- Ask For: A Certificate of Analysis (COA) for the specific batch you are using.
- Check: Is the moisture content below 50 PPM? Is the IV grade correct and consistent with previous successful batches? Is there any change in the percentage of rPET used?
- Result: If the raw material is out of spec, you have found your root cause. Do not proceed until you have good preforms.
Step 2: Reduce Overall Heating Temperature (The Quickest Fix)
- Action: Go to the control panel of your blow molding machine.
- Adjust: Lower the overall heating lamp power percentage by 2-3%.
- Observe: Run the machine for several minutes. Does the haze decrease?
- Result: If this solves the problem, your process was running too hot. If it helps but doesn't eliminate the issue, proceed to the next step.
Step 3: Check Mold Cooling Efficiency (The Race Against Crystals)
- Action: Inspect your mold and chiller system.
- Check Chiller: Is the outlet water temperature between 8-12°C (46-54°F)?
- Check Flow: Are the water lines free of kinks? Is there a strong return flow from the mold? Are the mold's internal channels clean?
- Result: If your cooling is insufficient, the bottle is crystallizing in the mold. Address any chiller or flow issues.
Step 4: Analyze Mold for Condensation (The Environmental Factor)
- Action: Carefully inspect the surface of the open mold cavities, especially in a humid environment.
- Look For: Any signs of moisture or "sweating."
- Adjust: If condensation is present, slightly increase the chiller water temperature to 13-15°C (55-59°F) to bring the mold surface above the dew point.
- Result: If the haze was a surface blemish that disappeared with this change, condensation was the culprit.
Step 5: Review Stretch Ratio (The Mechanical Transformation)
- Action: Calculate your axial and hoop stretch ratios based on your preform and bottle dimensions.
- Evaluate: Is the total stretch ratio adequate (typically >9)? Are both axial and hoop ratios well-balanced?
- Result: If the stretch is too low, the material is not being properly oriented. This is a fundamental design issue that may require a different preform, as detailed in our PET bottle mold design guide.
Step 6: Inspect Additives and Masterbatch (The Final Check)
- Action: Review your production records.
- Ask: Did the haze problem start after introducing a new color masterbatch, UV additive, or any other component?
- Test: Run a trial using only 100% virgin, natural PET resin with no additives.
- Result: If the haze disappears, one of your additives is the cause. Work with your supplier to find a high-clarity alternative.
Conclusion: Achieving Crystal Clarity Through a Controlled Process
The brilliant clarity of a PET bottle is not an accident. It is the direct result of a stable, well-understood, and tightly controlled manufacturing process.
Haze is simply a symptom that one or more variables have fallen out of their optimal range. By starting with high-quality, properly dried preforms, you eliminate the most common source of trouble before it even begins. A good machine and a knowledgeable partner are your best assets for quickly diagnosing and solving these issues, turning frustration into consistent, crystal-clear results.
Frequently Asked Questions (FAQ)
1. What is the first and easiest parameter to adjust if my bottles suddenly become hazy?
The first and easiest thing to adjust is the overall heating temperature. Go to your machine's control panel and reduce the total lamp power percentage by 2-3%. Overheating is the most common process-related cause of haze, and this simple adjustment often provides an immediate improvement. If it doesn't solve the problem, you know you need to investigate other areas, but it's the quickest and best place to start.
2. Does using recycled PET (rPET) inherently increase the risk of haze, and what can be done to minimize it?
Yes, using rPET does increase the risk of haze, but it can be well-managed. The risk comes from two main sources: lower or inconsistent IV in the recycled material, and potential micro-contaminants that survive the recycling process. To minimize haze, you must partner with a high-quality rPET supplier who uses advanced sorting and cleaning technology and can provide clear specifications on the purity, color, and IV of their product. Using a high-purity, "bottle-grade" rPET will yield significantly better results than a lower-grade flake.
3. How is "haze" officially measured? Is there a tool or an industry standard for it?
Yes, haze is measured officially using a tool called a haze meter or a spectrophotometer. The industry standard test method is ASTM D1003. This test measures the percentage of light that is scattered by more than 2.5 degrees as it passes through a sample. A lower percentage value means lower haze and better clarity. For high-quality PET bottles, haze values are typically very low, often under 1-2%.
4. Are thicker-walled bottles more susceptible to haze than lightweight bottles?
Yes, thicker-walled bottles are generally more susceptible to haze. This is because it is more difficult to rapidly cool (quench) a thick section of plastic. The thicker wall retains heat for longer, giving the PET molecules more time to arrange themselves into light-scattering crystals. This is why achieving clarity in thick-based cosmetic jars, for example, requires extremely efficient mold cooling and precise process control.
5. Can high humidity in the production environment affect bottle haze?
Yes, high humidity can directly cause a type of surface blemish that is often mistaken for internal haze. If the surface temperature of your chilled blow mold drops below the ambient air's dew point, moisture will condense on the mold cavity. When the bottle is blown, these water droplets create tiny imperfections on the bottle's surface, making it look dull or hazy. This is solved by slightly increasing the mold's cooling water temperature to keep it above the dew point.
🔗 Learn More about Blow Molding Technology
Blow Molding – Wikipedia
A comprehensive overview of various blow molding processes, including extrusion, injection, and stretch blow molding.Injection Molding – Wikipedia
Important for understanding the production of preforms used in stretch blow molding.Stretch Blow Molding – Wikipedia
Explains how PET bottles are formed through axial and radial stretching processes.PET Bottle – Wikipedia
Background information on the materials and properties of typical PET bottles.Design of PET Bottles – Wikipedia
An introduction to the design considerations and geometry used in PET bottle manufacturing.
🔗 Related Pages on Our Website
Automatic Blow Molding Machines – iBottler
Discover our full range of customizable automatic PET bottle blow molding machines.Blow Bottle Mold – iBottler
Explore our precision blow molds designed for PET and PP bottles.Preform Mold – iBottler
Learn more about our high-precision preform molds suitable for various injection molding machines.PET Wide Mouth Jar Project Starter Guide: Equipment, Molds & Process Explained
Pros and Cons: Should You Choose PET Blow Moulding for Your Bottle Project?
Worried About Blow Mold Fit? We Have Mounting Dimensions for 80% of Blow Molding Machines Worldwide
Can One Semi‑Automatic Blow Molding Machine Produce All Bottle Sizes? Here’s Why Not
Why Do Krones Blow Molding Machine Users Come to Us for Their Molds?
Why Do PET Preforms Come in Different Colors? Function, Application, and Production Tips
How to Set Parameters for 600ml Bottles on a Semi-Automatic PET Blowing Machine?
From 3D Printed Samples to Production: How Can You Rapidly Validate Blow Mold Designs?
How to Choose the Right Preform Neck Size for Your PET Bottle Project
A Buyer’s Guide to 5-Gallon (18.9L) Bottle Blow Molding Machines: From PET to PC?
Pitting on your blow mold surface? A complete guide from cause analysis to repair and prevention.
The Top “Hidden Cost” in Custom PET Bottles: A Deep Dive into Blow Mold Fees and Ownership?
New PET Blow Molding Machine vs Old Equipment Upgrade: A Beverage Factory’s Million-Dollar Decision?
How to reduce the PET blow molding scrap rate from 5‰ to 1‰? An old-timer’s 8 insider tips.
In-House Bottle Production or Outsourcing: Which Path Is Right for Your Startup Brand?
Blow Mold Damage? When and How to Replace Only the Broken Parts?
Bottle Design: Ad Agency vs. Mold Factory? How One Decision Impacts Your Cost and Brand?
Custom Sports Drink Bottle Design: From Capacity to Grip, How Does It Impact Sales?
